Let’s be real for a second: portrait photography is a lot harder than it looks. You see these incredible shots on Instagram or in galleries like Edin Fine Art and think, "Hey, I can do that. I’ve got the camera, I’ve got the lens, and my friend is reasonably photogenic."
Then you get home, load the RAW files onto your computer, and… yikes. The eyes are blurry, your friend looks like they’re being interrogated by the FBI, and there’s a literal tree growing out of their head.
We’ve all been there. Even the pros at Shut Your Aperture started somewhere, making the same clunky mistakes that every beginner makes. The good news? Most of these "failures" are actually just easy-to-fix technical hiccups. If you want to stop taking "okay" photos and start creating actual art, you need to tighten up your portrait photography techniques.
In this guide, we’re going to dive deep into the seven most common mistakes photographers make when shooting people and exactly how to fix them. Plus, we'll talk about how to level up your workflow using tools like Luminar to make those final edits pop.
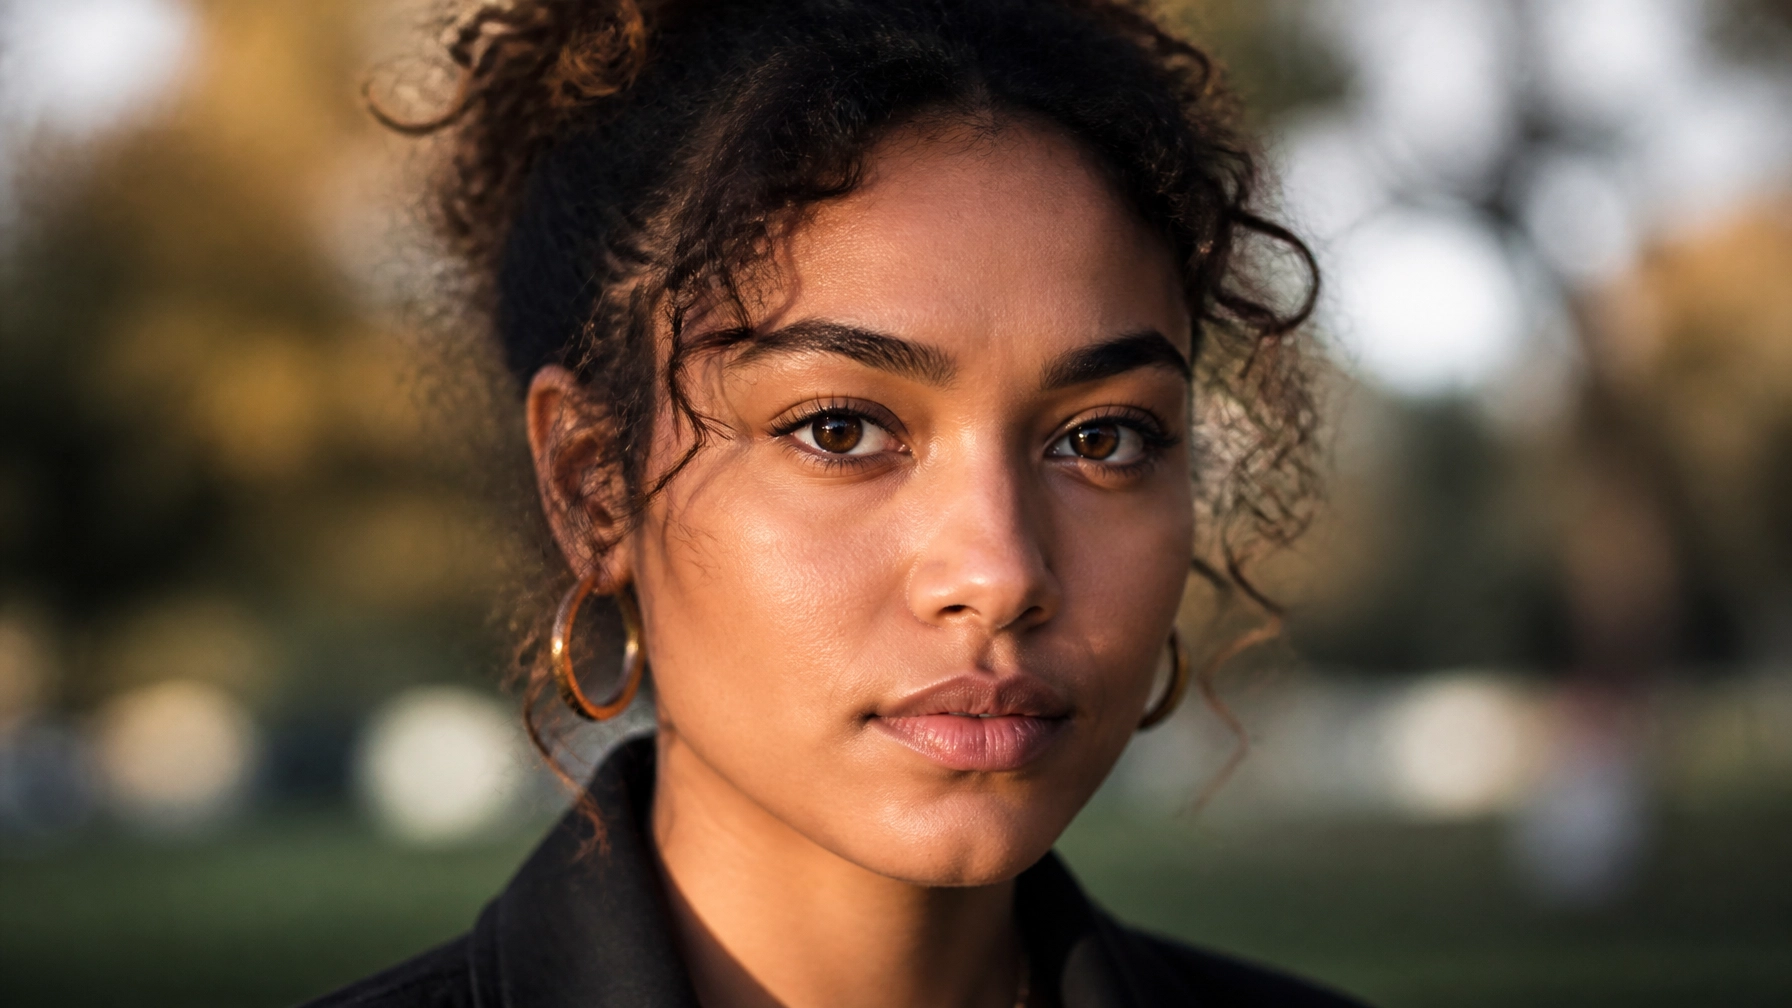
1. Missing the Eye Focus (The Soul of the Portrait)
If the eyes aren't sharp, the photo is trash. Sorry, I don't make the rules. You can have the most beautiful lighting and the perfect pose, but if the camera focused on the tip of the nose or the stray hair across the forehead, the viewer will feel a disconnect.
The Mistake:
Many photographers leave their camera in "Auto Area AF" mode, letting the camera decide where to focus. Cameras are smart, but they aren't mind readers. They often grab the closest thing to the lens (usually the nose) or the highest contrast area (the background).
The Fix:
- Use Single Point AF: Manually move your focus point directly over the eye closest to the camera.
- Eye-AF is Your Best Friend: Most modern mirrorless cameras (like the ones we compared in our Lumix S5 II vs Sony A7 IV guide) have incredible Eye-Autofocus. Turn it on. It tracks the eyeball like a heat-seeking missile.
- Open Your Aperture Carefully: While shooting at f/1.2 or f/1.4 looks cool, the depth of field is so thin that if the subject even breathes, you lose the focus. Try stopping down to f/2.0 or f/2.8 until you’re confident in your technique.
If you’re still struggling with the technical side of things, check out our mastering manual mode guide to get a better handle on your settings.
2. Using the Wrong Focal Length (The "Nose-Growing" Effect)
Did you know your lens can actually change the shape of someone’s face? It’s called lens distortion, and it’s a silent portrait killer.
The Mistake:
Using a wide-angle lens (like a 24mm or 35mm) too close to your subject. Wide-angle lenses expand the center of the frame and compress the edges. If you get close to someone with a wide lens, their nose will look huge, and their ears will look like they’re disappearing.
The Fix:
The "sweet spot" for portrait photography is generally between 50mm and 135mm.
- 85mm is widely considered the king of portrait lenses. It provides a flattering compression that makes faces look natural and creates a creamy background blur (bokeh).
- If you’re shooting with a crop sensor, a 50mm lens acts like a 75mm or 85mm, making it a perfect budget option.
For more gear-specific advice, PhotoGuides.org has some great breakdowns on lens selection for different styles.
3. Harsh Lighting and "Raccoon Eyes"
Lighting is the "photo" in "photography." Without good light, you’re just capturing shadows in all the wrong places.
The Mistake:
Shooting in the middle of the day under the direct sun. This creates "raccoon eyes": deep, dark shadows in the eye sockets: and highlights every single pore and blemish on the skin. It’s unflattering, harsh, and makes your subject squint.
The Fix:
- Find Open Shade: Move your subject under a tree, a porch, or the shadow of a building. This creates soft, even light that wraps around the face.
- The Golden Hour: Shoot during the hour after sunrise or the hour before sunset. The light is directional, warm, and much softer.
- Use a Reflector: If you have to shoot in tricky light, a simple white reflector can bounce light back into those dark eye shadows, making the face glow.
If you want to really master these concepts, we have a full course on this over at Learn Shut Your Aperture.
4. Distracting Backgrounds (The "Tree-Head" Syndrome)
Your subject is the star. The background is the supporting cast. If the background is too loud, it steals the show.
The Mistake:
Not looking past the subject. You’re so focused on their smile that you don’t notice the trash can, the bright red car, or the telephone pole sticking out of the top of their head.
The Fix:
- Check Your Borders: Before you click, scan the edges of your frame. Is there anything distracting?
- Step Left or Right: Often, moving just six inches to one side can completely hide a distraction or put a clean patch of green behind your subject.
- Use a Wide Aperture: Blurring the background into oblivion (using f/1.8 or f/2.8) helps separate the subject from the mess.
5. Poor Posing and "The Statue" Look
Most people aren't professional models. When you put a camera in front of them, they freeze. They don't know what to do with their hands, and their smile becomes a grimace.
The Mistake:
Expecting the subject to know how to pose. If you just stand there silently clicking the shutter, your subject will get more and more nervous, and it will show in the photos.
The Fix:
- Give Direction: Be specific. Instead of "look natural," say "shift your weight to your back leg" or "put your hand in your pocket, but leave the thumb out."
- Create Triangles: In photography, triangles are pleasing to the eye. Have them bend an elbow, a knee, or tilt their head. It adds "flow" to the body.
- Communication is Key: Keep talking! Compliment them, crack a joke, and tell them they’re doing a great job. A relaxed subject is a beautiful subject.
6. Chopping Off Limbs (Bad Cropping)
There’s a right way and a wrong way to crop a person.
The Mistake:
Cropping exactly at the joints. Never crop at the ankles, the knees, the wrists, or the elbows. It makes the subject look like an amputee and creates a very jarring visual break.
The Fix:
Crop at the "fleshy" parts. Mid-thigh, mid-shin, or mid-forearm. This feels much more natural. Also, pay attention to the top of the head. Either leave a little bit of "headroom" or crop in tight on the forehead: don't just barely graze the hair.
7. Over-Processing (The "Plastic" Face)
We’ve all seen it: the photo where the skin looks like a Barbie doll and the eyes are glowing like they’re radioactive.
The Mistake:
Overdoing the "Clarity" or "Texture" sliders, or using automated skin-smoothing tools too aggressively. You want your subject to look like the best version of themselves, not a CGI character.
The Fix:
- Subtlety is King: Retouching should be invisible.
- Use the Right Tools: I highly recommend using Luminar. Their AI-powered portrait tools are incredible because they recognize facial features and allow you to make specific adjustments: like brightening the eyes or removing a single blemish: without making the skin look fake.
- Step Away: After you finish an edit, walk away for ten minutes. When you come back, you’ll often realize you went a little too far with the sliders.
Diving Deeper: Camera Settings for Portraits
To truly master portrait photography techniques, you need to move beyond the "P" mode on your camera. If you're still stuck there, check out our beginner's guide to camera basics.
Here is a quick "cheat sheet" for your next portrait session:
- Aperture: f/1.8 to f/2.8 for single subjects (blurry background). f/4 to f/5.6 for groups.
- Shutter Speed: Keep it above 1/200s. People move, and you don't want motion blur ruining a great expression.
- ISO: As low as possible (ISO 100) to keep the image clean. Don't be afraid to bump it up to 800 or 1600 if you’re indoors, though. Modern cameras handle noise very well.
- White Balance: Set it to "Cloudy" or "Shade" for a warmer, more flattering skin tone, or shoot in RAW and fix it later in Luminar.
The Power of Post-Processing
You’ve taken the shot, you fixed the mistakes, and now you’re looking at the raw file. It looks a little flat, right? That’s normal. RAW files are designed to be edited.
The goal of post-processing isn't to "fix" a bad photo; it's to enhance a good one. This is where Luminar really shines for portrait photographers. Instead of spending hours masking skin in Photoshop, you can use the Portrait Bokeh AI to further isolate your subject or the Face AI to subtly enhance features.
For more inspiration on how professional edits should look, take a peek at Edin Chavez’s personal blog. You can see how he balances color and light to create a mood that feels authentic.
Final Thoughts on Portraiture
Portrait photography is a journey. You’re going to make mistakes: it’s part of the process. The difference between a hobbyist and a professional is that the professional knows why a photo didn't work and knows how to fix it next time.
Remember to coordinate with the rest of your creative workflow. I’ve been talking to Sonny, our Social Media Manager, and we’re going to be sharing some "Before & After" examples of these fixes on our Instagram soon, so keep an eye out for those!
Stop fearing your camera. Stop settling for "good enough." Go out there, find a subject, and practice these portrait photography techniques until they become second nature.
And if you want to get serious, don't forget to check out the deep-dive tutorials at Learn Shut Your Aperture. We’ll see you behind the lens!