Updated October 2026
Street photography does not reward the person who fires the most frames. It rewards the person who notices something, finds a clean position, and stays ready when the pieces come together. A gesture, a patch of light, a dog looking up, a stranger passing a street performer: ordinary things can make an epic photograph when the frame has a reason to exist.
You do not need to chase strangers or turn every walk into a confrontation. You need a small, repeatable way to see. These street photography tips build that process around timing, light, graphic relationships, and telling details. Then we will put the ideas together in a practice walk you can repeat with a phone or a camera.
What street photography actually means
Street photography explores everyday life and the relationships between people and their surroundings. A street is one setting, not a requirement. A publicly accessible plaza, market, promenade, or station can offer the same mix of movement, gesture, architecture, and coincidence. Access and photography rules still depend on the location. A place that looks public may be privately managed.
A face does not have to fill the frame. Public life can appear through shadows, hands, signs, shoes, or the space someone occupies. Some photographs are candid; others begin with a conversation. Be clear about the difference when you describe the picture. A posed portrait can be excellent without pretending it was an unnoticed moment.
Do not confuse a visible expression with a person’s private emotions. You can photograph a furrowed brow without knowing whether someone is angry, concentrating, or dealing with sunlight. Describe what the picture shows. Let the viewer respond without attaching an invented biography to a stranger.
1. Find the timing before you chase the moment
Timing is more than pressing the shutter quickly. It starts with predicting where something will happen. Watch the rhythm of a crossing, how a shop doorway opens, or where walkers enter a patch of sun. If you understand the pattern, you can choose your frame before the subject arrives. That gives you time to check the edges instead of reacting blindly.
Pick a background you would photograph even without a person. It might be a wall with a strong color, a repeating set of windows, or an uncluttered sidewalk. Stand somewhere safe where the movement will cross that background. Set your exposure and focus. Now wait for a useful relationship rather than photographing every passerby.
Take a short sequence when a gesture is changing. One frame may show a foot joining the other foot; another may separate the stride clearly. But a long burst is not a substitute for observation. It can leave you with dozens of nearly identical frames and no clear reason to choose one. Release the shutter deliberately, then watch what happens next.
Look for beginnings and endings. A person turning toward another person can be more readable than the middle of a conversation. A hand lifting a cup may make a cleaner shape than a hand resting against clothing. You are not directing the scene. You are noticing when its existing elements become easier to read.

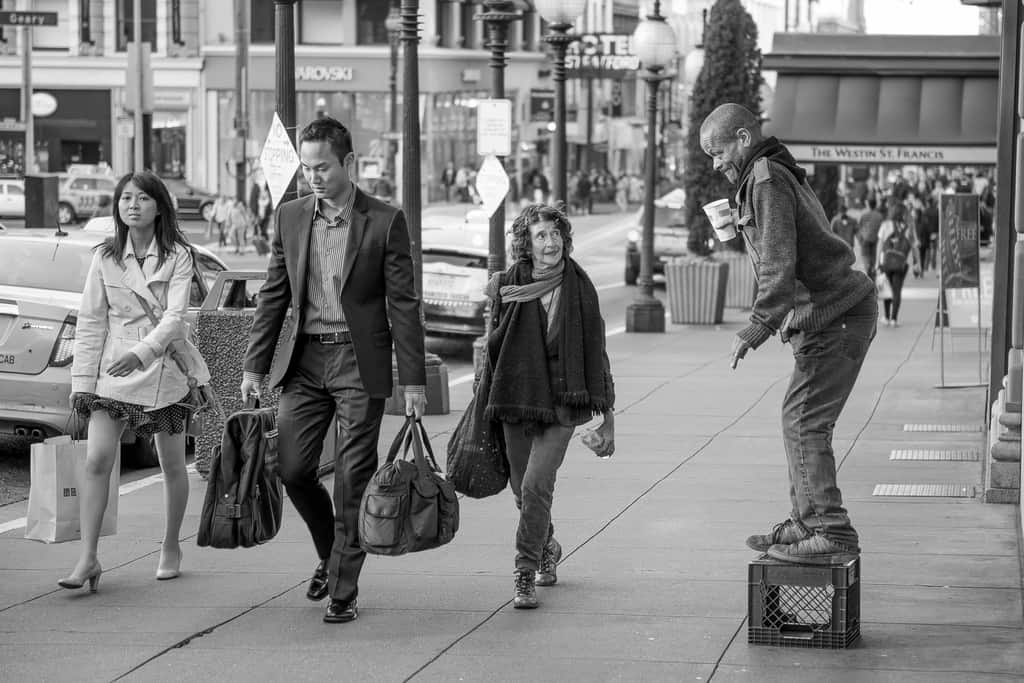
In the San Francisco frame above, people occupy different parts of the sidewalk while the performer stands higher on a crate. The positions and gestures give the eye several places to travel. Use that as a reminder to watch the whole frame. An interesting person alone is not automatically an interesting photograph.
Do a quick edge check
Before the action reaches your chosen point, scan all four edges. Is half a face about to enter? Does a bright car pull attention away from the main subject? Is a pole touching someone’s head? You cannot control everything, but you can often improve the picture by moving a few inches or changing the camera height.
After the moment passes, stay for another cycle if the location still has potential. The first useful frame tells you something about the scene. It does not mean the scene is finished. Change one thing, such as your distance or the amount of foreground, and compare the next opportunity.
2. Use light to make the subject readable
Good light is not limited to sunrise or sunset. A bright afternoon can produce clean shadows and strong graphic shapes. Overcast light can make faces and details easier to expose. A shop window can separate a person from a darker sidewalk. The question is not whether the light is fashionable. The question is whether it helps the subject stand out.
Find the brightest important part of the scene and the darkest part you want to keep. Then decide which matters more. If a face in sunlight is central, protect that area from clipping. If a silhouette is the idea, you may not need detail in the person at all. Make the exposure support your intention instead of automatically lifting every shadow.
At a boundary between light and shade, wait for movement to cross. Keep watching the background, too. A person in bright light against an equally bright wall may disappear. A small change in position can put that person against a darker doorway. Separation often comes from where you stand, not from an expensive lens.
Check a test image and, when available, the histogram or highlight warning. A camera screen can look darker or brighter depending on outdoor glare. If important highlights are gone, reduce exposure and test again. Do not assume every camera meters a contrasty street the same way.
A practical camera-settings starting point
For ordinary walking subjects in daylight, try around 1/500 second as a starting point, then inspect the results. Faster motion, closer subjects, and tighter framing may need a faster shutter. A still subject may allow a slower shutter if your hands are steady. These are working choices, not guaranteed settings.
Try f/5.6 or f/8 when you want some environmental detail and enough depth of field to forgive small focus errors. Open the aperture when the light drops or when separating a subject is the goal. Remember that depth of field also changes with focal length, camera distance, and sensor format. One aperture does not produce the same look in every setup.
Auto ISO can keep your attention on the scene, especially when you move between shade and sun. Set a minimum shutter speed if your camera supports it, and understand what happens when the ISO limit is reached. Some cameras will then allow the shutter to slow. Review an image when the light changes rather than trusting the menu forever.
Continuous autofocus can help with people moving toward or away from you. Single autofocus can work for a predictable position or a subject that pauses. Select a focus area you can place quickly. If the camera keeps choosing the background, use a smaller area or a different focus method. Learn this before the walk gets busy.
3. Build relationships with color, shapes, and space
A strong street photograph often has more than one visual connection. Clothing can echo a wall. A diagonal arm can repeat a sign. A round object can sit against a grid of rectangles. These relationships help the photograph feel organized without requiring a complicated story.

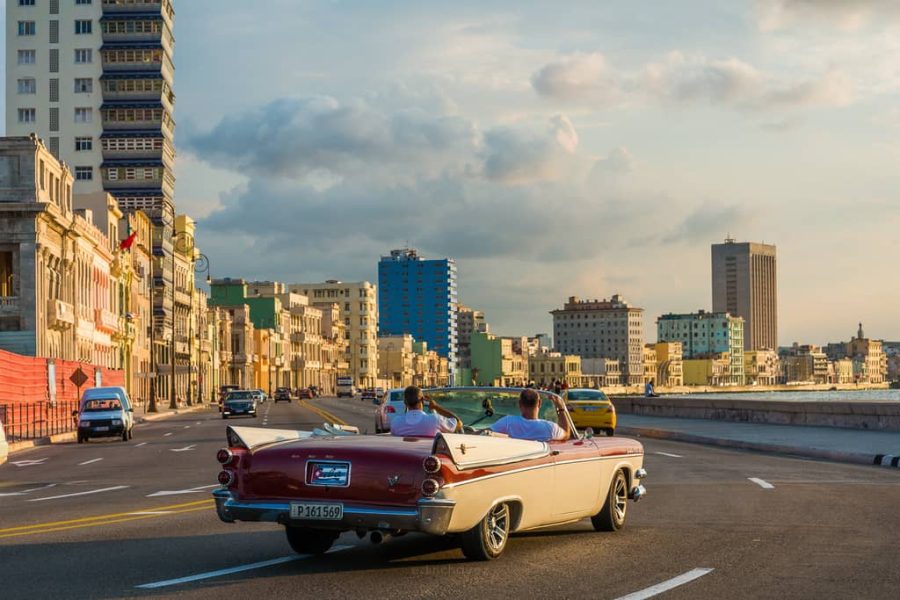
The red convertible above makes a large, simple shape across the frame. The driver, windshield, palms, and pavement add layers around it. When a bold color is doing this much work, do not overload the frame with competing color. Ask what would happen if you moved closer, wider, or lower. Each position changes which relationship leads.
Leave room where movement points when that helps the composition. A person walking into open space may feel different from a person nearly touching the edge. Neither is automatically wrong. A tight edge can create tension; open space can create anticipation. Choose the effect instead of blindly following a rule.
Separate foreground, middle distance, and background when you want layers. Watch for overlaps that flatten those layers: a head joining a sign, a dark jacket merging with a doorway, or two bodies becoming one confusing shape. You can sometimes fix the overlap by waiting half a second. Other times, you need to move.
Reflections can add another layer, but they can also bury the subject in clutter. Look for a reflection with a clear shape and an obvious relationship to the direct view. If you cannot explain what the reflection contributes, try a cleaner frame without it. Complexity needs a purpose.
Use black and white deliberately
Black and white can emphasize gesture, contrast, and geometry. It does not automatically rescue a weak photograph. Preview the tonal relationships: does the person separate from the wall, or do their colors turn into the same gray? A colorful scene may have surprisingly little tonal contrast when converted.
Keep a color version when color carries the connection. A red shirt echoing a red object loses that specific relationship in black and white. Compare both treatments without treating one as more serious. The best edit is the one that supports what made you press the shutter.
4. Get closer to the telling detail, not always the face
Details can suggest everyday life without showing everything. A dog beside its owner’s legs, a hand against a shop window, or a worn bag at a crossing can anchor a frame. Decide what makes the detail worth noticing. Size alone is not a reason to crop tightly.

The dog’s face and red leash are clear focal points above, while the legs and passing people keep the setting present. A detail photograph can still have context. Consider what you would lose by cropping away the sidewalk or the people behind. The tightest version is not necessarily the strongest version.
Choose a camera height that fits the subject. Standing at eye level can make a small subject disappear into the ground. Lowering the camera may give it a cleaner background and a stronger presence. Stay aware of your surroundings while moving, and do not block a walkway to get the angle.
Be selective about cropping bodies. A deliberate crop can concentrate attention, while an accidental crop can look careless. Check fingers, feet, and the relationship between the detail and the rest of the frame. You do not need every body part, but the picture should look chosen rather than unfinished.
Be respectful without becoming timid
A good photograph is not worth making someone feel trapped. Keep a reasonable distance, avoid blocking exits, and stop if a person objects. If someone asks what you are doing, answer plainly. A calm conversation is more useful than acting as if the camera gives you special rights over everyone around you.
Use extra care around children, distress, medical situations, and people who may be vulnerable. Ask yourself whether the photograph needs an identifiable face and whether publishing it could expose someone to harm. Permission is not a magic answer to every situation. Context, power, and the intended use still matter.

If you want a close portrait, asking can be the best route. Introduce yourself, explain the picture you would like, and accept a no without trying to wear the person down. An agreed portrait is a different kind of photograph from a candid frame. Both can have energy. Honesty about the process matters more than defending a label.
Photography and publication rules vary by jurisdiction and by setting. Do not assume that public access means unrestricted photography, or that permission to take a picture covers advertising use. Check relevant local rules and property policies before a project where those distinctions matter. For a deeper practical discussion, read our photography ethics guide.
Turn the tips into a focused practice walk
Choose one short route and one visual problem. For example: separate a subject from a busy background, find a repeated color, or catch a readable gesture. Spend the first few minutes watching without shooting. Notice where people move, where light falls, and which positions let you stand safely without becoming an obstacle.
Use one lens or one phone camera setting for the walk. The point is to learn what fits inside that view. Constantly changing focal lengths can keep you occupied with equipment instead of the scene. Work one location from a few positions before moving on. Repetition makes small differences easier to see.
After the walk, choose five frames, then reduce those to two. Compare the gesture, background, edges, and exposure. Write a short reason for keeping each picture. If your reason is only that the subject was interesting, inspect the composition again. Your framing still has to do some work.
Return to the same route with one change. You might use a different camera height or wait for cleaner spacing between people. This gives you a specific experiment instead of a vague promise to improve. Keep the files that explain your mistakes as well as the successes. They show what to watch for next time.
Want stronger street frames instead of a camera roll full of missed moments? The Academy’s Street Photography course takes you through composition on the move, city light, people and stories, and editing a street project. Build a repeatable process for seeing the moment and presenting the work, then bring it back to your next walk. Our street photography guide is another starting point for your next walk.
Street photography questions
What is the best camera for street photography?
The best starting camera is one you can carry comfortably and operate without hunting through menus. A phone, compact camera, or interchangeable-lens camera can work. Reliable focus, quick exposure control, and familiarity matter more than buying a particular model.
What shutter speed should I use for street photography?
Try around 1/500 second for walking subjects in daylight, then inspect the results. Faster or closer movement may need a faster shutter. Still subjects can allow slower settings. Stabilization can reduce camera shake, but it does not stop a moving person.
Do street photographs have to be candid?
No. Candid public-life photographs and portraits made after a conversation can both belong in a street project. Describe the process honestly. Do not present a posed photograph as an unnoticed moment.
Should I edit street photography in black and white?
Use black and white when tone, gesture, and shape carry the photograph. Keep color when it creates an important visual relationship. Compare the versions rather than assuming black and white makes every street photograph stronger.
How can I practice street photography without approaching strangers?
Start with wider public-life scenes, silhouettes, details, or movement through a chosen background. Stay out of people’s way and respect objections. A focused walk built around light or repeated shapes can train your eye without close portraits.
Keep the street kit simple
A small prime lens can keep a compatible camera comfortable on a long walk. The Nikon NIKKOR Z 40mm f/2 is a compact full-frame Z-mount option; on a DX Nikon Z body it gives a tighter angle of view. It is not a universal fit or a promise of better pictures. Check your camera mount and preferred framing before buying.
Affiliate links may earn us a commission at no extra cost to you. Prices and availability can change. Start with what you own; practice is the real upgrade.