
Updated October 2026
A red light on a Promise Pegasus is a reason to stop and find out what happened. It is not a reason to reformat the system, force every drive online, or copy a terminal sequence from an old blog post. The files matter more than making the light change color.
I originally wrote this post after trouble with one of my Pegasus systems in 2016. My old account described a route that got my system working again. It did not record the exact model, RAID layout, firmware, or failure state. That missing information makes it a poor repair recipe for someone else’s array. The history stays here, but the executable force-online commands do not.
This is a safety and diagnosis guide, not a remote diagnosis of your storage. We will separate a failed or degraded array from a healthy new volume that you intentionally want to format. Those are different jobs. Mixing them up can turn a recoverable problem into permanent loss.
First: decide whether this is recovery or setup
If the Pegasus contains files you need and you do not have a verified independent copy, treat the situation as recovery. Do not erase, initialize, delete a logical drive, create a new array, or change drive state just to see whether something improves. Get model-specific help from Promise support or a qualified RAID data-recovery professional.
If the system is healthy, the drives are intentionally empty or their contents are expendable, and you have confirmed the correct device, you may be dealing with setup. That is where the manufacturer’s new-volume documentation belongs. A setup procedure is not a repair procedure for an array with missing files or failed drives.
If you cannot tell which case applies, stop at information gathering. A desktop volume not appearing does not prove that the underlying files are gone. A drive marked offline does not prove that bringing it online is safe. The status labels need to be interpreted together with the configuration and event history.
Apple states plainly that erasing a storage device deletes everything on it. Its Disk Utility erase guide tells you to copy files you want to keep to another storage device first. That warning applies even when a tutorial makes the Erase button look like a convenient troubleshooting step.
What my original Pegasus account can and cannot tell you
In the original account, I described having two Promise Pegasus systems and having replaced drives before. I opened Promise Utility, checked for updates, updated firmware, and restarted the equipment. When that did not solve the problem, I used the command-line utility to change individual physical drives to online and rebooted the RAID.
That sequence was my account of one case. It does not establish which drive was healthy, which data was current, or which controller state made the operation work. It also does not establish whether those choices would be safe on another unit today. Success once is not enough evidence to turn a risky state change into general advice.
The previous version of this article preserved the commands with warnings. This version removes them. A reader should not be able to skim past the warning and copy a destructive sequence without understanding the array. I would rather give you a useful way to protect your files and reach the right diagnosis.
The old replacement-drive video is also not a diagnosis of your fault. A video can show a correct operation for its particular setup and still be wrong for yours. Do not combine a firmware update, drive replacement, rebuild, and reformat into one trial-and-error routine.
Why forcing a drive online is not a general red-light fix
A cautionary response on Promise’s forum warns that forcing the wrong drive online can cause irrecoverable filesystem damage. An offline drive may contain stale data, may have failed, or may be part of a more complicated sequence of events. Reintroducing that drive without understanding what changed can put inconsistent data back into the array.
The warning is explicit in Promise’s offline-drive discussion. The response asks people not to casually force drives online and explains that the service report is needed to understand the proper sequence. Another thread on the Promise forum warns about stale data, corruption, and possible backplane damage from repeatedly forcing a broken drive online.
Those discussions contain instructions for particular cases. Do not pull a command out of someone else’s support conversation and assume the conditions match. The important part for this guide is the warning and the need for a diagnosis. Instructions given after reviewing one person’s logs are not permission to alter your own array.
Do not downgrade utilities, update firmware, reorder disks, or repeatedly power-cycle the unit merely because an old online post suggests it. Each change can complicate the evidence. Ask support which version is appropriate for your exact Pegasus model, operating system, and failure state.
Record the state before changing it
Write down the exact Pegasus model from the enclosure label, your computer and operating-system version, and the Promise Utility version. Record the controller firmware if it is visible without making changes. Pegasus, Pegasus2, Pegasus3, and later families should not be treated as interchangeable just because they share a name.
Photograph the enclosure and the drive-slot lights. Note which slot has which warning. Record whether the unit powers on, whether the utility detects it, whether the logical drive appears, and whether the operating system mounts a volume. Keep the observations separate from guesses about the cause.
Make a short timeline: when it last worked, whether there was a power interruption, whether someone removed a drive, whether a rebuild was already running, and whether files were written after a warning appeared. Tell support about earlier attempts, including commands, replacement drives, or updates. Omitting those changes makes diagnosis harder.
Keep drive order intact unless the person diagnosing the array specifically tells you otherwise. Do not remove several drives to test them one by one. If a support professional asks for a physical change, confirm the slot, the reason, and the condition that makes it appropriate before proceeding.
Collect a service report for support
A response in the R4 red-light discussion on Promise’s forum requests a subsystem service report before recommending a next step. The described route uses Promise Utility’s Subsystem Information section and its Save Service Report control. Labels and access requirements can differ by utility version.
Use the report-export function for your version rather than experimenting with array controls. If the utility cannot detect the unit or export the report, include that fact in your support request. Do not take an unavailable report as a reason to start changing disks.
A service report may include hardware identifiers and system details. Send it through the vendor’s support case or a recovery provider’s agreed channel, not an open public comment containing everything. Review screenshots for personal filenames and other information before posting them publicly.
Understand the three layers you are looking at
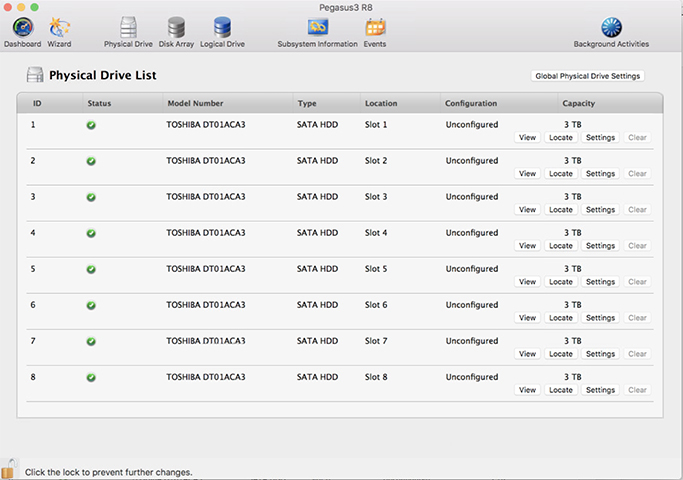
A physical drive is an individual disk in a bay. A disk array groups selected physical drives under a RAID configuration. A logical drive is storage presented from that array. The operating system then uses a filesystem on the logical drive. A problem at one layer may appear as a symptom at another.
That distinction matters because formatting a filesystem does not repair a failed physical disk. Creating a new disk array is not the same as mounting an existing volume. A missing desktop icon does not tell you which layer failed. Read the physical-drive, array, and logical-drive status together, and let support interpret the combination.

The vendor example above shows unconfigured drives in a Pegasus3 R8 setup. It is not a picture of a failed array and not a target state to force your existing drives into. Use it to understand the physical-drive list, not as a before-and-after repair goal.
Check the backup without stressing a failing source
A backup is useful only if it contains the files you need and you can read them independently of the troubled Pegasus. Locate the other copy, check its date, and open representative files from that copy. Check original RAW files, project catalogs, sidecar files, and deliverables as appropriate. A folder name alone does not prove the contents are complete.
If the only copy is on an unstable array, do not launch a large verification scan or a repeated copy loop from it. Ask a recovery professional how to preserve or image the source safely. Copying files from a drive that is physically failing can be a different risk from checking an already independent healthy backup.
RAID is not an independent backup. Redundancy may help a particular array tolerate certain drive failures, but it does not protect against every deletion, filesystem problem, controller fault, theft, or disaster. Two volumes on the same enclosure also do not give you the same separation as another device stored elsewhere.
A separate external drive can be one part of a backup plan. It is not proof that a backup exists, and it is not a substitute for enough capacity, regular copying, and restore checks. The photograph is a storage illustration, not Edin’s Pegasus or a recommended recovery device.
Healthy new-volume setup is a different workflow
Promise’s new-volume guide identifies Pegasus2 and Pegasus3 models and walks through creating a disk array and logical drive. Its macOS example uses unconfigured drives and a Pegasus3 R8. That scope matters. It does not diagnose red lights on an existing array, and its screenshots are historical examples rather than proof of current compatibility for every system.
Before following a setup guide, confirm that the exact unit is healthy, that every selected drive can be erased, and that you have the documentation for your model and current software. Review the selected disks, intended RAID level, capacity, and formatting choice. Do not let a wizard choose a layout you do not understand.
In that vendor example, the format checkbox creates an HFS+ volume. The separate APFS example creates a logical drive without the format option and then uses Disk Utility for the filesystem. That explains the separation between hardware RAID setup and operating-system formatting. It is not a blanket recommendation to use one filesystem on your own system.

The screenshot above is from the vendor’s new-volume example. The Erase control belongs to intentional setup after identifying the correct empty logical drive. Do not use it on a volume containing files you need. An operating system offering to initialize an unreadable device is not evidence that initialization is safe.
Filesystem choice should match the operating systems, applications, and backup tools that will use the volume. Confirm current model support and workflow requirements before committing. An older compatibility table is not a current operating-system guarantee. If the exact combination is unclear, ask Promise and the relevant software vendor.
Synchronization and rebuilding are not interchangeable
The new-array guide shows synchronization after creating a logical drive. That is not the same situation as rebuilding a degraded array after a diagnosed drive replacement. Similar progress bars do not make those operations interchangeable. Know what process is running and why before interrupting it.

Record the activity name and status when asking for help. Do not assume a progress percentage means your files are protected. Follow the model-specific instructions about power and interruption, and ask support if the state is unexpected.
After the fault is resolved, protect the photography workflow
Test representative files and a small restore before relying on the storage again. If support replaced a drive or changed the array, keep the diagnosis and configuration notes with your equipment records. Future troubleshooting is easier when you know what is installed and why it changed.
Build a repeatable backup routine with an independent copy and another copy outside the same failure location. Keep enough version history to recover from accidental deletion or a damaged project. Synchronization alone can copy a bad change to another location, so understand the retention behavior of the tool you choose.
Keep catalogs, original photographs, edits, and exported deliverables organized so a restore has a clear target. Want a cleaner editing workflow after the storage is stable? The Academy’s Lightroom course includes catalog organization and the Develop workflow, helping you spend less time hunting for photographs and more time editing them. It is photography training, not RAID repair or data recovery.
Promise Pegasus questions
Should I reformat my Pegasus when a drive light turns red?
No. Diagnose the warning and protect your files first. Formatting deletes filesystem contents and does not repair a failed physical drive. Use model-specific support if the array contains files you need.
Can I force all offline drives online?
Do not do that as a general fix. An offline drive may hold stale data or be failing. A cautionary response on the Promise forum warns that forcing the wrong drive online can cause irreversible data loss. Have support review the service report and configuration.
Is a RAID array a backup?
No. RAID redundancy and an independent backup solve different problems. Keep readable copies outside the troubled enclosure, with retention and restore checks appropriate to your work.
Is creating a logical drive the same as recovering a volume?
No. New-array and logical-drive creation are setup operations. They should not be used to repair an existing array with needed files. Recovery starts with preserving the source and diagnosing its state.
What information should I give Promise support?
Provide the exact model, operating system, utility and firmware versions when available, slot warnings, array and logical-drive status, a timeline of the failure, prior changes, and a service report if it can be exported safely.
Separate storage for a working backup plan
The Samsung T7 Shield 2TB is a portable USB-C SSD option for files that fit its capacity. It is not a Pegasus replacement drive, a RAID repair tool, or a complete backup plan by itself. Check your connection, filesystem needs, and actual library size before buying. Larger projects need more capacity.
Affiliate links may earn us a commission at no extra cost to you. Prices and availability can change.
Technical examples: Promise’s linked new-volume documentation. Storage illustration: licensed Pexels photograph. Screens and procedures vary by model and software version.

