
Updated October 2026
The Peak Design Everyday Messenger V1 is the original bag introduced through the 2015 Kickstarter campaign. The launch was exciting, but an old pledge link is not useful buying advice today. If you own this bag or are looking at a used one, the important questions are more practical: which version is it, does your kit fit, are the carrying parts sound and can you reach the camera without unpacking everything?
This guide is about the original V1, not a review of the current Everyday Messenger. Peak Design identifies V1 as discontinued and keeps separate instructions for it. Later V1 sizes and V2 bags should not be treated as identical to the larger original campaign bag. Check the actual label, measurements and photographs before trusting a listing’s shorthand.
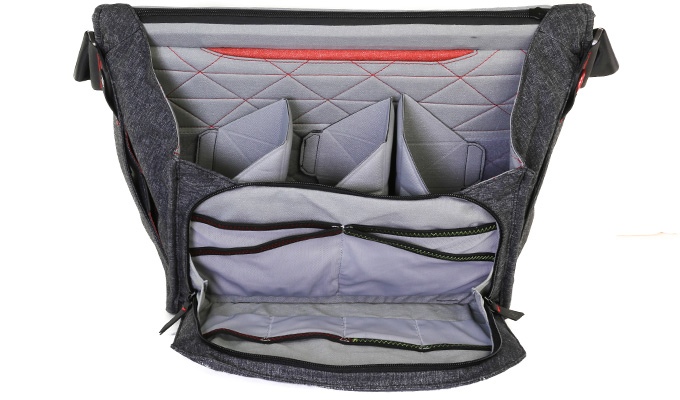
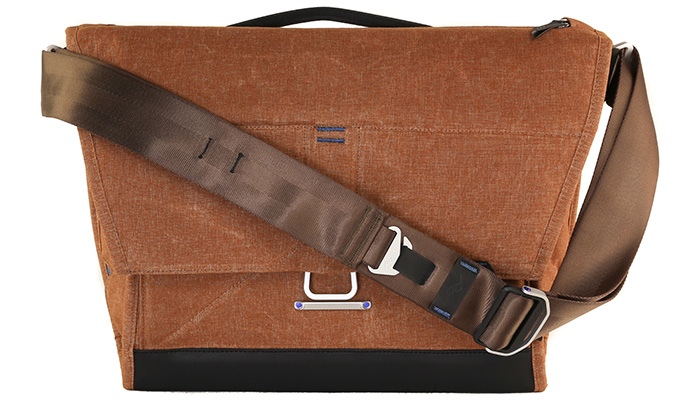
The city photograph introducing this guide is an example of a photography outing, not proof that this bag was used to make that image. The three original product photographs below show the charcoal and tan bags and their interior arrangement. No packing capacity claim replaces a test with your own camera, lenses and laptop.
Identify the version before comparing bags
Start with the seller’s photographs rather than the name in the headline. Ask for the front, back, side attachments, open interior and any identifying labels. The V1 has a MagLatch flap, folding interior dividers and a top quick-access zipper. Its expanding front organizer is another useful clue when comparing it with later designs. A color name alone is not enough to identify the generation.
The 2015 campaign described its original larger bag as expanding from 13.5 to 20.5 liters and advertised a dedicated laptop sleeve for 13–15-inch laptops. Those are historical claims about that campaign configuration. They are not dimensions for every later V1 size, and they do not guarantee that a modern laptop with a particular screen diagonal fits.
Do not import a current product page’s pockets, dividers, laptop capacity or accessories into a V1 listing. Ask which removable parts are actually included. A bag photographed with three dividers, a stabilizer strap and a tripod band may arrive without them if the description is vague. Get that list in writing before buying.
There is also a difference between an original product photograph and the unit being sold. These photographs help you understand the design. A used purchase needs recent photographs of the exact bag, especially its load-bearing attachments and interior.
 Save
SavePack for the photograph, not the maximum volume
Begin with the smallest kit that does the job. Our camera buying guide can help you compare systems before deciding how much equipment to carry. Put your camera and the lens you expect to use first in the easiest compartment to reach. Then add a second lens only if it gives you a meaningful option. A bag can accept more equipment than you want to carry on one shoulder for an afternoon.
Try the kit with lens caps, hood, straps and any grip attached. Published camera dimensions often omit something that affects packing. A lens that fits vertically without a hood may press against the flap when the hood is reversed. A battery grip changes both the camera’s height and the space needed to lift it out.
Keep the total load balanced instead of putting every heavy item against one end. Place small loose accessories in closed pockets or a pouch. A memory card should not be moving around beneath a camera, and a metal tool should not be rubbing against a lens barrel. Separate things that can scratch from things you are trying to protect.
Leave room for your hand. If you must move a lens, unzip another pocket and twist the camera sideways every time you need it, the arrangement is too crowded for quick work. Make several practice removals over a soft surface before taking the bag outside.
For a city walk, plan a simple route using our street photography practice guide. That may mean one camera, one extra lens, a spare battery and a small cleaning kit. For a more deliberate tripod outing, you might choose a different lens mix and leave the laptop behind. Neither arrangement is a universal recommendation. The best packing layout is the one that supports your plan without distracting you from looking.
Use FlexFold dividers deliberately
The folding dividers are one of the original bag’s main features. They let you create tall spaces, shelves or separate compartments. Peak Design’s V1 overview covers setups for small cameras, medium cameras, a large center cavity, stacked gear and longer lenses. Use that original guide rather than assuming a V2 demonstration shows the same interior.
Attach each divider firmly to the interior lining and check that the chosen fold supports the item. Do not treat a shelf as a rigid platform simply because it looks tidy in a photograph. Lift the bag and let the gear settle, then check that nothing is pressing against another item or escaping its compartment.
If you stack lenses, keep caps on and separate them properly. Make sure the lower item can be reached without balancing the upper one somewhere unsafe. For a camera stored lens-down, check that the surrounding arrangement is not putting awkward pressure on the lens or camera mount.
A taller empty cavity can work better than several tiny ones for a larger body. Conversely, a small mirrorless camera may need a tighter compartment so it does not move around. Adjust the dividers to the equipment, not the equipment to an attractive diagram.
After changing a layout, close the flap, carry the bag briefly and inspect it again. If a divider has peeled away or a lens has migrated, fix the arrangement before a longer outing. Missing or worn dividers are part of a used bag’s condition, not an afterthought.
 Save
SaveFit the strap to your body and your load
Peak Design describes cross-body carry as the messenger’s main use. The smooth strap side lets you move the bag from your back toward the front for access. The reverse side has a silicone grip for occasional single-shoulder carry. That grip does not make a heavy load comfortable indefinitely.
Adjust the main length so the padding sits on your shoulder and the bag rests at a height you can reach. The V1 strap instructions cover its adjustment loops and quick adjuster. If you prefer the right shoulder, Peak Design has separate instructions for removing and reversing the main strap so the padding stays centered. Follow those instructions instead of guessing at the attachment hardware.
The quick adjuster’s snapping handle is not a lock. Peak Design’s slipping-strap article explains that the snap keeps the handle from swinging, while the mechanism relies on friction. Pulling the handle outward as well as along the strap permits adjustment. Contact with your arm or another object can change the setting unintentionally.
Cinch the bag for carrying and loosen it for access, as the maker recommends. Check whether a different tension-hook loop gives you a better starting length. If the adjuster moves under the manufacturer’s described pull test without anyone manipulating the handle, contact support rather than assuming that is normal.
The stabilizer strap can help keep the bag from swinging and the original campaign described a waist-carry arrangement. Learn its routing unloaded first. Do not improvise a load-bearing connection or continue carrying expensive gear on frayed attachment webbing. Comfort and security both depend on the actual condition of the bag.
Check laptop fit with the main compartment loaded
Screen size is not a complete laptop measurement. Width, depth, thickness, a protective case and the shape of the corners all affect fit. A laptop that slides into an empty bag can be harder to remove after the camera compartments are full.
Test the computer you will actually carry. Put it in the rear sleeve without forcing the zipper or bending the surrounding panel. Add your normal camera kit and try the zipper again. If you have to press the bag flat or drag metal zipper teeth against the laptop, the fit is not useful just because the screen size matches an old advertisement.
Keep the charger and cables organized in the front section rather than wedging a hard power brick where it pushes into the computer. If you carry a tablet or documents too, include them in the test. Thin items still take space when the sleeve is already tight.
For a photography walk, ask whether the laptop needs to come at all. Leaving it at home can make carrying easier and reduce what is exposed to rain or a drop. If a computer is essential for the assignment, choose a bag that handles the full load comfortably instead of defending a cramped fit.
 Save
SaveClose the bag before trusting it in motion
MagLatch lets the flap fasten at different positions as the load changes. Choose a position that closes the bag properly and test the engagement with a gentle lift of the flap. A magnet helping the latch find its position is not the same as confirming that the closure is engaged.
The top zipper offers access without opening the whole flap. That can be useful when the bag is in front of you, but it should be fully closed again before you walk away. Check the zipper ends, the rear laptop opening and the organizer closure too. Quick access is only useful when the other items remain secure.
Be careful where you set the bag down. A narrow or uneven surface is not a safe place for an open camera bag. Keep it closed on a seat or floor, and do not assume it will stand upright with every load. Support it while opening if the arrangement is top-heavy.
The V1 overview also covers tripod carry and Capture Clip attachment. Follow the exact routing and accessory instructions. A tripod outside the bag changes its balance and can catch on surroundings. Check clearances before moving through a doorway, crowd or public-transport aisle.
If you attach a camera externally with Capture, verify the clip, plate and mounting location as a complete system. Check the camera’s engagement before letting go. Do not treat any decorative webbing on any bag as a rated mounting point.
Weather resistance is not waterproof storage
Peak Design describes the V1’s 400D nylon canvas as DWR-treated and poly-coated, with a waterproof 900D bottom liner. Those materials help explain its weather-resistant construction. They do not make the entire bag a sealed waterproof case.
Keep openings closed, avoid setting the bag in standing water and protect valuable gear separately when the forecast or location calls for it. Sustained rain, wet ground and a spill are different situations from a brief drizzle. A material specification should not become a promise that every camera inside will stay dry.
After a wet outing, empty the bag and let it dry fully. Do not leave a damp camera, wet cloth or folded strap packed away for days. Check hidden pockets and dividers rather than judging dryness from the outer surface alone.
Peak Design’s cleaning guide recommends warm water and a damp washcloth, with a small amount of mild detergent when needed, followed by rinsing. Avoid abrasive pads. It specifically says not to submerge the bag or put it in a washing machine because agitation and heat can damage its structure and coating. Dry it fully in a ventilated place before storing it.
Inspect a used V1 before buying
Ask for close photographs of both main strap attachments, the webbing, stitching, adjusters, carry handle and stabilizer connections. Look for fraying, torn fabric, distorted hardware and repairs. Cosmetic scuffs are different from damage where the bag carries its weight.
Work every zipper through its full travel. Check for separated teeth, a slider that does not close reliably and fabric caught near the ends. Open and close MagLatch at the positions you expect to use. Inspect the interior lining and divider attachment areas for wear.
Smell and dampness matter too. Ask whether the bag has been stored wet, exposed to smoke or cleaned in a machine. Check the base, hidden corners and padded sections for stains, mildew or unusual stiffness. Do not assume a quick surface wipe fixes deeper damage.
Confirm the included dividers, stabilizer strap and small accessories. Then pack your kit and carry it long enough to notice pressure, shifting and awkward access. If the seller will not let you test or offer useful return terms, treat that limitation as part of the buying decision.
Contact Peak Design about a specific problem before assuming replacement parts or a warranty remedy will be available for a discontinued bag. Do not promise that a used purchase qualifies or that an old V1 will be replaced with the same version. A clean, complete example can be useful; a damaged carrying system is not a bargain worth overlooking.
Learn faster with a plan. The ShutYourAperture Academy has 22 photography courses, from the fundamentals of aperture, shutter and ISO to genre courses like landscape, portrait and street.
Frequently asked questions
Is the original Everyday Messenger V1 still the current model?
No. Peak Design identifies V1 as discontinued and keeps separate support instructions. Verify the generation and size of a used listing.
Will any 15-inch laptop fit?
No. Screen diagonal does not establish physical fit. Test your laptop, case and normal camera load in the exact bag.
Does the quick-adjust handle lock the strap?
No. Peak Design says its snap keeps the handle in place; the adjuster relies on friction. Follow the V1 adjustment instructions and contact support about abnormal slipping.
Is the whole bag waterproof?
No waterproof-case claim is justified. Its weather-resistant shell and waterproof bottom liner do not make the openings sealed against sustained rain or immersion.
Can I wash it in a machine?
No. Peak Design recommends hand cleaning, no submersion or washing machine, and full drying in a ventilated area.
What matters most on a used V1?
Sound strap attachments, working closures, intact lining, included dividers and a comfortable fit with your actual equipment. Check return terms and support options before buying.
Build a lighter carry kit
These retailer search links are starting points, not current price or stock claims. Confirm the exact generation, fit and included parts.
Affiliate disclosure: Some links are affiliate links. If you buy through them, Shut Your Aperture may earn a commission at no extra cost to you. As an Amazon Associate, we earn from qualifying purchases.
Find practical photography tips at Shut Your Aperture Academy. Plan the photographs first, then pack only what helps you make them. Good light and timing matter more than carrying every lens you own.
References: official V1 materials description, V1 features and setup, strap adjustment explanation, official cleaning guidance and original 2015 campaign.