Every time we press the shutter, we are capturing more than just light hitting a sensor. We are freezing an ephemeral moment in time: a fleeting whisper of the universe that will never happen exactly the same way again. For many of us, the RAW file is the "intrinsic" soul of that moment, but it often arrives on our screens looking a bit flat, a bit tired, and perhaps a bit detached from the emotion we felt while standing behind the lens.
In the world of photography, light is our primary paintbrush, and the landscape: whether urban or wild: is our canvas. But even the best painters need to refine their strokes. That’s where post-processing comes in. Many hobbyists fear that editing will "ruin" the reality of a shot, but I’ve always believed that editing is simply the final act of creation. It’s about bringing back the ethereal quality that your eyes saw, but your camera couldn't quite translate.
With the 2026 updates to Adobe Lightroom, the game has changed entirely. We are no longer fighting with clunky sliders for hours. We are now working with intuitive, AI-driven tools that act as our "unsung heroes" in the creative process. Today, I want to show you how to master these photo editing tutorials in under five minutes, keeping your images looking organic, breath-taking, and most importantly, natural.
The Philosophy of the Natural Edit
Before we dive into the "brass tacks" of sliders and masks, let’s talk about the mindset. I have tried every editing software under the sun, and nothing compares to the speed and depth of the current Lightroom ecosystem. However, the biggest mistake I see fellow enthusiasts making is over-processing. They push the saturation until the grass looks radioactive and the sky looks like a neon sign.
We must approach our images with reverence. A stoic commitment to the truth of the scene is what separates a professional-grade edit from a digital mess. The goal is to enhance, not to reinvent. Now that we’ve delved into the heart of why we edit, it’s time to get down to the actual workflow.

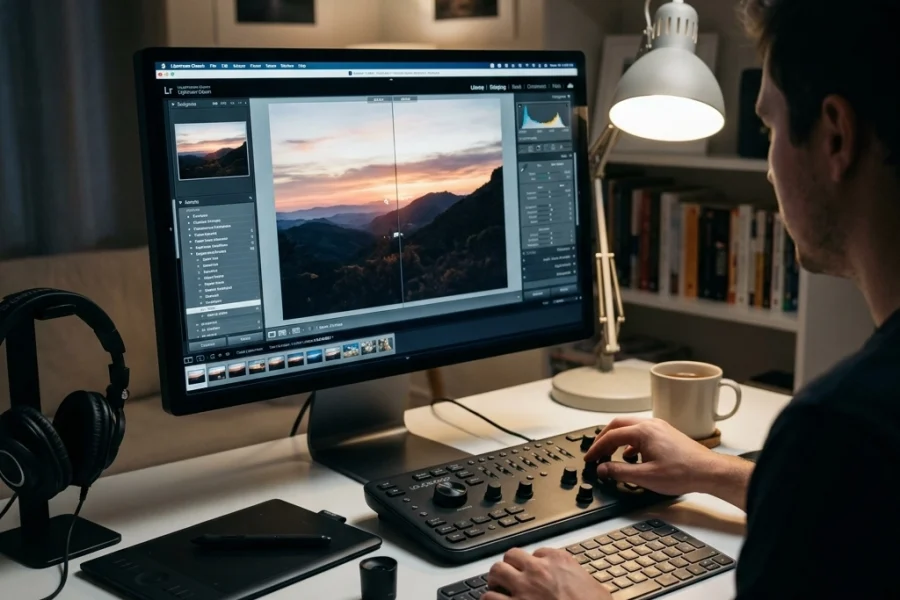
Alt text: A professional photographer editing a high-dynamic range landscape photo on a modern laptop, showing the balance between subtle color grading and natural light.
Foundational Finesse: The 60-Second Base
The first minute of your edit should always be about the foundation. If the house isn't level, it doesn't matter what color you paint the walls. In the 2026 version of Lightroom, the "Auto" button has become significantly more intelligent, but I still prefer a hands-on approach to maintain creative control.
- Exposure and Contrast: Start by setting the mood. Does the image feel heavy? Lift the exposure slightly. Does it feel thin? Bring it down. I often find that a slight bump in contrast adds the necessary "bite" to a flat RAW file.
- The Alt/Option Trick: This is a game-changer. While dragging your Blacks and Whites sliders, hold down the Alt (Windows) or Option (Mac) key. The screen will turn black or white, showing you exactly where you are "clipping" your data. You want to push these until you just see the first hints of color appearing. This ensures a full dynamic range without losing detail in the shadows or blowing out the highlights.
- White Balance: This is where the "ethereal" feel is born. A slightly warmer temperature can make a sunset feel like a golden embrace, while a cooler tone can make a blue hour shot feel wonderfully crisp.
If you are looking to take your base edits even further, check out our HDR tutorial for a deeper dive into managing extreme light.
Masking Magic: Targeted Adjustments
The real power of the 2026 update lies in the "Select Subject" and "Select Sky" masks. These tools are no longer just "good enough"; they are frighteningly accurate. Instead of applying global changes that affect the entire "canvas," we can now pinpoint our adjustments.
Subject Sophistication
When you use a subject mask, you are telling the viewer exactly where to look. I like to add a tiny bit of "Clarity" and "Sharpness" to the subject while slightly dropping the "Dehaze" on the background. This creates a subtle depth of field that feels three-dimensional and professional. It’s about creating a visual hierarchy.
Sky Sentinels
The sky often acts as the "ceiling" of our photograph. If it’s too bright, it pulls the eye away from the subject. By using the "Select Sky" mask, you can drop the highlights and add a touch of "Texture" to bring out the clouds. If you've shot something like the beautiful mountains, this step is vital to keep the scale of the landscape feeling majestic.

Alt text: A split screen showing a raw photography file next to a finished edit using advanced Lightroom masking to enhance the sky and subject.
Generative Genius: Cleaning the Canvas
We’ve all been there: you capture a perfect street scene, but there’s a stray trash can or a distracting power line cutting through the frame. In the past, this meant a trip to Photoshop and twenty minutes of meticulous cloning.
The 2026 Generative Remove tool in Lightroom is a total game-changer. It doesn’t just "patch" the area; it analyzes the surrounding environment and "imagines" what should be there. It treats the environment as a living thing. When I was shooting for my project in Tiny Sydney, removing small distractions allowed the miniature effect to truly pop without looking "Photoshopped."
Venture forth! Don't be afraid to remove those small "eye-sores." As long as you aren't changing the fundamental truth of the location, you are simply polishing the diamond.
Color Comfort: The Art of Grading
Color grading is where the soul of the photographer truly shines. This is where you decide the "vibe" of your work. Are you going for a classic look, or something more abstract?
In 2026, Lightroom’s Color Grading wheels (Midtones, Shadows, and Highlights) are more responsive than ever. To keep things natural, I follow a simple rule: Complementary Harmony.
- Add a hint of blue or teal to the shadows.
- Add a touch of orange or gold to the highlights.
- Keep the midtones neutral.
This "Teal and Orange" look is a classic for a reason: it mimics the natural contrast of the sun against the sky. If you want to see how these principles apply to professional-grade prints, take a look at the work over at Edin Fine Art.
Detailed Decisions: The Stoic Approach to Sharpness
The final minute of our 5-minute edit belongs to the "Detail" panel. This is where most people ruin a perfectly good photo. Excessive sharpening creates "halos" and digital noise that scream "amateur."
The 2026 AI Denoise is your best friend here. If you shot at a high ISO because the light was "dancing" too quickly, run the Denoise at about 30-40%. It cleans up the grain while preserving the "intrinsic" textures of the image. For sharpening, use the Masking slider (again, hold Alt/Option). Move it until only the edges of your subject are white. This ensures you are only sharpening the lines that matter, leaving the smooth areas (like the sky or skin) untouched.
For those interested in the technical side of gear and how it handles noise, my deep dive on the Nikon D850 is a great resource to understand sensor performance.

Alt text: A close-up view of the Lightroom Detail panel showing the AI Denoise and Sharpening sliders being adjusted for a crisp, natural finish.
Workflow Efficiency: Seize These Moments!
You might be thinking, "Edin, how am I supposed to do all of this in five minutes?" The secret is automation and presets.
I have created a library of personal "starting point" presets that I’ve developed over years of trial and error. You can find some of my favorite tools and resources in the downloads section. A preset isn't a "one-click fix": it’s a head start.
- Apply your "Natural Base" preset.
- Let Lightroom AI run the "Select Subject" mask.
- Check your "Generative Remove" areas.
- Fine-tune the Color Grading.
- Export.
If you’re working on a series, such as a Dubai Timelapse or a street photography set, use the "Sync" button. Edit one photo to perfection, then apply those settings to the rest of the batch. This is how pros handle thousands of images without losing their minds.
Bridging the Gap: From Digital to Physical
Now that we’ve delved into the digital darkroom, it’s time to get down to what matters: sharing your vision. Whether you are submitting your work to our submissions page or building a portfolio on ProShoot.io, the quality of your edit is your calling card.
I’ve spent a lifetime capturing the world, from the streets of Barcelona to the heights of the Himalayas. What I’ve learned is that the camera is just a tool, but the edit is your voice. Don't let your voice be a scream; let it be a clear, resonant song.
If you're looking for more inspiration, I highly recommend checking out the work of Cory Richards or Dylan Fox. They represent the pinnacle of finding that balance between the technical and the emotional.

Alt text: A beautiful, naturally edited landscape photo of a mountain range at sunset, illustrating the perfect balance of light and shadow.
A Philosophical Summary
Photography is a journey of "reverence" for the world around us. We are the observers of the ephemeral, the keepers of the light. By mastering these photo editing tutorials, you aren't just clicking buttons; you are refining your perspective. You are ensuring that the "ethereal" beauty of the world is preserved for others to see.
The 2026 Lightroom updates are truly game-changers, but they only work if you have the vision to guide them. Keep your edits simple, keep them clean, and always stay true to the feeling you had when you first saw the light hit your subject.
Dear hobbyists and fellow enthusiasts, I hope this guide helps you reclaim your time and improve your craft. Editing shouldn't be a chore; it should be the moment your vision finally comes to life. If you want to see more of my personal work and behind-the-scenes stories, head over to blog.edinchavez.com or explore my studio work at Edin Studios. For even more technical guides, Photo Guides is an excellent place to continue your education.
Drop me a line below if you have any questions about the new AI features or if you’re struggling with a specific edit. I’m always here to help you shut your aperture and open your mind!
Seize these moments! The light is waiting.
Want to learn more? Check out our category for tutorials to keep your skills sharp in 2026!