Let’s be real for a second: that little "M" on your camera dial is terrifying. It’s like the "check engine" light of photography. Most people see it and immediately retreat back to the safety of Program or Auto mode. But here at the Shut Your Aperture School, we believe that the "M" doesn’t stand for "Maybe I’ll ruin this photo": it stands for Mastery.
If you want to stop taking "okay" snapshots and start creating art, you need to know how to use manual mode camera like a pro. It’s the difference between letting a computer guess what you want and you telling the camera exactly what to do. Today, we’re diving deep into the core curriculum of our photography tutorials to turn you into a manual mode wizard.
Why Manual Mode? The Freedom of Control
When you’re in Auto mode, your camera is basically a glorified light meter. It tries to make everything "average." It wants the whites to be grey and the blacks to be grey. It doesn’t know you’re trying to capture a moody, dark silhouette or a bright, airy high-key portrait.
When you take the wheel, you decide the mood. You control the depth of field. You control the motion. That is where the magic happens. Whether you are following the latest photography news matters or shooting with a vintage lens, manual mode is your universal language.
Lesson 1: The Holy Trinity (The Exposure Triangle)
If you’ve spent any time looking at photography tutorials, you’ve heard of the exposure triangle. It’s the foundation of everything. Think of it as a three-legged stool. If one leg is too short, the whole thing falls over.
1. Aperture (The Eye)
Aperture is the opening in your lens. It’s measured in f-stops (like f/1.8 or f/11).
- Lower numbers (f/1.8): A wide opening. More light comes in. This creates that creamy, blurred background (bokeh) that everyone loves.
- Higher numbers (f/11): A narrow opening. Less light comes in. This keeps everything from the foreground to the background in sharp focus.
2. Shutter Speed (The Eyelid)
This is how long your "eye" stays open.
- Fast speeds (1/1000s): Freezes motion. Great for sports or a bird in flight.
- Slow speeds (1/30s or longer): Blurs motion. Essential for those silky waterfall shots or light trails.
3. ISO (The Sensitivity)
ISO is how sensitive your camera sensor is to light.
- Low ISO (100): Less sensitive, but the cleanest image quality.
- High ISO (3200+): More sensitive, allowing you to shoot in the dark, but it adds "noise" or grain to your photo.
SEO Alt Text: Infographic showing the relationship between aperture, shutter speed, and ISO for manual mode photography.
Lesson 2: The Pro Workflow – Setting Your Shot
One of the biggest questions we get at Shut Your Aperture is: "Which one do I change first?" If you're wondering how to use manual mode camera settings effectively, you need a repeatable workflow. Pros don't just spin dials randomly.
Step 1: Set Your ISO
Start by setting your ISO as low as possible (usually 100). This ensures you get the highest quality image with the least amount of grain. Only raise your ISO if you’ve run out of options with your aperture and shutter speed and the photo is still too dark. Check out more technical breakdowns at Shut Your Aperture for specific sensor performance.
Step 2: Choose Your Aperture
What is the "vibe" of the shot? If you’re shooting a portrait and want the person to pop, set it to a low number like f/2.8. If you’re shooting a sweeping landscape, set it to f/8 or f/11. Your aperture is your primary creative tool.
Step 3: Adjust Shutter Speed to Balance
Now look at your light meter (that little bar at the bottom of your viewfinder). If the bar is leaning toward the minus (-) side, your photo is too dark. Slow down your shutter speed to let more light in. If it’s leaning toward the plus (+) side, speed it up.
Lesson 3: Reading the Meter (Don't Trust Your Screen)
The biggest mistake beginners make is trusting the LCD screen on the back of the camera. It’s lying to you. Depending on your screen brightness, a photo might look perfect on the LCD but turn out pitch black when you open it on your computer.
Instead, learn to read the Histogram.
A histogram is a little graph that shows the distribution of tones in your image.
- If the graph is all scrunched up on the left, your photo is underexposed (too dark).
- If it’s scrunched on the right, it’s overexposed (too bright).
- You want a nice "mountain" in the middle, or at least a spread that doesn't "clip" (hit the edges).
Mastering the histogram is a staple in our photography tutorials because it’s the only way to ensure your exposure is technically correct every single time.
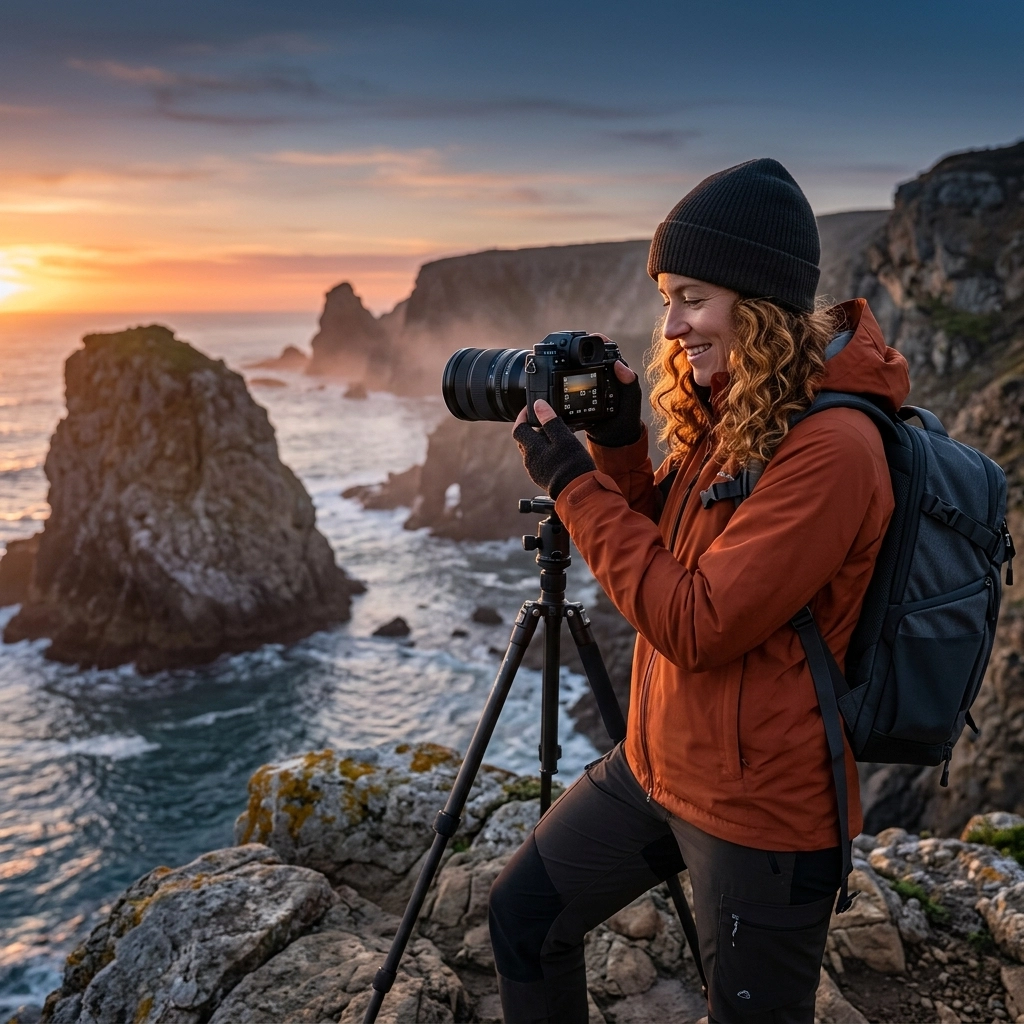
SEO Alt Text: A photographer checking the histogram on a camera screen while shooting a sunset at the beach.
Lesson 4: The "Pro Cheat" – Manual Mode with Auto ISO
Wait, is it still manual mode if something is "Auto"? Yes! Many professionals use this as their secret weapon. You set your Aperture for the depth of field you want and your Shutter Speed to either freeze or blur motion. Then, you set your ISO to "Auto."
This allows the camera to handle the math of the light sensitivity while you maintain control over the creative elements. It’s perfect for street photography or events where the light is constantly changing and you don't have time to faff with dials. If you want to see how this applies to high-end gear, head over to proshoot.io for professional equipment reviews.
Lesson 5: Focus and White Balance
Using a manual mode camera isn't just about exposure; it’s about color and clarity.
White Balance tells the camera what "white" looks like under different lighting. Ever take a photo indoors that looks way too orange? That’s a white balance issue. While you can leave this on Auto, pros often set it to "Daylight" or "Cloudy" to keep the colors consistent across a whole shoot. This saves a massive amount of time in post-processing.
Focusing is another beast. Even if you're in manual exposure, you can still use Auto Focus. However, in tricky situations: like shooting through a fence or doing macro photography: switching your lens to Manual Focus (MF) is the only way to get the shot.
Lesson 6: The Power of RAW and Post-Processing
If you are shooting in manual mode, you absolutely must be shooting in RAW format, not JPEG. A JPEG is a finished meal; a RAW file is the ingredients. RAW files hold significantly more data in the highlights and shadows.
When you bring those RAW files into a program like Luminar, you have the power to "fix" exposure mistakes that would be impossible to save in a JPEG. We love Luminar because it uses AI to simplify the complex parts of editing, letting you focus on the art. You can find more editing tips and visual inspiration at EdinFineArt.com.
SEO Alt Text: Side-by-side comparison of a RAW photo before and after editing in software to show dynamic range recovery.
Practicing Like a Pro: The Shut Your Aperture Way
You can't learn to swim by reading a book, and you can't learn how to use manual mode camera by just reading a blog post. You need to get out there. Here is a daily exercise we give our students at the Shut Your Aperture School:
- The "One Setting" Challenge: Go for a walk and pick one aperture (say, f/4). Don't change it. For every photo you take, you are only allowed to adjust shutter speed and ISO to get the right exposure.
- The Low Light Test: Go into a dimly lit room. Try to get a sharp photo of a moving object without using a flash. This will force you to understand the trade-off between shutter speed and ISO.
- The Silhouette: Find a bright light source (like a window). Try to expose the photo so the person in front of the window is a solid black silhouette. This teaches you how to override what the camera "thinks" is a good exposure.
For more hands-on inspiration and deep dives into specific styles, check out the archives at blog.edinchavez.com.
Common Manual Mode Pitfalls
Even the pros mess up. Here are the things to watch out for:
- Leaving your ISO high: You finish a shoot at a dark bar at ISO 6400, then go out the next morning into bright sunlight. If you don't check your settings, your first 20 photos will be pure white. Develop a habit of "zeroing out" your camera settings after every shoot.
- The "Blurry" Shutter Speed: A general rule is the "Reciprocal Rule." If you're shooting with a 50mm lens, don't let your shutter speed go below 1/50th of a second, or you'll get camera shake.
- Over-relying on the light meter: Sometimes the light meter is wrong. If you’re shooting in the snow, the meter will try to make the snow grey. You actually need to "overexpose" (move the bar to the +1 side) to make the snow look white.
SEO Alt Text: Close-up of a hand adjusting the dial on a professional DSLR camera in a manual setting.
Final Thoughts: Welcome to the School
Shut Your Aperture isn't just a name; it’s a mindset. We want to strip away the fluff and give you the practical skills to take the best photos of your life. Manual mode is the "red pill" of photography: once you see how much control you have, you’ll never want to go back to Auto.
Learning how to use manual mode camera is a journey, not a destination. You’ll take some bad photos. You’ll forget to change your settings. You’ll get frustrated. But one day, it will click. You’ll see a scene, know exactly what settings to use, and capture exactly what you envisioned.
That is the moment you become a pro.
Keep shooting, keep experimenting, and remember that the best camera is the one you actually know how to use. For more photography tutorials and to join our community of creators, keep exploring Shut Your Aperture. We’re here to make sure you never have to guess again.


