Understanding Lighting Types
Key lights act as the main light source in product photography. Positioned typically at a 45-degree angle from the camera, they create the overall mood and set the tonal variance of the image, illuminating the primary elements of the product. Their placement is critical: too direct, and the image can become harsh; too subdued, and it lacks depth.
Fill lights serve a supporting role. They counterbalance the harsh shadows cast by the key lights, ensuring that no part of the product falls into complete obscurity. Generally placed opposite the key light, fill lights help flatten out the lighting environment but must be handled efficiently to avoid creating a washed-out look. They frequently hover around half the intensity of the key light to maintain an atmosphere in the photograph without overpowering the main lighting effects.
Backlights stand behind and often above the product. Their strategic placement often determines the crispness of the product outlines in relation to the background. Without a backlight, products risk appearing flat against the backdrop. The subtle boundaries backlights create are instrumental in deepening the distinction between the product and its surroundings and enhancing its contour in digital imagery.
As one works with different products, variations in textures and reflectiveness necessitate a slight divergence from this traditional setup. The ability to adapt key light intensity, modify the angle of backlights, or tweak the softness of fill lights can improve the quality and desirability of product photos, adapted to specific photographic needs and medium requirements.
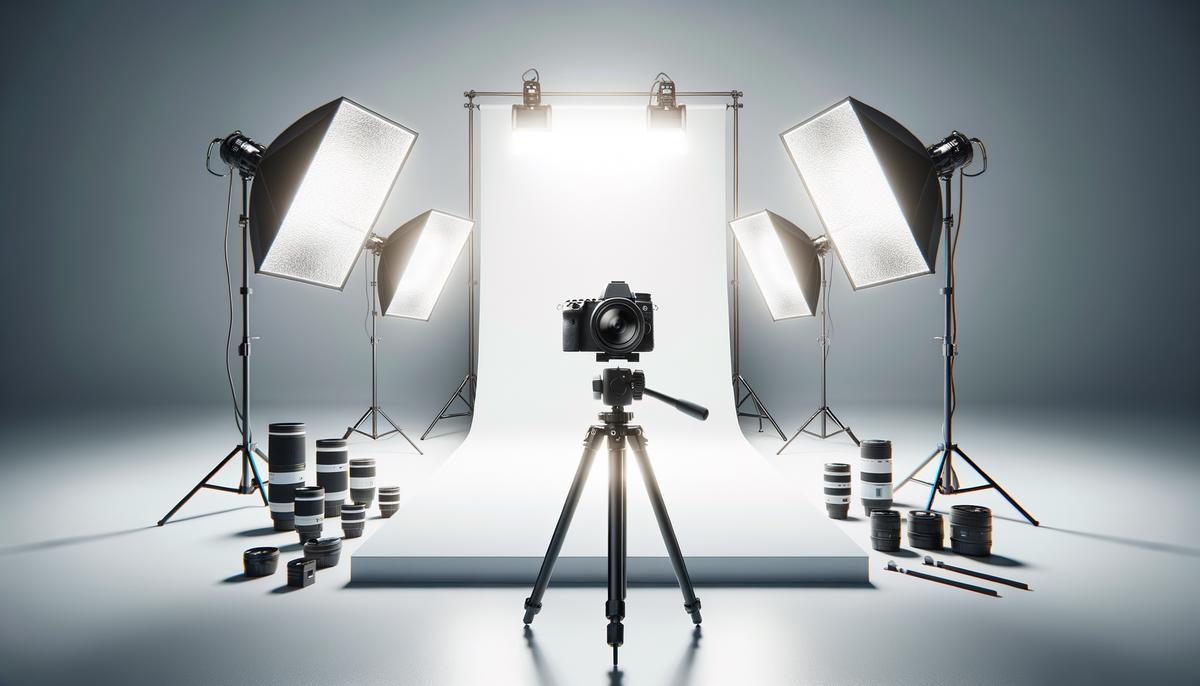
Setting Up the Lighting
To achieve an optimal three-point lighting setup in a studio environment, one should consider the specific characteristics of the product being photographed, such as its size, color, and reflectivity. This careful approach ensures that each light source contributes effectively to producing high-quality product images.
Begin by arranging your key light. This primary source should be positioned strategically to define the shape and enhance the texture of your product. The angle and distance from the product will vary depending on its dimensions and inherent qualities. For larger items, a broader light might be needed to cover more surface area, while smaller, more intricate objects may require a narrower beam to highlight fine details without overwhelming the entire piece.
Next, integrate the fill light into your setup. This secondary light should be less intense than the key light and placed on the opposite side to softly fill in shadows, ensuring detailed textures and colors are visible without creating unwanted glare or reflection, especially on shiny surfaces. The fill light should be subtle, illuminating enough to reveal details but dim enough to maintain the depth created by the key light shadows.
Position your backlight. This light is crucial for separating the product from the background, offering a delicate outline or halo effect that elevates the product's edges against the backdrop. The backlight should be placed behind the product, slightly higher, aiming down at it. Care must be taken with reflective products to avoid unwanted highlights or glare.
Throughout the process, adjustments may be necessary to accommodate specific product attributes. For example, highly reflective objects like glassware or metallic surfaces require diligent management of both key and backlight to minimize reflections while accentuating their shape and texture. Matte surfaces often benefit from slightly more intense fill lights to bring out color richness and detail textures.
Using this foundational three-point lighting setup adapted to your product's specific features enhances the accuracy of your representations and the aesthetic appeal, potentially influencing buyer perceptions and actions. As you continue in your photographic endeavors, constant experimentation and refinement of lighting arrangements will become invaluable, enabling you to translate the visual essence of any product into captivating imagery.
 Save
SaveManaging Light Quality
Managing the quality of light in product photography is just as crucial as ensuring the correct positioning of lights. The use of tools like diffusers and reflectors is instrumental in manipulating the harshness and softness of light, aspiring for perfection in how a product is presented in images.
Diffusers are pivotal when your key objective is to soften intense light that might otherwise generate stark, unflattering shadows and highlights on the product. They scatter light, allowing it to evenly distribute across a broader area, thus reducing glare and creating a gentle illumination that enhances the product's appeal. Softboxes are a common choice, encased with translucent material they evenly dispense light to produce softer shadows, ideal for bringing out subtle details and textures within products such as fabrics or printed materials.
On the other end, reflectors are used to redirect existing light from the key, fill, or even the backlight into areas that require additional exposure. By precisely positioning these reflective surfaces—typically made of materials like foil, white board or specialized reflective fabric—you can fill in shadows effectively, providing a balance in lighting that might otherwise rely too heavily on direct sources. The angle and distance from which the reflector is placed play a significant role in how softly the bounced light impacts the subject, making it an essential tool for fine-tuning the shoot's overall light quality.
A great benefit of reflectors is their ability to enhance light efficiency without the need for additional power sources. This makes them cost-effective and adds an element of fine control in managing ambient and artificial lighting conditions. Utilizing both diffusers and reflectors together allows one to choreograph a play of shadow and light that results in photographs that are both technically satisfying and visually compelling.
- Use diffusers to soften harsh light and reduce glare
- Position reflectors to redirect light and fill in shadows
- Combine diffusers and reflectors for optimal light control
Testing different configurations with these tools will supply a more thorough understanding of how light interacts with various surfaces and angles. Remember, achieving a sophisticated photography setup does not necessarily depend on the abundance of equipment but rather on how proficiently you manipulate the tools at hand.
By mastering these techniques, a product photographer builds a diverse array of methods to sculpt the perfect lighting environment suited to every distinct product. Moving ahead from the basics into more nuanced territory, it becomes evident that manipulating the interplay of light and shadow is an artistic endeavor all its own—a journey that challenges one to harness creativity and technical skill in equal measure for stellar results.
- Hunter F, Biver S, Fuqua P. Light Science & Magic: An Introduction to Photographic Lighting. 5th ed. Focal Press; 2015.
- Harnischmacher C. Tabletop Photography: Using Compact Flashes and Low-Cost Tricks to Create Professional-Looking Studio Shots. 1st ed. Rocky Nook; 2012.