

For many of us, the journey into photography begins with a sense of wonder: a desire to freeze a fleeting moment of beauty, to capture the ethereal glow of a sunset or the stoic resolve of a mountain peak. We start in "Auto," letting the camera’s internal brain make the choices for us. But eventually, every serious creator reaches a crossroads. You want more control. You want to be the one who decides how the light dances across your sensor. You switch that dial to "M," and suddenly… everything goes wrong.
Your images are blurry, too dark, or so noisy they look like they were shot through a screen door.
Don't worry, dear hobbyists. This is an intrinsic part of the learning curve. Manual mode isn't just a setting; it’s a relationship between you, your gear, and the environment. If your manual mode shots aren't hitting the mark, it’s rarely because of the gear itself (though a Nikon D850 certainly helps). It’s usually a breakdown in the technical dialogue between your settings.
Let’s get down to the brass tacks and explore why your manual shots are failing and how you can reclaim your creative throne.
1. Shutter Speed Shakes and the Focal Length Rule
One of the most common reasons manual mode shots fail is a lack of reverence for shutter speed. We often focus so much on getting the "right" exposure that we forget that shutter speed is the heartbeat of the image. If it beats too slowly while you are holding the camera, the result is the dreaded "camera shake."
Even the steadiest hands have a limit. I have tried every breathing technique in the book, but physics always wins. A good rule of thumb: the 1/focal length rule: is your best friend here. If you are shooting with a 50mm lens, your shutter speed should be at least 1/50th of a second. If you’re zooming in with a 200mm lens, you need at least 1/200th to keep things sharp.
When the light is ephemeral and fading, you might be tempted to drop that shutter speed to let more light in. Resist the urge unless you have a tripod. Otherwise, you’re just inviting blur to the party.
2. The ISO Inhibition: Fear of the Grain
I see it all the time with fellow enthusiasts: a deep, almost primal fear of high ISO. We’ve been told for years that ISO is the enemy, that it "ruins" photos with digital noise. While it’s true that a lower ISO provides a cleaner canvas, an underexposed photo is a far greater tragedy.
If you are shooting in manual and your images are consistently dark because you refuse to move past ISO 100, you are setting yourself up for failure. In the digital darkroom: whether you use Luminar 4 or other editing software: brightening an underexposed image actually creates more noise and artifacts than if you had simply raised the ISO in-camera.
Think of ISO as the sensitivity of your soul to the light. When the light is dim, you must be more sensitive. Don't be afraid to push to 800, 1600, or even 3200 if it means getting a sharp, well-exposed frame. A little grain adds character; a blurry, dark mess adds nothing.
3. The Myth of the "Magic Setting"
Many beginners go online looking for the "best settings for landscape" or "best settings for portraits." They find a list, dial them into manual mode, and then wonder why their photos look terrible.
Here is the truth: there are no universal settings. Light is a paintbrush that is constantly moving. The sun dances behind a cloud, and your exposure changes. You move from the sidewalk to the shade of a building while practicing street photography, and your settings must adapt.
Manual mode requires you to be present. You cannot set it and forget it. If you’re looking for a "plug and play" experience, manual mode will only frustrate you. You must learn to read the light with your own eyes and adjust your three pillars: aperture, shutter speed, and ISO: in real-time.
4. Misunderstanding the "Stoic" Light Meter
Your camera has a built-in light meter, and in manual mode, it is your primary guide. However, that meter is programmed to see the world as 18% gray. If you point your camera at a pristine, snow-covered field, the meter will think, "This is too bright! I must make it darker (gray)." If you point it at a black velvet curtain, it will think, "This is too dark! I must make it brighter (gray)."
If you follow the meter blindly, your whites will look muddy and your blacks will look washed out. This is where you need to step in and exercise your creative authority. Learn to use Exposure Compensation or, better yet, understand your Metering Modes.
For example, when I'm shooting high-contrast scenes, I often switch to Spot Metering. This allows me to tell the camera exactly which part of the scene: perhaps the highlight on a subject's face: is the most important. Mastering this is a key step in mastering your camera in 2026.

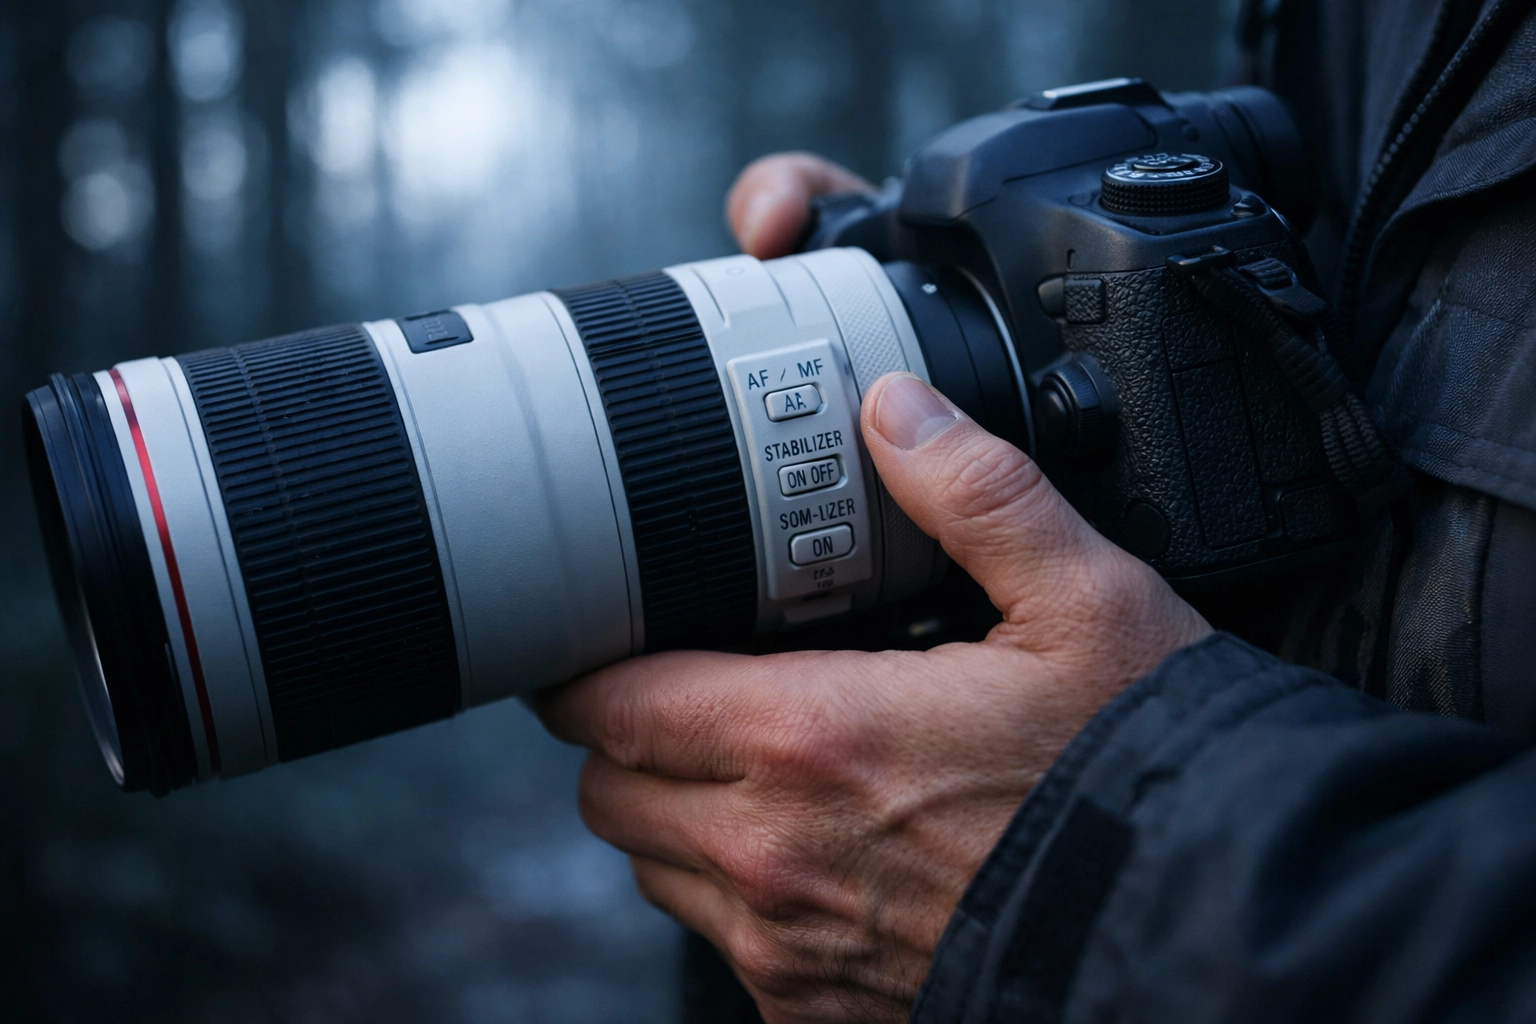
5. Stabilization Sabotage on Tripods
This is a technical "gotcha" that catches even seasoned pros. Many modern lenses and camera bodies feature Image Stabilization (IS) or Vibration Reduction (VR). These are "unsung heroes" when you are shooting handheld, as they compensate for your natural micro-movements.
However, when you mount your camera on a sturdy tripod, these systems can actually create blur. The internal sensors look for movement to compensate for, and when they find none, they can create a feedback loop of tiny vibrations.
Whenever you are using a tripod for something like an HDR tutorial or a long-exposure landscape, turn off stabilization. It feels counter-intuitive, but it’s the secret to getting those tack-sharp results you see on Edin Fine Art.
6. Aperture Ambiguity: More Than Just Blur
In the world of manual mode, aperture is often viewed simply as the "background blur" tool. While a wide aperture (like f/1.8) creates that ethereal bokeh we all love, it also drastically narrows your plane of focus.
If your manual shots are coming out with the nose in focus but the eyes blurry, your aperture is likely too wide for the situation. Conversely, if you're shooting a vast landscape and using f/22 to get "everything in focus," you might actually be losing sharpness due to a phenomenon called diffraction.
Every lens has a "sweet spot": usually between f/5.6 and f/11: where it performs at its peak. Understanding the intrinsic relationship between aperture and the story you are trying to tell is vital. Are you trying to isolate a single flower, or are you trying to capture the 7 mistakes you’re making with landscape photography? Choose your aperture with purpose.
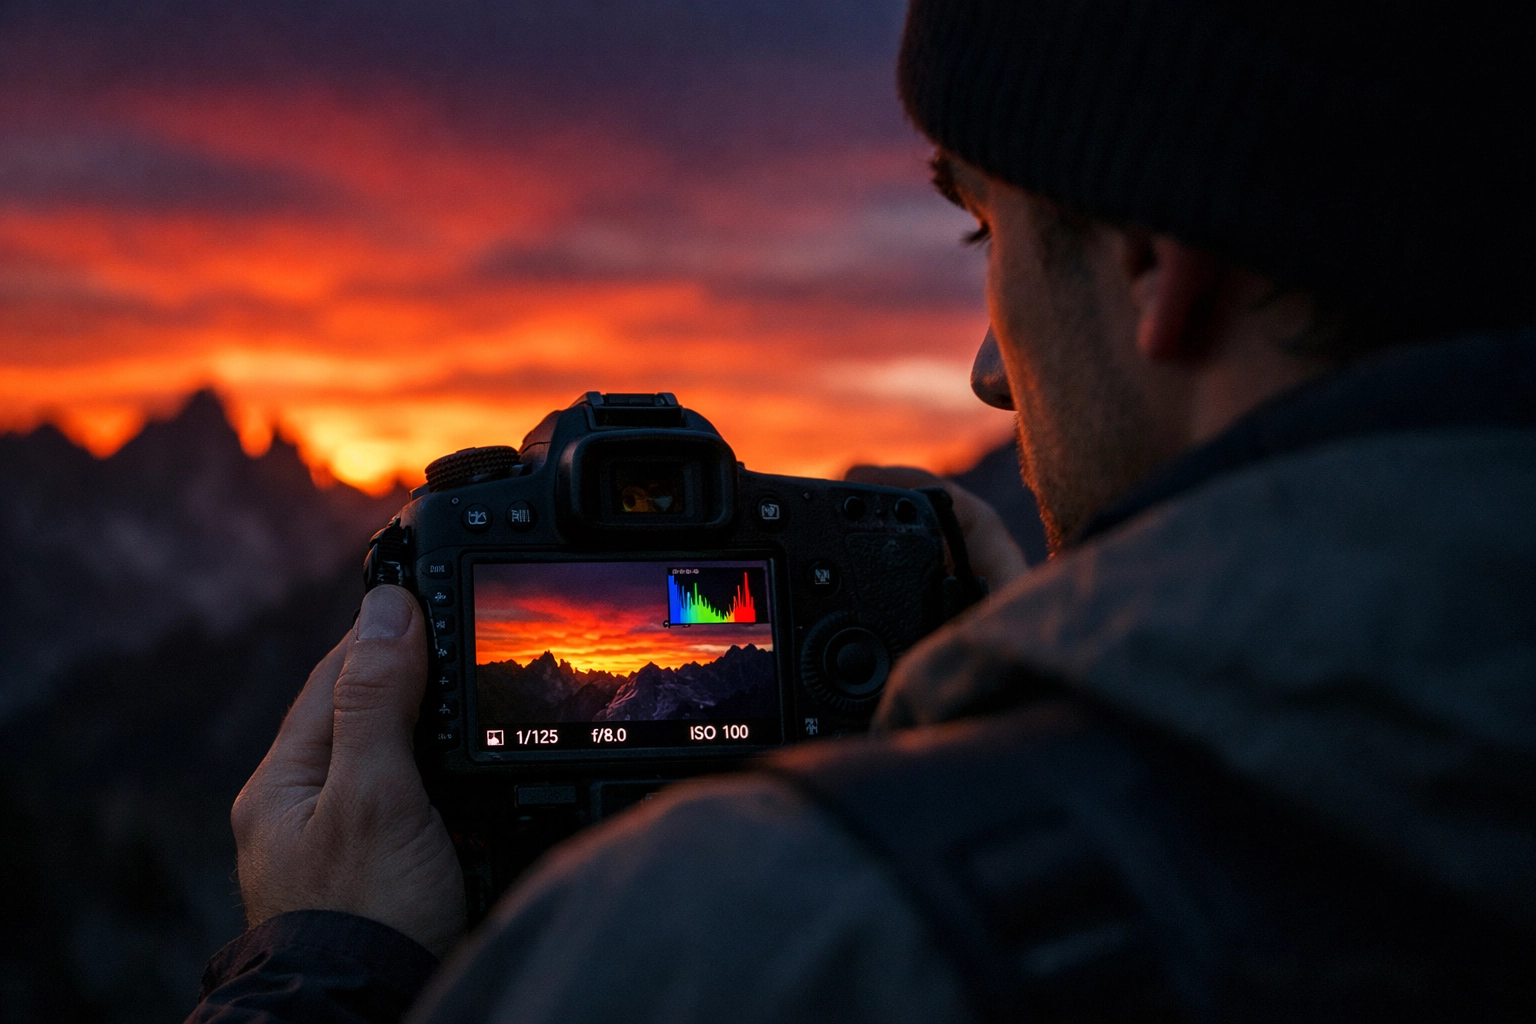
7. Ignoring the Histogram Canvas
If you are relying solely on the image preview on the back of your LCD screen to judge exposure, you are flying blind. Screens can be misleading: they look bright in the dark and dark in the sun.
The Histogram is your true North. It is a mathematical representation of the light hitting your sensor. If the "mountain" of the graph is smashed against the left side, you are losing detail in the shadows. If it’s smashed against the right, you are "blowing out" your highlights.
Learn to read the histogram like a map of your creative territory. It’s a game-changer for anyone wanting to take their work to a professional level, much like the techniques found at ProShoot.io.
8. White Balance Woes
While you can technically fix White Balance in post-processing (if you're shooting RAW, which you should be!), getting it wrong in-camera can make it very difficult to visualize your final result while in the field.
Manual mode gives you the power to set the "temperature" of the light. Auto White Balance often struggles with mixed lighting: like a room with both tungsten bulbs and natural window light. By manually selecting "Cloudy," "Sunlight," or a specific Kelvin temperature, you ensure that the mood of your photo matches the reality of the moment. Nothing compares to the warmth of a correctly balanced golden hour shot.
9. Focus Failures in the Manual Realm
When people talk about Manual Mode, they usually mean exposure, but sometimes they switch the lens to Manual Focus as well. Manual focusing is an art form, especially in macro photography or biolapse projects.
However, if you are struggling to get sharp shots, you might be overestimating your eyes. Use tools like Focus Peaking or the "Magnify" function on your mirrorless camera to ensure your subject is truly crisp. Don't let a "near miss" ruin a perfect composition. Sometimes, letting the camera's sophisticated autofocus do the heavy lifting while you control the exposure is the smartest move you can make.

10. The Burden of Perfection
The final reason your manual shots might not be working is simply that you’re using manual mode when you shouldn’t be.
I know, that sounds like heresy. But manual mode is a tool, not a badge of honor. In fast-paced environments: like a wedding or a professional headshot session where the light is changing: fiddling with dials can cause you to miss the "ephemeral" moment.
Professional photographers often use Aperture Priority or Shutter Priority. These modes allow you to control the most important variable while letting the camera’s powerful computer handle the rest. You can still use Exposure Compensation to tweak the result.
Venture forth and experiment, but remember: the goal is the image, not the setting.
Moving Beyond the Dials
Now that we’ve delved into the common pitfalls, it’s time to get down to the soul of the craft. Manual mode isn't about numbers; it’s about having a conversation with the world. It’s about looking at a scene and saying, "I want the shadows to feel heavy and stoic," or "I want the light to feel airy and ethereal."
When you master these technical hurdles, the camera stops being a barrier and becomes an extension of your vision. It becomes the paintbrush you use to color the canvas of your life.
If you're still feeling stuck, I highly recommend checking out some of our tutorials or watching our behind-the-scenes videos. There is a vast community of fellow enthusiasts here ready to help you grow.
Photography is a shared journey, a reverence for the world we inhabit. Each "failed" shot is simply a lesson in disguise. So, grab your gear, head out into the wild, and keep shooting. The light is waiting for you to capture it.
Drop me a line below if you have any questions or if there's a specific manual mode struggle you're facing: I'd love to hear from you! For more inspiration, you can always visit Edin Chavez’s blog or explore the stunning galleries at Edin Studios.


