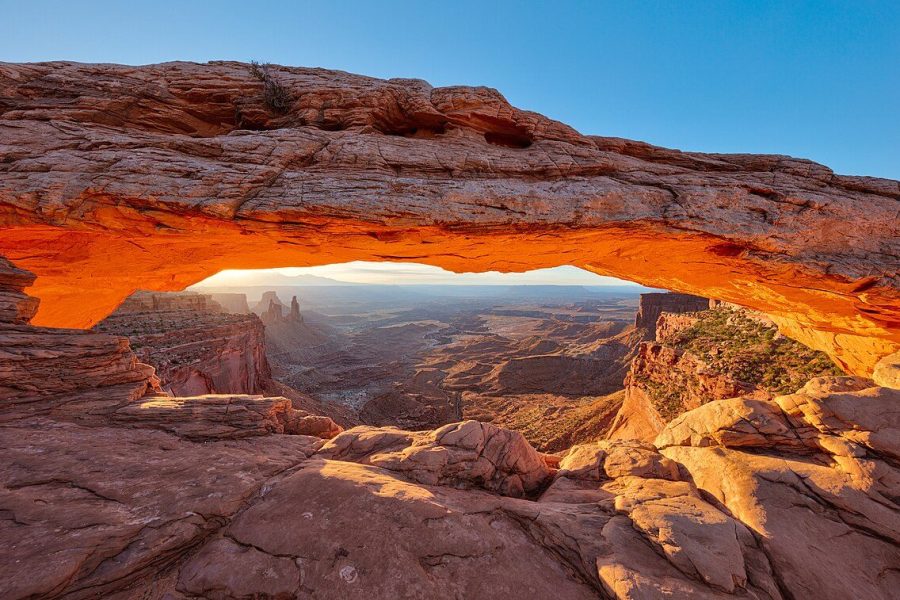
A professional real estate photographer delivers 25–40 edited images within 24 hours of a shoot. Achieving that turnaround consistently requires a systematized workflow — the same steps, the same order, the same quality checks every time. Here is the complete HDR preset workflow used by production real estate photographers, from SD card to MLS delivery.
For a tighter post-processing workflow that matches the look discussed below, see our Lightroom presets guide.
Step 1: Import Settings in Lightroom
Card import is where you make decisions that affect everything downstream. Set up your import dialog correctly once, save as a preset, and never think about it again.
 Save
SaveIn the Import dialog (Lightroom Classic):
- File Handling: Copy (not Move) — keeps the originals on your card until you confirm successful import and backup
- File Renaming: Custom Name + Date — format: YYYYMMDD_ClientLastName_### (e.g., 20260415_Johnson_001.CR3)
- Apply During Import → Develop Settings: “Real Estate Import Base” preset (see below for values)
- Metadata: A saved metadata preset with your copyright info, contact details, and website
- Destination: Jobs folder organized by Year → Month → ClientName
Real Estate Import Base Preset — Values
- Lens Profile Corrections: Enabled
- Remove Chromatic Aberration: Enabled
- Camera Calibration Profile: Camera Standard (or Camera Neutral for flatter starting point)
- Highlights: -20 (gentle initial highlight recovery for bracketed frames)
- Shadows: +10 (light lift to aid bracket selection)
- Everything else: 0
Step 2: Culling HDR Brackets
For HDR brackets (3 or 5 frames per composition), you need to identify and flag the usable bracket sets. Quick culling process:
- Switch to Grid view (G)
- Sort by Capture Time — brackets will appear as sequential groups
- Select all frames of each bracket set (typically 3 images with -2EV/0/+2EV markings visible in metadata)
- Flag the sets where all frames are sharp and the composition is correct (P for Pick)
- Reject obvious duplicates, blurry frames, or test shots (X to reject)
- Use Photo Mechanic for faster culling if volume exceeds 200 frames — its faster file rendering speeds up the cull significantly
Step 3: HDR Merge in Lightroom
For each bracket set:
- Select all frames in the bracket (Ctrl+click / Cmd+click)
- Right-click → Photo Merge → HDR (or Shift+Ctrl+H / Shift+Cmd+H)
- In the HDR dialog:
- Auto Align: On (handles slight movement between frames)
- Auto Settings: Off (you will apply your preset manually)
- Deghost Amount: Medium (handles curtain movement through windows, trees outside)
- Create Stack: On (keeps your bracket frames stacked with the HDR result)
- Click Merge — Lightroom creates a 32-bit floating point DNG file with the merged data
The merged HDR DNG retains full RAW editability. Every slider in the Develop module works normally — you are not working with a compressed, baked-in HDR file like a TIFF from Photomatix. This is a huge advantage of Lightroom’s HDR merge over traditional HDR software.
Step 4: Apply Your Real Estate Preset
With your HDR DNG selected, apply your real estate preset. A good real estate preset at this stage should set:
- Lens correction: already applied at import, but preset should confirm Enable Profile
- Transform: Upright = Auto (corrects verticals to start)
- Highlights: -60 to -80
- Shadows: +30 to +40
- Whites: -20 to -30
- Blacks: -10
- Texture: +15
- Clarity: +8
- Vibrance: +10
- White Balance: leave at As Shot (preserve the merged HDR WB from your shooting WB)
Step 5: Scene-Specific Adjustments
After your preset, every image requires some manual adjustment. The three most common adjustments for real estate HDR images:
Window Pull (if needed)
Create a mask (Masking → Select Sky works well for windows in many interiors, or use Luminance Range to select bright values 80–100). Within the mask, reduce Exposure by -1 to -2.5 stops. This pulls blown window areas down without affecting the darker interior.
Transform Fine-Tuning
After Auto Upright, check verticals manually. In many wide-angle interior shots, Auto Upright corrects the most obvious convergence but leaves subtle tilt or horizontal misalignment. Use the Guided Transform tool: click four points on vertical lines (wall edges, window frames) to force perfect vertical correction. Then check the Constrain Crop box to remove empty edges from the transform.
Color Temperature Fine-Tune
Most real estate interiors have mixed lighting (warm LED recessed lights, cool window daylight). Your target: the walls should look white or cream (not yellow/green/blue). Adjust Temp and Tint until wall colors look neutral, then use the HSL panel to selectively warm wood floors (Hue/Saturation on Orange/Yellow channels) without affecting walls.
Step 6: Export for MLS Delivery
Create a saved Export Preset named “MLS Delivery [Market]” with:
- Format: JPEG, Quality: 92
- Color space: sRGB
- Resize to Fit: Long Edge, 3000 pixels
- Resolution: 72 PPI
- Output Sharpening: Screen, Standard
- Export Location: Same folder as originals, subfolder “DELIVERY”
- File Naming: ClientLastName_###_MLS (e.g., Johnson_001_MLS.jpg)
Select all HDR DNG files for the job (not the bracket originals), apply the MLS Delivery export preset, and export. A typical 30-image real estate job exports in 2–3 minutes.
Total Workflow Time Target
| Step | Time per Job (30 images) |
|---|---|
| Import + metadata | 5 minutes |
| Culling | 10 minutes |
| HDR merge (30 sets) | 15–20 minutes (can batch and walk away) |
| Preset application | 2 minutes |
| Scene adjustments (30 images) | 30–45 minutes |
| Export | 3 minutes |
| Total | ~75 minutes |
For shooting the brackets that feed this workflow, see our real estate camera settings guide. For the Lightroom presets that power the edit, see our best Lightroom presets for real estate roundup.
Skylum’s Luminar Neo runs as a Lightroom plugin and adds AI-powered sky replacement, portrait retouching and noise reduction to your existing workflow. Tagged as affiliate per FTC.
Frequently Asked Questions
How do I merge HDR brackets in Lightroom?
Select all bracket frames, right-click → Photo Merge → HDR (Shift+Ctrl+H). Set Auto Align: On, Auto Settings: Off, Deghost: Medium. Lightroom creates a 32-bit DNG with full RAW editability.
How long should real estate photo editing take?
A systematized workflow for a 30-image job should take approximately 75 minutes from import to delivery: 5 min import, 10 min culling, 20 min HDR merge (unattended), 45 min scene adjustments, 3 min export.
Should I use Lightroom HDR merge or Photomatix for real estate?
Lightroom HDR merge is preferred — it produces a 32-bit DNG with full RAW editability. Photomatix produces a finished TIFF with limited further adjustment. The Lightroom workflow is faster, more flexible, and stays within one application.
What file naming convention should I use for real estate deliveries?
Date + client + number: YYYYMMDD_ClientName_###. For MLS delivery: ClientName_###_MLS.jpg. Easy to sort, identify, and re-deliver months later.
How do I handle mixed lighting in real estate editing?
Target neutral walls first with Temp/Tint. Then use the HSL panel’s Orange and Yellow channels to selectively warm wood tones without affecting walls. Use local masks for areas where global WB cannot fix both zones simultaneously.