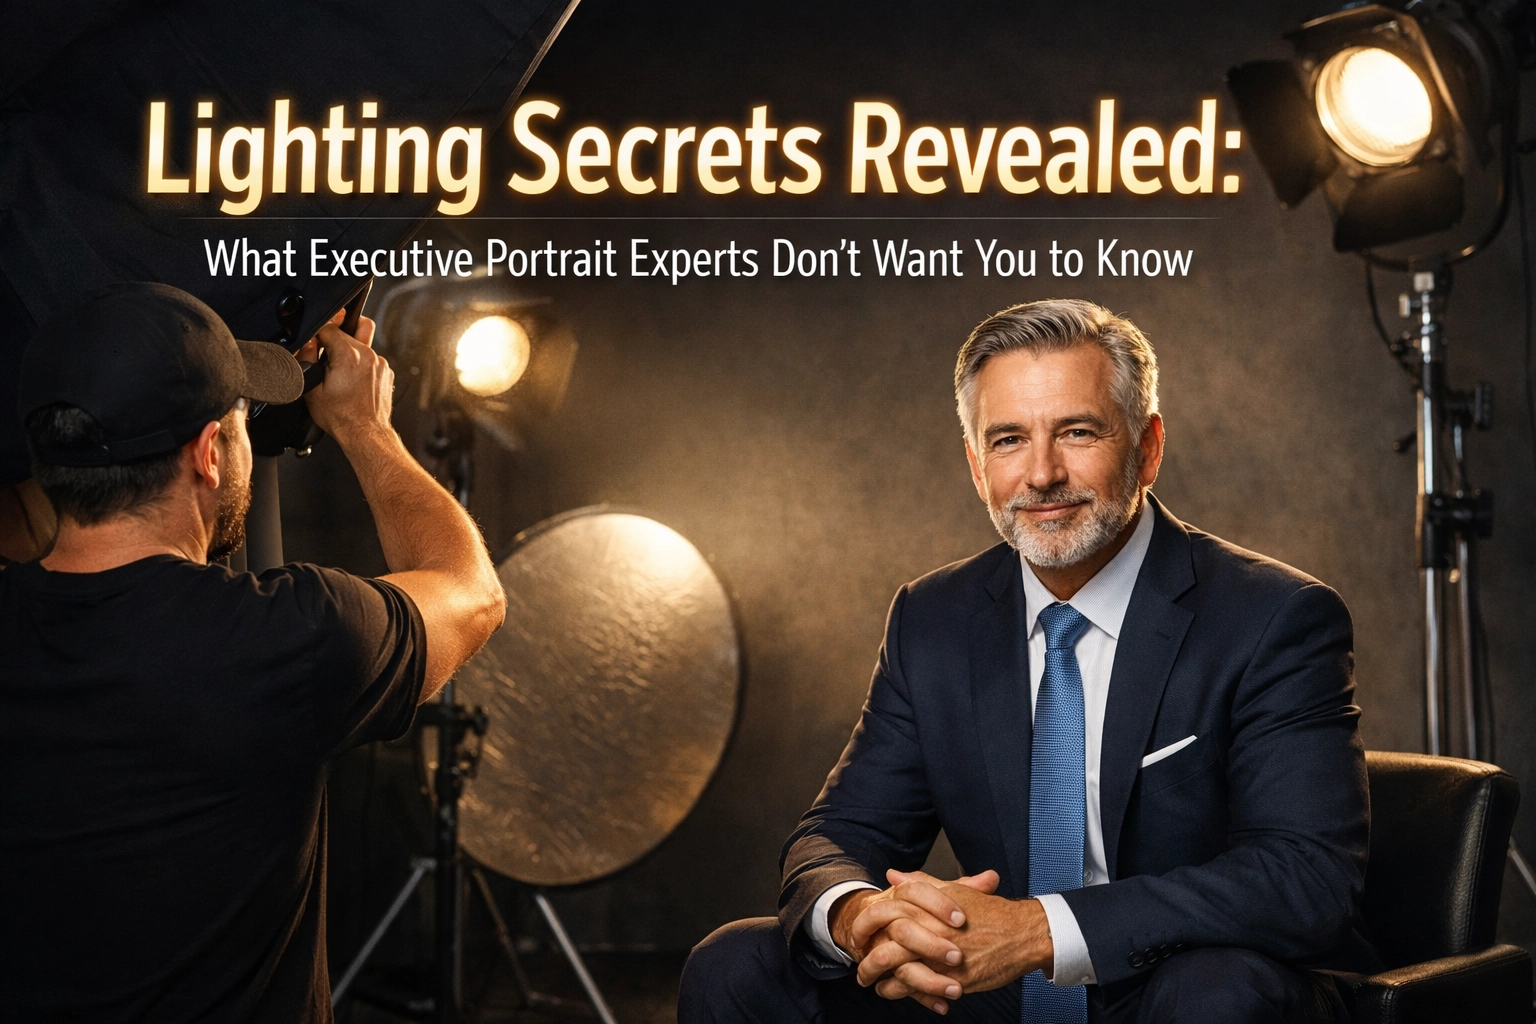
Let’s be real for a second. You’ve seen those high-end executive portraits: the ones where the CEO looks like they just stepped off the cover of Forbes with an air of authority, confidence, and just the right amount of approachability. You look at your own LinkedIn photo, taken against a beige wall with a smartphone flash, and you wonder: What am I missing?
Most people think it’s the camera. They think if they drop five grand on a Sony or a Canon, they’ll magically look like a titan of industry. I hate to break it to you, but the camera is probably the least important part of the equation. The "secret" that high-end portrait photographers don't always broadcast is that it’s all about the light.
Lighting is the difference between looking like a professional leader and looking like you’re being booked into the local precinct. Today, I’m pulling back the curtain on the best lighting for executive portraits and sharing the professional corporate headshot tips that the pros usually keep to themselves.
The Psychology of Light in Business
Before we get into the gear, we have to talk about the "why." Light isn't just about visibility; it’s about psychology. In the world of executive portraits, we aren't just taking a picture of a face; we are building a brand.
A shadow in the wrong place can make someone look untrustworthy or tired. Light that’s too harsh can make an executive look aggressive or stressed. On the flip side, soft, directional light can convey wisdom, stability, and success. This is why understanding professional corporate headshot tips is essential for anyone looking to level up their professional presence.
The Power of the Key Light
The "Key Light" is exactly what it sounds like: it’s the primary source of illumination. In executive photography, the secret isn't just having a bright light; it's where you put it.
Most experts use the "11 o'clock" or "1 o'clock" rule. If you imagine a clock face on the floor with the subject at the center, the light should be placed at an angle rather than directly in front of them. This creates a subtle shadow on the opposite side of the face, which adds dimension and prevents the "flat" look that makes people look heavier than they are.
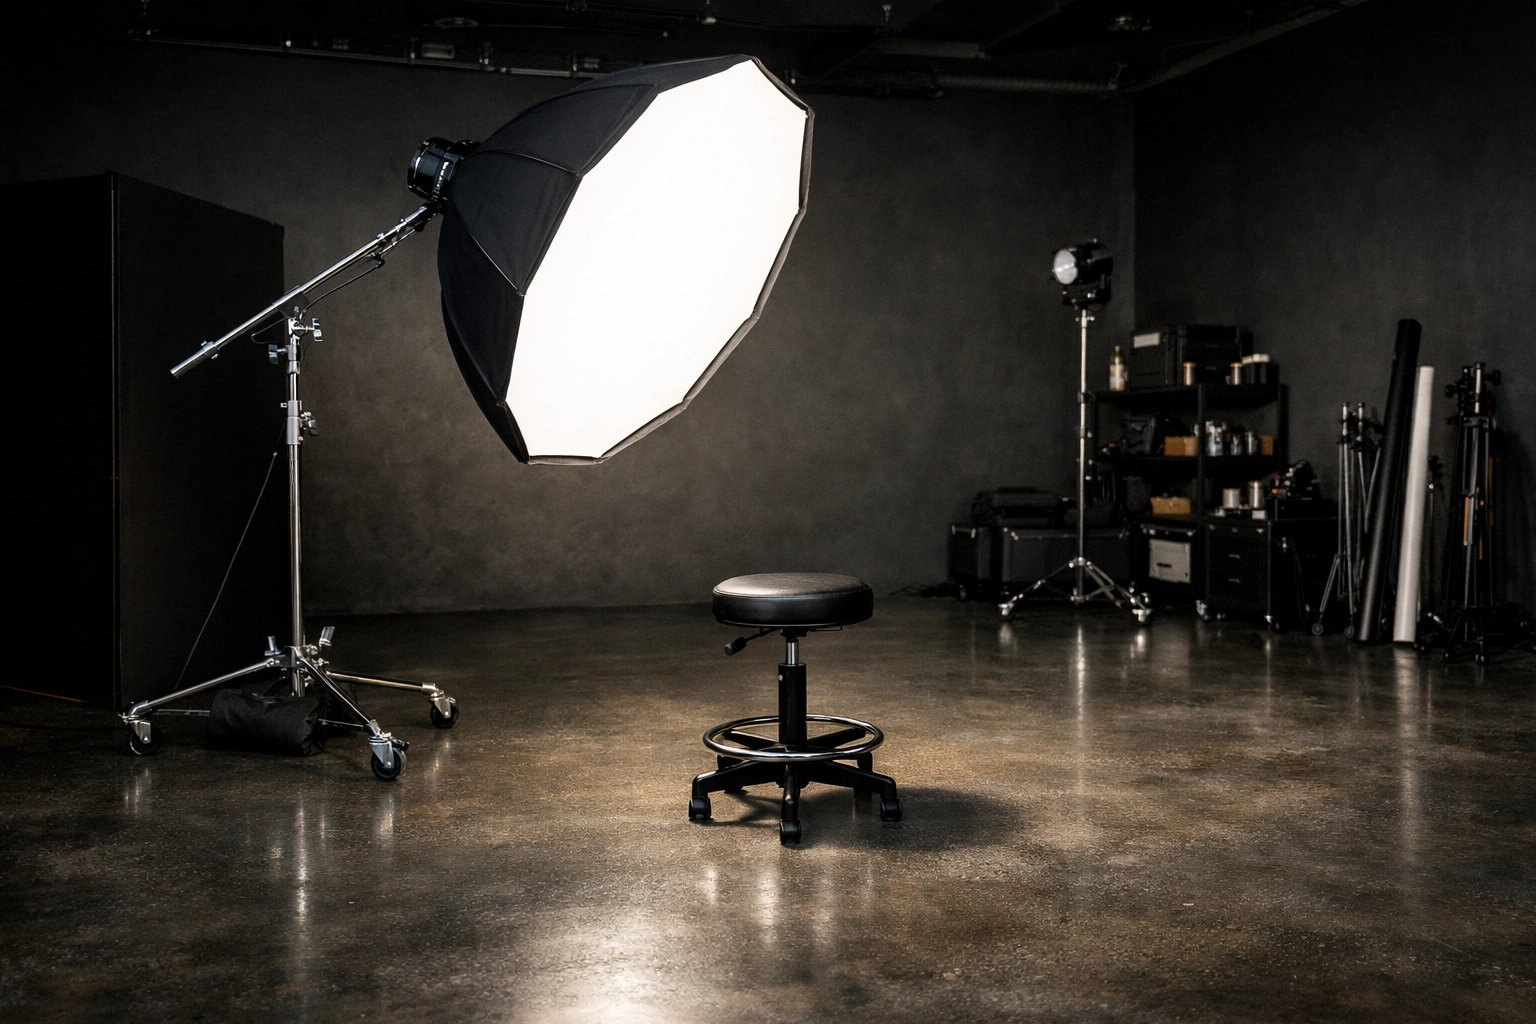
Alt-text: A professional lighting setup in a studio featuring a large softbox positioned at a 45-degree angle to a subject, creating a classic corporate lighting look.
Why "Flat" Light is a Career Killer
In a world of ring lights and zoom calls, we’ve become addicted to flat lighting. Flat lighting is when the light hits the face directly from the front, filling in every shadow. While this can hide wrinkles (which is why beauty vloggers love it), it also hides character and jawlines.
For an executive portrait, you want structure. You want to see the shape of the face. Experts use a technique called "Short Lighting." This is when the side of the face turned away from the camera is the one being lit. It makes the face look slimmer and more chiseled. If you’re wondering how to prepare for a headshot session, start by practicing your "good side" in the mirror with a single lamp to see how shadows define your features.
The Secret of the Catchlight
If you look closely at a world-class portrait, you’ll see a tiny spark of light in the subject’s eyes. These are called catchlights.
Without catchlights, the eyes look "dead" or "flat." It’s a subtle thing, but the human brain picks up on it instantly. Portrait experts use specific modifiers: like large octaboxes or beauty dishes: to ensure that the catchlight is positioned in the upper half of the iris. It gives the subject a "spark" of intelligence and life.
When you’re learning the ultimate guide to photography tutorials, mastering catchlights is often the "ah-ha" moment for many students.
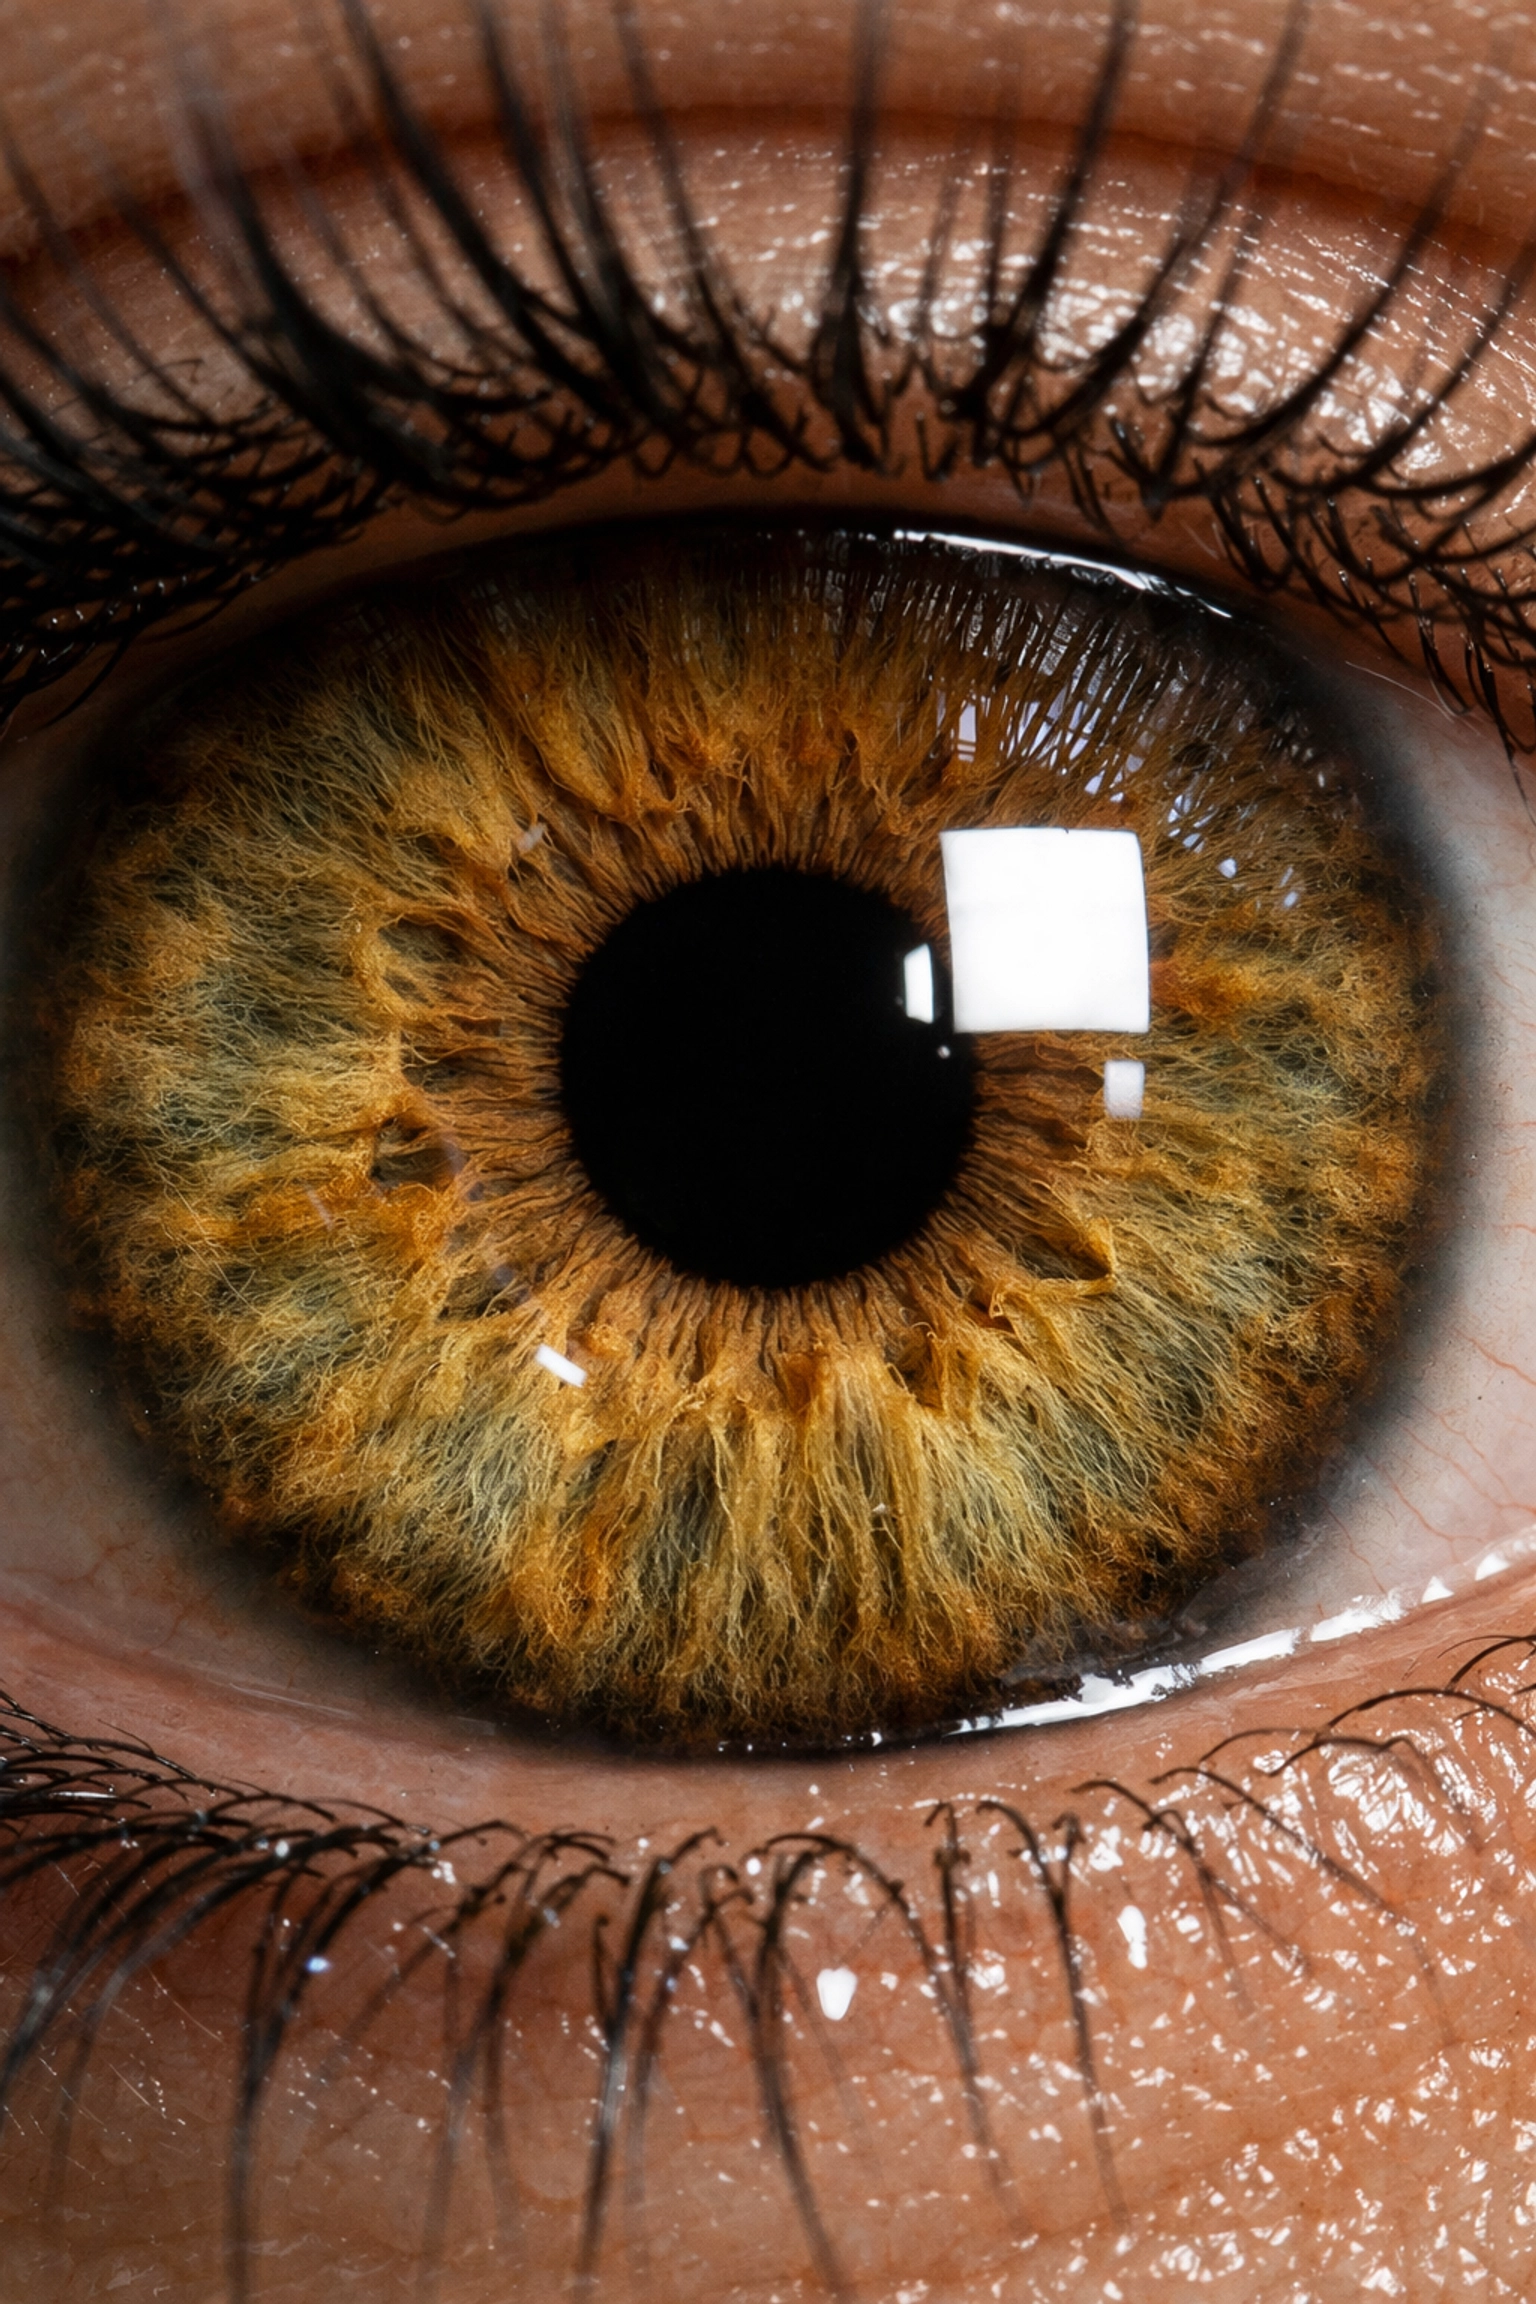
Alt-text: Close up of a man's eyes in a professional headshot showing a clear, bright catchlight that adds life and energy to the portrait.
The Fill Light: Controlling the Drama
While the Key Light does the heavy lifting, the Fill Light is what separates the amateurs from the pros. The Fill Light is used to "fill in" the shadows created by the Key Light.
The secret here is the ratio. If the Fill Light is too strong, you’re back to flat lighting. If it’s too weak, the shadows are too dark, making the executive look like a villain in a noir film. For a standard corporate look, you want a ratio that keeps the shadows visible but detailed.
Sometimes, experts don't even use a second light. They use a "reflector": a simple white or silver board: to bounce some of the Key Light back onto the shadowed side of the face. This creates a natural, soft transition that looks expensive without being over-the-top. You can find more gear insights at PhotoGuides.org.
Backlighting and Separation
Have you ever noticed how a professional portrait seems to "pop" off the screen? That’s not a Photoshop trick (well, not entirely). It’s usually a result of a "Kicker" or "Rim Light."
This is a light placed behind the subject, off to the side, aimed back at the head and shoulders. It creates a thin line of light along the hair and suit jacket, which separates the person from the background. Without this, an executive wearing a dark navy suit can easily blend into a dark background, making them look like a floating head.
If you are shooting in a studio, this is a non-negotiable. If you're working on your own setup, check out this ultimate guide to event photography gear to see how different lights play together in a professional environment.
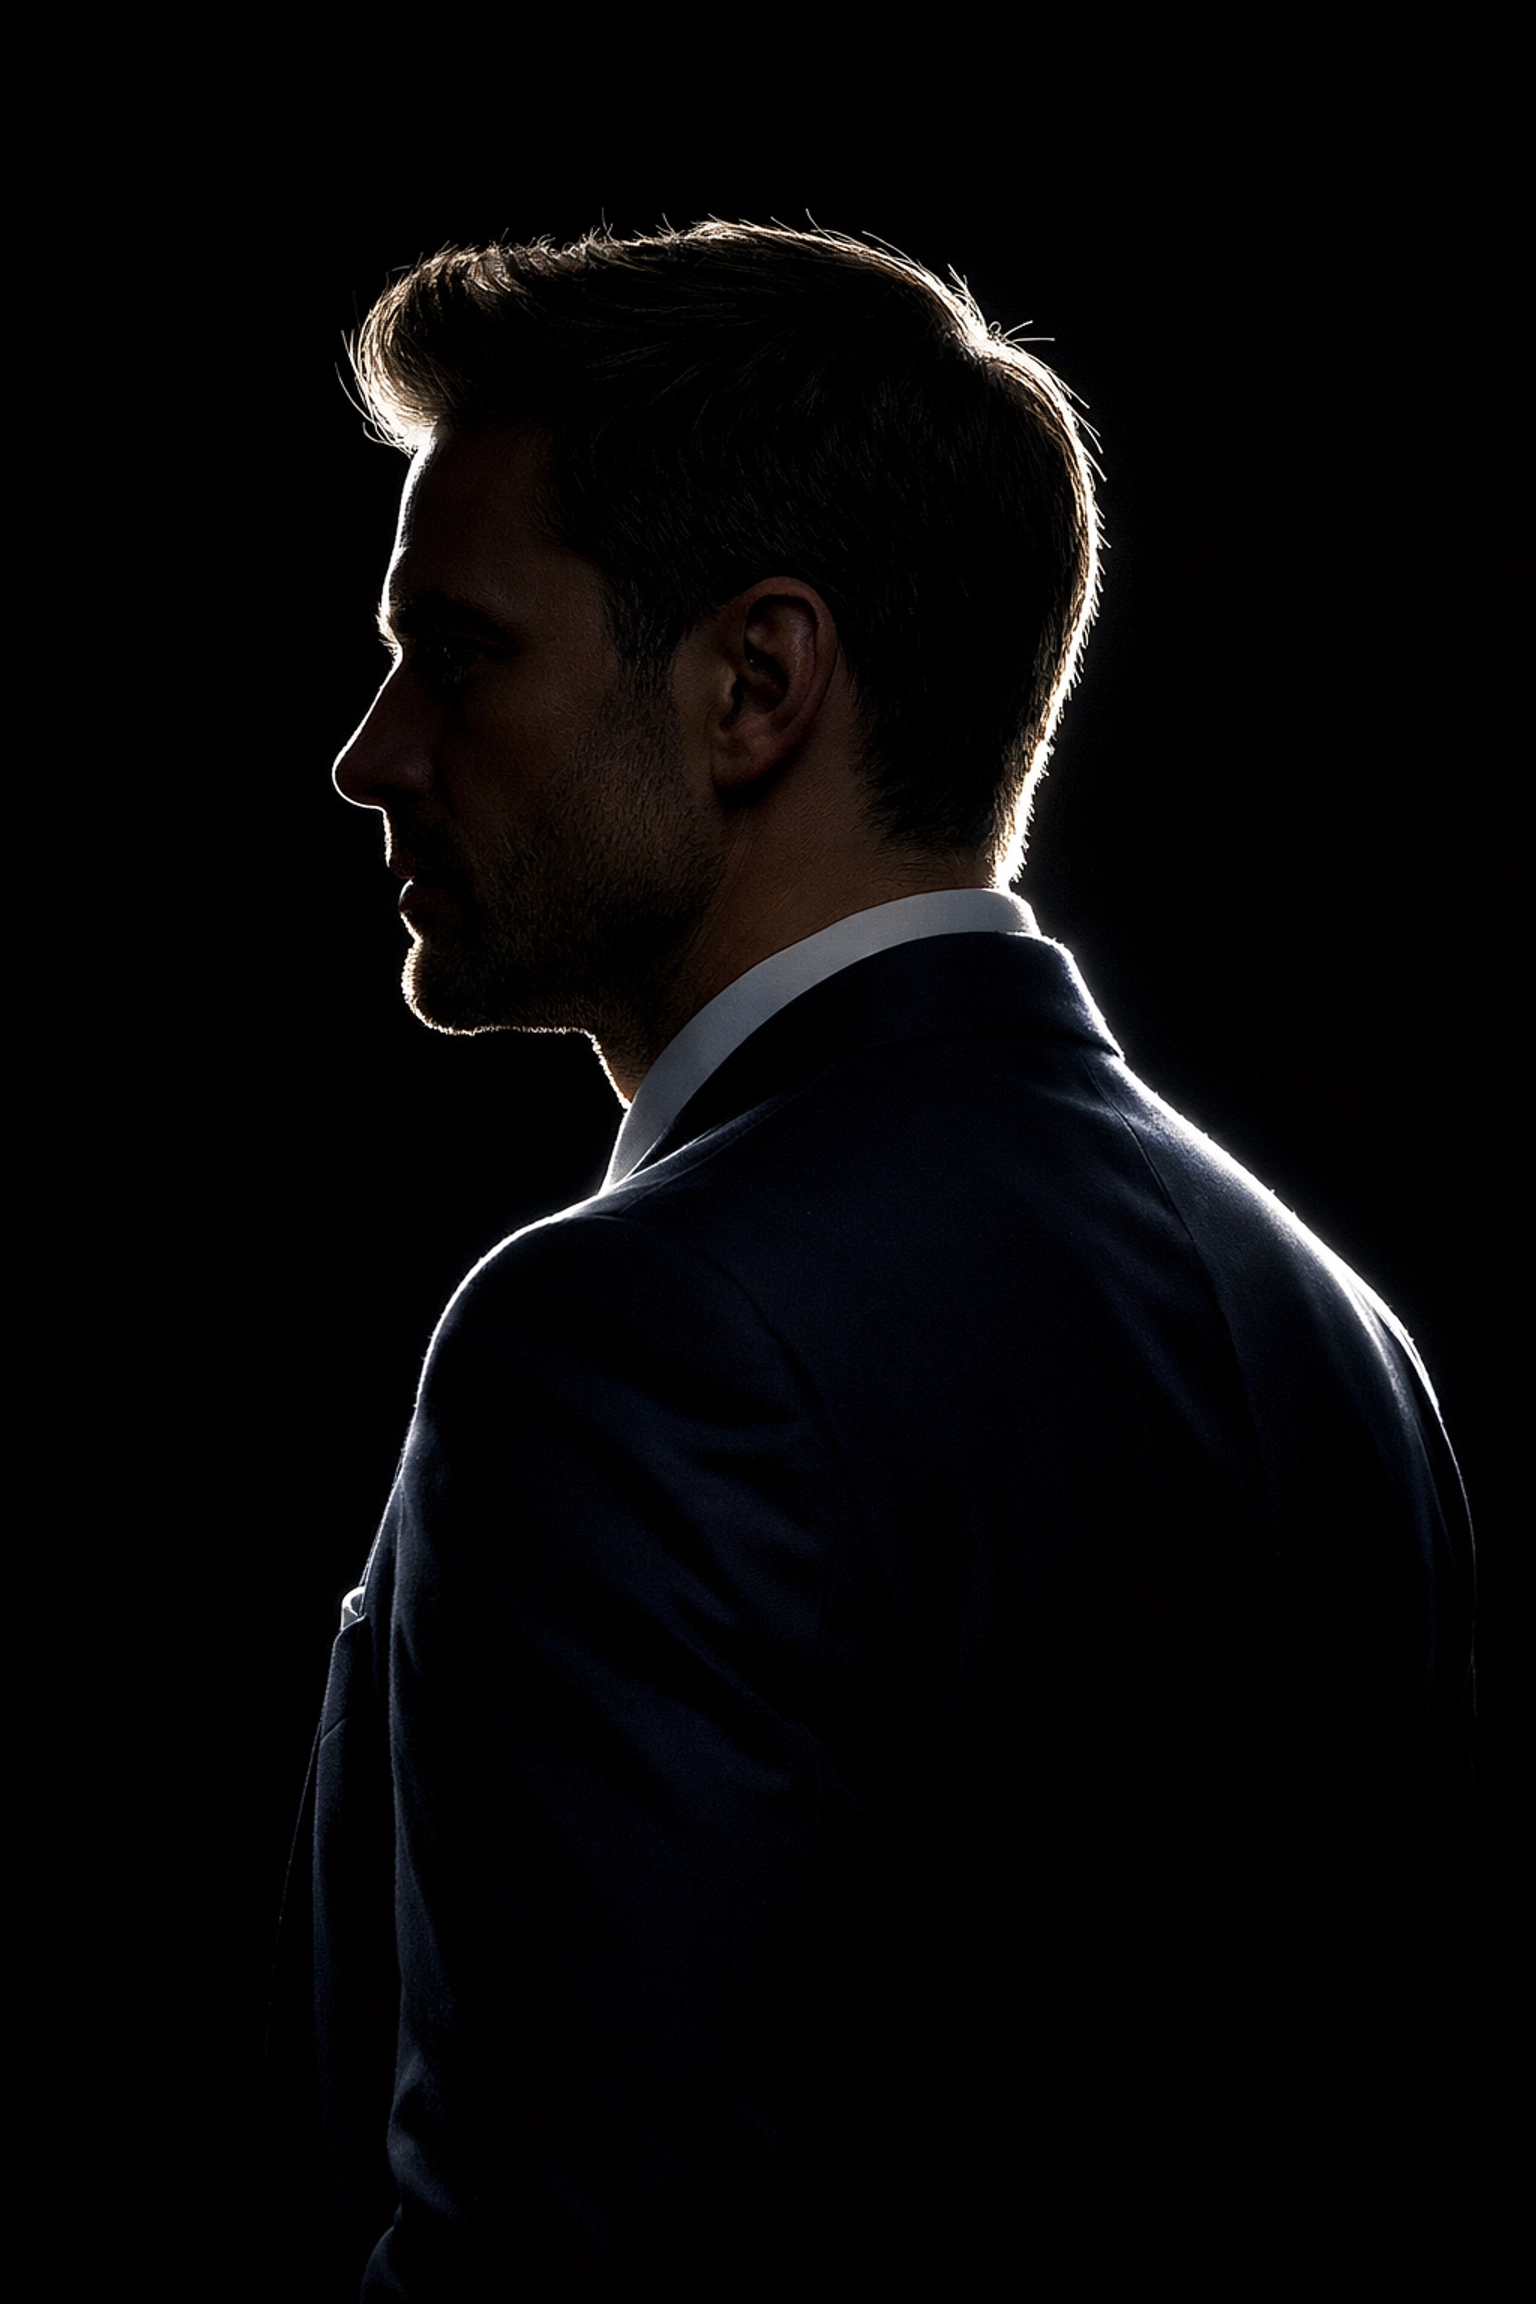
Alt-text: A behind-the-scenes view of an executive portrait session showing a rim light creating a halo effect around the subject's hair for background separation.
Modifiers: Size Actually Matters
If you walk into a pro studio, you won't see bare lightbulbs. You’ll see giant white "tents" or umbrellas. These are modifiers. The rule of thumb is simple: the larger the light source relative to the subject, the softer the light.
Hard light (like the sun at noon) creates harsh shadows and highlights every pore and blemish. Soft light (like a cloudy day or a 60-inch softbox) wraps around the face, smoothing out skin textures and creating a healthy glow. For the best lighting for executive portraits, bigger is almost always better. It’s the most forgiving way to light a human being.
Lighting for Different Skin Tones
This is a "secret" many experts don't talk about enough: you cannot light every person the same way.
Deep skin tones reflect light differently than pale skin tones. For subjects with darker skin, photographers often use larger modifiers and pay closer attention to "specular highlights": the shiny bits of light on the skin: to define the shape of the face without making it look "ashy." It’s a delicate balance that requires a pro’s eye. If you want to see how this looks in practice, check out the galleries at Perfect Corporate Headshots.
The "Outdoor" Executive Look
Not every executive wants to look like they are in a studio. Many prefer the "environmental" look: standing in a modern office or on a city balcony.
The secret here? Experts still use lights.
Even if it looks like natural light, there is almost certainly a flash or a reflector involved to balance the sunlight. The goal is to make the subject slightly brighter than the background. This guides the viewer’s eye exactly where it needs to go: to the face. If you’re trying to replicate this, learning how to manipulate light in post-production is key. Tools like Luminar are fantastic for enhancing natural light and adding that "sun-kissed" glow after the fact.

Alt-text: An executive standing in a high-rise office with a city background, lit perfectly to stand out against the bright windows.
How to Prepare for a Headshot Session
If you’re the one being photographed, the lighting is the photographer's job, but you can help them out. Here are a few professional corporate headshot tips to make the lighting work for you:
- Moisturize: Well-hydrated skin catches the light better and looks healthier.
- Avoid Reflective Clothing: Shiny fabrics can create weird hotspots under studio lights. Stick to matte wools or cotton.
- Watch the Glasses: If you wear glasses, the photographer has to work around "glare." High-quality anti-reflective coatings are a lifesaver.
- Trust the Process: Sometimes a lighting setup looks weird from where you’re standing, but it looks like magic through the lens.
For more deep dives into the technical side of photography, I always recommend checking out blog.edinchavez.com or www.proshoot.io for professional workflows.
Post-Processing: The Final 10%
Even with the perfect lighting, every executive portrait needs a little bit of polish. This isn't about making someone look like a different person; it’s about removing distractions.
Photographers will use software to subtly enhance the eyes, soften skin textures, and ensure the color of the light is consistent. While we often talk about mastering night sky filters in Photoshop or creating custom cloud brushes in Photoshop, the retouching for portraits is much more surgical.
I personally love using Luminar for quick, AI-driven portrait enhancements. It can handle things like "Iris Enhancement" and "Skin Softening" in seconds, allowing you to focus on the creative side of the shoot rather than spending hours clicking on blemishes.
If you're more into creative compositing, you might enjoy learning about crafting skies in Photoshop or even creating a shooting star effect in Photoshop, though maybe keep the shooting stars out of your corporate headshot!
Why This Matters for Your Brand
In 2026, your digital presence is your first impression. Whether someone finds you on LinkedIn, your company website, or a press release, they are judging your competence based on your photo.
Cheap lighting says you don't care about details. Professional, expert-level lighting says you are a leader who understands the value of quality. It’s an investment in your career.
If you’re looking to get this done right, don’t just hire "someone with a camera." Hire someone who understands the lighting for executive portraits. You can see examples of top-tier work over at www.edinstudios.com or www.edinfineart.com.
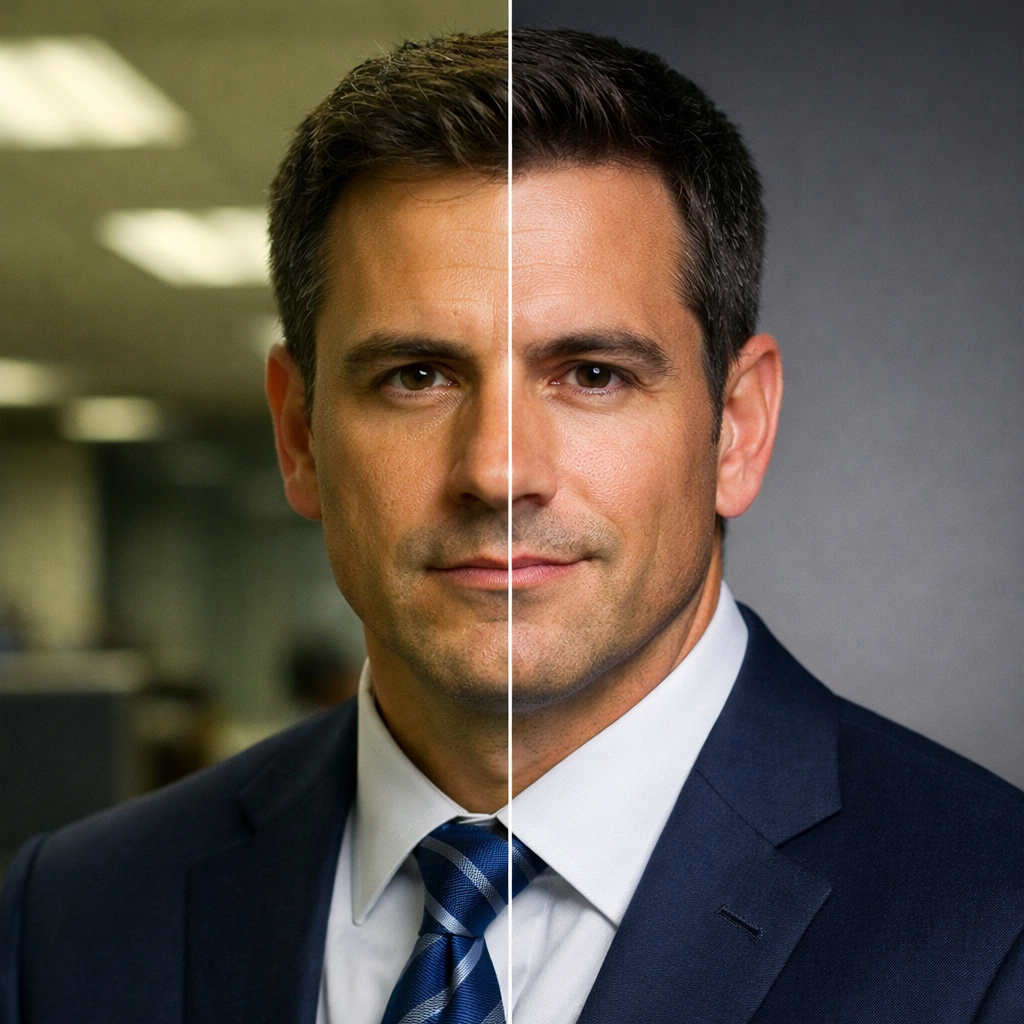
Alt-text: A side-by-side comparison of a poorly lit headshot versus a professionally lit executive portrait, highlighting the difference in confidence and quality.
Bringing It All Together
The "secrets" of executive portrait lighting aren't actually magic: they are a combination of physics, psychology, and the right gear. By understanding the importance of the key light angle, the necessity of catchlights, and the power of soft modifiers, you can transform a basic photo into a high-impact branding tool.
Remember:
- Position your main light at an angle, not straight on.
- Use a large softbox for that "expensive" skin look.
- Don't forget the rim light to separate you from the background.
- Polish it off with a tool like Luminar to make it shine.
Ready to take the next step? Whether you’re a photographer looking to improve your craft or an executive looking for the best in the business, check out Perfect Corporate Headshots for the gold standard in the industry. And for more tips on everything from sky replacement in photoshop to dynamic sky creation, keep it locked right here.
Now, go out there and stop shutting your aperture on your own potential. The right light is waiting for you.