Pair this with our Lightroom presets guide if you want a one-click base look before fine-tuning.
Let’s be honest: the word "AI" in photography usually triggers one of two reactions. You’re either thrilled that you might finally get eight hours of sleep instead of retouching pores, or you’re terrified that every person you photograph is going to end up looking like a smooth, plastic mannequin from a 90s shopping mall.
We’ve all seen those portraits. You know the ones, the skin is so smooth it looks like it was rendered in a video game from 2005, the eyes glow like they’re powered by nuclear fusion, and the subject’s soul seems to have been deleted in the latest software update.
At Shut Your Aperture, we believe photography is about the human connection. But we also live in 2026, and we know that AI is here to stay. The goal isn't to ignore the tech; it's to master it so it works for you, not against you. If you want to speed up your workflow without losing the "human" look, you need a hybrid approach.
The Identity Crisis of Modern Portraits
The problem isn't AI itself; it’s how we use it. When digital photography first hit the scene, people over-processed images with "selective color" (remember the red rose in the black-and-white photo? Yeah, we’re sorry too). AI is in its awkward teenage phase. It’s powerful, but it doesn't always have taste.
A "human" look is defined by imperfections. It’s the slight asymmetry in a smile, the texture of the skin, the stray hair that shows the wind was blowing, and the depth in the eyes. When AI "corrects" all of these things at once, it flattens the personality of the subject.
To avoid this, we have to treat AI as an assistant, not the lead artist. You wouldn't let an intern finish a high-end gallery print without checking it, right? Same rule applies here.
Classic Techniques are Non-Negotiable
Before we even touch a slider in Luminar or Photoshop, we have to talk about the foundation. You cannot "AI" your way out of a bad photo. Well, you can, but it’ll look like garbage.
Classic portraiture relies on three things: lighting, posing, and connection.
- Lighting: If you use flat, boring light, AI is going to have a hard time finding the "shape" of the face. This leads to that dreaded "flat" look. Stick to your Rembrandts, your loops, and your butterfly lighting. Good shadows give AI the data it needs to enhance, rather than replace.
- Posing: AI can’t fix a subject who looks uncomfortable. A stiff neck or a forced smile is a human problem that requires a human solution.
- Depth of Field: While AI can simulate bokeh now, nothing beats the organic fall-off of a fast prime lens.
If you get these right in-camera, your retouching becomes a breeze. For more on the fundamentals of gear and how it’s evolving, check out our piece on photography news and gear updates.

The "Soul" of the Image: Eyes and Texture
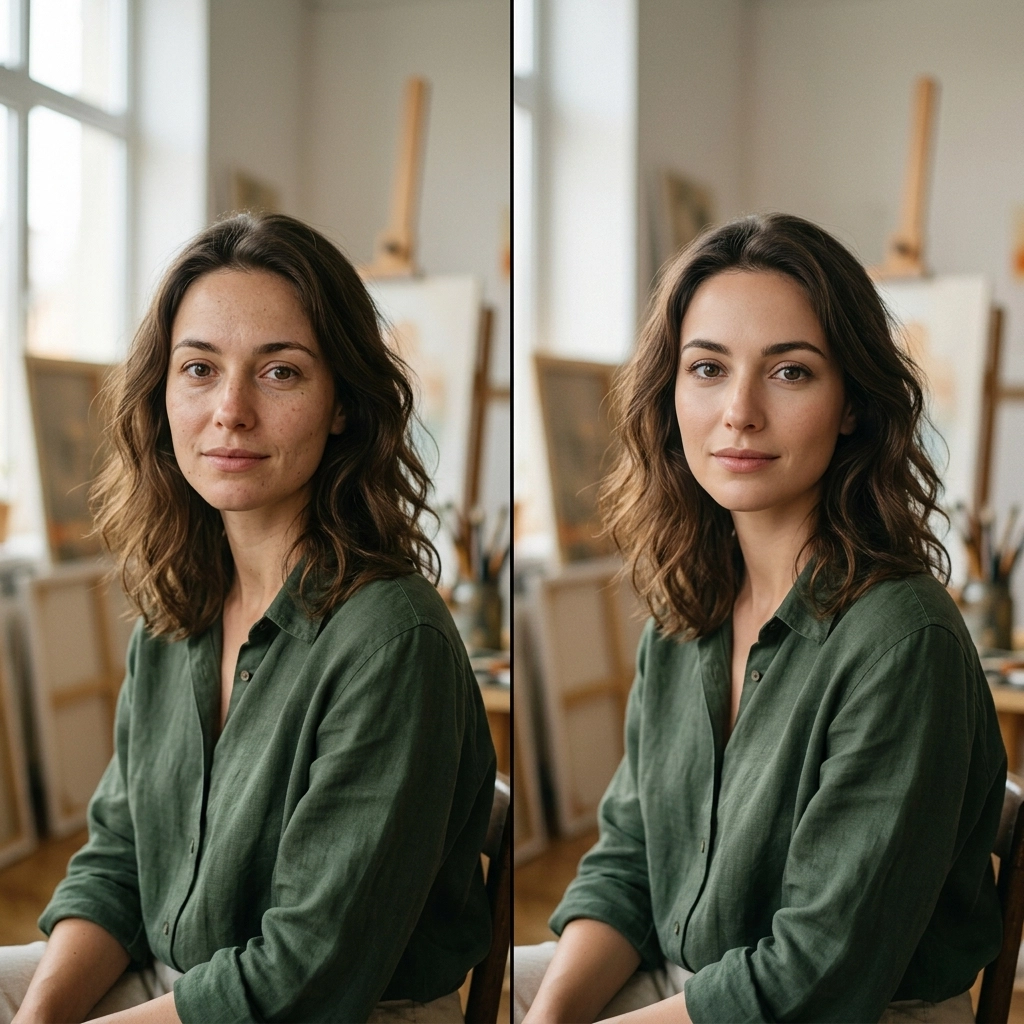
The two biggest giveaways of a "fake" AI portrait are the skin texture (or lack thereof) and the "dead" eyes.
Preservation of Pores
The "porcelain skin" look is the enemy of authenticity. When you use AI retouching tools, the first thing you should do is dial it back. If the software suggests 80% smoothing, try 30%. You want to even out the skin tone, not eliminate the skin’s surface.
In tools like Luminar, the Skin AI is incredibly smart because it separates skin defects from skin texture. It’s a game-changer. Instead of just blurring everything, it looks for blemishes and leaves the pores alone. This is how you keep someone looking like a person and not a wax figure.
The Eyes Have It
AI loves to make eyes "pop." It’ll brighten the sclera (the white part) and sharpen the iris until it looks like a gemstone. While a little bit of this is great, too much makes the subject look possessed.
When working on eyes, always look at the catchlights. If the AI adds artificial catchlights that don't match your light source, delete them. The eyes should reflect the environment the person was actually in.
The Hybrid Workflow: Step-by-Step
So, how do we actually do this? Here is the workflow I use at Shut Your Aperture to keep things fast but soulful.
1. The Raw Foundation
Start in your favorite RAW processor. I’m a big fan of getting the white balance and exposure perfect first. Don't let AI touch the color grading yet. You want a clean, honest slate. For great technical guides on RAW processing, I always recommend Shut Your Aperture.
2. The AI "Heavy Lifting"
Now, we bring in the AI. I use Luminar for this because its Portrait tools are built specifically for this hybrid balance.
- Face AI: Use this to subtly slim the face or enhance the jawline if the lens distortion messed with the proportions. Keep it under 10%.
- Skin AI: Use this for blemish removal. It saves hours of healing brush work.
- Structure AI: Be careful here. Use it selectively on things like hair or clothing to add detail, but keep it away from the skin.
3. The Human Touch (Manual Refinement)
This is where the magic happens. After the AI has done the grunt work, I go back in manually.
- Dodge and Burn: This is a classic technique that AI still hasn't quite mastered with the same "feeling" as a human. Use a low-opacity brush to manually emphasize the highlights on the cheekbones and the bridge of the nose.
- Selective Sharpening: Don't sharpen the whole image. Only sharpen the eyes, the lips, and maybe a few strands of hair.
- The "Flaw" Check: I intentionally leave in a tiny "imperfection", maybe a small mole or a slightly crooked hair. It signals to the viewer’s brain that this is a real photo of a real human.
Why You Should Coordinate with Your Social Media Manager
I was chatting with Sonny, our Social Media Manager, about this the other day. He noticed that our followers engage way more with portraits that feel "real." Photos that are too polished get scrolled past because they look like AI-generated stock art.
If you're a pro photographer, you need to sync up with your social team. Sonny uses the "raw" behind-the-scenes clips to show the human side of the shoot, which makes the final, polished (but still human) portrait feel more earned. It builds trust with your audience. When people see the work that goes into the "look," they appreciate the technology rather than fearing it.
AI Masking: Your New Best Friend
One of the best things to come out of the AI boom is intelligent masking. In the past, masking a subject's hair was a nightmare that involved a lot of coffee and frustration.
Now, with AI masking in tools like Lightroom and Luminar, you can select the subject, the background, or even just the "teeth" with one click. This allows you to apply your manual techniques to specific areas without the AI doing the actual creative work. You're using AI for the "selection," but you’re still the one making the "decision" on color and tone.
This keeps the human look because you aren't applying a global filter. You’re treating every part of the portrait with the individual attention it deserves. For more personal stories on how technology has changed the way I see the world, check out blog.edinchavez.com.
The Psychology of the Portrait
Portraiture is a psychological game. When someone sits in front of your lens, they are vulnerable. They are trusting you to show them at their best.
If you deliver a photo that looks nothing like them, even if it's "technically perfect", you've failed the human element of the job. I’ve seen photographers lose clients because they "beautified" them so much the client didn't recognize themselves.
The best use of AI is to remove the distractions (stray hairs, temporary blemishes, sensor dust) so that the subject's true self can shine through. If the person had a giant zit on their forehead on the day of the shoot, they want that gone. But if they have laughter lines around their eyes? They earned those. Leave them in.
Common Pitfalls to Avoid
Even with the best intentions, it's easy to slide into the "Uncanny Valley." Here are a few things to watch out for:
- Symmetry Overload: Human faces aren't perfectly symmetrical. Some AI tools try to "balance" features. Don't do it. It makes people look like aliens.
- Teeth Whitening: If the teeth are brighter than the whites of the eyes, it looks fake. Dial back the "Teeth Whitening" slider until they look healthy, not fluorescent.
- The "Glow" Effect: AI often adds a soft "Orton" glow to portraits. It’s pretty, but it can quickly look like a 1980s soap opera dream sequence. Use it sparingly.
Future-Proofing Your Portfolio
The trend in high-end photography is already shifting back toward "authentic" and "raw" aesthetics. As AI becomes more common, the "over-processed" look will become the mark of an amateur.
By mastering the integration of AI and classic techniques now, you’re positioning yourself as a photographer who understands the tech but isn't a slave to it. You’re keeping the "art" in the process.
I’ve spent years exploring this balance in my own work, from commercial shoots to fine art. You can see how I handle the interplay of light and texture in my galleries at Edin Fine Art.
Wrapping It Up
Integrating AI into your portrait workflow isn't about choosing a side. It’s about building a better toolbox.
Use AI to handle the boring stuff. Let it mask the hair, let it remove the pimples, and let it speed up your culling process. But when it comes to the feeling of the photo, the color grade, the "soul" in the eyes, and the preservation of real human texture, that’s your job.
Keep your lighting classic, keep your editing restrained, and keep your subject human. The best compliment you can get in 2026 isn't "Wow, what software did you use?" It's "Wow, you really captured who they are."
If you’re looking to dive deeper into these tools, I highly recommend playing around with Luminar. It’s one of the few platforms that actually seems to understand this balance between AI power and artistic control.
Now, get out there, shut your aperture, and go take something real.
Skylum’s Aperty is purpose-built for portrait retouching with AI skin, eye and detail enhancement. Luminar Neo’s Portrait AI complements it for full-body and editorial work. Tagged as affiliate per FTC.


