Look, I get it. You just unboxed that shiny new mirrorless camera or DSLR, and it feels like you’re holding a piece of NASA equipment. You’ve probably been sticking to the "Green Mode" (Auto) because, hey, the camera is smart, right? It should know what it’s doing.
But here’s the cold, hard truth: Auto mode is like putting a Ferrari in a school zone. It’ll get you from A to B, but you’re never going to feel the power of that engine. If you want to create images that actually make people stop scrolling, you have to move that dial to M.
Manual mode isn’t about being a "purist" or looking cool at a meetup. It’s about control. It’s about telling the camera exactly how you want the light to hit the sensor so you can capture the vision inside your head, not what a computer chip thinks you want.
In this guide, we are going to strip away the jargon and break down manual mode into simple, actionable steps. By the time you’re done reading, you’ll have the confidence to ditch Auto forever and start shooting like a pro.
Why Manual Mode is a Game Changer
When you shoot in Auto, the camera makes a "guess" based on the average light in the scene. Sometimes it gets it right. Most of the time, it struggles with tricky lighting: like a sunset, a dark room, or a person standing in front of a bright window.
In Manual mode, you become the boss. You decide how bright or dark the image is, how much of the background is blurry, and whether that moving car is a sharp freeze-frame or a beautiful streak of light. It’s the difference between taking a snapshot and making a photograph.
If you’re wondering which gear is even worth your time these days, check out our breakdown of the Canon EOS R5 vs Sony a7R V to see how modern tech handles these manual controls.
The Holy Trinity: The Exposure Triangle
Every single photo you’ve ever seen is the result of three settings working together: Aperture, Shutter Speed, and ISO. This is known as the Exposure Triangle. Think of it like a three-legged stool: if you move one leg, you have to adjust the others to keep the stool level.
1. Aperture: The "Eye" of Your Lens
Aperture is simply the opening inside your lens. Think of it like the pupil of your eye. When it’s dark, your pupil gets bigger to let in more light. When it’s bright, it gets smaller.
In photography, aperture is measured in f-stops (like f/1.8, f/4, or f/11). This is where most beginners get confused because the numbers feel backward:
- Small Number (f/1.8): Wide opening. Lets in tons of light. Creates a "shallow depth of field" (that creamy, blurry background everyone loves).
- Large Number (f/16): Narrow opening. Lets in very little light. Keeps everything from the foreground to the background sharp (perfect for landscapes).
If you’re shooting portraits, you’ll want a lower f-stop. If you’re using something like the OM System OM-1 Mark II for portrait photography, you’ll see exactly how to dial this in.

2. Shutter Speed: The "Blink"
Shutter speed is how long the camera’s sensor is exposed to light. It’s measured in fractions of a second.
- Fast Shutter Speed (1/1000s): Freezes motion. Great for sports, birds, or kids who won’t sit still.
- Slow Shutter Speed (1/10s or longer): Blurs motion. Used for those silky-smooth waterfall shots or light trails from cars at night.
Using a slow shutter speed requires a tripod, or your whole image will just be a blurry mess of "camera shake." If you're diving into high-speed action, take a look at our guide on OM System OM-1 Mark II settings for sports photography to see how shutter speed dictates the shot.
3. ISO: The "Caffeine"
ISO is the sensor’s sensitivity to light.
- Low ISO (100 or 200): Best for bright, outdoor settings. This gives you the cleanest, highest-quality images.
- High ISO (3200, 6400+): Used when it’s dark and you’ve already pushed your aperture and shutter speed to the limit.
The catch? High ISO introduces "noise" or "grain." It makes the photo look crunchy and less professional. Always try to keep your ISO as low as possible, but don't be afraid to bump it up if it means getting the shot. A grainy photo is better than a blurry, unusable one.
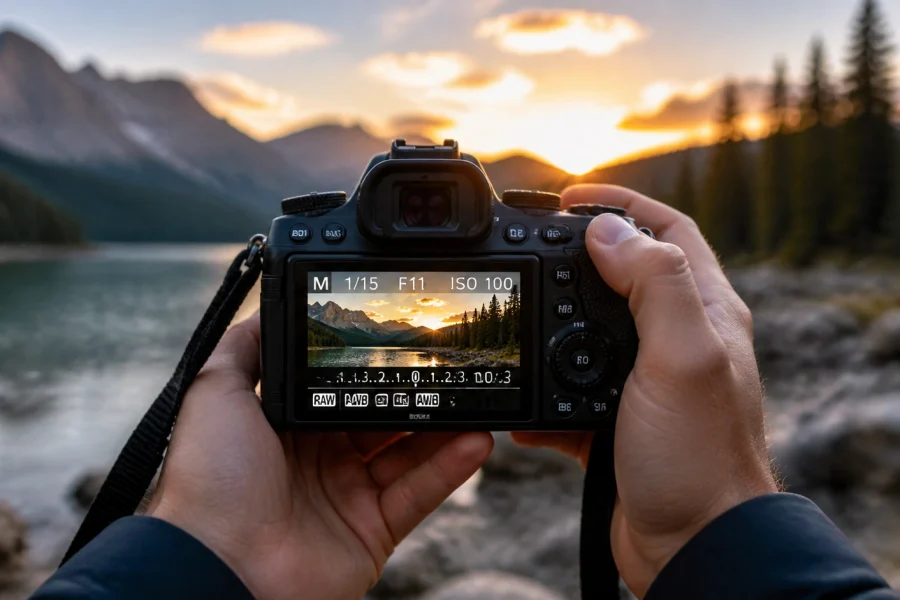
How to Read the Internal Light Meter
Your camera has a built-in "brain" called the exposure meter. When you look through your viewfinder or at your screen in Manual mode, you’ll see a little scale that looks like this:
-2 . . . -1 . . . 0 . . . +1 . . . +2
- If the ticker is at 0, the camera thinks the exposure is perfect.
- If it’s in the minus (-), your photo will be underexposed (too dark).
- If it’s in the plus (+), your photo will be overexposed (too bright).
Your goal in Manual mode is usually to get that ticker close to the center. However, since you’re the boss now, you might choose to underexpose a bit for a moody vibe or overexpose for a bright, airy look.

Step-by-Step: Taking Your First Manual Shot
Don't just read about it: grab your camera. Let’s do this together.
- Set your Mode Dial to M.
- Choose your Aperture first. Ask yourself: "Do I want a blurry background (low f-stop) or a sharp landscape (high f-stop)?" Set it.
- Set your ISO. If you’re outside in the sun, set it to 100. If you’re indoors, try 800 or 1600.
- Point your camera at your subject.
- Look at the light meter. Adjust your Shutter Speed until the little ticker is at 0.
- Take the shot.
- Review. Look at the screen. Is it too dark? Slow down the shutter speed. Is it too bright? Speed it up.
It’s a constant dance. Every time the light changes: like a cloud covering the sun: you have to tweak your settings. It feels slow at first, but eventually, your fingers will move the dials without you even thinking about it. For more specific setups, you can find deep dives into OM System OM-1 Mark II settings for wildlife photography to see how professionals balance these three elements in the field.
Mastering Metering Modes
Your camera doesn’t just "see" light; it calculates it based on a "Metering Mode." This is a hidden setting that can make or break your Manual mode experience.
- Matrix/Evaluative Metering: The camera looks at the whole scene and averages the light. This is the "safe" choice for most situations.
- Spot Metering: The camera only cares about the light in the very center (or on your focus point). This is incredible for backlit portraits where you want the person’s face exposed perfectly, even if the background is blown out.
- Center-Weighted Metering: A middle ground that prioritizes the center of the frame but considers the surroundings.
Understanding these helps you know why your light meter is telling you a shot is "correct." If you're into more technical street work, these modes are vital. Check out these 25 creative street photography ideas to put your metering skills to the test.

White Balance: Getting the Colors Right
Have you ever taken a photo indoors and everyone looked like an Oompa Loompa? That’s a White Balance issue. Different light sources have different "temperatures."
- Sunlight is blue/neutral.
- Tungsten (old lightbulbs) is orange.
- Fluorescent is green.
In Manual mode, you can set the White Balance yourself. "Auto White Balance" (AWB) is actually pretty good these days, but if you want consistency: especially for something like real estate photography: you should set it manually to match your environment.
The Secret Weapon: Shooting in RAW
If you are going through the effort of shooting in Manual mode, you must shoot in RAW format, not JPEG.
A JPEG is like a cooked meal: the camera has already decided the contrast, colors, and sharpness, and "baked" them into the file. You can’t change much later.
A RAW file is like the raw ingredients. It looks a bit flat and ugly at first, but it contains all the data the sensor captured. This allows you to fix a photo that was slightly too dark or adjust the white balance perfectly in post-processing.
When it comes to editing those RAW files, I highly recommend using Luminar. It uses AI to simplify the complex stuff, so you can spend more time shooting and less time staring at a computer screen.
Practical Scenarios: Manual Mode in the Real World
Let's look at how you'd actually use this knowledge in different environments.
Scenario A: The Dreamy Portrait
You’re outside at "Golden Hour" (the hour before sunset). You want that blurry background.
- Aperture: Set it as low as your lens goes (f/1.8 or f/2.8).
- ISO: 100 (it's still bright enough).
- Shutter Speed: Adjust until the meter hits 0. It’ll likely be fast (maybe 1/1000s or higher) because that wide aperture lets in so much light.
Scenario B: The Indoor Birthday Party
It’s a dimly lit living room. People are moving around.
- Aperture: Keep it low (f/2.8) to let in light.
- Shutter Speed: You need at least 1/125s or 1/200s so the people don’t look like ghosts when they move.
- ISO: Since the room is dark and your shutter is fast, you’ll need a high ISO. Don’t be afraid to go to 3200 or 6400.
For more niche settings, like shooting products for a side hustle, our guide on Sony ZV-E10 II settings for product photography breaks down the manual workflow for studio lighting.

Don’t Forget About Focus
Manual mode gives you control over exposure, but you also need to think about focus. Most modern cameras have incredible autofocus, but you still need to tell the camera where to look.
For portraits, always focus on the eye closest to the camera. For landscapes, focus about a third of the way into the scene to maximize sharpness. If you're struggling with getting sharp images, check out PhotoGuides.org for some excellent deep dives into focus techniques.
Stop Chasing Perfection
The biggest mistake new photographers make is thinking they have to get it "perfect" in the camera every single time. Here’s a secret: even the pros mess up. They underexpose, they miss focus, they forget to change their ISO from the night before.
The difference is that pros know how to read their mistakes and adjust quickly. If you want to speed up your learning curve, you need to practice with purpose. Don't just spray and pray. Take a shot, look at it, ask why it doesn't look the way you wanted, and change one setting.
If you’re feeling overwhelmed, that’s normal. Photography is a language, and right now, you’re just learning the alphabet. To help you put it all together into actual sentences, come join us at Shut Your Aperture Academy. We have structured courses that take you from "What is this button?" to "I just sold my first print."
Gear Matters, But Not How You Think
You’ll hear people arguing on forums about Sony vs Canon vs Nikon. While gear is fun, a better camera won't make you a better photographer if you don't understand the fundamentals. A pro with an entry-level camera in Manual mode will beat a beginner with a $6,000 setup in Auto every single time.
Master the light, and you can shoot on anything: even your phone. (But seriously, use the "Pro" mode on your phone to practice these same principles!)

Common Pitfalls to Avoid
As you embark on your manual journey, watch out for these rookie moves:
- Ignoring the Histogram: The screen on the back of your camera lies to you. In bright sunlight, the screen looks dark. In a dark room, it looks bright. Learn to read the histogram (that little graph that shows light distribution). If the graph is touching the right side, your highlights are "clipped" (gone forever).
- Leaving ISO on Auto: If you're in Manual mode but ISO is on Auto, you're not really in Manual mode. You're in a "semi-auto" mode. Take the training wheels off and set the ISO yourself.
- Forgetting to Reset: There is nothing worse than starting a beautiful landscape shoot at sunrise only to realize you’re still at ISO 6400 from the night before. Make it a habit to reset your settings to a "base" (ISO 100, f/5.6, 1/125s) before you put your camera away.
Developing Your "Eye"
Mastering the technical side is only half the battle. Once the settings become second nature, you can finally focus on composition, storytelling, and emotion. You can see how these technical skills translate into art by browsing through Edin’s Fine Art collection, where every shot is a result of calculated manual decisions.
Also, stay updated with the latest trends and stories in the industry over at blog.edinchavez.com. Seeing what other photographers are doing can give you the spark you need to go out and burn through a few memory cards.
Final Thoughts for the New Photographer
Manual mode is a hurdle, but once you clear it, the entire world of photography opens up to you. You stop being a spectator and start being a creator.
Start small. Maybe today you only focus on changing your Aperture. Tomorrow, try Shutter Speed. Within a week, you’ll be balancing all three like a pro. And remember, the delete button is free: take as many bad photos as you need to until you get the good ones.
If you want more specific deep dives, like OM System OM-1 Mark II settings for wedding photography or even street photography tips, we’ve got you covered.
Now, turn that dial to M, get out there, and shut your aperture!