Let’s be real for a second. That little "M" on your camera dial is terrifying. It’s like the "check engine" light of the photography world, most people see it and immediately look the other way, hoping everything just keeps working on its own.
You’ve probably spent a decent amount of money on a camera that has more buttons than a spaceship, yet you’re still shooting in "Auto." Don’t get me wrong, Auto mode is great for when you’re in a hurry, but it’s also the reason your photos might look a bit… flat. If you want to take those creamy-background portraits or those sharp, epic landscape shots you see on Shut Your Aperture, you have to take the training wheels off.
Welcome to Manual Mode 101. We’re going to break down the science of exposure without making your brain explode. By the end of this guide, you’ll actually understand what those numbers mean and how to use them to create the images you’ve always wanted.
Why Manual Mode? (Because Control is Everything)
Think of your camera’s Auto mode like a self-driving car. It’ll get you from point A to point B, but it doesn't know you want to take the scenic route or do a burnout in the parking lot. When you shoot in manual, you are the driver. You decide exactly how much light enters the lens, how much of the image is in focus, and how motion is captured.
Mastering these settings is the first step toward mastering photography with essential tips. It allows you to handle tricky lighting situations where Auto mode usually fails, like a bright sunset or a dark, moody room.
The Foundation: The Exposure Triangle
In the world of photography, everything revolves around light. Exposure is simply the amount of light that reaches your camera sensor. To control this, we use three main pillars known as the Exposure Triangle:
- Aperture
- Shutter Speed
- ISO
Think of these as a three-way seesaw. If you change one, you usually have to change another to keep the balance. Let’s dive into each one.

1. Aperture: The Eye of the Lens
Aperture is arguably the most fun setting to play with because it has the biggest impact on the "look" of your photo. Technically, the aperture is the opening in your lens. You can make it wide or narrow.
How it affects light
A wide opening (small number like f/1.8) lets in a ton of light. A narrow opening (large number like f/16) lets in very little light.
How it affects depth of field
This is where the magic happens. Aperture controls "Depth of Field", basically, how much of your image is sharp versus how much is blurry.
- Wide Aperture (Low f-number): Creates that beautiful, blurry background (bokeh). Perfect for portraits or food photography.
- Narrow Aperture (High f-number): Keeps everything from the foreground to the background in sharp focus. This is essential for stunning landscape photography.
If you’ve ever looked at Peter Lik’s iconic works, you’ll notice his landscapes are sharp from front to back. That’s because he’s using a narrow aperture to capture every detail.
2. Shutter Speed: Freezing Time
Shutter speed is exactly what it sounds like: the speed at which the camera’s shutter closes. It’s measured in fractions of a second (like 1/500) or whole seconds (like 5").
How it affects light
The longer the shutter stays open, the more light hits the sensor. If you’re shooting in a dark room, you need a slower shutter speed. If you’re out in the bright sun, you need a fast one.
How it affects motion
- Fast Shutter Speed (e.g., 1/1000): Freezes action. Think of a bird in flight or a car racing by. Everything is crisp.
- Slow Shutter Speed (e.g., 1/10): Creates motion blur. This is how photographers get those "silky" waterfalls or light trails from cars at night.
Pro Tip: If your shutter speed is slower than 1/60, you probably need a tripod. Otherwise, the tiny shakes in your hands will make the whole photo look blurry.

3. ISO: The Sensor’s Sensitivity
ISO is your camera’s sensitivity to light. Back in the day, this was determined by the film you bought. Now, it’s a digital setting.
When to use low ISO (100-400)
Always try to keep your ISO as low as possible. ISO 100 is the gold standard for high-quality, "clean" images. Use this when you have plenty of natural light, like during a midday shoot.
When to use high ISO (800 and up)
When it’s dark and you’ve already opened your aperture as wide as it goes and your shutter speed is as slow as you can handle, you "crank" the ISO. This tells the sensor to be more sensitive to whatever light is available.
The Trade-off: Noise
The higher the ISO, the more "noise" or grain you get in your photo. It can make your images look crunchy and lose detail. While modern cameras are getting better at handling high ISO, it’s always better to use more light than to rely on a high ISO. If you do end up with some grain, you can often clean it up later using software like Luminar.
Putting It All Together: Your First Shot
Okay, enough theory. How do you actually take a photo in manual mode? Here is a simple step-by-step workflow to get you started.
Step 1: Set your ISO
Start by looking at your environment. Is it a bright sunny day? Set it to ISO 100. Are you indoors? Try ISO 800. Think of this as your "baseline."
Step 2: Choose your Aperture
Decide what you want the photo to look like. Do you want a blurry background for a portrait? Go for f/1.8 or f/2.8. Do you want a sharp landscape? Go for f/11.
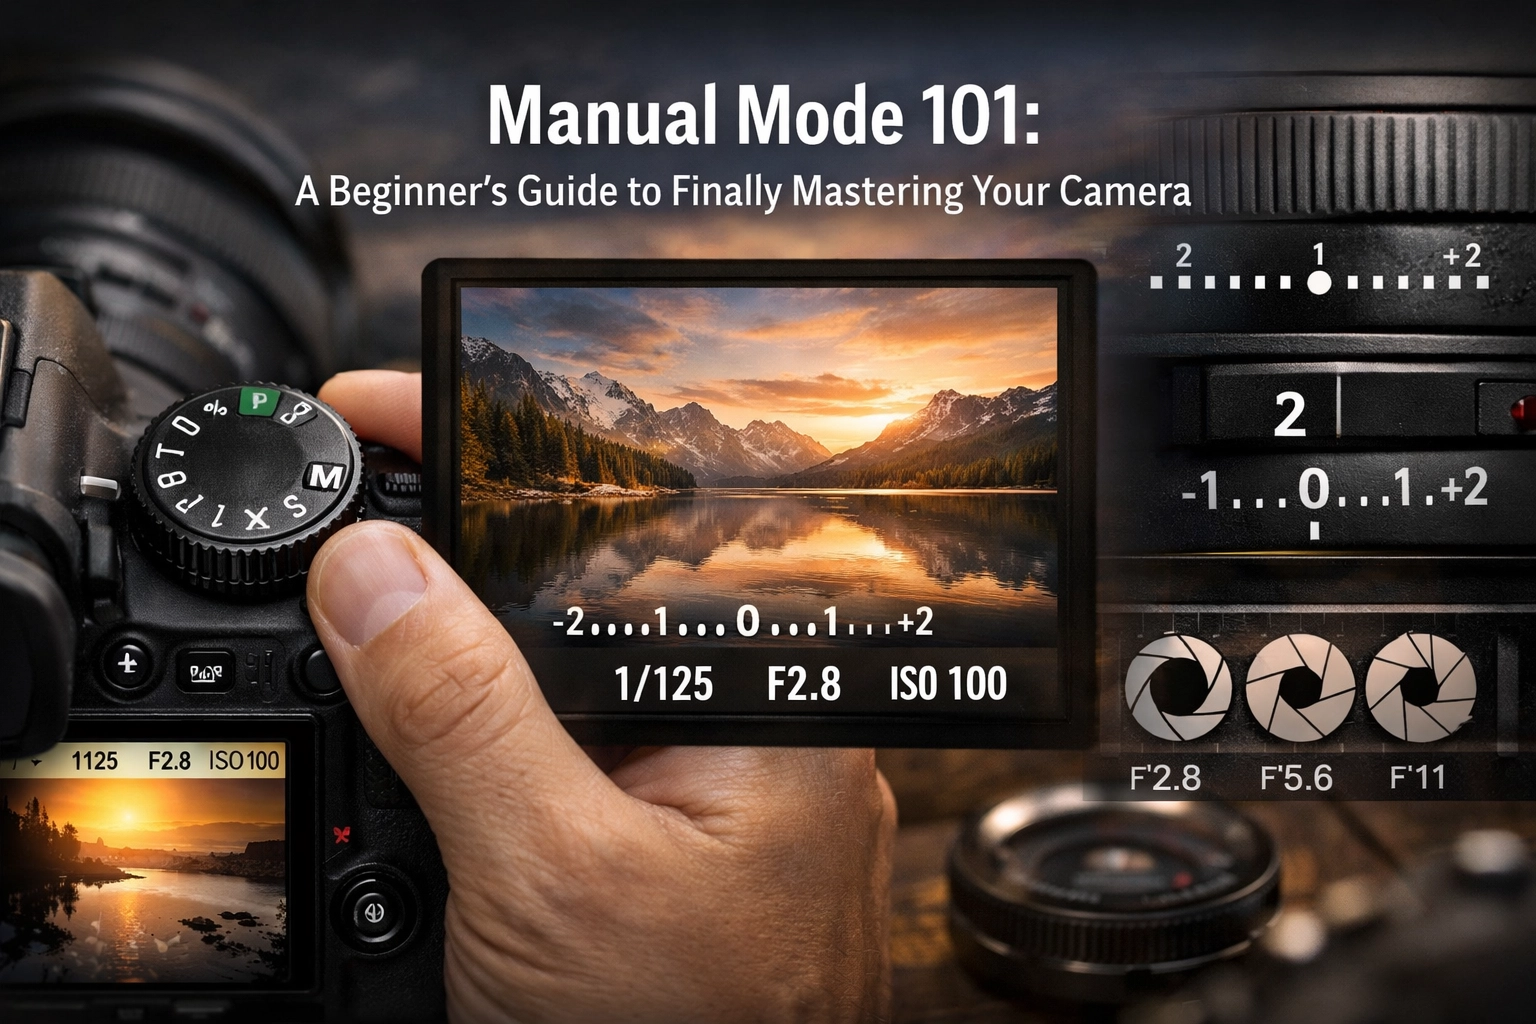
Step 3: Use the Light Meter
Look through your viewfinder or at your screen. You’ll see a little bar with a "0" in the middle, some negative numbers on the left, and positive numbers on the right. This is your Light Meter.
- If the little tick mark is on the negative side, your photo will be too dark (underexposed).
- If it’s on the positive side, it’ll be too bright (overexposed).
Step 4: Adjust Shutter Speed
Now, turn your dial to adjust the shutter speed until that little tick mark sits right on the "0."
Step 5: Take the Shot and Review
Take the photo. Did it come out how you wanted? If it’s too dark, slow down the shutter speed or increase the ISO. If it’s too bright, speed up the shutter or lower the ISO.

Real-World Scenarios
Learning the settings is one thing, but knowing when to prioritize which setting is where the artistry comes in. Let's look at a few common scenarios.
Scenario A: Real Estate Photography
When shooting interiors, you want everything to be sharp and bright. In real estate marketing, quality is king. You’ll likely want an aperture around f/8 to ensure the whole room is in focus. Since you're likely using a tripod, you can afford a slower shutter speed to let in more light without worrying about hand shake. For more on this, check out how luminosity plays a role in real estate photography.
Scenario B: Fast Action/Sports
If you’re at a soccer game, your priority is shutter speed. You need at least 1/500 or 1/1000 to freeze the players. Because the shutter is so fast, it isn't letting in much light, so you’ll need to open your aperture wide and potentially bump up your ISO.
Scenario C: The "Lush" Landscape
Inspired by Peter Lik’s favorite locations, you might find yourself in front of a canyon at sunrise. You’ll want ISO 100 for the best quality and f/11 or f/16 for depth of field. Your shutter speed might end up being several seconds long to capture the dim morning light, which is why a tripod is non-negotiable here.
The Secret Weapon: RAW Files
If you’re going to go through the effort of shooting in manual, you should also change your file format from JPEG to RAW.
A JPEG is like a cooked meal, the camera has already decided on the contrast, colors, and brightness, and it’s thrown away the "extra" data. A RAW file is like a bag of ingredients. It contains all the data the sensor captured. This gives you massive flexibility when editing. If you accidentally underexpose a shot in manual mode, a RAW file allows you to bring back those shadows in Luminar without the image falling apart.
Don't Be Afraid to Fail
The beauty of digital photography is that "film" is free. You can take 1,000 bad photos and it won't cost you a dime. When you first start using manual mode, you will mess up. You’ll take photos that are pitch black or completely white. That’s okay.
The goal isn't to be perfect immediately; it's to understand why the photo looks the way it does. When you finally nail that perfect exposure using your own settings, it feels a lot better than letting the camera do the work for you.

Moving Beyond the Basics
Once you've mastered the exposure triangle, you can start looking into more advanced techniques. For instance, understanding shot composition's impact on buyer attraction can help you frame your shots better, even if your exposure is perfect.
You might also want to explore different genres. Maybe you're interested in aerial photography for real estate or capturing ethereal imagery for high-end listings. Each of these requires a solid grasp of manual settings to handle the unique lighting challenges they present.
Summary Checklist for Your Next Shoot
Before you head out, keep this mental checklist handy:
- Mode Dial: Is it on "M"? (Yes, do it!)
- ISO: Set this first based on your available light.
- Aperture: Set this second based on how much "blur" you want.
- Shutter Speed: Adjust this until the light meter hits zero.
- Focus: Make sure you're focusing on the right part of the frame.
- Check: Take a test shot, look at the screen, and adjust.
If you find yourself stuck, head over to ProShoot.io for more technical breakdowns or check out some lessons in landscape photography to see how the pros handle complex scenes.
Manual mode isn't about being a "purist", it's about being an artist. It's about taking the vision you have in your head and actually making it appear on the sensor. It takes practice, and yeah, it can be a bit frustrating at first, but once it clicks, you'll never want to go back to Auto again.
So, grab your camera, find some good light, and start twisting those dials. Your portfolio will thank you. And remember, if you need that extra bit of "oomph" in your final images, tools like Luminar are there to help you cross the finish line.
For more tips on equipment and creative processes, you can always dive into Peter Lik’s creative process revealed or see how cinematic techniques can transform your property showcases. Happy shooting!