So, you’ve seen those epic shots on Instagram, the ones with the glowing mountain peaks, the silky waterfalls, and the stars that look like they were painted on the sky. You’ve probably thought, “I wish I could do that,” followed quickly by, “But my photos look like I took them with a potato.”
Don’t sweat it. We’ve all been there. Landscape photography is one of the most rewarding genres out there, but it can be intimidating when you’re just starting. The good news? You don’t need a $10,000 setup to get started. You just need a bit of know-how and a willingness to wake up way earlier than any sane person should.
In this guide, we’re going to break down the essentials of photography for beginners. We’ll cover the gear you actually need, how to use manual mode camera settings, and the composition tricks that turn a "meh" snapshot into a "wow" masterpiece. Grab a coffee, and let’s dive in.
What is Landscape Photography, Anyway?
At its simplest, landscape photography is about capturing the beauty of the world around us. It’s about scale, light, and emotion. While some people think it’s just pointing a camera at a mountain, it’s actually a bit more calculated than that. You’re looking for a way to tell a story about a place without using any words.
Whether you are shooting the rugged peaks of the Rockies or the misty vibes of Niagara Falls, the goal is to make the viewer feel like they are standing right there next to you.
The Gear: What’s in Your Bag?
Let’s get the "gear talk" out of the way. You don’t need the most expensive kit on the market, but having the right tools makes the job a lot easier.
Best Mirrorless Cameras for Landscapes
If you’re looking to upgrade from your smartphone, the best mirrorless cameras are the way to go. Why mirrorless? They are generally lighter than old-school DSLRs, which matters when you’re hiking five miles uphill. Cameras like the Sony a7 series or the Canon EOS R5 are favorites in the landscape world because of their incredible dynamic range and high resolution. If you want to check out some hands-on reviews, head over to ProShoot.io for the latest camera gear reviews.
Lenses: Wide or Long?
Most beginners start with a wide-angle lens (something between 16mm and 35mm). These are great for capturing those massive, sweeping vistas. However, don't sleep on telephoto lenses. Sometimes, zooming in on a specific peak or a pattern in the sand can create a much more powerful image.
The Almighty Tripod
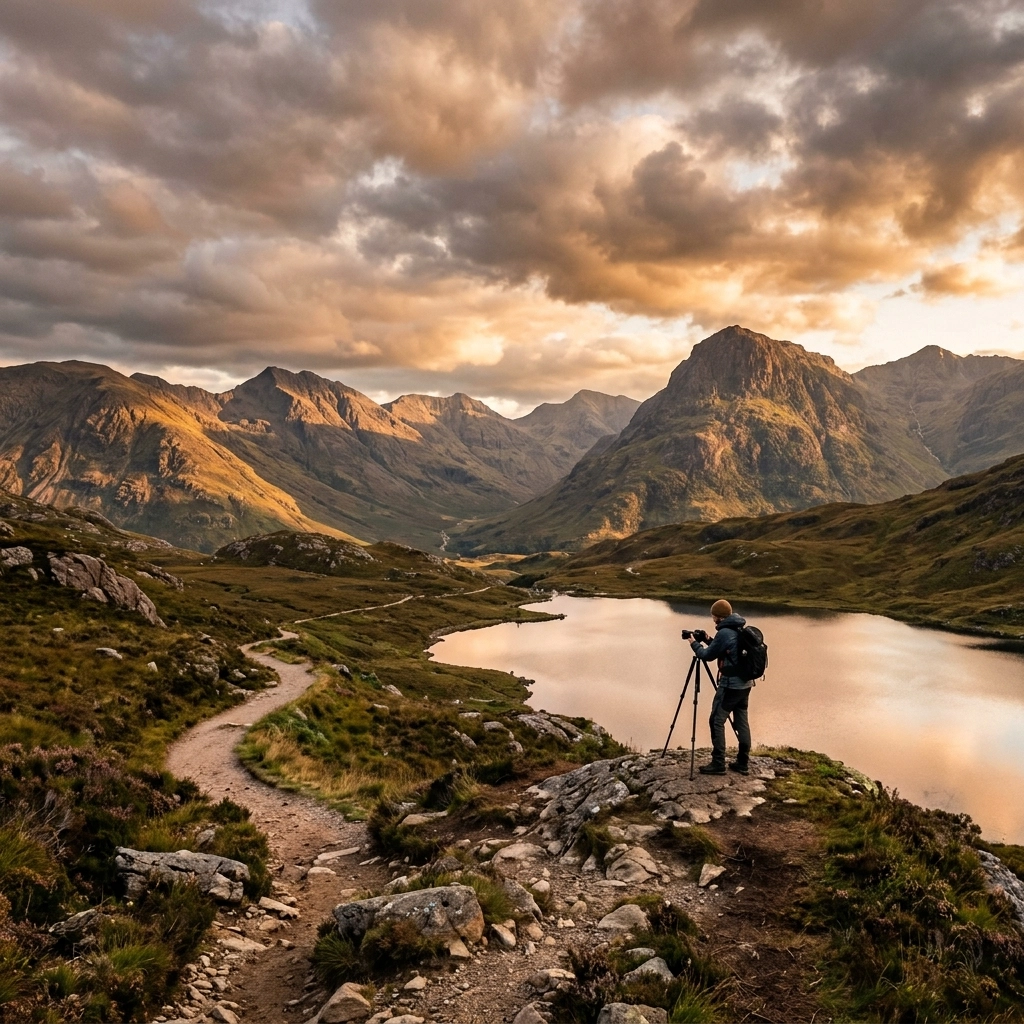
If there is one thing you shouldn't skip, it’s a solid tripod. Landscapes often require long shutter speeds, especially during "blue hour" or when you want to make water look like silk. If you try to hand-hold your camera at a 1-second shutter speed, your photo will look like a blurry mess.
 Save
Save
SEO Alt Text: A sturdy tripod standing on a rocky shoreline during a vibrant sunset, showing essential gear for landscape photography.
Mastering Your Settings: How to Use Manual Mode Camera
If you’re still shooting in "Auto," we need to talk. Auto mode is like letting a robot decide how your memories should look. It’s okay for a quick snap, but for epic landscapes, you need control. Learning how to use manual mode camera settings is the single biggest step you can take toward becoming a better photographer.
Aperture: The Key to Sharpness
In landscape photography, you usually want everything from the flower in the foreground to the mountain in the back to be tack-sharp. This is called "depth of field." To get a deep depth of field, you’ll want a higher f-stop number, like f/8, f/11, or f/16.
ISO: Keep it Clean
ISO is your camera's sensitivity to light. For landscapes, you almost always want to keep this as low as possible (usually ISO 100). Higher ISOs introduce "noise" or grain, which can ruin the fine details of a beautiful forest or a clear sky.
Shutter Speed: Controlling Motion
This is where the magic happens. A fast shutter speed freezes time. A slow shutter speed blurs it. If you’re shooting a waterfall and want that creamy water effect, you’ll need a slow shutter speed (maybe 1/2 second or longer). If it’s a windy day and you want the trees to stay sharp, you’ll need to speed it up.
For more in-depth photography tutorials on settings, check out Shut Your Aperture.
Composition: The Secret Sauce
You can have the best camera in the world, but if your composition sucks, your photo sucks. Here are a few landscape photography tips to help you frame your shot like a pro.
The Rule of Thirds
Imagine your frame is divided into a 3×3 grid. Instead of putting the horizon right in the middle, try putting it on the top or bottom third line. Place your main subject (like a lone tree or a person) where those lines intersect. It feels more balanced and natural to the human eye.
Leading Lines
Use elements in the environment to lead the viewer’s eye into the photo. A winding road, a river, or even a fallen log can act as a "leading line" that points toward the main subject.
Foreground Interest
This is what separates the pros from the amateurs. Find something interesting to put in the front of your shot: a rock, some flowers, or an interesting texture in the ice. This gives the photo a sense of depth and makes the viewer feel like they could step right into the scene.
Save
SEO Alt Text: A landscape photo of a mountain reflected in a still lake, utilizing the rule of thirds and foreground rocks for depth.
Light: The Photographer’s Best Friend
You can’t talk about landscapes without talking about light. Midday sun is usually harsh and creates ugly shadows. This is why landscape photographers are obsessed with the "Golden Hour" (the hour after sunrise and the hour before sunset). The light is soft, warm, and makes everything look like a dream.
Don't forget about "Blue Hour" either: the time just before the sun comes up or just after it goes down. The world turns a deep, moody blue, and it's perfect for cityscapes or long exposures of the ocean. If you want to see how light can transform a scene, take a look at the gallery on Edin Fine Art.
Beyond the Vista: Diversifying Your Skills
While you’re out there mastering the mountains, don’t forget that the skills you learn in landscape photography apply everywhere.
For instance, understanding light and composition will help you with street photography ideas. Sometimes the "landscape" is an urban one. If you find yourself in a city, look for the same leading lines and interesting light that you’d look for in a forest.
Similarly, if you decide to try your hand at portrait photography techniques, you’ll find that the "Golden Hour" you love for mountains is also the most flattering light for people. You can even check out this post on 5-minute portraits and low-light action to see how those worlds collide.
Post-Processing: Making Your Photos Pop
The shot you take in the camera is just the starting point. To really bring those "epic vistas" to life, you need a bit of editing.
Digital sensors often capture a "flat" image to preserve as much data as possible. It's your job to bring back the contrast, color, and mood. We recommend checking out some photo editing tutorials to get the basics down.
If you want to take your editing to the next level without spending hours in a dark room, give Luminar a try. It uses AI to help with things like sky replacement and accentuating natural light, which is a lifesaver for landscape shots. You can also learn how to make colors come to life in Photoshop through our internal guides.
Save
SEO Alt Text: A split-screen comparison showing a raw landscape photo next to an edited version with enhanced colors and contrast.
Staying Inspired and Keeping Up
The world of photography moves fast. From photography news about the latest sensor tech to new camera gear reviews, there’s always something new to learn.
One of the best ways to improve is to look at the work of others. Check out Edin Chavez’s blog for some incredible travel and landscape inspiration. Sometimes seeing how a pro handles a difficult lighting situation is better than any textbook.
If you’re feeling stuck, try a project. Maybe it’s a "365 project" where you take one photo a day, or maybe you dive into something niche like food photos or miniature looks. The key is to keep shooting.
Common Pitfalls to Avoid
As a beginner, you’re going to make mistakes. That’s part of the fun! But here are a few things to watch out for:
- The Wonky Horizon: Nothing ruins a great landscape like a crooked ocean. Most cameras have a built-in level: use it!
- Over-Processing: It’s easy to get carried away with the saturation slider. If the grass looks like it’s glowing radioactive green, maybe dial it back a bit.
- Ignoring the Weather: "Bad" weather often makes for the best photos. Stormy clouds and mist provide much more drama than a plain blue sky.
- Forgetting the Foreground: We mentioned this before, but it's worth repeating. Don't just shoot the mountain; shoot the path leading to it.
Save
SEO Alt Text: A photographer standing on a cliff edge during a storm, illustrating the drama of bad weather in landscape photography.
Wrapping It Up
Landscape photography is a journey, literally and figuratively. It’s about much more involved than a fancy camera; it’s about your perspective and how you choose to frame the world. Whether you’re following Kevin Young’s road to recovery through photography or just trying to get a decent shot of your local park, the most important thing is to get out there.
Use the resources at Edin Studios and keep practicing your manual mode camera skills. The more you shoot, the more you’ll start to "see" the light before you even pull your camera out of the bag.
Now, go charge your batteries, pack your tripod, and go find your own epic vista. The world is waiting for its close-up.
Luminar Neo’s Sky AI, atmosphere AI and SuperSharp are designed for landscape work — replace flat skies, add depth, and recover detail in seconds. Tagged as affiliate per FTC.


