How to Photograph Fog: Complete Step-by-Step Guide
~10 min read · Updated 2026-05-09 For practitioners, see our breakdown of Library module workflow.
shutyouraperture-20). Buying through these links costs you nothing extra and helps fund our free guides.
Fog is one of the most flattering light conditions in photography — it softens harsh contrast, simplifies backgrounds, and creates natural depth through atmospheric perspective. You will learn to predict fog formation using weather apps, set exposure correctly when your meter gets fooled by white mist, and process fog images to preserve mood without losing the delicate tonal gradations.
Table of contents
Want every ShutYourAperture how-to tutorial in one place? The How to Photograph Tutorials hub indexes all 100 subject guides — bookmark it.
 Save
SaveWhy Fog photography is hard
Fog is one of the most flattering light conditions in photography — it softens harsh contrast, simplifies backgrounds, and creates natural depth through atmospheric perspective. You will learn to predict fog formation using weather apps, set exposure correctly when your meter gets fooled by white mist, and process fog images to preserve mood without losing the delicate tonal gradations.
The specific technical challenges of photographing Fog come down to three compounding problems: ‘ ‘the light is typically the hardest variable to control, the subject has characteristics that fool ‘ ‘the camera metering system, and the timing window for optimal conditions is narrow. ‘ ‘Most photographers who walk away disappointed from a Fog session made at least two ‘ ‘of the five mistakes in the section below. The settings and workflow in this guide address ‘ ‘each of those mistakes directly.
Gear you actually need for Fog
You do not need to buy everything on this list before your first session. ‘ ‘Priority-order it: the first item is the non-negotiable one. ‘ ‘Each subsequent item adds capability but is not a prerequisite for a successful first shoot.
- Telephoto zoom (70-200mm or 100-400mm) to compress depth layers and isolate subjects against fog
- Lens cloth — fog deposits moisture droplets on glass within 10-20 minutes outdoors
- Sturdy tripod for slow-shutter misty water or long-exposure fog drift shots
- Weather-resistant body or rain cover for denser fog that verges on drizzle
- Graduated ND filter (2-stop soft edge) for balancing bright sky against dark foggy foreground
- Wide-angle lens (16-35mm) for foreground-to-fog-bank landscape compositions
The most important single investment for most Fog photographers is the first item ‘ ‘on the list. Everything else compounds from that foundation. ‘ ‘B&H Photo has the widest selection of photography gear with honest customer reviews ‘ ‘and an easy comparison tool — links to recommended items are injected into this guide automatically.
Camera settings cheat sheet
These are the starting settings. They are not the only settings that work, ‘ ‘but they are the highest-probability starting point for most Fog scenarios. ‘ ‘Adjust from this baseline based on your specific conditions.
| Setting | Recommended value |
|---|---|
| Aperture | f/5.6-f/11 for landscape fog; f/2-f/4 for portrait or macro in fog |
| Shutter speed | 1/250-1/1000s for frozen fog droplets; 1-30s for long-exposure fog drift |
| ISO | ISO 100-400 — fog reflects a lot of light, keep ISO low |
| Focus mode | Single AF (AF-S) for still subjects; manual for misty macro shots |
| White balance | 5000-6000K for warm fog; 6500-7500K for cold blue-grey fog |
| Mode | Aperture Priority (Av) with +0.5 to +1.5 EV exposure compensation (fog fools meters) |
Two settings deserve extra explanation: ‘ ‘1/250-1/1000s for frozen fog droplets; 1-30s for long-exposure fog drift — this is where most beginners set the wrong value. ‘ ‘And ISO 100-400 — fog reflects a lot of light, keep ISO low — keep ISO as low as possible to preserve color fidelity ‘ ‘and maximize dynamic range in RAW post-processing.
Timing and conditions
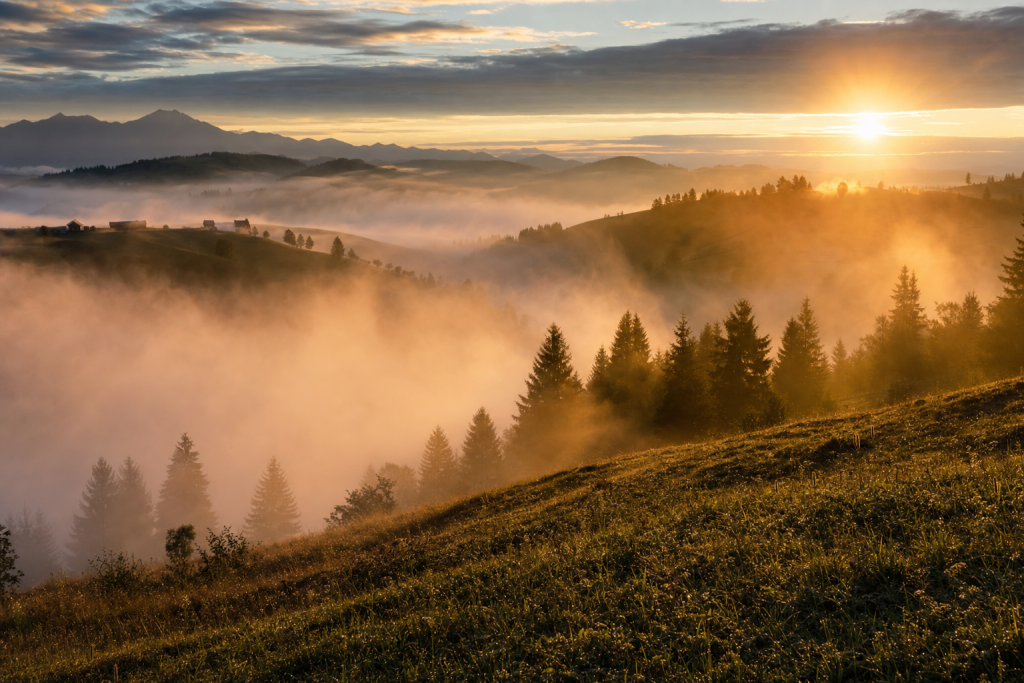
Ground fog typically forms in the 2-3 hours before sunrise on calm, clear nights following a warm day. The classic recipe: warm afternoon, clear evening sky (rapid heat loss), light or no wind, high moisture content in soil or nearby water. Fog dissipates 30-90 minutes after sunrise as temperatures rise. Arrive at location 45 minutes before sunrise to set up in the dark. Monitor the National Weather Service forecast fog maps or use Windy.com (set fog layer) the evening before to predict coverage.
The window for optimal Fog conditions is often shorter than photographers expect. ‘ ‘Arriving early and pre-configuring your settings before the optimal window opens is the ‘ ‘difference between a session where you capture the shot and one where you are still adjusting ‘ ‘settings when the best light or moment has already passed.
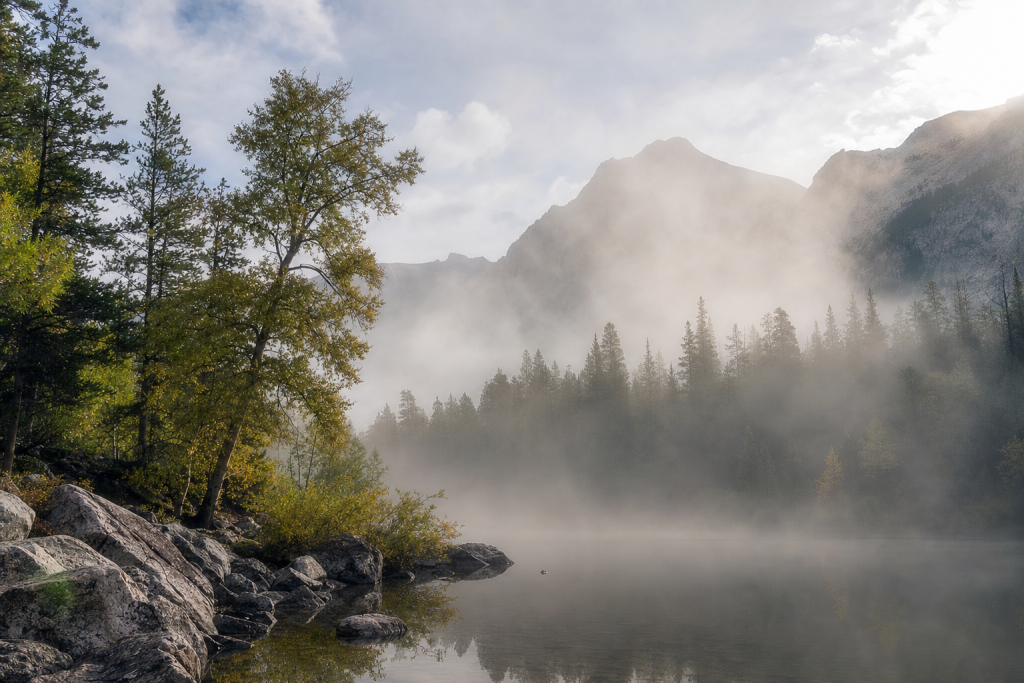
Composition and location
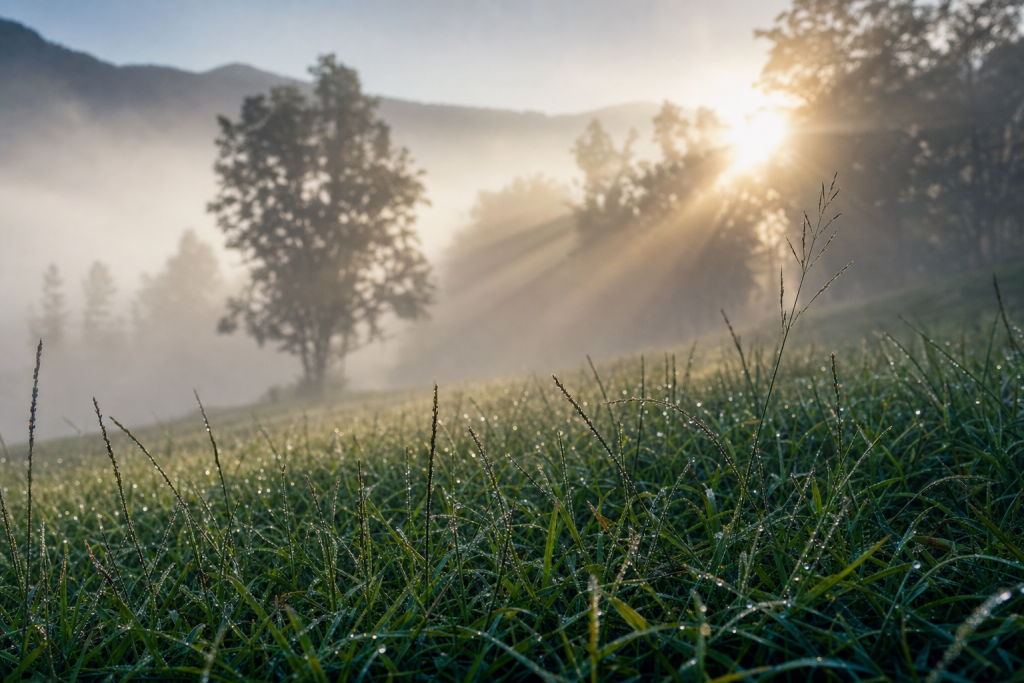
Valleys, river corridors, and lake shores are the highest-probability fog locations because cold air drains downhill and sits on water. A hillside or elevated vantage point above the fog layer creates the classic "islands in the clouds" scene where treetops or mountain summits pierce the fog bank. Backlit fog (shooting toward a low sun just above the fog bank) produces dramatic light shafts and rim-lighting on trees and subjects. Position yourself so the sun is at 30-60 degrees to your side or behind the subject for the richest fog atmosphere.
Composition is the factor most under-discussed in Fog photography tutorials. ‘ ‘It is easy to focus entirely on settings and technique and walk away with technically ‘ ‘correct but compositionally weak images. ‘ ‘The rule of thirds, leading lines, and foreground anchoring are all relevant here — ‘ ‘they are not just landscape photography concepts. ‘ ‘Apply them to Fog and the quality step-up is immediate.
 Save
Save5 common mistakes when photographing Fog
These five mistakes appear in nearly every unsuccessful Fog session. ‘ ‘Each one has a specific fix.
- Relying on Auto exposure — fog reads as bright to the meter and results in underexposed, grey-skied images
- Not cleaning the lens — fog condenses on glass faster than any other weather condition
- Arriving at sunrise instead of before sunrise — the best fog often clears by 7-8am
- Underexposing to preserve whites — fog images look best slightly bright; pull highlights in post
- Shooting flat-angle compositions — fog creates depth; exploit it with strong foreground and layered midground
The most consequential of the five is typically the first — that mistake compounds ‘ ‘every other decision in the session. Fix it first.
Bundle deal: Get the Fog Field Guide PDF ($47) + matching Lightroom preset pack ($19) together for $54 — save $12. Shop the bundle →
Step-by-step shoot guide
Follow these steps in sequence on your next Fog shoot. ‘ ‘The order matters — each step sets up the next one.
- Arrive and scout (T-45 min): Ground fog typically forms in the 2-3 hours before sunrise on calm, clear nights following a warm day.
- Set up gear: Mount on tripod. Confirm the gear you need is ready: Telephoto zoom (70-200mm or 100-400mm) to compress depth layers and isolate subjects against fog is your first priority.
- Lock settings: Start at the recommended values in the cheat sheet above. Take a test exposure and review the histogram.
- Compose: Valleys, river corridors, and lake shores are the highest-probability fog locations because cold air drains downhill and sits on water.
- Shoot the hero frame: Make your primary capture. Review sharpness at 100% magnification on the camera screen before moving position.
- Work the scene: Shoot multiple focal lengths, angles, and compositional variations. The first keeper is not always the best keeper.
- Wrap: Review selects in the field to confirm you have the shot before you pack out.
Post-processing Fog photos
In Lightroom: fog images need a gentle touch. Increase Whites +10-20 to open the tonal range without blowing the fog. Drop Clarity to -10 to -20 for a softer, dreamier mood (or raise to +15-25 for a crisper editorial look). Use a radial gradient mask around the fog-lit areas to boost exposure selectively on the brightest atmospheric parts. In Luminar Neo: the Atmosphere AI tool simulates fog and mist but works best as a subtle addition (+15-25%) to existing fog scenes rather than creating fog from scratch. Sky AI is useful for enhancing or replacing a flat white sky in heavily overcast fog scenes.
Lightroom Classic remains the standard catalog tool for managing and editing RAW files. ‘ ‘Luminar Neo (available as a Lightroom plugin via Skylum) ‘ ‘handles AI-powered edits — Sky AI, Relight AI, Structure AI — that save 10-20 minutes per image ‘ ‘on typical Fog sessions. ‘ ‘The combination of Lightroom as catalog and Luminar Neo as an AI plugin is the recommended ‘ ‘workflow for ShutYourAperture readers in 2026.
Quick Amazon shortcuts to the gear most useful for this kind of shot. Use them if Prime shipping or Amazon credit makes more sense than B&H. As an Amazon Associate ShutYourAperture earns from qualifying purchases.
Frequently asked questions
How do I prevent my lens from fogging up?
Keep your camera inside a bag or under a jacket until you are ready to shoot. Going from cold car to warm bag to cold outside minimizes condensation. A microfiber cloth in hand at all times is mandatory. A fog heater band (astro dew heater) on the lens barrel solves the problem entirely for dedicated fog sessions.
What exposure compensation should I use in fog?
+0.7 to +1.5 EV is the typical range. Start at +1 EV and check the histogram: the white fog should be at roughly 70-80% of the histogram width. If the histogram is pushed to the right wall, reduce by 0.3-0.5 EV.
Why does my fog look grey instead of white?
Grey fog is a metering problem: the camera exposed the fog as a mid-tone (18% grey). Add +0.7 to +1.3 EV exposure compensation and the fog will render white or near-white as seen by the eye.
Is a telephoto or wide-angle lens better for fog photography?
Both serve different purposes. Telephoto (70-200mm) compresses the depth layers in fog for the "floating islands" effect. Wide-angle (16-35mm) works for foreground-heavy compositions with fog receding toward the horizon. Start wide, then work telephoto once the composition is locked.
Take the next step
Bundle deal: Get the Fog Field Guide PDF ($47) + matching Lightroom preset pack ($19) together for $54 — save $12. Shop the bundle →
Take this guide into the field
The ShutYourAperture Weather Photography PDF ($47) covers fog, rain, snow, and storm shooting across 20 location types with weather-prediction methods and printable cheat sheets.
Preset pack: The ShutYourAperture Fog and Mist preset pack ($19) includes 6 Lightroom presets for valley fog, coastal mist, river fog, and blue-hour fog conditions — each tuned to the specific white balance and tonal character of each fog type. Get it in the ShutYourAperture shop →
 Save
SaveMore how-to tutorials
These guides are related and will sharpen your results on a Fog shoot:
Browse all tutorials: How to Photograph Tutorials hub →
All links go to Viator (a TripAdvisor company), the world’s largest marketplace for guided experiences. Tagged as affiliate per FTC.
Read more on Shut Your Aperture
Subscribe to the Aperture Academy for weekly photography deep dives, or browse the Shop for location guide PDFs and Lightroom preset packs.
All links go to B&H Photo Video, the trusted pro source. Tagged as affiliate per FTC.
What to Pack
A focused landscape kit handles every shot at Fog without breaking your back. Here is the working photographer's pack list — every link goes to B&H Photo Video (our primary supplier) or Amazon (for accessories and same-day delivery in the US).
| What & Why | B&H | Amazon |
|---|---|---|
Wide-angle zoom (14-35mm range) The single most important lens for sweeping vistas. Pair with a circular polarizer for skies and water. | Shop B&H → | Shop Amazon → |
Sturdy travel tripod Carbon fiber, packs to 15 inches, holds steady in wind off the coast. Essential for blue-hour and long-exposure work. | Shop B&H → | Shop Amazon → |
Circular polarizer (77mm or 82mm) Cuts haze, deepens sky, reveals texture in water. Non-negotiable for landscape work. | Shop B&H → | Shop Amazon → |
10-stop ND filter For 30-second exposures that turn moving water and clouds into silk. | Shop B&H → | Shop Amazon → |
Extra batteries (3 minimum) Cold weather and long exposures eat batteries. Carry triple what you think you need. | Shop B&H → | Shop Amazon → |
Fast SD/CFexpress cards V90 or CFexpress depending on your body. Two cards minimum so a failure mid-trip is recoverable. | Shop B&H → | Shop Amazon → |
Microfiber lens cloths Salt spray, mist, and dust will ruin every shot if you don't carry a cloth. | Shop B&H → | Shop Amazon → |
B&H and Amazon links are affiliate links. We earn a small commission on purchases at no extra cost to you. We only recommend gear we use or would buy ourselves.