Let’s be honest: that little green "Auto" square on your camera dial is a security blanket. It’s warm, it’s safe, and it’s also the biggest thing holding you back from taking photos that actually make people stop scrolling. You bought a nice camera because you wanted better photos, but right now, you’re essentially using a $2,000 piece of equipment as a glorified smartphone.
If you’ve ever looked at a professional shot, one with that creamy, blurred background or a perfectly frozen moment of action, and wondered why your photos look flat or "just okay," the answer is almost always Manual Mode.
I know, I know. You see all those dials and numbers, and it feels like you need a PhD in physics just to take a picture of your dog. But it’s actually much simpler than the "experts" make it sound. In fact, by the time you finish this guide, you’re going to realize that there are really only three things you need to worry about.
Ready to finally take control? Let’s dive into the five steps to mastering manual mode and ditching auto forever.
Step 1: Meet the Exposure Triangle (Without the Headache)
If you want to master manual mode, you have to understand the Exposure Triangle. Think of this as the holy trinity of photography. It consists of three settings: Aperture, Shutter Speed, and ISO.
Every single photo you take is a balance of these three elements. If you change one, you usually have to adjust another to keep the light balanced. It’s like a see-saw. If one side goes up, the other has to react.
Before we get into the nitty-gritty, you should definitely check out our Photography 101 guide for a deep dive into the basics, but for now, here is the "too long; didn't read" version:
- Aperture: How wide the "eye" of your lens opens.
- Shutter Speed: How fast that "eye" blinks.
- ISO: How sensitive your camera is to the light it sees.
When you’re in Auto mode, the camera makes a guess about these three based on what it thinks is "middle gray." But your camera is a computer, not an artist. It doesn't know you’re trying to capture a moody silhouette or a bright, airy portrait. It just wants to make sure the photo isn't too dark or too bright.

Step 2: Master Aperture (The "Vibe" Setter)
Aperture is usually the first thing I adjust when I’m setting up a shot. Why? Because it controls your Depth of Field. This is a fancy way of saying it decides how much of your image is in focus.
Aperture is measured in "f-stops" (like f/1.8, f/4, or f/11). This is where beginners often get confused: Small numbers mean a big opening.
- Low f-number (f/1.8, f/2.8): The lens is wide open. This lets in a ton of light and creates that beautiful "bokeh" (blurred background) that everyone loves. This is perfect for portrait photography.
- High f-number (f/11, f/16): The lens opening is tiny. This lets in less light, but it keeps everything from the foreground to the background in sharp focus. This is what you want for landscapes.
If you’re shooting a person and you want them to pop, drop that f-number as low as your lens will allow. If you’re shooting a mountain range, crank it up to f/11.
By choosing your aperture first, you’re deciding the "look" of the photo. Once that’s set, you just have to use the other two pillars to make sure the exposure is right. For more on this, you can always find great deep-dives on PhotoGuides.org.
Step 3: Command Your Shutter Speed (The "Motion" Controller)
Now that you’ve picked your aperture, you need to decide how long your camera’s sensor is exposed to light. This is your Shutter Speed.
Shutter speed is measured in fractions of a second. 1/1000 is very fast. 1/30 is very slow.
- Fast Shutter Speed (1/500 and up): This freezes motion. If you’re shooting sports, wildlife, or your hyperactive toddler, you need a fast shutter speed. If it’s too slow, your subject will just be a blurry mess.
- Slow Shutter Speed (1/60 and below): This allows motion blur. Think of those silky-smooth waterfalls or light trails from cars at night.
Pro Tip: If you’re holding the camera in your hands (not using a tripod), try not to let your shutter speed go below 1/60. Any slower than that, and the tiny shakes from your hands will make the whole image look blurry. This is a classic rookie mistake. In fact, we’ve listed it in our guide on 7 mistakes you’re making with manual mode.

Step 4: Use ISO as Your Secret Weapon (But Be Careful)
ISO is the third leg of the triangle. It tells your camera how "hungry" it should be for light. Back in the day of film, you had to buy a specific roll of film with a specific ISO. Now, we can change it with the click of a button.
- Low ISO (100 – 400): Use this when you have plenty of light (like outdoors during the day). It gives you the cleanest, sharpest images.
- High ISO (1600+): Use this when it’s dark. It boosts the signal to make the image brighter, but there’s a catch: it adds "noise" or grain to your photo.
In the 2026 era of photography, modern mirrorless cameras are incredible at handling high ISO. You can push your settings much further than you could five years ago. If you want to know why this shift happened, check out the 2026 camera shift secrets revealed.
Even with great tech, the rule is simple: keep your ISO as low as possible for the situation. Only raise it when you’ve already opened your aperture and slowed your shutter speed as much as you can.
Step 5: The Manual Mode Workflow (Bringing It All Together)
Okay, you know the parts. Now, how do you actually use them in the field? Follow this 5-minute workflow every time you turn your camera on:
- Switch the dial to "M": Don't look back. You can do this.
- Set your ISO: If it’s sunny, go to 100. If you’re indoors, try 800.
- Set your Aperture: Ask yourself: "Do I want a blurry background or a sharp one?" Set your f-stop accordingly.
- Look through the viewfinder: You’ll see a little scale with a "0" in the middle. This is your Light Meter.
- Adjust your Shutter Speed: Dial your shutter speed until the little marker on that scale is sitting right on the "0."
Take the shot. Look at the back of the screen. Is it too dark? Slow down the shutter. Too bright? Speed it up.
If you want to speed up your learning curve, I highly recommend practicing these steps daily. You can also head over to Shut Your Aperture’s learning portal for structured tutorials that walk you through this process in real-time.

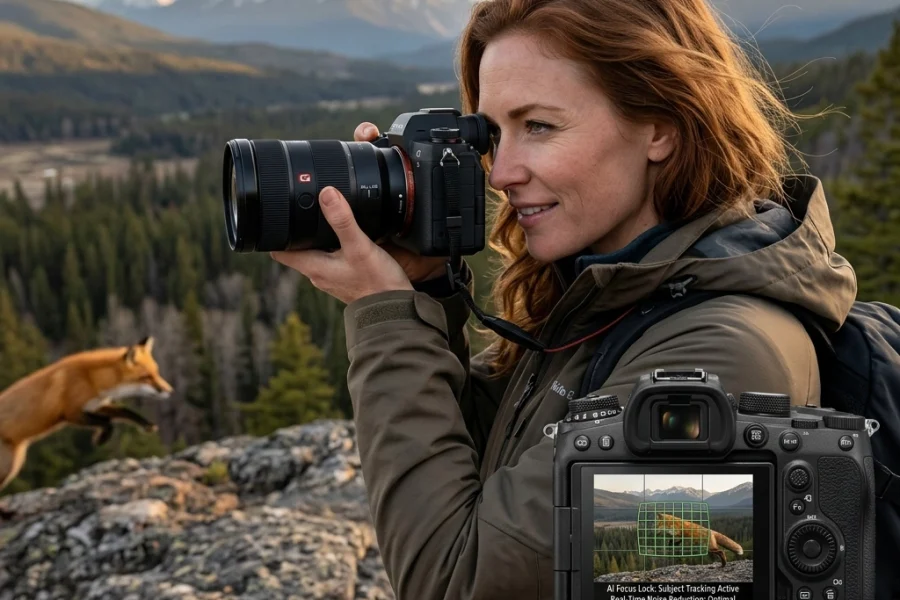
Why You Should Care About AI-Powered Tech in 2026
It’s May 2026, and the landscape of photography has changed. You might be wondering, "If AI is so good, why do I still need to learn manual mode?"
The truth is, AI-powered mirrorless tech is designed to assist the photographer, not replace their vision. Your camera might have AI subject tracking that can find a bird’s eye in a split second, but it doesn't know if you want that bird to be a silhouette against the sunset or a brightly lit documentary shot.
Manual mode gives you the "creative veto." When the AI thinks the scene is too dark and tries to brighten it, you can stay in manual and keep it dark to preserve the mood. AI is a tool, but manual mode is the steering wheel.
Even when it comes to editing, tools like Luminar use AI to enhance what you’ve captured, but they work best when you’ve provided a high-quality, well-exposed "raw" file to begin with. You can’t "AI-fix" a photo that was taken with the wrong shutter speed or a completely missed aperture setting.
The Secret Weapon: Reading the Histogram
Once you start shooting in manual, stop trusting your camera’s LCD screen. In bright sunlight, that screen looks dark. In a dark room, it looks blindingly bright. It lies to you.
The Histogram doesn't lie. It’s a little graph that shows the distribution of light in your photo.
- If the graph is all scrunched up to the left, your photo is underexposed (too dark).
- If it’s scrunched up to the right, it’s overexposed (too bright).
- You want a nice mountain range in the middle.
Learning to read the histogram is the "level up" that separates beginners from intermediate shooters. It’s one of those things Edin Chavez often talks about over at blog.edinchavez.com, it’s about using the data your camera gives you to make better artistic choices.

Common Pitfalls to Avoid
Even with a guide, you’re going to mess up. That’s part of the process. Here are three things to watch out for:
1. The "Set It and Forget It" Trap
Light changes constantly. If you move from the sun into the shade, your settings from 30 seconds ago are now useless. Get into the habit of checking your meter every time you move.
2. Focusing on the Wrong Thing
In Manual mode, you’re responsible for everything. Beginners often get so caught up in the exposure triangle that they forget to actually focus the lens or compose the shot. Don't let the math kill your creativity.
3. Fear of High ISO
In the old days, ISO 800 was "noisy." Today, ISO 3200 or even 6400 is totally usable. A grainy photo is better than a blurry one. If you need more light and your aperture is already wide open, don't be afraid to crank that ISO. You can always clean up the noise later in Luminar.
Practice Makes… Well, Not Perfect, But Way Better
The best way to master manual mode is through "The 100 Shot Challenge." Take your camera outside and commit to taking 100 photos in manual mode. Don't switch back to auto, even if you get frustrated.
By shot 20, you’ll be annoyed.
By shot 50, you’ll start to understand how the dials feel.
By shot 100, you’ll be adjusting your shutter speed without even thinking about it.
Photography is a muscle. You have to flex it. If you’re looking for more inspiration, check out Edin Fine Art to see what’s possible when you fully command your equipment.

Final Thoughts on Ditching Auto
Ditching auto isn't about being a "purist" or looking cool. It’s about removing the middleman between your brain and the final image. When you shoot in Auto, the camera is making creative decisions for you. When you shoot in Manual, you are the creator.
It might feel clunky at first. You might miss a few shots because you were fiddling with a dial. That’s okay. The shots you do get will be exactly how you envisioned them, and that feeling is worth the learning curve.
If you’re ready to take the next step in your journey, whether it's learning portrait techniques or understanding the latest AI photography news, keep pushing yourself to try new things. The "Manual" door is now open: walk through it.
For more detailed walkthroughs and community support, don't forget to visit https://learn.shutyouraperture.com/. We’re here to help you stop taking snapshots and start making art.