Let’s be honest. We’ve all been there. You’re standing in front of a majestic mountain range or a sunset that looks like it was painted by the gods, you click the shutter, and… the photo looks like a blurry, beige mess. It’s frustrating. You start thinking you need a more expensive camera or a plane ticket to Iceland to get those "pro" shots.
But here’s the truth: the fastest way to get better at landscape photography isn’t about buying more gear. It’s about mastering a few fundamental habits that bridge the gap between "snapshot" and "fine art." At Shut Your Aperture, we believe anyone can take world-class photos if they stop guessing and start being intentional.
If you want to stop taking mediocre photos and start creating images that people actually want to hang on their walls, this guide is for you. We’re going to dive deep into the technical, the creative, and the practical steps to level up your game.
Master Your Camera: Stop Using Auto Mode
If you are still shooting on "Auto," you are letting a computer chip make creative decisions for you. Computers are smart, but they don't have a soul. They don't know that you want that waterfall to look like silk or that you want every single wildflower in the foreground to be tack-sharp.
The absolute fastest way to improve is learning how to use manual mode camera settings. When you take control of the Exposure Triangle: Aperture, Shutter Speed, and ISO: you unlock the door to professional photography.
The Landscape Trio
For landscapes, you usually want three things: maximum detail, zero "noise" (grain), and everything in focus from the front to the back.
- Aperture (The f-stop): To get that deep "everything is in focus" look, you need a narrow aperture. Aim for f/8 to f/11. Going higher (like f/22) can actually make your photos softer due to something called diffraction.
- ISO: Keep this as low as possible. ISO 100 is your best friend. This ensures your images are clean and crisp.
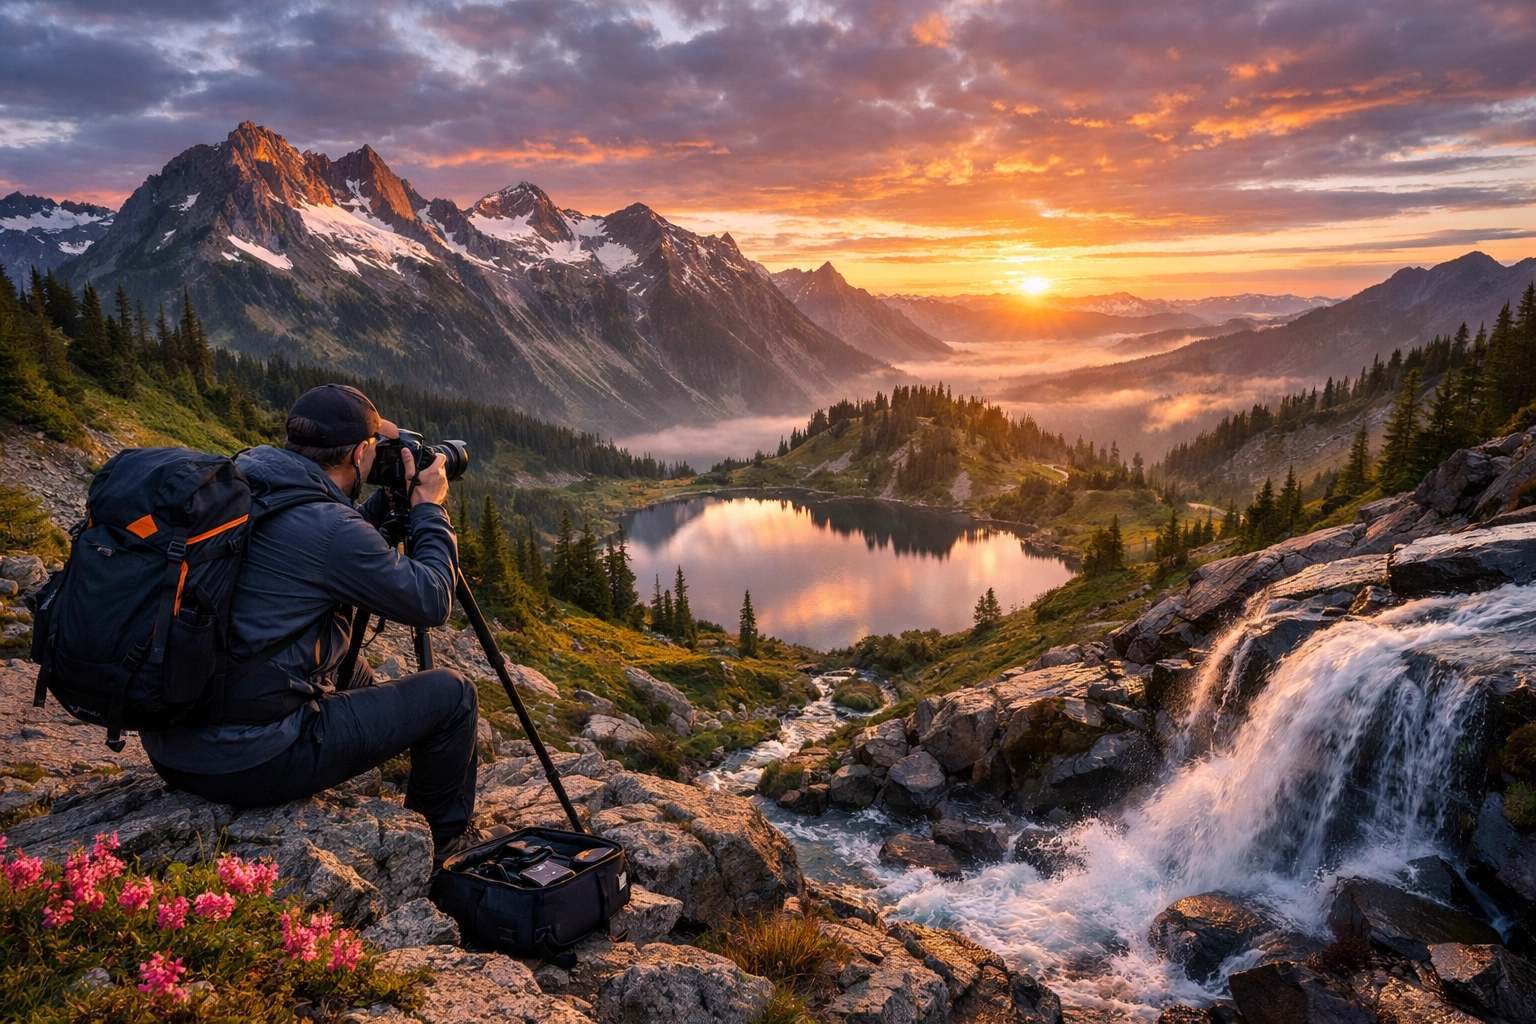
- Shutter Speed: Once your Aperture and ISO are set, your Shutter Speed is the "balancing act." Since you’re using a low ISO and a narrow aperture, your shutter will likely need to stay open longer. This is why you can’t hold the camera in your hands: you’ll need a tripod.
If this sounds a bit overwhelming, don't sweat it. We’ve got a massive resource on Manual Mode 101: A Beginner’s Guide to Finally Mastering Your Camera that breaks this down even further.
 Save
Save
The Single Most Important Piece of Gear: The Tripod
If you ask ten pro photographers for their number one tip, nine of them will say: "Get a tripod." The tenth guy probably forgot his at home and is currently crying about it.
A tripod isn't just a stand for your camera; it’s a tool that forces you to slow down. When you have to physically set up three legs and level your camera, you stop "spraying and praying." You start looking at the corners of your frame. You notice that ugly trash can or that distracting branch in the corner before you take the shot.
Beyond composition, a tripod allows you to use those slow shutter speeds we talked about. This is essential for capturing beauty in motion when shooting rivers, oceans, or waterfalls. If you want that dreamy, misty water effect, you need a 1-second or longer exposure. You can't hold a camera still for a full second without it looking like a shaky mess.
Composition: The "Rule of Thirds" and Beyond
You can have the most expensive camera in the world, but if your composition sucks, your photo sucks. Composition is how you tell the viewer where to look.
The easiest place to start is the Rule of Thirds. Imagine your frame is divided into a 3×3 grid. Instead of putting the horizon right in the middle (which is usually boring), put it on the top or bottom third line. Place your main subject: like a lone tree or a mountain peak: on one of the four points where the lines intersect.
Add a Foreground Element
This is the "pro secret" for landscape photography. A great landscape photo has layers:
- Foreground: Something close to the lens (rocks, flowers, a path).
- Middle ground: The main subject (a lake, a forest).
- Background: The sky or distant mountains.
Including a foreground element creates a sense of depth. It makes the viewer feel like they could step right into the photo. For more in-depth photography tutorials on framing and composition, check out our ultimate guide.
Save
Hunt for Better Light
The "fastest" way to get better is often just changing when you shoot. Most beginners go out at noon when the sun is high and the shadows are harsh and ugly. Pro landscape photographers live for two times of day: Golden Hour and Blue Hour.
- Golden Hour: The hour after sunrise and the hour before sunset. The light is soft, warm, and creates long, beautiful shadows that emphasize the texture of the land.
- Blue Hour: The 20-30 minutes before sunrise and after sunset. The sky turns a deep, moody blue, and the world feels calm and ethereal.
If you want to find the top spots for majestic sunset photography, you have to be willing to wake up early and stay out late. For more inspiration on finding the perfect light and location, you can explore more over at Shut Your Aperture.
Focus on the "Hidden Gems"
Social media has a way of making us feel like we have to go to the same five spots in Oregon or Switzerland to get a good photo. But some of the best landscape photography comes from finding hidden gems for stunning travel photography.
Look for the "lesser-known" spots. Check out secluded paradises near your home. Sometimes a local park or a quiet coastal stretch can offer more unique images than a crowded tourist landmark. When you find these hidden gem locations, you have the freedom to experiment without ten other tripods bumping into you.
Mastering Water and Texture
Landscapes aren't just about mountains. Water is one of the most dynamic subjects you can shoot. Whether it's the crashing waves of a picturesque coastal escape or a still lake reflecting the clouds, mastering water is a rite of passage.
To really nail these shots, you need to understand the best camera settings for stunning water landscapes. Often, this involves using Circular Polarizers to cut glare on the water's surface or using Neutral Density (ND) filters to allow for even longer exposures during the day.
You can also use rare textures like cracked mud, frost, or lichen-covered rocks to add a "tangible" feel to your photos. The goal is to make the viewer feel the environment.
Save
Post-Processing: The Final Polish
The camera captures the data, but you create the art in the edit. Every professional landscape photo you see has been edited. This isn't "cheating": it’s a digital darkroom.
One of the most powerful tools for landscape photographers today is Luminar. It uses AI to help with things like sky replacement (when the weather doesn't cooperate) or enhancing the natural "glow" of a sunset. Using Luminar can significantly speed up your workflow, allowing you to spend less time behind a computer and more time out in the field.
When editing, focus on:
- Bringing back highlights: Don't let your clouds look like white blobs.
- Opening up shadows: Show the detail in the rocks and trees.
- Correcting White Balance: Make sure the colors feel true to the mood of the moment.
For more advanced editing tips and to see how the pros do it, check out proshoot.io or see the fine art galleries at www.edinfineart.com to see the end result of professional processing.
Practice and Persistence
You can read every blog post on the internet, but the fastest way to get better is to get outside and shoot. A lot.
Go back to the same location multiple times. See how it looks in the winter versus the spring. See how it looks during a storm versus a clear day. Persistence is what separates the hobbyists from the masters. If you want to see behind-the-scenes content of how these shots come together, follow the journey on blog.edinchavez.com.
Landscape photography is a marathon, not a sprint. But by mastering your manual settings, using a tripod, and chasing the right light, you’ll see your "hit rate" of great photos skyrocket.
Ready to dive deeper? Check out our mastering light and water guide or look into the latest photography trends to stay ahead of the curve. Whether you're shooting ethereal landscapes or enigmatic vistas, the world is waiting for your perspective.
Now, grab your gear, shut your aperture, and go find something beautiful to capture. For more studio-based tips and professional photography services, visit www.edinstudios.com.
Save
Luminar Neo’s Sky AI, atmosphere AI and SuperSharp are designed for landscape work — replace flat skies, add depth, and recover detail in seconds. Tagged as affiliate per FTC.


