ISO in Photography: Free ISO Chart + How to Use It
Updated
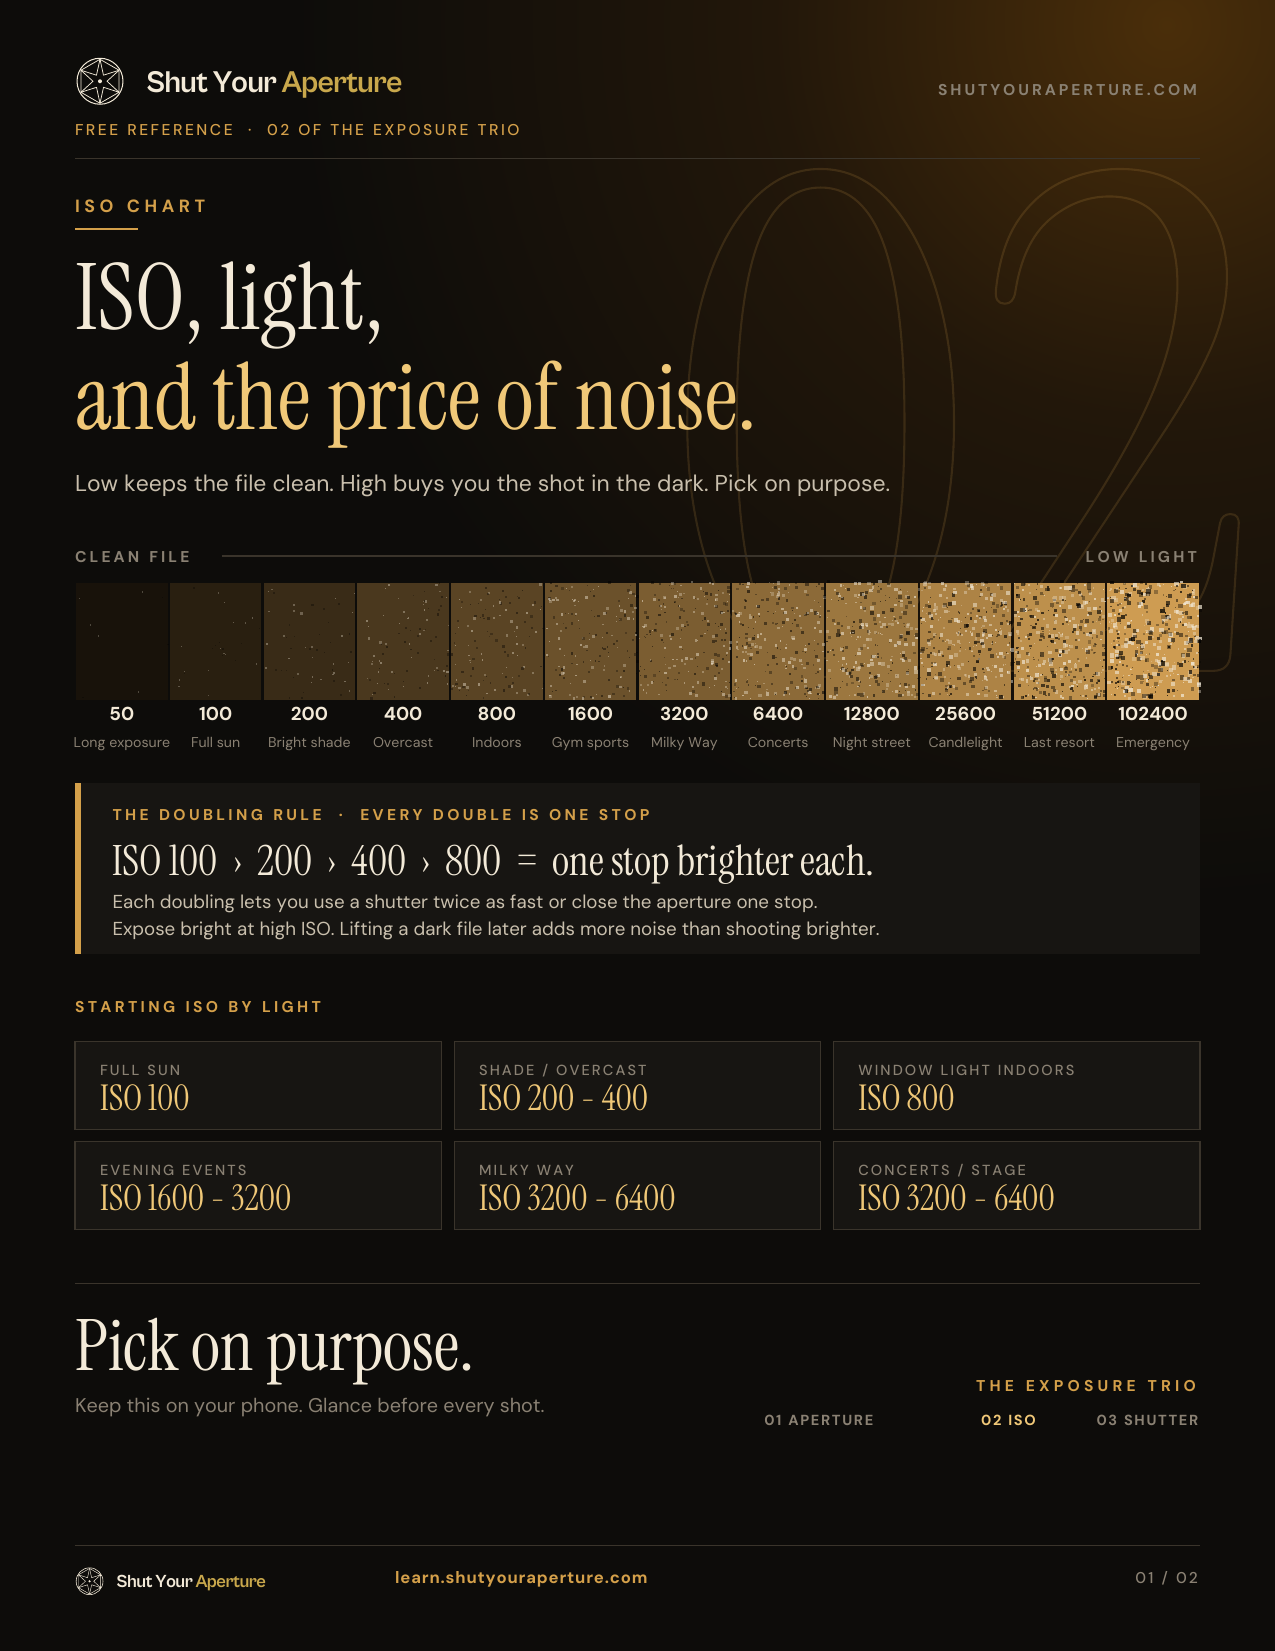
ISO sets how much your camera brightens the signal from the sensor. Low ISO (100) gives the cleanest file with the most detail. High ISO (3200 and up) lets you shoot in dim light with a fast enough shutter, at the cost of more noise. Use the lowest ISO that still lets you get the shutter speed and aperture you need. The free chart below has starting ISOs for every kind of light.
Get the free ISO Chart (PDF)
Enter your email and it downloads right away. We'll also email you a copy.
You'll join the Shut Your Aperture email list for photo tips. Unsubscribe anytime.
What ISO actually does
ISO doesn’t make the sensor catch more light. Aperture and shutter speed decide how much light lands on it. ISO is gain: it amplifies what came in. That’s why a dark scene at high ISO looks noisy. There just wasn’t much light, and the camera turned it up.
The steps work like the other two settings. ISO 100 to 200 is one stop brighter. 200 to 400 is another. Every doubling equals one stop, the same as halving the shutter speed or opening the aperture one full stop.
Starting ISO by light
| Light | Start here | Typical pairing |
|---|---|---|
| Full sun | ISO 100 | f/8, 1/500s |
| Shade / overcast | ISO 200 – 400 | f/4, 1/500s |
| Window light indoors | ISO 800 | f/2.8, 1/200s |
| Evening events, receptions | ISO 1600 – 3200 | f/2.8, 1/250s |
| Milky Way | ISO 3200 – 6400 | f/2.8, 15-20s on a wide lens, tripod |
| Concerts / stage | ISO 3200 – 6400 | f/2.8, 1/250s |
These are starting points. Take one test frame, check the histogram, and adjust.
The rule that fixes most low-light photos
You can clean up noise. You can’t fix motion blur. When the light drops, most people hold ISO low and let the shutter slow down to 1/30s. The photo comes out clean and blurry, and it’s ruined. Raise ISO first. A sharp ISO 6400 file with some grain beats a clean ISO 800 file where the face is smeared.
Second rule: expose bright at high ISO. An underexposed ISO 3200 file brightened two stops in Lightroom looks worse than a correctly exposed ISO 12800 file. The noise lives in the shadows, and lifting shadows lifts noise.
Worked examples with real settings
Wedding reception, dim room
Manual mode, f/2.8, 1/250s, Auto ISO with a max of 12800. The shutter stays fast enough for people moving and talking, the aperture holds two faces, and the camera floats ISO as you move between the dance floor and the bar. Check a frame at 100% early in the night so you know what your camera’s ceiling looks like.
Kids’ basketball game in a gym
f/2.8, 1/1000s, ISO 3200 to 6400. Gym lights are dimmer than they look. 1/1000s freezes a jump shot. If the file is too dark at ISO 6400, open the aperture before you drop the shutter.
Milky Way from a dark site
14-24mm on a tripod, f/2.8, 15 to 20 seconds, ISO 3200 to 6400. Longer than about 20 seconds on a 14mm lens and stars start to stretch into short lines. If it’s too dark, raise ISO rather than stretching the shutter.
Landscape on a tripod
Back to base ISO (usually 100, sometimes 64). You have all the time in the world on a tripod, so let the shutter run long and get the cleanest file your camera can make.
Auto ISO, set up properly
Auto ISO is a tool, not a cheat. Set two things: a maximum ISO you’re happy with (find it with the test below), and a minimum shutter speed so the camera raises ISO before the shutter gets too slow. 1/250s is a good floor for people. 1/1000s for sports. Then shoot in aperture priority or manual with Auto ISO and you control depth and motion while the camera handles brightness.
Find your camera’s clean limit (15-minute test)
Pick a dim room with some dark areas and fine detail. Put the camera on a table. Shoot the same frame at ISO 800, 1600, 3200, 6400, 12800 and 25600, keeping the exposure correct by changing the shutter. Open all of them at 100% in Lightroom. The highest ISO you’d still print or post is your Auto ISO max. Now you’ll stop guessing at events.
Mistakes I see all the time
- Fear of high ISO. Cameras from the last several years handle ISO 6400 far better than older bodies did, and raw denoise tools clean up more. Test yours.
- Leaving ISO high the next morning. Check it before every shoot. ISO 6400 in full sun forces a very fast shutter or a blown-out frame.
- Shooting JPEG at high ISO. Shoot raw so noise reduction has the full file to work with.
ISO is one part of exposure. Pair it with the aperture chart and the shutter speed chart.
Want this on your phone at the shoot?
Get the free ISO Chart (PDF)
Enter your email and it downloads right away. We'll also email you a copy.
You'll join the Shut Your Aperture email list for photo tips. Unsubscribe anytime.
FAQ
What ISO should I use?
The lowest ISO that still gives you the shutter speed and aperture you need. ISO 100 in full sun, 800 by a window indoors, 1600 to 3200 at evening events.
Does high ISO ruin photos?
Not if the shot is sharp and exposed well. Noise can be cleaned up in editing. Motion blur from a slow shutter can’t.
How do I set Auto ISO?
Set a maximum ISO you’re happy with and a minimum shutter speed, like 1/250s for people. The camera then raises ISO before the shutter gets too slow.
Is the ISO chart free?
Yes. The PDF chart is free. Enter your email to get it and join the Shut Your Aperture email list.