Airbnb Lightroom Presets
Table of Contents — 4 min read
Airbnb Lightroom Presets is one of the most important skills in lightroom. This guide covers exactly what you need to know — from first principles to advanced application. Our complete training is inside Shut Your Aperture School — but this guide gives you the working knowledge you need today.
 Save
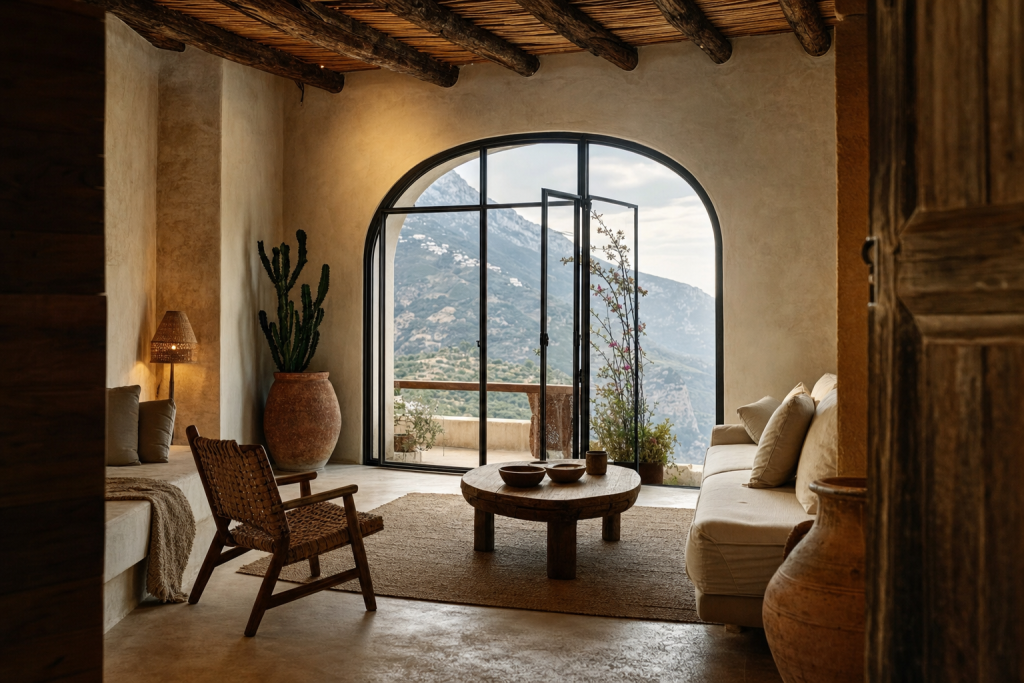
SaveReal estate Lightroom presets: what MLS-ready actually requires
MLS-ready presets are calibrated to the specific demands of multiple listing service photo standards. The MLS — Multiple Listing Service — is the database real estate agents use to advertise properties, and its photo display standards are surprisingly demanding. Photos that look fine in your Lightroom preview can render poorly in MLS thumbnails, full-size MLS displays, and the syndicated displays on Zillow, Realtor.com, and Redfin. For ready-made MLS-ready presets, see our real estate Lightroom presets.
The display standards for MLS photos are: typically 1500-2000 pixels on the long edge, sRGB color space, JPEG at 80-85% quality, and a file size under 5MB per image. Photos that exceed these specifications get auto-resized by the MLS system in ways that often degrade quality. Photos that fall short of these specifications display as low-resolution and amateur.
A properly-built MLS-ready preset accounts for these display constraints. The export preset (separate from the develop preset) handles the resize, sharpening, and quality settings for MLS output specifically. The develop preset handles the look — neutral whites, recovered windows, lifted shadows, accurate floor and ceiling rendering.
The five core moves of every MLS-ready preset
Every well-built MLS preset performs the same five core moves in some variation. Understanding these gives you the working knowledge to evaluate any preset, modify presets to your taste, or build your own.
Move 1: White balance neutralization with mild cool bias. MLS photos benefit from white walls reading as actual white, not warm white. A slight cool white balance correction (-300 to -600 Kelvin from “auto”) combined with a +5 to +10 tint adjustment typically produces accurate-feeling whites without making the image look clinical.
Move 2: Aggressive shadow lift with controlled highlight recovery. The single biggest improvement in real estate frames is opening shadow detail without crushing highlights. Shadows +50 to +70, highlights -50 to -70, in combination, give the bright-but-detailed look that defines professional MLS photography.
Move 3: Lens correction and chromatic aberration removal. Wide-angle real estate lenses (16-35mm, 14-24mm, 11-24mm) introduce significant geometric distortion and color fringing. The lens correction profile and chromatic aberration removal should be on by default in any real estate preset. If you are starting from raw files without these enabled, the frames will look amateurish at MLS display sizes.
Move 4: Selective saturation: greens (lawns) and oranges (woods) up, blues (skies) careful, reds (bricks) controlled. The HSL panel adjustments in a good MLS preset are usually subtle but specific. Lawn greens and wood tones get a 5-10% saturation increase. Sky blues are pushed only when targeting twilight or sky-replacement workflows. Reds (often present in brick exteriors and decorative elements) are usually held flat to avoid over-warm casts.
Move 5: Subtle clarity and texture without crunch. Real estate clarity adjustments should bring out detail in surfaces (wood grain, stone texture, fabric weave) without giving the image an HDR-crunched look. Clarity +5 to +10 is the typical range. Texture (Lightroom’s mid-frequency detail slider) +5 to +10 alongside clarity produces a clean detail-enhanced result without artifacts.
Where MLS presets fail and how to fix them
Even well-built MLS presets fail in specific scenarios. Knowing the failure modes lets you correct manually rather than abandoning the preset entirely.
Failure mode: blown sun spots through windows. When direct sunlight enters a window into the camera frame, no preset can fully recover the highlight. The fix is a manual radial mask on the window itself with exposure -2 stops, clarity +30, dehaze +20.
Failure mode: ceiling looking gray instead of white. Caused by directional shadow from interior lighting. Apply a gradient mask from the bottom of the frame upward, with exposure +0.5 across the upper third.
Failure mode: warm cast bleeding into dark areas. Tungsten interior lights spilling onto wood floors and dark cabinets create a yellow/orange cast that the global white balance correction does not fully neutralize. Apply a luminance mask targeting darker tones with a slight cool color correction.
Failure mode: bathroom looking blue compared to other rooms. LED-lit bathrooms register cool while tungsten-lit living rooms register warm. The fix is room-by-room white balance variation rather than globally identical settings.
Setup workflow for installing real estate presets
Installing real estate presets correctly into Lightroom requires a few steps that are easy to skip but materially improve workflow.
First, organize presets into a dedicated “Real Estate” folder in the Lightroom presets panel. Sub-folders for “MLS Interior,” “Twilight,” “Drone,” “HDR Flambient” make navigation faster during the editing pass.
Second, set up your default import preset to apply lens correction and chromatic aberration removal automatically. These settings should be on by default for every real estate frame; baking them into the import preset saves clicks on every shoot.
Third, create custom export presets for MLS (1500-2000px long edge, sRGB, JPEG 80%, 1.2MB max file size), Airbnb (longer edge, brighter overall, slightly warmer), and full-size archive (full-resolution TIFF for client delivery).
Fourth, build a custom Smart Collection in Lightroom for “Real Estate Today” filtering by date and folder. The smart collection auto-populates as you import the day’s shoot, eliminating manual file management during the editing pass.
 Save
SaveRecommended starting settings for real estate edits
| Setting | MLS Interior | Twilight Exterior | Airbnb Lifestyle |
|---|---|---|---|
| White Balance | Auto + slight cool | Daylight 5500K | Warm 5800-6200K |
| Exposure | +0.3 to +0.7 | 0 to -0.3 | +0.5 to +0.8 |
| Highlights | -50 to -70 | -30 to -50 | -30 to -50 |
| Shadows | +50 to +70 | +20 to +40 | +30 to +50 |
| Whites | +10 to +20 | +5 to +10 | +10 to +15 |
| Blacks | -5 to 0 | -15 to -25 | -5 to -10 |
| Clarity | +5 to +10 | +10 to +15 | +5 |
| Vibrance | +5 | +15 to +25 | +10 to +15 |
Want to master lightroom?
Shut Your Aperture School is the complete photography training — 1,200+ students, 4.9/5 stars, 30-day guarantee.
MLS-Ready Real Estate Presets
Built specifically for real estate workflows — neutral whites, recovered windows, twilight magic, drone aerials. Handles 80% of your listing edit in one click.
For Lightroom’s official documentation, see Adobe’s Lightroom user guide.
Ready to take this further?
The fastest way to keep improving is structured practice with feedback. Inside Shut Your Aperture School, you get the complete training, plus a community of working photographers and direct feedback on your work. The 30-day guarantee removes the risk.
Related guides in Real Estate Presets & Editing
See all Real Estate Presets & Editing articles →
Skylum’s Luminar Neo has the industry’s best one-click sky replacement and atmosphere AI — the two edits real estate listings need most. Tagged as affiliate per FTC.
 Save
SaveFAQ
What is airbnb lightroom presets?
Airbnb lightroom presets refers to the techniques and settings photographers use to achieve specific results in this category. The full breakdown is in this guide.
What settings should I use for airbnb lightroom presets?
Specific settings depend on lighting and scenario. The settings tables and recommendations in this article cover the most common cases.
Are presets useful for airbnb lightroom presets?
Yes — well-built presets handle most of the heavy lifting in a single click. See the preset recommendations below.
All links go to B&H Photo Video, the trusted pro source. Tagged as affiliate per FTC.