Let’s be real for a second. You don’t need a massive studio with five different strobes, three assistants, and a power generator to take a killer portrait. In fact, some of the most iconic photos ever taken were made using nothing but the sun and a bit of know-how. Natural light is the most versatile, beautiful, and: best of all: free tool in your kit.
If you are just getting started with photography for beginners, the thought of "finding the light" can feel a little mystical. But it’s not magic; it’s physics. Once you understand how light behaves, you can bend it to your will. Whether you’re shooting with the best mirrorless cameras or an old DSLR you found in the attic, this guide is going to help you master portrait photography techniques using only natural light.
Why Natural Light?
Why do we love natural light so much? For one, it’s approachable. You don’t have to worry about sync speeds or batteries dying in your flashes. But more importantly, natural light has a "quality" that’s hard to replicate perfectly with artificial sources. It can be incredibly soft and flattering, or it can be harsh and dramatic.
When you’re out in the field, you’re also learning to be observant. You start noticing how the light hits a building at 4 PM or how the "open shade" under a tree makes skin look like butter. This awareness is what separates a person with a camera from a photographer.
The Gear: Keep It Simple
You don’t need to break the bank to get started. While camera gear reviews might have you believing you need a $5,000 setup, the truth is simpler. A decent body and a "nifty fifty" (50mm f/1.8 lens) are enough to create professional-grade portraits.
If you’re looking into the best mirrorless cameras of 2026, you’ll find that modern sensors handle natural light beautifully, especially in high-contrast situations. But remember, the lens is often more important for portraits because it determines your depth of field (that creamy, blurry background we all love).
Understanding the "Quality" of Light
Before you press the shutter, you need to look at the light. Is it "hard" or "soft"?
- Hard Light: Think of a clear, sunny day at noon. The shadows are dark and have sharp edges. It’s high-contrast. It’s tough for portraits because it creates "raccoon eyes" (dark shadows in the eye sockets), but it’s great for edgy, dramatic shots.
- Soft Light: Think of an overcast day. The clouds act like a giant softbox, diffusing the sun. Shadows are pale and have soft, blurry edges. This is the most flattering light for skin because it hides blemishes and softens features.
 )
)
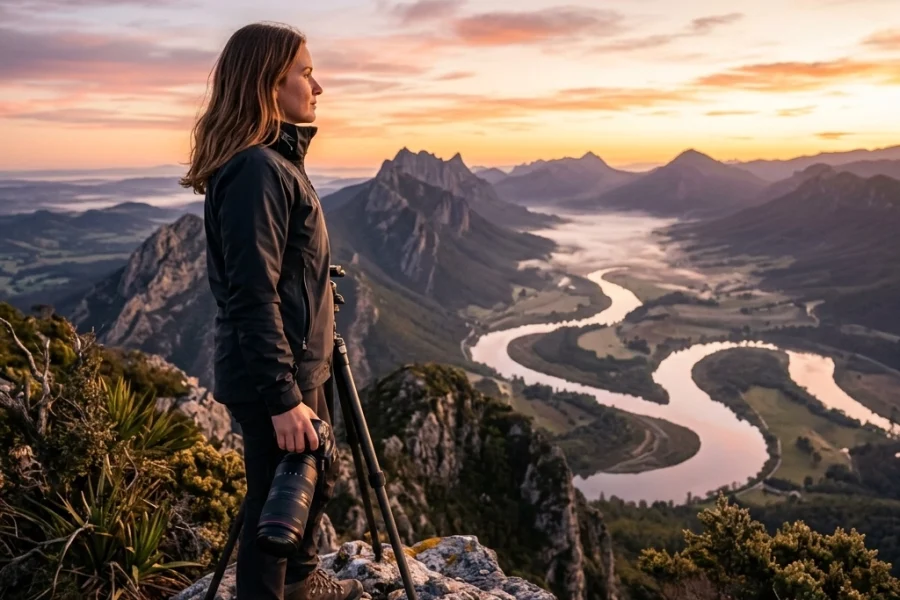
Alt text: A woman standing in a field during the golden hour with soft rim light on her hair, demonstrating natural light portrait photography.
Timing Is Everything: The Golden Hour
You’ve probably heard of the Golden Hour. It’s that window of time right after sunrise and right before sunset. The sun is low in the sky, which means the light has to travel through more of the Earth's atmosphere. This scatters the blue light and leaves us with those warm, orange, and red tones.
During this time, the light is directional but soft. You can point your subject directly at the sun without them squinting their eyes out. It creates a beautiful glow on the skin. If you want to dive deeper into why this works, check out some of the photography tutorials over at PhotoGuides.org.
Pro Tip: If the Golden Hour is too short for you, try the "Blue Hour" (just after the sun sets). The light is very cool and even, giving your portraits a moody, cinematic vibe.
Mastering the Midday Sun
Most people will tell you to put your camera away at noon. I say they’re boring. Sure, the midday sun is harsh, but you just need to know how to manage it.
Use Open Shade
Find a "pocket" of shade. This could be under a porch, beneath a large tree, or in the shadow of a tall building. The key is to place your subject at the very edge of the shade, looking out toward the light. This gives you the softness of shade but keeps the "catchlights" in their eyes. Catchlights are those little white reflections in the eyes that make a person look alive. Without them, the eyes look flat and "dead."
Use a Reflector
A simple 5-in-1 reflector is the best $30 you will ever spend. If the sun is hitting your subject from behind (backlighting), you can use the silver or white side of the reflector to bounce some of that light back onto their face. It fills in the shadows and makes the skin pop. It's a staple in portrait photography techniques.
How to Use Manual Mode for Portraits
If you want to truly succeed, you have to stop using "Auto." I know it’s scary, but learning how to use manual mode camera settings is the only way to get consistent results.
For natural light portraits, here is your basic starting point:
- Aperture: Low numbers (f/1.8, f/2.8). This creates a shallow depth of field, making your subject stand out from the background.
- Shutter Speed: Keep it fast enough to avoid motion blur. Usually, 1/200s or faster is safe for portraits.
- ISO: Keep it as low as possible (ISO 100 or 400) to avoid "noise" or grain in your photos.
If you find yourself struggling with this, don't worry. Even the pros had to start somewhere. Check out this easy guide for beginners to fix common manual mode mistakes.
 )
)
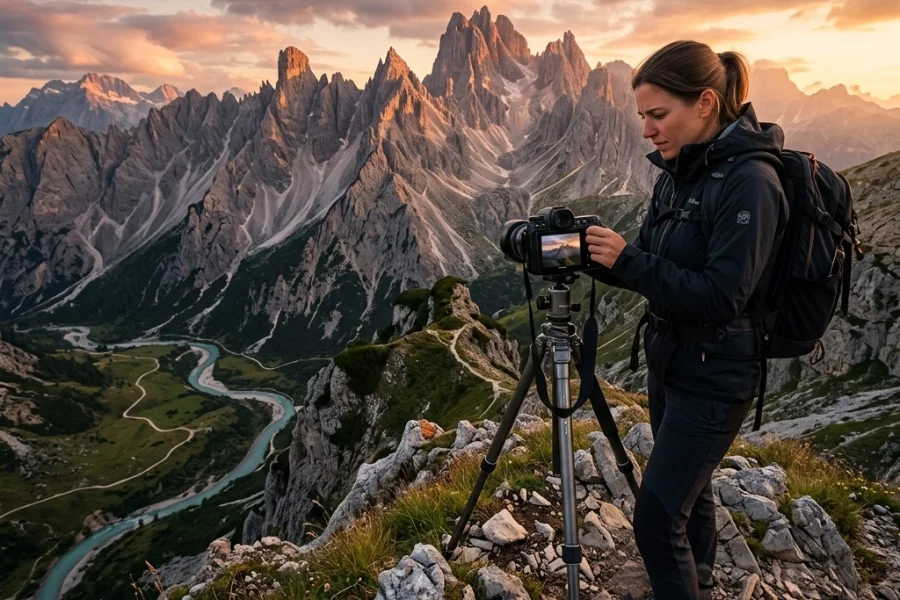
Alt text: A photographer using a white circular reflector to bounce natural light onto a model's face during a midday shoot.
Direction of Light: Where Should the Subject Face?
The direction of light changes the mood of the photo completely.
- Front Lighting: The light is directly in front of the subject. It’s very flat and hides wrinkles. It’s safe but can sometimes look a bit "boring."
- Side Lighting: The light hits the subject from one side. This creates shadows on the other side of the face, adding depth and drama. It’s great for "hero" shots or more masculine portraits.
- Backlighting: The light is behind the subject. This creates a "halo" effect around their hair and shoulders. You’ll need to overexpose your shot slightly or use a reflector to make sure their face isn't just a black silhouette.
Composition and Posing
Once you’ve found the light, you need to work with your model. For photography for beginners, posing is often the most awkward part.
Keep it simple. Ask them to shift their weight to one leg. Ask them to look away and then look back at the camera. If you're doing corporate headshots, the posing will be more rigid, but for creative portraits, movement is your friend.
Don't forget the background! A messy background can ruin a great portrait. This is where landscape photography tips actually come in handy: look for leading lines or natural frames (like tree branches) to draw the viewer’s eye toward your subject. If you want to see some world-class examples of composition, browse the galleries at Edin Fine Art.
Post-Processing: Bringing the Light to Life
Even the perfect natural light photo usually needs a little "love" in post-production. You don't need to overdo it: the goal is to enhance what's already there, not create a fake reality.
I’m a big fan of using Luminar for portrait editing. It has some incredible AI tools that can specifically target skin, eyes, and even the "glow" of the light without making the photo look over-processed. If you’re into photo editing tutorials, you know that less is usually more.
When editing natural light portraits:
- Adjust the White Balance: Make it a little warmer to enhance the sun's glow.
- Lift the Shadows: If the face is a bit dark, gently bring up the shadow slider.
- Enhance the Eyes: A tiny bit of sharpening and brightening on the iris makes a huge difference.
 )
)
Alt text: Close-up portrait of a man using side lighting to create dramatic shadows and highlight facial texture.
Common Mistakes to Avoid
We’ve all been there. You get home, put the SD card in your computer, and realize the photos aren't what you thought they were. Here’s what usually goes wrong:
- Dappled Light: This is when light filters through leaves and creates bright spots and dark spots on the subject's face. It looks like a leopard print of light. It’s almost always a bad look. Move them into full shade or full light.
- Green Cast: If you’re shooting deep in the woods, the sunlight bouncing off the green leaves can turn your subject’s skin slightly green. You’ll need to fix this in your white balance settings later.
- Ignoring the Background: You were so focused on the face that you didn't notice the trash can or the tree branch "growing" out of their head. Always do a quick scan of the whole frame.
Street Photography Ideas for Portraits
If you don't have a model, go for a walk! Some of the best street photography ideas involve finding interesting light in the city and waiting for someone to walk into it. Look for light reflecting off glass skyscrapers or the "tunnel light" in subway entrances. These urban environments offer unique portrait photography techniques that you just can't find in a studio.
Staying Up to Date
The world of photography is changing fast. From new AI sensors in the latest photography news to mirrorless tech that can track a subject's eye through a blizzard, there's always something new to learn. But at the end of the day, a sensor is just a box that catches light. If you master the light, the gear becomes secondary.
 )
)
Alt text: A photographer focusing a mirrorless camera on a subject in bright, natural daylight.
Final Thoughts
Portrait photography with natural light is all about patience and observation. It’s about learning to see the world not just as objects, but as surfaces that reflect and absorb light.
So, here is your homework: This weekend, take your camera and a friend (or even a pet) and go outside. Don't go to a specific "photo spot." Just walk around your neighborhood. Look for "good light." Look for the way the sun hits a brick wall or how it peeks around a corner.
Try shooting in the shade, try shooting with the sun behind them, and try your hand at manual mode. The more you fail, the faster you’ll learn. And if you need more inspiration, there are plenty of photography tutorials waiting for you right here on Shut Your Aperture.
Now, stop reading and go shoot! The sun isn't going to wait for you.