Street photography is the purest form of people-watching. It’s the art of capturing the mundane, the chaotic, and the beautiful moments of everyday life without a script. But let’s be real: walking out your front door with a camera can feel incredibly intimidating. You’re standing on a busy corner, people are rushing past, and suddenly your mind goes blank. You feel like a tourist in your own city, or worse, a creep with a lens.
The secret to moving past that "deer in the headlights" feeling isn't necessarily more gear or a flight to Paris. It’s having a bag full of ideas and a roadmap to follow. Whether you’re a beginner trying to overcome the fear of photographing strangers or a pro looking for a fresh spark, this guide is your ultimate toolkit.
What is Street Photography, Really?
Before we dive into the ideas, let’s clear the air. Street photography isn't just taking photos of people walking. It’s about the human condition. It’s about story, mood, and those split-second moments that will never happen again in exactly the same way.
You don't even need people in the frame for it to be street photography. An empty park bench with a discarded newspaper, a neon sign reflected in a rain puddle, or the way shadows stretch across a sidewalk all tell a story about the world we build for ourselves. If you want to dive deeper into the technical side of things, check out our photography news and tutorials to keep your skills sharp.
Mastering the Mindset: How to Stop Being Afraid
The biggest hurdle in street photography isn't technical: it's psychological. Most of us are terrified of someone yelling at us or feeling like we’re invading privacy. Here is the truth: most people are far too busy with their own lives to notice you.
If you’re feeling shaky, start slow. You don't have to jump straight into the face of a stranger with a wide-angle lens.
- Start with Inanimate Objects: Focus on the "vibe" of the city. Architecture, street signs, and textures.
- Shoot from a Distance: Use a longer lens if it makes you feel safer at first, though we eventually want to get closer.
- Find a "Stage": Find a cool background and wait. Let the people walk into your frame. You’re just a part of the scenery.
Remember, the goal is to be a ghost, not a hunter. If someone does catch your eye, a simple smile and a nod go a long way. If they look upset, just move on. No photo is worth a confrontation. For a full breakdown of getting your head in the game, our landscape photography guide actually covers some great tips on patience that apply perfectly to the street.

Gear and Settings: Keep It Simple
In street photography, less is almost always more. You want to be mobile, discreet, and fast. If you’re hauling a massive tripod and a bag full of five different lenses, you’ve already lost.
The Camera
Anything works. Seriously. Your iPhone, a compact Ricoh, or a mirrorless setup. If you’re deciding between the heavy hitters, take a look at our comparison of the Canon EOS R5 vs Sony A7R V or the Sony A7 IV vs Canon EOS R6 Mark II. Both are incredible, but for the street, you want the one that feels most like an extension of your hand.
The Lens
A prime lens is the street photographer’s best friend.
- 35mm: The classic choice. It’s wide enough to show the environment but tight enough to focus on a subject.
- 50mm: Great for portraits and isolating details.
The Settings
Speed is king. Use Aperture Priority or Manual with Auto-ISO.
- Aperture: f/5.6 to f/8 is the "sweet spot" for ensuring your subject is sharp while keeping some of the background context.
- Shutter Speed: Keep it at 1/250s or faster. People move quickly, and camera shake is the enemy.
- Zone Focusing: This is a game-changer. Set your lens to manual focus, pick a distance (like 3 meters), and everything within a certain range will be sharp. This allows you to shoot without waiting for the autofocus to hunt.
For those using specific gear, we’ve put together a specialized guide on OM System OM-1 Mark II settings for street photography that covers exactly how to dial in your camera for the pavement.
Beginner-Friendly Street Photography Ideas
If you’re staring at a blank sidewalk, try these "scavenger hunt" ideas to get the gears turning.
1. The Power of Silhouettes
This is one of the easiest ways to get dramatic shots without the "fear" of showing faces. Find a strong light source: like a sunset at the end of a street or a brightly lit shop window: and wait for a person to cross in front of it. Expose for the light, and your subject will turn into a dark, mysterious shape. Look for interesting outlines: umbrellas, hats, or a person mid-stride.
2. Hunting for Colors
Pick a color before you leave the house. Today is "Red Day." Your only job is to find red elements in the city. A red coat, a red fire hydrant, a red neon sign. This forces your brain to stop looking for "subjects" and start looking for "composition." It’s a great way to train your eye.
3. Reflections and Layers
Puddles after a rainstorm are a street photographer’s playground. Get low to the ground and use the reflection to create a parallel world. Shop windows are also great for this; they allow you to layer the inside of the store with the reflection of the street behind you. It creates a complex, dreamlike image that tells two stories at once.
4. Shoot from the Back
If you’re still shy about faces, photograph people from behind. This focuses the viewer's attention on the person’s outfit, their posture, and their environment. It makes the subject anonymous and allows the viewer to project their own story onto the person.

Intermediate Ideas: Adding Complexity
Once you’re comfortable being out there, it’s time to start looking for more nuanced stories.
5. Juxtaposition (The Visual Punchline)
Juxtaposition is when you place two contrasting elements in the same frame to create a new meaning. Think of a tired businessman sitting in front of a giant advertisement for a tropical vacation. Or a small child standing next to a massive, imposing statue. These shots are witty and thought-provoking. They require you to find a "stage" (the ad or the statue) and wait for the "actor" to arrive.
6. Light and Shadow as the Main Subject
In many great street photos, the light is the subject. Look for "god rays" coming between buildings or harsh shadows that cut across the sidewalk. During the golden hour, the long shadows can create incredible leading lines. If you're struggling to make those shadows pop in post-processing, using a tool like Luminar can help you emphasize the contrast and grit of the urban environment.
7. The "Decisive Moment"
Coined by Henri Cartier-Bresson, this is the idea of capturing an event that is ephemeral and spontaneous. A dog jumping, a person leaping over a puddle, a sudden burst of laughter. This requires lightning-fast reflexes and an ability to anticipate what’s about to happen. Watch people’s body language; you can often tell when someone is about to do something interesting seconds before they do it.
Advanced Ideas: Pushing the Envelope
Ready to get bold? These ideas will challenge your social skills and your technical precision.
8. The Street Portrait
This involves walking up to a stranger and asking to take their photo. It sounds terrifying, but it’s incredibly rewarding. The trick is to be genuine. "I love your style, would you mind if I took a quick portrait?" Most people are flattered. If you want to master the aesthetics of this, our ultimate guide to portrait photography techniques is a perfect companion.
9. Shooting Up Close
Get a wide lens (like a 28mm) and get physically close: within arm's reach. This creates an immersive feeling, making the viewer feel like they are standing in the crowd. It requires confidence. If you act like you belong there, people will treat you like you belong there.
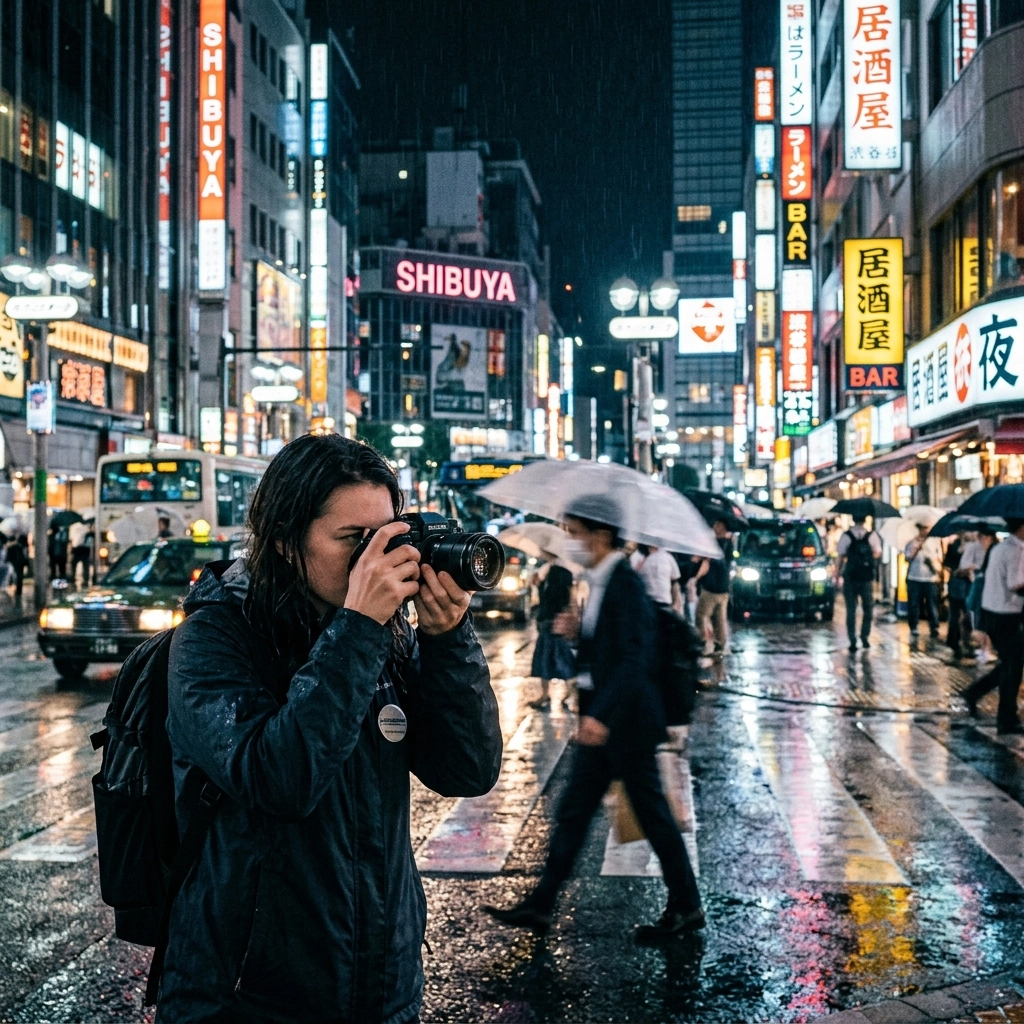
10. Night Street Photography
The city changes completely after dark. Neon signs, car headlights, and street lamps create a cinematic, "Blade Runner" vibe. This is where you’ll need to push your ISO and perhaps embrace a bit of grain. High-ISO noise can actually add to the mood of a street photo, giving it a raw, film-like quality.

Building a Street Photography Project
The best way to improve is to stop taking random photos and start building a project. A project gives you a goal and helps you develop a consistent style.
- The Commute: Photograph your daily trip to work for a month.
- One Corner: Pick one busy intersection and visit it at different times of the day: morning light, midday bustle, and midnight quiet.
- The Hands of the City: Focus only on people’s hands and what they are holding or doing.
- Urban Decay: Document the parts of the city that are being forgotten: peeling paint, broken windows, and overgrown lots.
Working on a project forces you to look deeper than the surface level. It turns you from a "snap-shooter" into a visual storyteller. For more inspiration on how to structure your work, check out PhotoGuides.org for some fantastic community-driven ideas.
Editing Your Street Photos
Taking the photo is only half the battle. The way you edit your street shots can completely change the mood. Many street photographers prefer Black and White because it strips away the distraction of color and focuses on the shapes, textures, and emotions.
However, color can be just as powerful if it’s used intentionally. When you're processing your shots, try to maintain the "truth" of the moment while enhancing the atmosphere. I often use Luminar for its intuitive AI tools that can quickly balance harsh street lighting or bring out the details in dark shadows without making the photo look over-processed.
Learning and Growing
Street photography is a marathon, not a sprint. You will have days where you come home with 500 photos and 499 of them are garbage. That’s normal. Even the masters only expected to get a few truly "great" shots a year.
The key is to keep shooting and keep learning. If you’re looking to take your photography to the next level and want structured guidance, I highly recommend checking out the courses at Shut Your Aperture Academy. It’s packed with insights that can help you cut through the noise and find your unique voice.
You might also find inspiration in the work of Edin Chavez. His fine art gallery and his personal blog showcase how to blend street sensibilities with high-end aesthetic value.
Final Thoughts: Just Get Out There
At the end of the day, all the tips and gear in the world won't matter if your camera stays in your bag. The street is a living, breathing thing that is constantly changing. Every time you step outside, there is a masterpiece waiting to be captured: you just have to be there to see it.
Start with the easy stuff. Shoot some silhouettes. Look for some red. Chase some shadows. Before you know it, that fear will turn into excitement, and you’ll be hunting for the next "decisive moment" with a smile on your face.
Shut your aperture, open your eyes, and go find your story.