
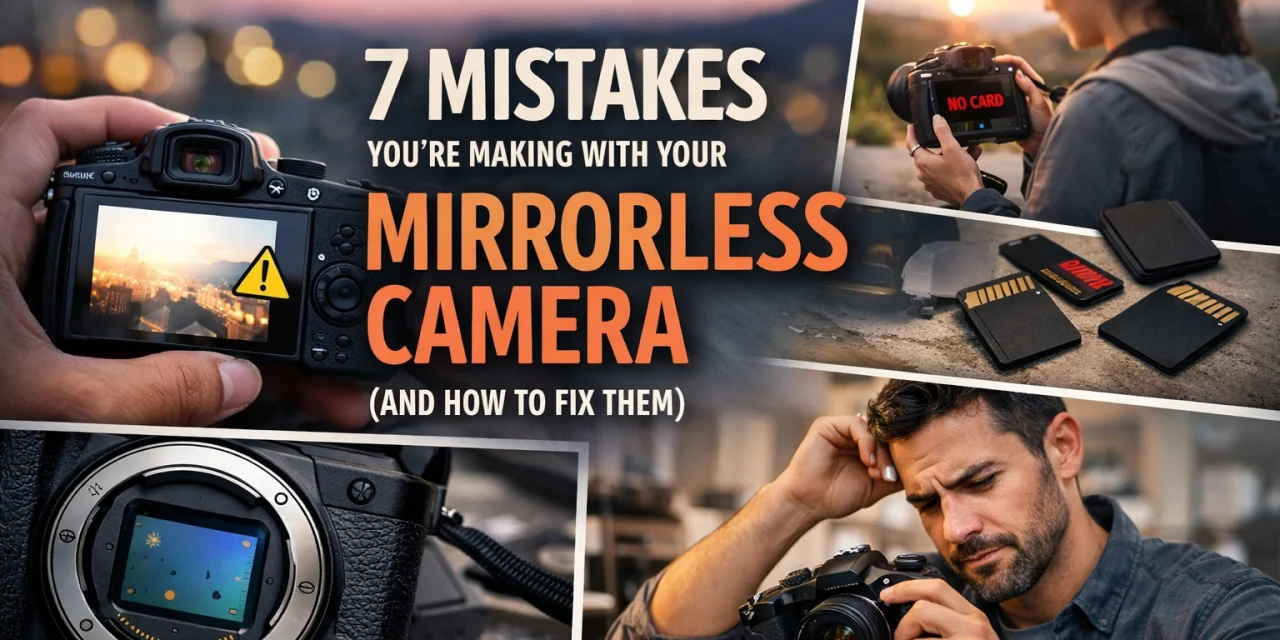
So, you finally took the plunge. You ditched the heavy DSLR, said goodbye to the clacking mirror, and joined the mirrorless revolution. I get it: the promise of lighter gear, face-tracking autofocus that feels like magic, and seeing your exposure in real-time is hard to resist.
But here’s the thing: switching to mirrorless isn't just about changing your hardware; it’s about changing how you think about photography. A lot of photographers carry over their old DSLR habits, and frankly, it’s holding them back. If you feel like your photos aren't quite hitting that "pro" level yet, you might be falling into a few common traps.
At Shut Your Aperture, we see these mistakes all the time. Whether you’re shooting landscapes in the Sierras or street photography in NYC, these errors can be the difference between a "delete" and a "keeper."
Let’s break down the seven biggest mistakes you’re making with your mirrorless camera and, more importantly, how to fix them so you can start shooting like the pro you are.
1. You’re Still Using "Focus and Recompose"
This is the biggest habit DSLR veterans struggle to break. Back in the day, we only had a handful of reliable focus points in the center of the frame. We’d lock focus on the subject’s eye, hold the shutter halfway, and then move the camera to get the composition we wanted.
On a mirrorless camera, this is a recipe for soft images. Mirrorless sensors are packed with hundreds (sometimes thousands) of focus points that cover almost the entire frame. When you "focus and recompose," you’re actually shifting the plane of focus slightly, which can cause you to miss the sharpness, especially if you’re shooting with a wide aperture like f/1.8.
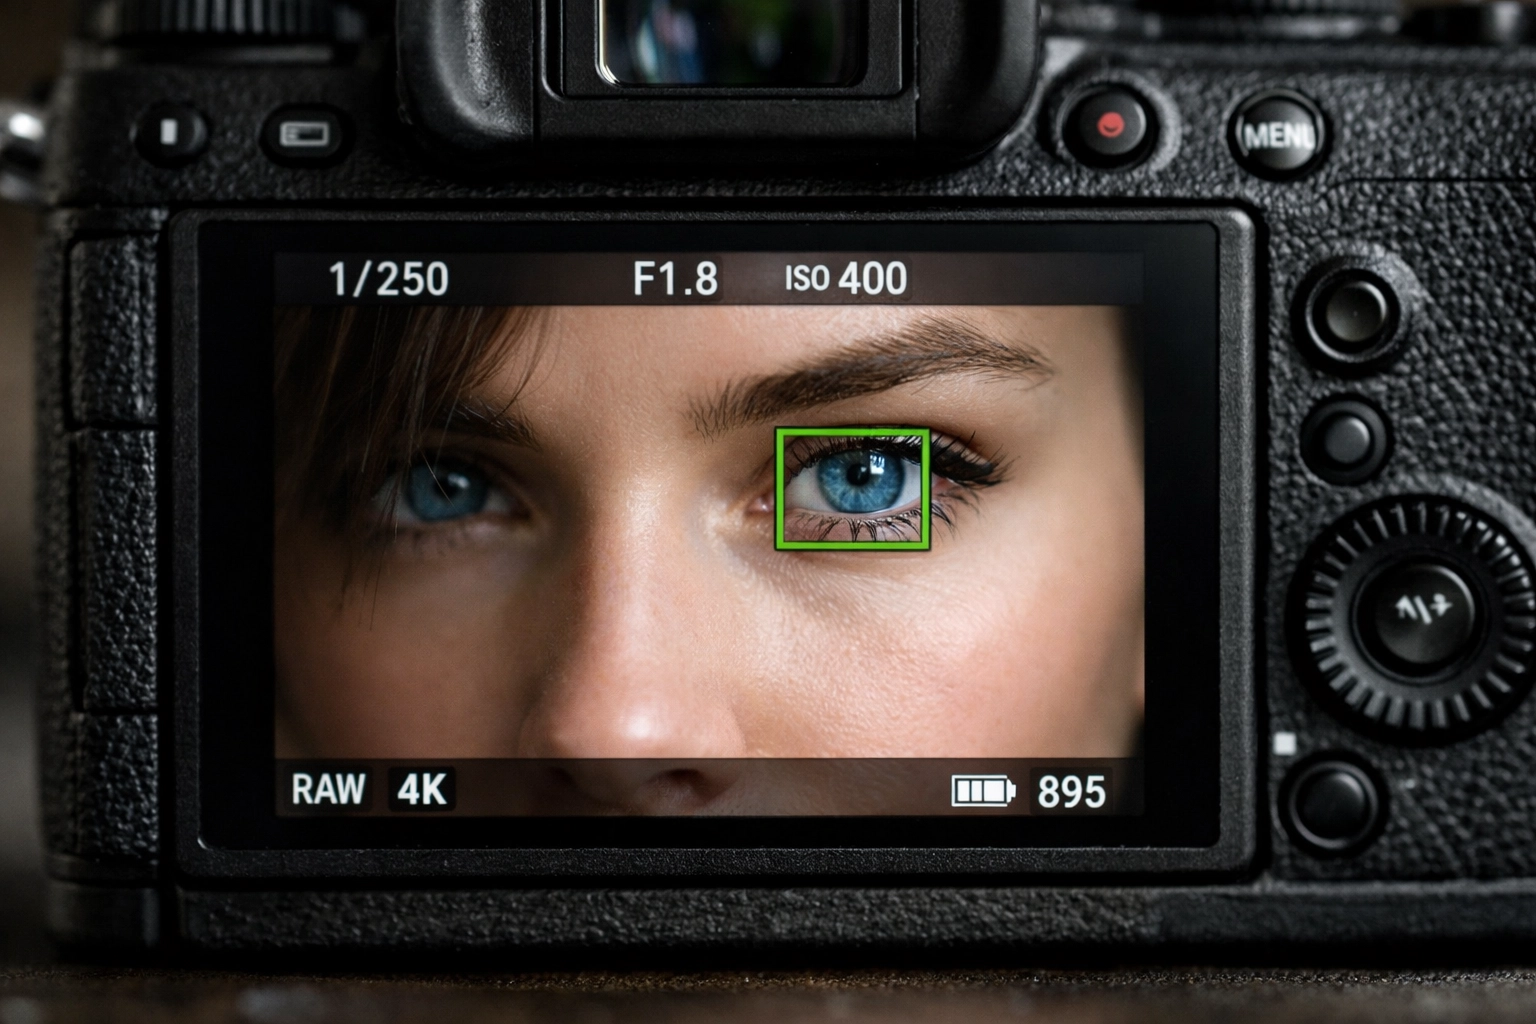
The Fix: Trust the Eye-AF
Modern mirrorless cameras have incredible Eye-Autofocus (Eye-AF). Instead of moving the camera, let the camera do the work. Enable Animal or Human Eye-AF and let the focus point follow your subject around the frame. It’s one of the reasons why everyone is talking about AI-integrated mirrorless cameras and you should too. If you aren't shooting people, use the touchscreen or the joystick to move your focus point to exactly where you want it. Stop moving the camera; start moving the point.
2. You’re Ignoring Your Electronic Viewfinder (EVF) Settings
One of the coolest things about mirrorless is the EVF. It shows you exactly what your final image will look like before you even press the shutter. This is known as "Exposure Simulation." However, many beginners either have this turned off or don’t know how to use it to their advantage.
If your EVF is set to auto-brightness, you might think your exposure looks great, only to get home and realize your RAW files are way too dark. Conversely, if you have "Exposure Simulation" turned off (often used in studio settings with flashes), you lose the main benefit of mirrorless: seeing your exposure in real-time.
The Fix: Master the "WYSIWYG" (What You See Is What You Get)
Go into your menu and make sure "Exposure Simulation" is ON for natural light shooting. Also, pay attention to your refresh rate. If you're shooting fast action, bump the EVF refresh rate to 120fps (if your camera supports it) to reduce lag. Just remember, a higher refresh rate drains the battery faster. For more technical deep dives on EVF tech, you can always check out resources at PhotoGuides.org.
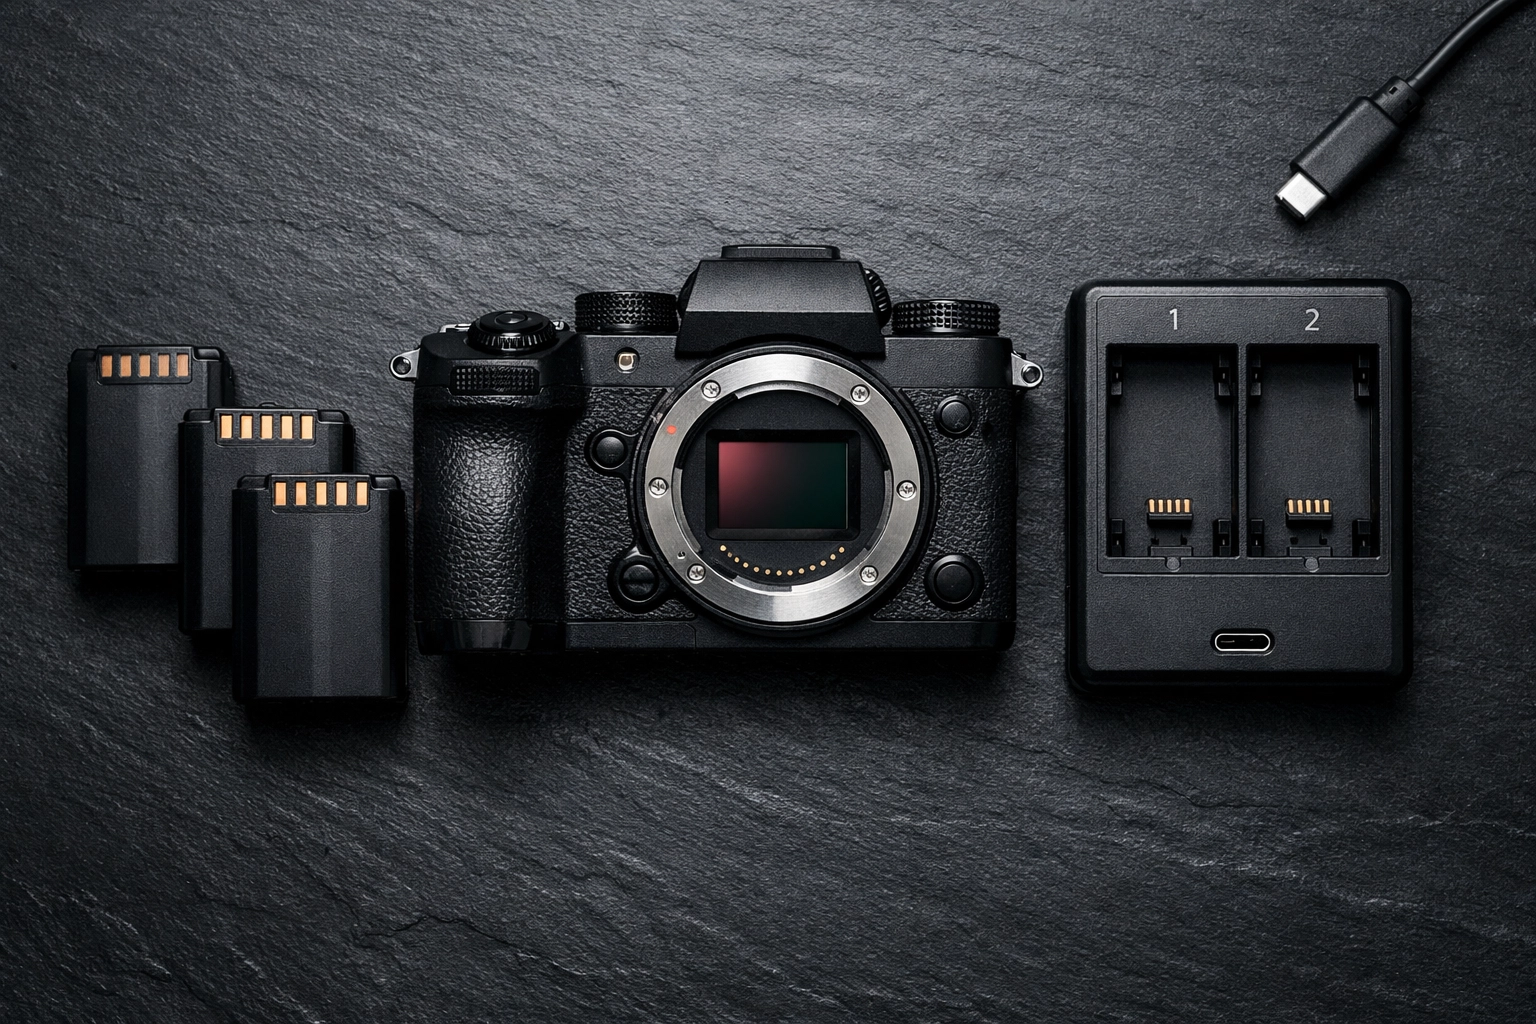
3. You’re Not Managing Your Battery Life Properly
We have to talk about the elephant in the room: mirrorless cameras are battery hogs. Unlike a DSLR, which only uses power when the shutter clicks or the screen is on, a mirrorless camera is essentially a small computer with two high-resolution screens (the back LCD and the EVF) that are running constantly.
If you head out for a full day of shooting with just one battery, you’re playing a dangerous game.
The Fix: Airplane Mode and Spares
First, buy at least two extra batteries. There is no way around this. Second, turn on "Airplane Mode" in your camera settings. This prevents the camera from constantly searching for a Bluetooth or Wi-Fi connection to your phone, which saves a surprising amount of juice. Also, set your "Auto Monitor Off" to a shorter interval. If you’re a landscape photographer, learning to manage power is part of the fastest way to get better at landscape photography.
4. Leaving the Sensor Exposed During Lens Changes
In a DSLR, there is a mirror sitting in front of the shutter and sensor. When you take the lens off, the sensor is somewhat protected. In most mirrorless cameras, the second you take that lens off, the sensor is right there, staring at the world. It’s a magnet for dust, pollen, and hair.
I’ve seen photographers leave their camera body uncapped on a table while they dig through their bag for another lens. Don't do that. Dust spots are a nightmare to edit out, especially in clear blue skies.
The Fix: The "Sensor Down" Technique
Always point your camera sensor toward the ground when changing lenses. Gravity is your friend here; it helps prevent dust from falling into the chamber. Some newer cameras (like the Canon R series or Sony A7IV) have a setting that closes the shutter curtain when the camera is powered off. Enable this! It adds a layer of protection. If you do end up with some spots, using software like Luminar makes it incredibly easy to remove them with their AI erase tools.
5. You’re Getting "Rolling Shutter" with the Electronic Shutter
Mirrorless cameras offer a "Silent Shutter" mode, which is a godsend for wedding photographers or anyone shooting in quiet environments. This uses the electronic shutter instead of the mechanical one. However, unless you have a high-end camera with a "stacked sensor" (like the Nikon Z9 or Sony A1), the electronic shutter reads the data from the sensor line by line.
If your subject is moving fast: or if you are moving the camera quickly: this results in "rolling shutter." Your straight lines will look slanted, and your subject might look like it’s warping through time.
The Fix: Know When to Go Mechanical
Use the electronic (silent) shutter for static subjects, portraits, and landscapes. If you’re shooting sports, birds in flight, or anything with fast motion, switch back to the mechanical shutter. It’s noisier, but it prevents that weird "jello" effect. For more tips on gear performance, I often share my personal field tests over at blog.edinchavez.com.
6. Using Slow SD Cards and Expecting Pro Performance
Mirrorless cameras can shoot at insane speeds: 10, 20, or even 30 frames per second. That’s a massive amount of data being shoved onto your memory card. If you’re using an old, slow SD card you found in a drawer from 2018, your camera’s "buffer" is going to fill up in three seconds, and you’ll be stuck waiting for the camera to finish writing data while the action passes you by.
The Fix: Invest in V60 or V90 Cards
Check your manual for the recommended card speed. Usually, you want at least a UHS-II V60 card for high-speed photography and 4K video. If you’re shooting high-bitrate video, you might even need V90 cards or CFexpress Type A/B cards. Don’t bottleneck a $3,000 camera with a $20 card. You can find gear recommendations in our shop.
7. You Aren’t Customizing Your Buttons
Mirrorless cameras are highly customizable. Manufacturers know that every photographer works differently, so they give you a dozen "C" (Custom) buttons. If you’re still diving into the main menu every time you want to change your ISO, AF mode, or white balance, you’re missing out on the efficiency that mirrorless offers.
The Fix: Build Your Own Workflow
Spend an hour with your manual and a cup of coffee. Map your most-used settings to the physical buttons on the body. Personally, I love mapping "Subject Tracking" to a back button so I can toggle it on and off instantly. Creating a seamless workflow is a huge part of why the latest photography news will change the way you shoot everything, as new firmware updates often add even more customization options.

Bonus Tip: Don't Over-Process the Perfection
Because mirrorless cameras have such high dynamic range, it’s tempting to push every slider to the max. You can pull so much detail out of the shadows that sometimes the photos end up looking "flat" or "HDR-ish" in a bad way.
Keep it simple. Keep it natural. If you need a head start on your editing, our DJI Drone Lightroom Presets actually work wonders on mirrorless files too, giving them a clean, professional look without looking overdone. And if you're working on high-end portraits, Luminar is fantastic for subtle skin retouching that keeps things looking human.
Final Thoughts
Making the switch to mirrorless is exciting, but it comes with a learning curve. Don't be discouraged if your first few outings don't result in masterpieces. The tech is there to help you, not replace your skill. By fixing these seven mistakes: trusting the Eye-AF, managing your power, protecting your sensor, and customizing your gear: you’ll find that your camera becomes an extension of your eye rather than a hurdle to jump over.
Photography is about the moment, and mirrorless cameras are designed to help you capture that moment faster and more accurately than ever before. So, grab your gear, check your settings, and go shoot something amazing.
If you need more resources or want to level up your kit, head over to our resources page or check out the latest photography news. Keep shooting!


