
Updated October 2026.
A small camera is useful when it lets you stop thinking about the camera. Mount it securely, frame the shot and get back to the activity. The catch is that a camera without a big viewing screen makes it easy to bring home a long recording of the wrong thing. A short test before you start is worth more than another hour of footage.
This guide covers the original GoPro HERO4 Session from 2015, later called HERO Session. It does not cover HERO5 Session or a current HERO camera. It is a researched setup and used-buying guide, not a hands-on review. The landscape photograph illustrates planning and composition, not a sample from this GoPro.
Identify the original Session
The original Session is the cube-shaped camera with a small status display, a Shutter/Select button and an Info/Wireless button. Its battery is built in. There is no removable battery to swap between takes and no large rear screen for checking composition. Establish the exact model before using a seller’s specification list.
The HERO4 name does not mean this camera records 4K like some other HERO4 models. The original manual lists 1440p at 30/25fps and ordinary 1080p at up to 60/50fps, depending on video format. It also lists lower-resolution modes. Do not borrow HERO5 Session’s capabilities or a modern camera’s stabilization claims.
The original still-photo options include 8MP Ultra Wide and 5MP Medium. Burst and time-lapse are separate capture choices. If photographs are your main goal, test whether this wide fixed-lens workflow gives you the framing and detail you need. A small action camera is a particular tool, not a substitute for every camera in the bag.
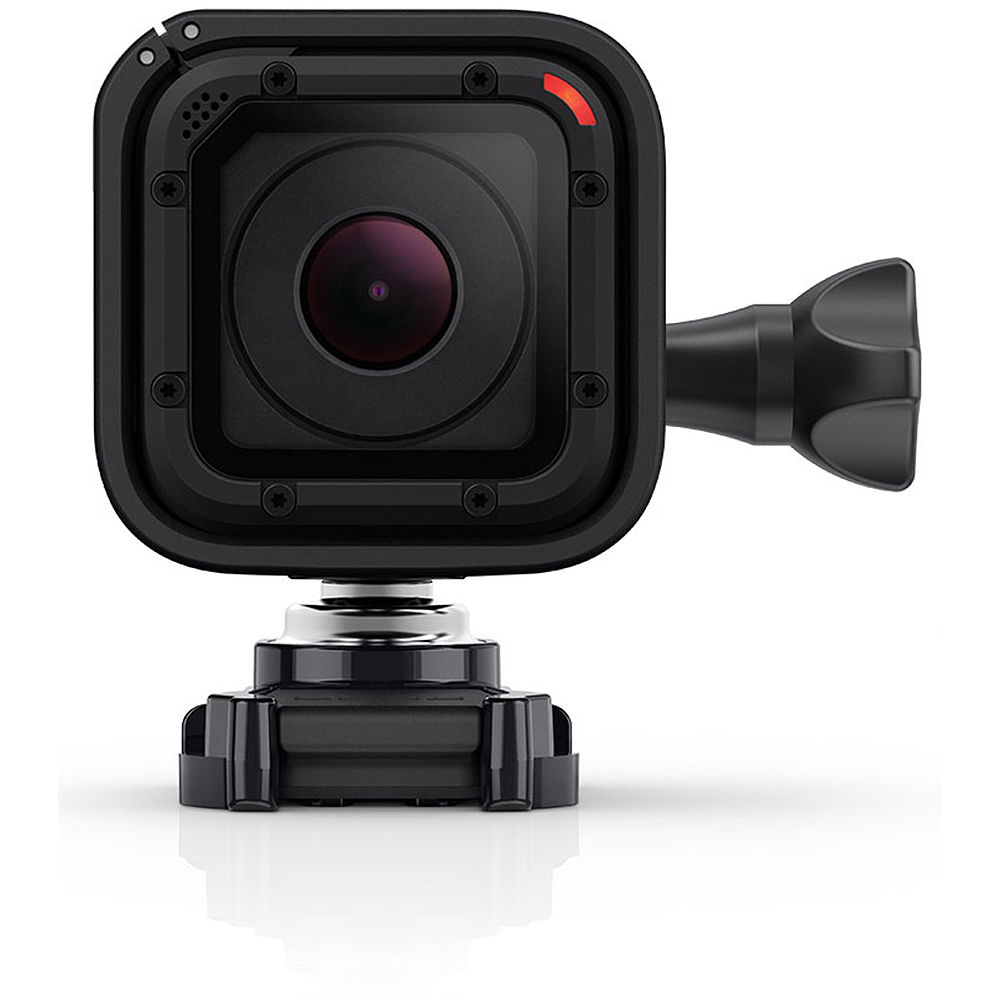
Learn the buttons before mounting it
The original one-button workflow starts recording when you press Shutter/Select. Pressing again stops the recording, and in the standalone workflow the camera powers down to save battery. The Info/Wireless button shows status information and gives access to settings. Check the displayed mode before starting rather than trusting the shape of the camera.
Firmware matters. GoPro’s HERO Session update page lists v02.00, dated March 31, 2016, and says it adds direct-camera selection of single photo and Burst modes, among other changes. An early manual’s app-dependent instructions may not describe every control on an updated unit.
Check the installed version and follow the official update process for this exact Session model. Do not install a HERO5 Session package because the names look similar. Make a recording after an update and confirm the settings and file before depending on the camera.
Practice starting and stopping while the camera is in its intended frame. Make sure a strap or mount does not press the button accidentally. A quick glance at the status display and lights is useful, but playback of a saved test file is the proof that the camera captured what you wanted.
Choose a video mode for the finished clip
Start with ordinary 1080p if you want a straightforward widescreen file. The original manual lists 1920 x 1080 in a 16:9 frame, with Ultra Wide and Medium field-of-view choices for ordinary 1080p. Use the setting that fits the scene instead of choosing the widest view automatically.
The 1440p mode records 1920 x 1440 in a 4:3 frame. It gives you a taller composition that you can crop for a widescreen project. Plan that crop before shooting. A taller file does not magically increase the detail of a later 16:9 crop, and the final subject still needs to fit the usable area.
SuperView takes more vertical 4:3 content and stretches it into 16:9. It is a rendering choice, not the same geometry as ordinary widescreen video. Compare a short clip of your subject in both modes. People and straight lines near the edges may make the difference easier to judge.
Frame-rate choices depend on mode and NTSC/PAL settings. The original table lists 1080p60/50, 720p100 and WVGA120/100, with the latter at only 848 x 480. A 120fps headline is not a promise of 1080p120. Check resolution, frame rate and field of view together before planning slow motion.
Make a frame that survives the movement
Choose a subject and leave enough room for the way the camera will move. A helmet, chest, board or handheld view changes as you move your body. A pleasing frame while standing still may point at the ground once the activity begins. Rehearse the normal position and review a short clip.
Include a useful reference in the scene: a horizon, path or part of the equipment that explains the point of view. Avoid filling half the frame with an accidental obstruction. Check that the frame, buckle and clothing stay outside the lens’s view throughout the movement.
Keep the lens surface clean. A fingerprint, water drop or smear can spoil an entire sequence even though the camera is recording normally. Inspect it before the shot and again after handling or water use. Clean it using appropriate care rather than rubbing grit across the surface.
For a stationary landscape or time-lapse, treat the composition like a photograph. Look at the edges, foreground and bright areas. The sunset will not fix a frame with no subject. Choose the view before letting the camera run.

Secure the mount without creating a hazard
The original kit documentation describes a Standard Frame and a Low-Profile Frame. These hold the camera for mounting; they are not extra waterproof housings. Check that the camera is seated correctly and the latch closes securely. Inspect used frames for cracks, distortion and worn parts.
Use the correct buckle, thumbscrew and mount for the activity. Tighten and test them according to the manufacturer’s instructions, without crushing parts or improvising attachments. Make sure the setup cannot interfere with controls, visibility or movement. A camera should never make the activity less safe.
Adhesive mounts need the right surface and installation procedure. Follow GoPro’s instructions for surface preparation and time before use rather than treating tape as an instant universal attachment. Check the equipment manufacturer’s restrictions too, especially when mounting on safety equipment.
A tether is not a universal recommendation. GoPro’s manual recommends added retention for some water setups but explicitly warns not to use a tether when mounting the camera on a helmet. Follow the guidance for your actual mount and activity. Do not create an entanglement risk in an attempt to save the camera.
Waterproofing depends on the door and condition
The original manual rates the camera to 33 feet, or 10m, with the side door closed. It says no additional housing is needed for that rated use. The Standard and Low-Profile Frames do not increase the rating. A used camera also needs a condition check; an original specification is not proof that its seal is intact today.
Before closing the door, inspect the seal and remove debris using the manual’s care instructions. Close it fully. Do not open the door while the camera is wet or surrounded by sand. Dry and clean the outside first so water or grit does not enter the card and USB compartment.
After saltwater use, the manual calls for a fresh-water rinse and drying. Check the door and microphone areas without pushing sharp objects inside. Stop using a camera with a damaged door or seal around water. Ask GoPro about suitable service or replacement options instead of testing the damage in a pool.
Charging requires the side door to be open. The manual explicitly says the camera is not waterproof during charging. Do not connect external power and then treat the camera as ready for rain, spray or underwater use. That open connection changes the setup.

Internal battery: test runtime, not the old promise
The battery cannot be removed from the original Session. That matters more on a used unit than a launch-era “up to two hours” line. Age, temperature, wireless use and recording settings affect what your camera can actually do. Make a sustained recording in the mode you intend to use and measure the useful result.
Charge with the correct Micro-USB cable and a power source that follows the original manual’s electrical guidance. It specifies chargers marked 5V 1A and gives computer USB charging as an option when the charger rating is unknown. Inspect the port and cable for damage before connecting them.
The manual distinguishes USB power arrangements: it describes recording with a suitable USB charging adapter, but says you cannot record while charging through a computer. Test the intended setup, and remember that the open door removes waterproof protection. Do not treat a charging cable as a fix for every runtime problem.
Watch for heat warnings, unexpected shutdowns or unusual physical damage. Allow an overheated camera to cool as directed. Do not puncture, open or attempt to replace the integrated battery yourself. If the battery or camera behaves abnormally, stop and seek qualified advice.

Cards, copying and loop recording
The original manual specifies microSD, microSDHC or microSDXC cards, Class 10 or UHS-I, up to 64GB. Choose a supported, known-good card rather than assuming a larger modern card will work. Power down before inserting or removing it, and keep the compartment clean and dry.
Record a test long enough to expose a card problem, then check the files on a computer. A card icon or a few seconds of preview does not verify sustained recording. Copy important footage to separate storage and confirm the copies before formatting the card.
Loop recording preserves a recent segment according to the selected interval rather than behaving like an ordinary continuous archive. The manual lists intervals and explains separate Max behavior. Read the exact setting and test what remains after stopping. Never use Looping when losing earlier moments would be a problem.
A card reader is a practical transfer option described in the manual. Old references to GoPro Studio are historical workflow instructions, not proof that you can install and use that software today. Verify your current editor and playback application with actual Session files.
Photos, time-lapse and Protune
For a single photograph, frame carefully and choose the photo mode deliberately. Burst can give you several frames from a short action, but timing and composition still matter. Check the result at full size rather than relying on the small status screen to tell you the image is good.
Time-lapse photo intervals in the original manual range from 0.5 to 60 seconds. Choose an interval for how quickly the scene changes, then make a short sequence and inspect it. Use a secure support and plan card capacity, light changes and power before starting a longer capture.
Protune is mode- and firmware-dependent. The original manual describes ISO Limit and Sharpness controls in supported video modes, with restrictions for Looping and photos; the later update notes add more Protune settings. Inspect the actual menu for your installed firmware. Do not borrow the full manual-control list of a current GoPro.
Change one setting at a time and keep a normal reference clip. Lowering an ISO limit can make a dark scene darker; changing sharpness can affect the editing workflow. These controls need a reason and a test, not an assumption that turning on an advanced label improves every file.
Software, sound and the used-kit decision
GoPro’s current Session update page describes a Quik app route as well as manual updating. That is not a guarantee that every present-day phone, app version and old camera works together. Test installation, pairing, preview, settings and file transfer on your actual phone before buying a unit that depends on those functions.
Make a sound test in the intended position. Listen to the saved file for wind, handling noise and obstructions around the microphone openings. Do not assume a modern external microphone adapter or a newer camera’s audio controls are available on this model. Important speech may need a separate recording plan.
Inspect the door, seal, lens, buttons, display, USB port, frame and mount. Confirm the exact camera and included accessories, firmware and return terms. Test video, photos, charging, wireless and a sustained recording. This guide makes no current price, stock or repair-service promise. Buy only if the entire older-camera workflow fits your needs.
Keep the original HERO4 Session manual beside the exact-model update notes. Learn a simple reliable setup first, then add specialized modes when the shot calls for them.
Frequently asked questions
Does the original HERO4 Session record 4K?
No. Do not borrow 4K claims from other HERO4 models or HERO5 Session. The original manual lists 1440p30/25 and ordinary 1080p up to 60/50fps.
Can I swap the battery?
No. The original Session battery is integrated and cannot be removed by the user. Test useful runtime on a used unit.
Do the frames add waterproof protection?
No. The camera itself is rated to 10m with the side door closed; the Standard and Low-Profile Frames do not increase that protection.
Is it waterproof while charging?
No. Charging requires the side door to be open, and the manual says it is not waterproof during charging.
Does 120fps mean 1080p120?
No. The original table lists WVGA120/100 at 848 x 480. Ordinary 1080p reaches 60/50fps.
Will current apps definitely work with an old Session?
Test the actual phone, app, pairing and recording workflow. Current support-page instructions are not a blanket compatibility guarantee.
Gear to check for an original Session kit
Verify exact model, condition and compatibility before buying. These are shopping starting points, not promises of stock or price.
Original camera: Browse Amazon or B&H. Check the actual item against your setup.
Correct mounting frame: Browse Amazon or B&H. Check the actual item against your setup.
Recording card: Browse Amazon or B&H. Check the actual item against your setup.
Charging cable: Browse Amazon or B&H. Check the actual item against your setup.
Affiliate disclosure: This article contains affiliate links. If you buy through them, we may earn a commission at no extra cost to you. As an Amazon Associate, we earn from qualifying purchases.
For practical photography tips, visit the Shut Your Aperture Academy. Build your understanding of light and composition alongside your camera setup.