Updated October 2026 | By Edin Chavez, owner of Edin Studios
Disclosure: I am an Aftershoot affiliate. If you start a plan through my links, I may earn a commission at no extra cost to you. Check the offer and billing terms at checkout; I am not promising a particular discount.
AI portrait retouching software can take repetitive cleanup out of a volume workflow, but it does not decide how a person should look. Skin, shine, stray hair and clothing need care whether you are finishing one headshot or two hundred. The useful goal is a consistent delivery that still looks like the people you photographed.
AI retouching promises a middle path: consistent, natural cleanup applied across a whole batch, with you adjusting the results instead of making every fix yourself. This guide covers what the tools do, how to set them up for natural results, and the mistakes that make retouched faces look fake. The tool I will use as the example is Aftershoot Retouch, and I will keep my claims about it tied to what the company publishes.
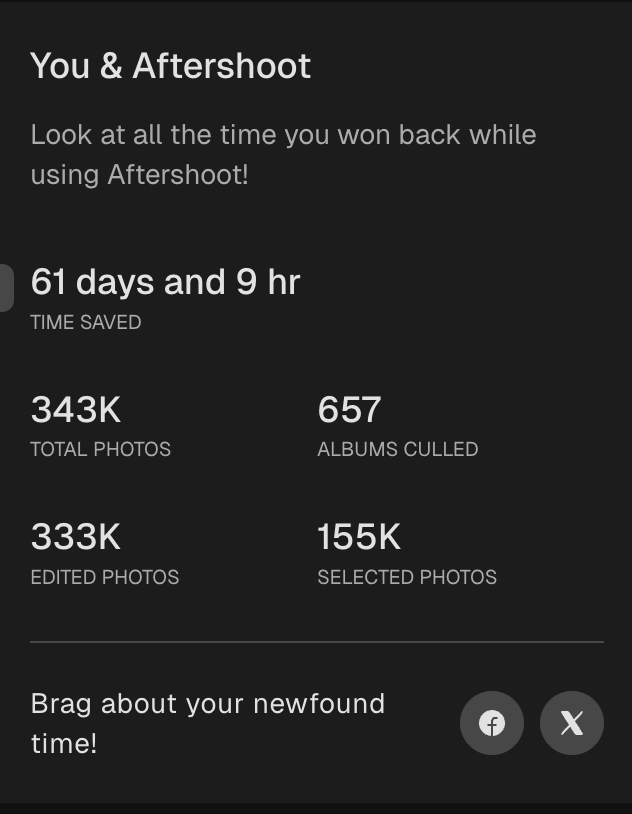
My October 2026 snapshot. I run Edin Studios and use Aftershoot every single day. My supplied app screenshot shows 343K total photos, 657 albums culled, 155K selected photos, 333K edited photos, and 61 days and 9 hours saved. These are rounded app counters, not an independently timed test or a promise of your results. This is a snapshot, not a live reading.
 Save
My own Aftershoot experience is daily use at Edin Studios. The supplied counters cover culling and editing; they are not a retouching benchmark. The advice below combines current documented features with general portrait-finishing principles. I am not claiming a tested retouching result on these illustration photographs.
Table of Contents
- Why retouching breaks volume workflows
- What AI retouching can do
- How to keep it natural
- Batch settings and presets
- Groups, families, and mixed subjects
- Headshots and backgrounds
- A volume retouching workflow
- Ethics and client expectations
- Cost
- Questions photographers ask
Why retouching breaks volume workflows
Three things make retouching hard at volume.
It is manual by nature. Spot healing, frequency separation, and dodge and burn are skilled, per-image tasks. Even with actions and shortcuts, each portrait takes real attention.
Consistency is hard. Two different people retouching, or one person at different times of day, produce different results. A set of headshots for one company should look like it belongs together.
Over-retouching is easy. When you are working fast, it is tempting to push sliders too far. Plastic skin and missing pores are the telltale marks of rushed retouching, and clients and viewers can tell.
The goal of automation here is not to make people look different. It is to remove the distractions, a blemish, a shiny forehead, a stray hair, so the person looks like their best ordinary self.
 Save
What AI retouching can do
Aftershoot’s retouching page lists a set of tools. Here is what each one is for, using the company’s own descriptions.
- Blemish removal. Quickly removes blemishes while preserving natural skin detail. The page marks it as improved.
- Stray hair removal. Cleans up flyaways. Also marked as improved.
- Face shine removal. Takes down oily highlights that show up under flash or hot lights.
- Glass glare removal. Handles reflections on eyeglasses, a common headache for corporate headshots.
- Wrinkle remover, eye bag removal, and teeth whitening. Listed among the face tools, with before and after examples on the page.
- Cloth dewrinkle. Smooths clothing creases while keeping fabric texture, embroidery, and pleats intact. Marked new.
- Object removal. Removes distractions like exit signs.
- Custom backgrounds for headshots. Offers backdrops or lets you upload your own, with edge refinement built in. The page labels this as beta.
- Retouch on RAW. Aftershoot says you can now retouch RAW files, so you move from editing to retouching in one place without exporting.
Because the background feature is labeled beta, I would test it carefully, especially around hair edges, before using it on paid work.
How to keep it natural
The difference between good retouching and bad retouching is restraint. Here are the rules I would follow.
Start subtle. Aftershoot says its retouching is subtle by default, with dials you can adjust up or down for skin, eyes, teeth, and more, per image. Take that as a starting point and resist the urge to push up.
Keep texture. Real skin has pores. If a face looks airbrushed at 100 percent zoom, you have gone too far. Check at full size, not only on a thumbnail.
Leave defining features alone. Freckles, scars, laugh lines, and moles are part of who a person is. Remove temporary distractions, such as a pimple or shine, and leave permanent features unless the client asks otherwise.
Mind the eyes and teeth. Brightening can look great or look alarming. A small adjustment goes a long way, and over-whitened teeth are one of the most common retouching giveaways.
Compare to the original. Flip between before and after. If you cannot tell what changed, the retouch is probably about right. If the change jumps out, back it off.
 Save
Batch settings and presets
This is where volume work pays off. According to Aftershoot, you can retouch one photo and sync the same settings across the whole batch, and you can let the AI batch retouch photos while maintaining your style. It also lists ten built-in retouch presets designed for real-world shoots like weddings and portraits, and an auto-detect feature that surfaces what needs polishing.
Here is how I would set up a batch.
- Pick a representative sample. Choose five to ten images covering your range: different skin tones, ages, lighting, and glasses or no glasses.
- Start with a preset. Pick the closest built-in preset and run it on the sample.
- Inspect at full size. Look at skin texture, eyes, teeth, and hair edges.
- Adjust and save the settings. Tune the sliders to a natural level you are comfortable with.
- Sync across the batch. Apply the settings to the full set.
- Spot-check. Review a sampling from the full run, then fix outliers by hand.
The sample step is what prevents a bad batch. A preset that looks fine on one subject can be wrong for another, and a quick test beats a re-run of two hundred images.
Groups, families, and mixed subjects
Volume work includes groups: families, teams, wedding parties. These are harder because each person needs different treatment, and a heavy hand on one face can make the person next to them look unretouched by comparison.
Aftershoot says its retouching uses smart subject detection so you can retouch groups or individuals, and fine-tune edits by age, gender, or group, which it describes as useful for families, couples, and bridal parties. That matters for volume: you can set a lighter touch for children and older adults, for example, and a different level for others in the same frame.
My approach: keep group retouching lighter than individual retouching. In a group, the viewer’s eye is on the whole picture, so consistency across faces matters more than perfection on any one.
 Save
Headshots and backgrounds
Headshots are the best case for retouching at volume. The framing is predictable, the lighting is controlled, and the client wants consistency across a whole team.
A reasonable pipeline for a corporate headshot day:
- Shoot tethered or with careful exposure, keeping lighting identical across the session.
- Cull to one best frame per person. See our Cull to Target guide, since “one per person” is a natural target.
- Apply a consistent edit across the batch. Aftershoot’s editing tools include portrait and headshot crop modes, which can give the entire team matching framing. More in our AI photo editing guide.
- Run light retouching with shine, glare, blemish, and stray hair on, and heavier tools off by default.
- If the client wants a uniform backdrop, test the custom background feature and check hair edges on every image.
- Check clothing. Cloth dewrinkle can help with shirts and jackets that creased during the day.
For school photographers, the same pipeline applies, with a lighter hand on children. See our school photography workflow for the full picture.
A volume retouching workflow
- Cull and edit first. Never retouch a frame you will not deliver.
- Decide your retouch level per job. Corporate headshots, school portraits, and wedding formals each deserve a different level.
- Test on a sample. Always.
- Batch retouch. Sync the approved settings across the set.
- Review at full size in sections. Check faces, eyes, hair edges, and clothing.
- Fix outliers manually. A few frames will need hand work, and that is normal.
- Deliver. Export or send straight to a gallery.
Aftershoot describes its overall flow as cull, edit, retouch, deliver, and says that skipping the export-import-export cycle is part of the pitch. Whether that fits your process depends on how you work, so test the whole chain on a past job before relying on it.
Review the delivered face, not only the preset
A sample tells you whether a setting is promising. It does not prove that the entire batch is ready. Review every delivered face for accidental changes around glasses, brows, teeth, hair and skin boundaries. A group photograph can contain a successful correction on one person and a bad edge on another. Build that review into the quoted turnaround instead of treating it as optional work after the export.
Use a checklist that separates the intended correction from a person’s defining features. Did you mean to reduce a temporary blemish, or did the tool soften a mole? Did glare reduction reveal the eyes cleanly, or create an odd shape on the lens? Did wrinkle cleanup help the shirt, or remove a printed pattern? When a correction changes something you did not agree to change, reduce it or leave the original detail.
Review the same images at useful magnification and at the final delivery size. Magnification reveals edges and texture; the final size tells you whether the whole portrait feels believable. A technical defect can be small on screen and still matter in a printed headshot. Conversely, extreme zoom can tempt you to erase natural details nobody asked you to remove. Keep the intended use in view.
Use lighting groups instead of one universal batch
A single corporate day can mix window light, flash and a darker reception room. Separate those conditions before deciding whether one setting fits everything. Check an image near the start and end of each lighting group. If the camera exposure or white balance drifted, fix the basic edit first. Retouching is not a substitute for consistent capture or an accurate color decision.
Do not assume two similar thumbnails have the same skin texture or highlight problem. Different angles change reflections on glasses and shine on a forehead. A setting that works on a straight-on headshot may fail on a profile. Keep the batch modest when the conditions vary, and mark difficult frames for separate review rather than repeatedly pushing the entire album harder.
Keep the client handoff separate from your experiment
Save an unretouched export and a finished version with clear names. Keep your test set away from the client delivery folder so an experiment cannot become the final gallery by accident. When a client requests a change, you should be able to find the source frame and approved finish without guessing which export was sent. One clear version is better than a folder full of nearly identical revisions.
Open the actual exported JPEGs in the viewing environment the client will use. Check color, crop, sharpening and file dimensions, then test the private delivery link on a phone. If the job includes a background replacement, inspect every hair edge in that exported version. Keep access private when the brief requires it; a quick delivery deadline does not authorize a public gallery.
Ethics and client expectations
Retouching raises real questions, and a professional photographer should have a position on them.
Agree on the level up front. Tell clients what is included. “Natural cleanup of temporary blemishes and shine” is a clear promise. Anything beyond that is an upgrade by request.
Be careful with children. Keep it minimal, and follow the school’s or parents’ preferences.
Do not change how people look in ways they did not ask for. Reshaping bodies and faces is a different conversation from cleaning up a bad-light moment.
Keep your originals and independent backups. A reversible app workflow is useful, but it is not a backup of the only copy of your files. Check how edits, settings and exports are saved before a large job.
Cost
Aftershoot currently lists Retouch at $20/month billed annually ($240/year), or $25 on monthly billing. Select is $10/month annually ($120/year), Edit is $30 ($360/year), and Complete is $45 ($540/year). Monthly billing is $15, $35 and $55 for those three respectively. These are subscriptions, not one-time purchases. Individual modules are separate; do not assume buying Retouch includes culling or editing. Aftershoot says processing has no per-image fees and offers a 30-day trial without a credit card. Check the current pricing page and Retouch offer through my affiliate link before buying. Gallery storage has separate terms; unlimited processing does not mean unlimited free hosting.
Want to judge skin tones and color before trusting a batch? My Complete Lightroom Editing Course at ShutYourAperture Academy offers instruction for deliberate color decisions and a repeatable Lightroom workflow. Build the eye for a consistent portrait set so AI supports your look instead of deciding it.
Questions photographers ask
Does AI retouching make people look fake?
It can if you push the settings. Aftershoot describes its retouching as natural and subtle by default, and adjustable per image. Start low and check at full size.
Can it retouch RAW files?
Aftershoot says it now supports retouching on RAW files, so you can move from editing to retouching without exporting.
Can it handle groups?
The company says smart subject detection lets you retouch groups or individuals and fine-tune by age, gender, or group.
Does it handle glasses glare and shiny skin?
Aftershoot lists glass glare removal and face shine removal among its tools.
Can it swap backgrounds?
Aftershoot lists custom backgrounds for headshots with edge refinement, labeled beta. Test hair edges carefully.
Will retouching replace my backup?
No. Keep original files and independent backups, and check how settings and exports are stored. A reversible edit is not a backup of your only copy.
How much does retouching cost?
Retouch is $20/month billed annually ($240/year), or $25 on monthly billing. Processing has no per-image fee under the listed plan. Check current pricing and checkout; gallery storage is separate.
What does your own app snapshot prove?
I use Aftershoot daily at Edin Studios. My supplied counters show culling and editing use, not a retouching benchmark or a guarantee of another photographer’s results.
The bottom line
Retouching at volume is a balance between consistency and restraint. Test the repeatable cleanup, inspect every delivered face, and keep the person recognizable. Try Aftershoot Retouch on a representative set before committing a client batch.
A pen tablet for the manual finish
The Wacom Intuos Pro Small (2025, PTK470K0A) is a specific option for brush-based cleanup after the batch. B&H lists a 7.4 x 4.1-inch active area, Pro Pen 3 and USB or Bluetooth connectivity. It is a pen tablet, not a display. Check operating-system support and whether your finishing application supports the controls you need. This is a researched option, not a claim that I used it for these photographs.
Check the Wacom Intuos Pro Small at B&H
This is an affiliate link. I may earn a commission at no extra cost to you. Price and availability can change.
Sources and images: Edin Chavez owner-portfolio portrait photographs (illustrations, not Aftershoot processing tests); Edin supplied October 2026 app snapshot; official Aftershoot press-kit promotional artwork. Current feature and billing details checked against Aftershoot Retouching, Pricing and its pricing-tiers article in October 2026. Galleries storage and paid fair-usage terms are separate from processing plans.