

Updated October 2026
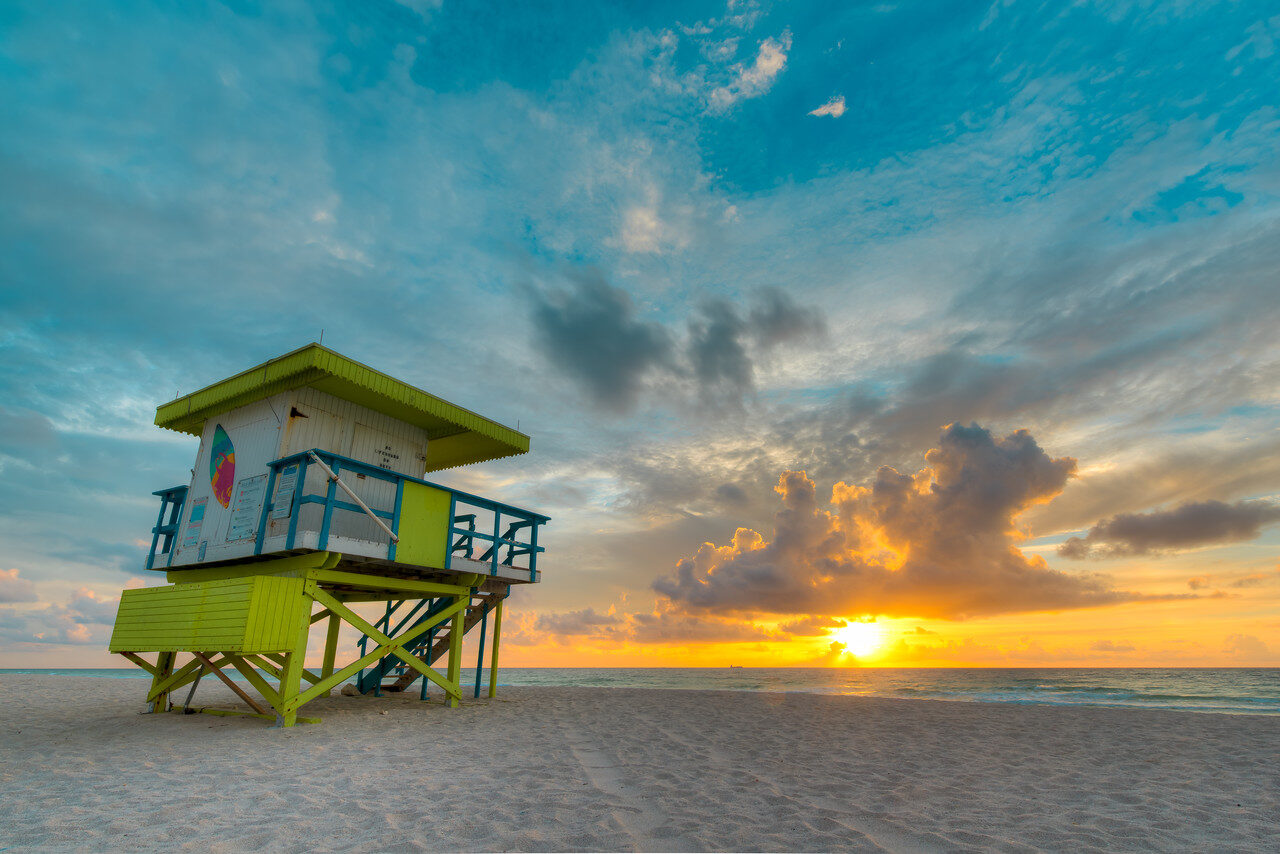
Sunrise is the best light of the day and the hardest to get right. It is dark when you arrive, bright when you leave, and the good part lasts about twenty minutes. This guide is the shooting half of the story: where to stand, what to pack, which settings to use and how to catch the color while it is there. The Miami Beach sunrise below is the example, and the before and after slider shows what a few simple Lightroom sliders can do with a file shot this way.
[wpw_ba_viewer width=”auto” disable_intro=”false” alternate_skin=”true”]
[wpw_ba_img src=”http://blog.edinchavez.com/wp-content/uploads/edd/2015/08/After.jpg” data_alt=”http://blog.edinchavez.com/wp-content/uploads/edd/2015/08/Before.jpg” title=””]
[/wpw_ba_viewer]
Want the editing side step by step? Read our full walkthrough, how to edit a sunrise photo in Lightroom. This post is about getting a file worth editing.
Scout the night before
The best sunrise photos are decided before the alarm goes off. Pick your spot the day before, in daylight, and work out where the sun will come up. A free sun-position app or a compass tells you the exact direction. Beaches facing east, hilltops, piers, bridges and open fields all work well. Look for a foreground you can place in the lower third of the frame: a lifeguard tower, a palm, a pier piling, a rock, wet sand with a reflection.
Check the forecast too. A totally clear sky gives clean, simple color. A sky with scattered clouds gives you something to light up. Heavy overcast usually gives you nothing, and fog gives you mood. Aim for mornings with a few high clouds, since they catch the color before the sun even clears the horizon.
What to pack
- Camera and a wide lens. Something around 16 to 35mm full-frame equivalent lets you take in the sky and the foreground.
- A sturdy tripod. Light is low before sunrise, and slow shutter speeds need a still camera.
- A remote or the self-timer. It keeps your hands off the camera.
- Spare batteries and cards. Cold drains batteries, and you will shoot more than you think.
- A headlamp or small flashlight. You will walk in the dark.
- A lens cloth. Dew and sea spray find every lens.
- Warm layers and coffee. You will stand still for an hour.
Arrive early, really early
Get there at least 45 minutes before sunrise. The first color often shows up 30 minutes ahead of the sun: a soft blue, then pink, then orange along the horizon. Many photographers show up as the sun appears and miss the best light. Set up in the dark, compose your frame and take test shots so you are ready when the sky starts to glow.
Keep shooting after the sun clears the horizon too. The light changes quickly in the first ten to fifteen minutes, and the golden light on the foreground often looks better than the sky itself.
The best camera settings for sunrise
Start in manual mode or aperture priority, and shoot RAW. RAW holds more detail in both the bright sky and dark foreground, which gives you far more room in editing.
- ISO: 100 or the lowest native setting. Raise it only if you have to.
- Aperture: f/8 to f/11 for sharpness from front to back.
- Shutter speed: let the meter decide. In the dark it may run from 1 to 30 seconds. On a tripod that is fine.
- White balance: try Daylight or Cloudy for warmer color, or leave it on Auto and fix it later in RAW.
- Focus: focus about a third of the way into the scene. In the dark, use live view and zoom in on a distant light or the horizon.
- Metering: check the histogram. Keep the right side from slamming into the edge.
Expose for the sky
The sky holds the color, so protect it. Underexpose by one to two stops if the sun is in the frame or very close. The foreground will fall dark, and that is fine, because you can lift shadows later. A blown-out sky cannot be saved. If the histogram shows a spike jammed against the right edge, dial the exposure down and shoot again.
When the contrast is too much for one frame, bracket. Take three shots: one for the sky, one for the middle tones and one for the foreground. You can blend them in editing, or just pick the best. Bracketing costs nothing but a few seconds, and it saves a morning when the light is wild.
Read the sky and the weather
Some mornings the sky does all the work. A few simple signals tell you what kind of sunrise you will get. High, thin clouds, like cirrus, catch the first light and turn pink and orange. Medium clouds, spread out with gaps, give you the classic fire in the sky. Low, thick cloud on the eastern horizon blocks the sun, so you may get only a soft glow. A clean sky with a bit of haze near the horizon gives a gentle gradient from deep orange to light blue.
Humidity matters too. Moist air softens color and creates mist over water. Dry air gives sharper, cleaner light. Wind affects water, so if you want smooth sea or a mirror-like lake, aim for a calm morning and use a slow shutter. If waves are crashing, a faster shutter freezes spray and shows power.
Sunrise at the beach, in the mountains and in the city
The beach: Face east and use the water. Wet sand reflects the sky, and waves add leading lines. Try a slow shutter of half a second to two seconds so the water turns silky, and keep your tripod legs from sinking by pushing them down firmly. Watch the tide so you do not get cut off.
The mountains: Hike in the dark with a headlamp and tell someone your route. Valleys fill with fog at dawn, and peaks glow first. Use a longer lens to compress layers of ridges, and pay attention to temperature, since it drops fast before the sun.
The city: Rooftops, bridges and waterfronts give a skyline silhouette against warm color. Streetlights are still on, which adds small points of light. Shoot a few frames in blue hour for deep color, then keep going as the glass buildings pick up gold.
Blue hour before the sun
Before the sky turns orange, it goes deep blue. This is blue hour, and it often delivers the calmest, most elegant photos of the morning. Use a tripod, a low ISO and a long exposure of several seconds. Water turns smooth, and lights look soft. Many photographers rush past it. Stay, and you may find it is your favorite part.
Compose like you mean it
A great sky over a boring foreground makes a boring photo. Build the frame with a foreground, a middle ground and a background.
- Use the lower third. Give the sky two thirds of the frame when the clouds are good, and one third when the foreground is the star.
- Look for leading lines. A boardwalk, a shoreline, a fence or a path pulls the eye to the sun.
- Find reflections. Wet sand and tide pools double the color.
- Watch the horizon. Keep it level. A crooked horizon ruins an otherwise great shot.
- Add scale. A small figure, a bird or a boat gives a sense of size.
Handling the sun itself
Pointing the camera right at the sun is the hardest part. The sun will clip to pure white, and that is normal, but you can control the mess around it. Stop down to f/16 for a clean sunburst with sharp rays. Keep the lens spotless, since dust and fingerprints turn into flares. If you see ghosts and haze, shift the camera slightly or shield the front of the lens with your hand or a hat.
You can also hide the sun behind a cloud, a building or a palm tree. The edge of the object glows, and the picture gets drama without the harsh disc.
Shoot a sequence, not a single frame
Sunrise is a performance. Plan to shoot every few minutes from the first blue to full daylight. In a good sequence you will usually see three moments: the quiet blue glow before the sun, the peak of color as it breaks the horizon and the clean golden light afterward. Each looks different, and any of them could be your favorite.
Try a time-lapse too. Set an interval timer to take a photo every five to ten seconds from before dawn to after sunrise. You end up with a short clip of the whole show.
Common sunrise shooting mistakes
Arriving late. You miss the first and best color. Be there early.
Blowing out the sky. Check the histogram, not just the screen, which looks brighter outdoors than it is.
Ignoring the foreground. Find something interesting for the bottom of the frame.
Leaving too soon. The best light can come after the sun is up. Stay and keep shooting.
Shaky shots. Use a tripod, a remote and a stable surface. Do not hold the camera for slow shutters.
Forgetting to clean the lens. Morning moisture is sneaky. Wipe the front element every few minutes.
After the shoot
Back home, import your RAW files, pick your best frames and start with the Basic panel. Pull Highlights down to protect the sky, lift Shadows to open up the foreground, then add a bit of warmth and contrast. A few sliders do most of the work, as the before and after above shows. Our full Lightroom sunrise tutorial walks through every panel, plus the graduated and radial filters.
One more habit worth building: review your sunrise files the same day. Look at which frames worked and why. Was it the foreground, the timing, the cloud pattern or the exposure? Write one line about it. Over a few mornings you will notice what you do right and what you miss, and you will plan the next sunrise better. Photographers who keep notes improve quickly, because every early alarm becomes something learned and not just a lost hour of sleep.
Take it further with the Academy
If you want to edit faster and with more confidence, the Lightroom editing course in the Shut Your Aperture Academy is where to start. It is taught by Edin Chavez, and you get lifetime access, so you can come back to it before every shoot. For light, composition and storytelling beyond sunrise, browse the whole Shut Your Aperture Academy. Shoot a sunrise this week, then bring the files in and edit along.
Frequently asked questions
What is the best time to shoot a sunrise?
Arrive about 45 minutes before sunrise. The first color often appears 30 minutes before the sun comes up, and the golden light keeps going for 10 to 15 minutes after.
What camera settings should I use for sunrise photos?
Shoot RAW at a low ISO, around f/8 to f/11, on a tripod. Let the shutter speed run as long as it needs and expose for the sky.
How do I stop my sunrise photos from looking washed out?
Underexpose by one to two stops, check the histogram and protect the highlights. Then lift shadows and add contrast in editing.
Do I need a tripod for sunrise photography?
For the best results, yes. Light is low and shutter speeds are slow, so a tripod keeps the picture sharp.
How do I get a sunburst effect?
Stop down to f/16 or so, put the sun partly behind an object like a tree or building, and keep the lens clean.
Can I shoot a sunrise with my phone?
Yes. Tap the bright part of the sky, drag exposure down and use night mode on a steady surface. See our DIY smartphone photography tips for more.
Gear box: sunrise shooting starting points
These are research starting points, not rankings. Check current specs, reviews and prices before you buy.
- A travel tripod: See travel tripods at B&H or on Amazon.
- A wide-angle lens: Browse wide-angle lenses at B&H.
- Graduated ND filters: See graduated ND filters at B&H.
- A headlamp: Browse headlamps on Amazon.
Affiliate disclosure: some links above are affiliate links. If you buy through them, Shut Your Aperture may earn a small commission at no extra cost to you.

