
Updated October 2026.
The Rokinon 135mm f/2 ED UMC is a lens for slowing down. It can separate a person, a branch or a distant detail from a messy background, but it will not focus for you. That is the decision to make before comparing sharpness charts or buying a cheap used copy. If the subject moves faster than you can focus, a beautiful blur is still a missed photograph.
This guide covers the original manual-focus 135mm f/2 ED UMC sold under Rokinon and Samyang names. It is not the newer autofocus 135mm f/1.8, and it is not the T2.2 cine version. The specifications come from the makers; the shooting advice is a practical workflow, not a claim that the photographs here were made with this lens or that every mount works identically.
Know the original lens before buying
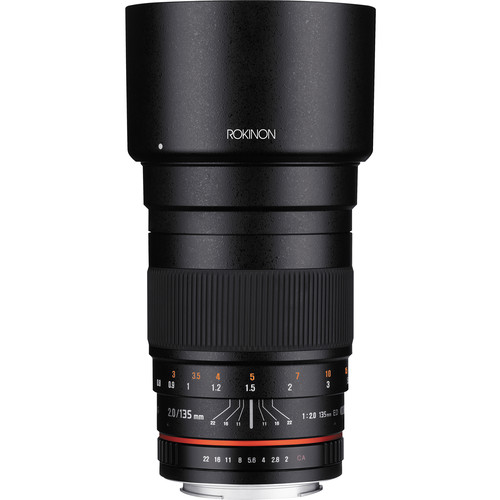
The optical design has 11 elements in seven groups, including one extra-low-dispersion element. The maximum aperture is f/2, the minimum is f/22, and the diaphragm has nine blades. Minimum focusing distance is 0.8m, measured from the camera’s sensor plane rather than the front glass. That makes close details possible, but it does not turn this into a dedicated 1:1 macro lens.
The filter thread is 77mm. Samyang lists different dimensions and weights for different mounts: its table gives 830g for Canon EF, 815g for Nikon F and 840g for Sony E. Do not carry one weight across every version. Add the body, adapter and support when deciding whether the complete kit is comfortable to carry or safe on a tripod.
There is no optical image stabilization and no autofocus motor. The original lens is not a weather-sealed working tool. A hood or front filter does not make it waterproof. Protect the kit from rain, blowing dust and sudden condensation. Its simple controls can be useful, but simplicity is not a substitute for careful handling.

Match the mount, not just the brand
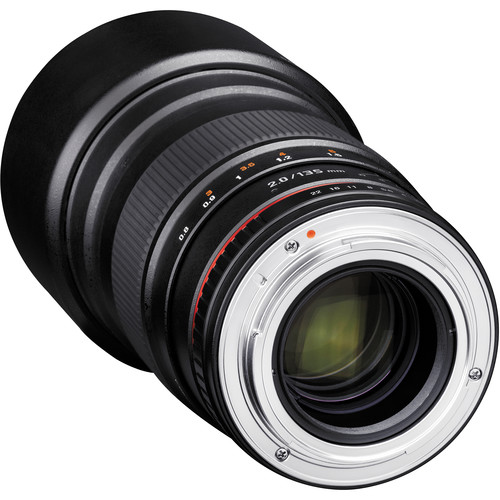
A listing that says Rokinon 135mm is not enough. Read the mount on the listing and inspect the actual rear of the lens. Canon EF, Nikon F, Sony E, Fujifilm X and other versions do not attach interchangeably. Sony A and Sony E are different systems. Canon EF is not Canon RF or EF-M. An adapter may be possible for a particular pairing, but check that combination before paying.
The Nikon F version with an automatic chip is an important exception to the unchipped versions. Rokinon identifies it separately, and Samyang lists camera exposure modes for Nikon F. The chip can support communication and focus confirmation on compatible bodies; it does not add autofocus. Cameralabs describes the Nikon version’s automatic aperture operation and the need to keep the aperture ring at its smallest-aperture position when using camera control.
Do not apply that setup to every mount. On an unchipped version, the physical aperture ring sets the opening, and the camera may show no meaningful aperture value or omit it from EXIF. Some mirrorless cameras require a setting that allows release without a recognized lens. Check your camera manual and test the actual body. A normal shutter release is not proof that metering, stabilization or metadata are configured correctly.
Understand what 135mm changes in the picture
On a full-frame camera, 135mm gives a narrow view that is useful for picking a small part of a scene. On a 1.5x crop camera, the field of view resembles about 202.5mm on full frame; on a 1.6x Canon crop camera, about 216mm. On Micro Four Thirds, the familiar field-of-view comparison is about 270mm. The physical focal length remains 135mm and the aperture marking remains f/2.
A long lens does not create perspective compression by itself. Your camera position sets perspective. Moving farther away to maintain similar subject framing changes the relationship between near and far objects. Use that working distance intentionally. Before making a portrait, check whether you have enough room to step back without standing in a road or blocking a walkway.
Look behind the subject as carefully as you look at the subject. A distant, uncluttered background can become a soft field of color. A nearby branch or bright sign may remain distracting even at f/2. Move a few steps sideways, change camera height or ask the subject to shift. The aperture is one tool for separation, not a repair for every composition.
Build a repeatable manual-focus routine
Start with a still subject in steady light. Support the camera and use magnified live view or the camera’s magnified electronic viewfinder. Put the enlarged area over the detail that must be sharp, then turn the ring slowly in both directions to find the best point. For a portrait, that usually means the nearer eye rather than hair, eyelashes at another distance or a bright reflection behind the face.
Focus peaking is useful for finding a region of contrast, but it is not a guarantee of critical focus. A thick colored outline can cover more depth than you want at f/2. Treat it as a guide and confirm with magnification when time allows. DSLR focus-confirmation indicators deserve the same caution, even on a chipped version. Check the saved image, not just a green light.
The Digital Picture reports focus shift as the aperture is narrowed on its tested lens. That makes a final focus check at the shooting aperture sensible for precise work. You can compose with a brighter wide-open view, then stop down and check again. If your camera’s view becomes noisy or dark, add support and allow more time rather than assuming the original focus remains perfect.
Choose a shutter speed for the subject
Camera shake becomes easy to see at a narrow angle of view, especially when you magnify the display to focus. Use a stable stance, hold the camera without squeezing it sideways and raise shutter speed when necessary. A reciprocal-focal-length guideline is only a starting point. Sensor resolution, crop, your technique, subject movement and final viewing size all affect the result.
If your body has stabilization and asks for a manual focal length, enter the real 135mm rather than a crop-equivalent number, following that body’s instructions. Body stabilization is separate from the lens, and it does not freeze a moving person. A sharp background with a blurred face often means the shutter was too slow for the subject, not that the lens needs adjustment.
On a tripod, check the camera’s stabilization guidance and use a timer or remote release when useful. Make sure the head is secure and the kit does not creep after you compose. Avoid resting the focus ring against a support where a small movement can turn it. Wind, loose plates and vibration can spoil a carefully focused picture without changing the focus setting.
Portraits: give the subject room to breathe
This lens suits a patient portrait session better than an unpredictable event. Explain when you need the subject to hold still, focus carefully and make short sets. Recheck after either of you moves. At close portrait distances, a small lean can move the eyes outside the sharp region. More frames do not solve that if focus stays at the old distance.
Use f/2 when the shallow depth of field supports the picture. Stop down when both eyes, several people or an important prop need more depth. Position people near the same focus plane rather than lining them up at different distances and hoping the lens covers everyone. Check the edges of glasses and eyelashes, not simply whether the background looks pleasantly soft.
For children, sports, dancing or an event you cannot repeat, reliable autofocus may be the better choice. Manual focus can work with practice and planned movement, but this is not a reason to gamble on a client’s unrepeatable moment. Choose the tool that lets you pay attention to expression and timing instead of spending the whole session chasing a focus ring.
Landscapes and distant details
A telephoto landscape starts by removing things. Look for a ridge, a reflection, a line of trees or a patch of light rather than trying to include the entire view. Check the frame edges for awkward cutoffs. Small changes in position can separate overlapping shapes that looked like one flat mass from the first spot.
Distance does not mean everything is automatically sharp. Focus on an important feature and compare the nearest and farthest details you need. Try moderate apertures before closing all the way to f/22. More depth of field can come with less fine detail from diffraction. A useful balance depends on the scene and the output, so compare actual files rather than following one fixed landscape setting.
Haze, heat shimmer and moving air can soften distant subjects even with good focus and support. If every distant detail wavers but nearby detail stays clear, changing lenses may not fix the atmosphere. Try a different time or viewpoint. These landscape photographs illustrate framing and light, not a controlled demonstration of this lens’s optical performance.

Night photography needs exact infinity focus
A bright f/2 telephoto lens can be useful for selected night-sky subjects and distant city details, but a narrow field of view changes the work. It is not the obvious lens for fitting a broad Milky Way arch into one frame. Plan the composition and the amount of sky you can include before arriving in darkness.
Do not turn the focus ring to its hard stop and assume the stars are sharp. Cameralabs notes that the far stop goes beyond infinity. Magnify a bright star, focus carefully and make a short test. Inspect several parts of the frame. Recheck after temperature changes or an accidental touch to the ring. A printed distance mark is a useful reference, not a certificate of focus.
For untracked stars, use short test exposures and check trailing at your intended output size. Usable exposure time depends on sky position, sensor and framing. A fixed wide-angle rule cannot promise round stars at 135mm. A tracker introduces its own alignment, balance and exposure workflow; it does not remove the need for accurate focus or careful review of corners and highlights.
Check a used lens before the return window closes
Inspect the glass for haze, fungus, scratches and separation. Look at the mount, filter thread, aperture ring and hood fit. The focus ring should move consistently without grinding or sudden loose patches. Ask about repairs, drops and moisture exposure. A few dust specks are not automatically a failed lens, but cloudiness or obvious damage deserves closer investigation.
Test on your own camera. Photograph a detailed flat subject with careful alignment and compare opposite sides. Repeat at several apertures, refocusing where needed. A tilted target or focus error can imitate a defective copy. Then test a normal portrait distance and distant detail. The aim is a lens that works for your pictures, not a dramatic verdict from one badly aligned chart.
On unchipped versions, check exposure after changing the aperture ring. Independent reviewers have reported metering differences with stopped-down operation. Review the histogram and use manual exposure or compensation as needed. On a Nikon chipped version, test the supported communication and aperture control on your body. Buy with a clear return path; a low price is not enough if the mount or operation is wrong.
Frequently asked questions
Does the original Rokinon 135mm f/2 have autofocus?
No. The ED UMC lens is manual focus. A Nikon automatic chip does not add an autofocus motor.
Is it the same lens as the AF 135mm f/1.8?
No. This guide covers the original 135mm f/2 ED UMC, not the later autofocus f/1.8 design or the T2.2 cine lens.
What filter size does it use?
It uses a 77mm front filter thread. Check the exact model before ordering accessories.
Does it have image stabilization?
No. Any stabilization supplied by your camera is separate, and it cannot freeze a moving subject.
Can I use the infinity hard stop for stars?
Do not assume it is exact infinity. Magnify a star, focus carefully and inspect a test exposure.
Is the Nikon version different from an unchipped Canon EF version?
Yes. The Nikon F automatic-chip version can support camera communication and aperture operation on compatible bodies. Check the exact version and camera instructions; all versions remain manual focus.
A practical manual-focus kit
Check exact model, mount, condition and return terms. These links are shopping starting points, not stock or price promises.
- Original Rokinon 135mm f/2 listings: match the mount and avoid mixing up AF and cine versions.
- Remote shutter releases: match the camera connector or supported wireless system.
- 77mm neutral-density filters at B&H: choose strength for the exposure and test color.
- Tripods at B&H: support the whole kit safely.
Affiliate disclosure: Some links are affiliate links. If you buy through them, Shut Your Aperture may earn a commission at no extra cost to you. As an Amazon Associate, we earn from qualifying purchases.
Find practical photography tips at Shut Your Aperture Academy. Build your understanding of light and framing alongside your lens technique.
References: Rokinon model information, Samyang mount-specific specifications, The Digital Picture review and Cameralabs review.