Updated October 2026
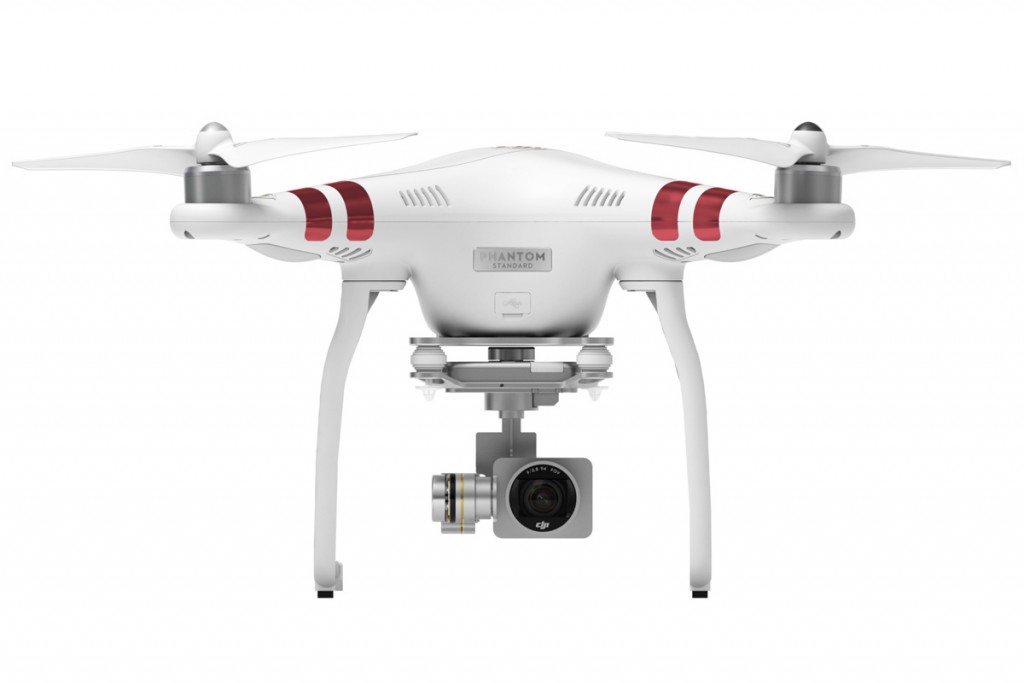
The DJI Phantom 3 Standard is a 2015 aircraft, not a current beginner-drone recommendation. Its appeal today is a low-cost route into a stabilized camera and DNG files, provided the exact aircraft, battery, controller and phone actually work together. A cheap listing becomes expensive quickly when the gimbal is damaged, the battery is tired or the app cannot connect.
Start with that complete system rather than the old launch price. This guide covers the Phantom 3 Standard, not the Phantom 3 Professional, Advanced, SE or 4K. Similar white shells do not make the camera, radio link or setup interchangeable. Read the label on the aircraft and compare its controller with the Standard manual before buying accessories or loading firmware.
The original announcement is retained at its original address and date, but the useful question has changed: can this particular used Standard safely record the photographs you want? Separate three checks: equipment condition, camera workflow and legal permission to fly. Passing one does not settle the other two.
Know what the Standard camera can do
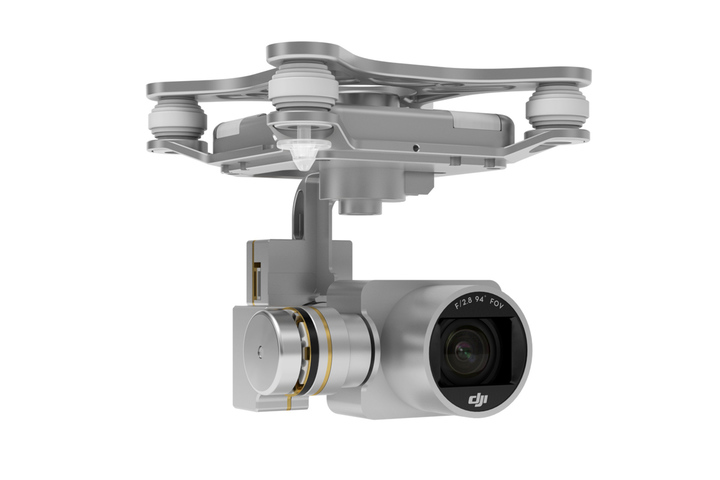
DJI’s Standard manual lists a 12-megapixel, 1/2.3-inch sensor and a fixed 20mm-equivalent f/2.8 lens with a 94-degree field of view. Still images reach 4000 by 3000 pixels, with JPEG and DNG recording. The lens is fixed-focus at infinity. It does not offer an interchangeable lens, optical zoom or an adjustable aperture.
Video reaches 2.7K at 30 frames per second. Full HD is listed at 24, 25 or 30 frames per second, and 720p reaches 60. Do not mistake the Standard for the Professional’s 4K camera. When a seller writes only “Phantom 3,” request a clear model-label photograph and an original file from that aircraft.
The three-axis gimbal helps hold the camera steady, but it cannot repair damaged vibration mounts, compensate for every gust or turn poor light into a clean photograph. The small sensor gives you less room to lift dark shadows than a larger camera. Favor good light, restrained ISO and exposures that protect important highlights.
For framing and aerial composition beyond this exact model, use our aerial photography guide. Here, keep the priority on a reliable aircraft and an original file you can inspect.
 Save
SaveInspect the whole used kit before paying
Ask what is included: the exact aircraft, Standard controller, compatible flight battery, correct charger, propellers and any storage card. “Ready to fly” in an old announcement describes the original package, not the completeness of a used sale. Missing small parts and a failing battery can erase the apparent bargain.
Look closely at the shell around motor mounts, arm ends and landing gear. Check for cracks, distorted plastic, loose hardware and signs of a hard landing. Examine the camera ribbon cable, gimbal arms and rubber vibration mounts. A camera that hangs straight while powered off has not yet proved that its stabilization works.
With the seller demonstrating the aircraft in a suitable location, watch the gimbal initialize and check the live image. Tilt the camera with the controller, record a short clip and inspect it for shaking, an unstable horizon or repeated gimbal warnings. Check the card’s original footage on a computer, not only the phone preview.
Request the repair and crash history without treating an answer as a warranty. Review any available flight and battery information, then verify normal operation yourself or through a competent technician. Do not buy a questionable aircraft because the seller promises a firmware update will fix every problem. A software change is not a diagnosis of damaged hardware.
Battery condition matters more than the old flight-time claim
The original specification says approximately 25 minutes of flight. That is not a promise for an aged battery, wind, repeated maneuvers or a particular used aircraft. Plan for the condition you can verify, with a generous landing reserve, rather than trying to reproduce a launch-era maximum.
Inspect the battery casing, contacts and latch. Stop if it is swollen, leaking, damaged or behaving abnormally. A battery that lights up or accepts a charge has not proved that it can sustain flight safely. Follow DJI’s battery safety documents and the charger instructions for the exact pack; do not attempt forum-style revival tricks or leave a suspect pack charging unattended.
Check the battery information and warnings in DJI GO during a demonstration. Sudden percentage drops, cell warnings and unexpected shutdowns need attention before flight. Make sure the pack locks fully into the aircraft. Also test the controller battery: a charged aircraft is not enough if its radio controller loses power.
Before buying replacements, verify model compatibility, the supplier and the condition of what will arrive. Old-stock batteries can have age-related problems even when unused. We do not promise that genuine new batteries or repair parts are available simply because a retailer search returns a result.
Test DJI GO on your exact phone
The Phantom 3 Standard uses DJI GO, not DJI Fly. DJI’s current GO page identifies support for the Phantom 3 series. That establishes the app family, not that every modern phone, operating-system release and aircraft firmware combination will work without trouble.
Start at DJI’s official DJI GO page and use its platform-specific route. Avoid random download mirrors and modified packages. On iOS, check the live App Store listing and your device’s requirements. On Android, follow the current official download instructions rather than assuming an old manual’s store link still describes today’s installation process.
Before paying for a used Standard, demonstrate the exact phone and controller together. Check that the app opens, reaches the camera view, receives telemetry and displays the live feed. A seller’s working tablet does not prove that your phone will work. An app installation alone is not a successful aircraft connection.
Keep a note of the working app, phone operating system and aircraft firmware versions. Use only files and procedures meant for the Standard when following official update instructions. Do not borrow an Advanced or Professional update tutorial because the airframes look similar. If installation, linking or firmware status remains uncertain, settle it before treating the drone as a bargain.
 Save
SaveSeparate controller linking from phone Wi-Fi
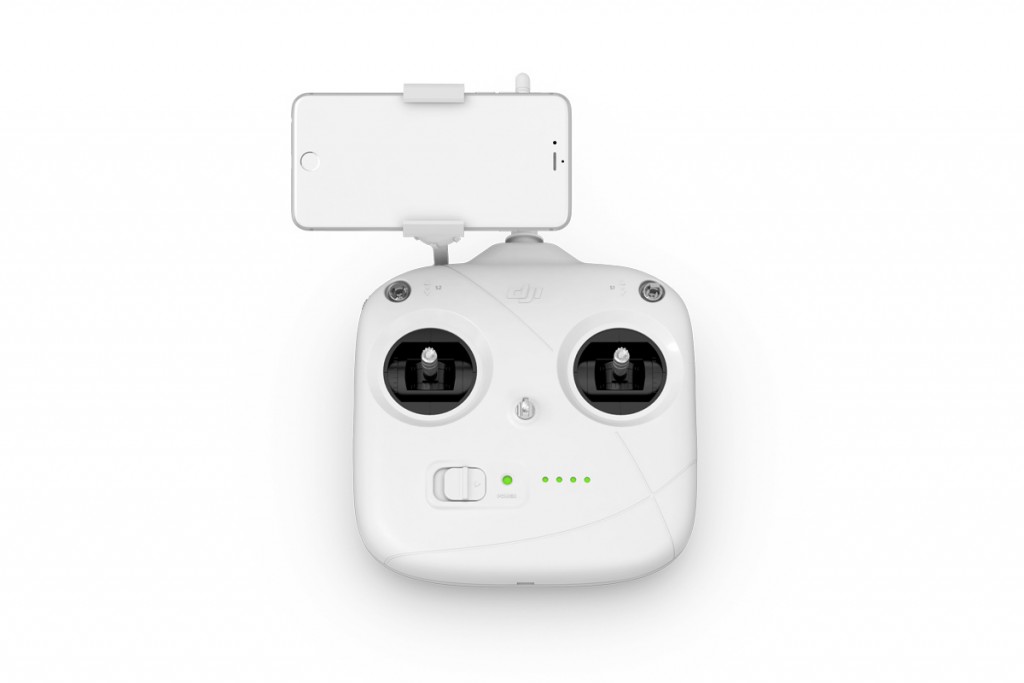
The Standard’s phone connection is wireless. DJI’s manual describes connecting the mobile device to the controller’s Phantom Wi-Fi network, then opening DJI GO’s camera view. Do not expect the Professional’s USB phone connection or Lightbridge workflow to describe this model.
There are two separate relationships to check: the controller must link to the aircraft, and the phone must connect to the controller’s Wi-Fi video downlink. Seeing the controller’s network in your phone settings does not prove that the aircraft is linked. Likewise, stick control without a live picture does not prove that the camera connection is ready.
Follow the Standard manual’s linking and Wi-Fi instructions, including the indicator-light checks. For a used unit, ask the seller about changed network credentials. Keep account passwords and private connection details out of public listings. If a reset is needed, use the model-specific official procedure rather than cycling unrelated switches at random.
Test the connection with the aircraft safely on the ground before planning a flight. A connection problem belongs in a controlled setup session, not in an improvised experiment over water. Check that camera settings, battery telemetry and recorded files behave normally before moving on.
Use return-to-home as a backup, not a flight plan
DJI describes Smart, Low Battery and Failsafe return-to-home in the Standard manual. These procedures depend on the recorded home point, GPS conditions and the situation that triggered them. Confirm that the home point has been recorded before takeoff, and understand the mode and warnings shown by the app.
The Standard cannot avoid obstacles during return-to-home. Set a suitable return altitude for the actual site within applicable limits, and consider trees, wires, structures and the route back. An automatic return is not proof that the aircraft will take a clear path. The manual also describes different behavior near the home point, so do not reduce RTH to one universal rule.
Understand the S1 and S2 switches before flying. Read the manual’s control and cancellation procedures, practice normal control in a lawful open area and avoid changing flight modes casually. An inexperienced pilot should not test advanced modes or signal-loss behavior simply to see what happens.
Keep the aircraft within visual line of sight and return while you still have a comfortable battery reserve. Published transmission-distance numbers are technical specifications under stated conditions, not a recommendation to fly that far. Buildings, interference, terrain and the law all matter more than an old range claim.
Make a short, deliberate first flight
Choose a lawful open site with room to take off, hover and land without approaching people, traffic or obstacles. Check weather, wind, airspace and ground hazards. Follow the manual’s compass instructions and warnings, using a location away from magnetic interference. Do not calibrate beside a car, a large metal structure or indoors.
Inspect the propellers and fit the correct ones as the manual directs. Remove transport protection before powering the gimbal and confirm the battery is secure. Review the aircraft status, GPS, home point, battery, card and return settings. Stop when warnings or abnormal behavior remain unresolved.
For the first test, hover nearby, check response and land. Build confidence through short sessions rather than combining an unfamiliar aircraft with a distant photo location. Do not launch merely because the app allows it; flight readiness includes the equipment, pilot, location and legal conditions.
Photography starts after that basic check. Make a few frames from a stable hover, then review them on a computer. Look for softness, vibration, uneven horizons and exposure problems. A short test with useful files is worth more than a long flight that hides a camera defect.
 Save
SaveSet up the photo and card workflow
Use DNG when you want raw files for editing, and test your editor before an important outing. JPEG is useful for a fast preview or a simpler delivery. Choose the available recording option in DJI GO, take a test frame and verify that the expected file reaches the card.
The manual lists microSD cards up to 64GB, Class 6 or higher. For video and other high-resolution files, DJI recommends a UHS-1 or Class 10 microSD card to minimize read/write delays. Class 6 is the listed minimum, not the preferred choice for video. Confirm that the aircraft recognizes your card, then record and play back a short clip. Back up existing files before formatting. Use a reader to transfer the original card files; a phone preview or cached video is not a substitute for the camera’s full recording.
Start with low ISO in good light. Since the aperture is fixed, exposure choices involve shutter speed, ISO and the light itself. For stills, keep the shutter fast enough for the scene and aircraft movement rather than choosing a slow value only because the gimbal looks steady.
The Standard offers exposure bracketing, which can help with bright sky and darker foreground. Inspect every frame before combining them: movement between exposures can create alignment problems. Avoid treating HDR processing as permission to clip highlights or ignore a weak composition.
For video, choose the required resolution and frame rate before takeoff. Use gentle movements and give each shot a clear beginning and end. If you consider filters, verify exact camera fit and gimbal compatibility first. A poorly fitting accessory is not an upgrade.
Compose an aerial photograph, not a range demonstration
A higher viewpoint is useful only when it clarifies the picture. Look for shorelines, repeated shapes, roads and the relationship between foreground and background. Change height or camera angle within the permitted flight area to simplify the frame, not to chase the highest possible number.
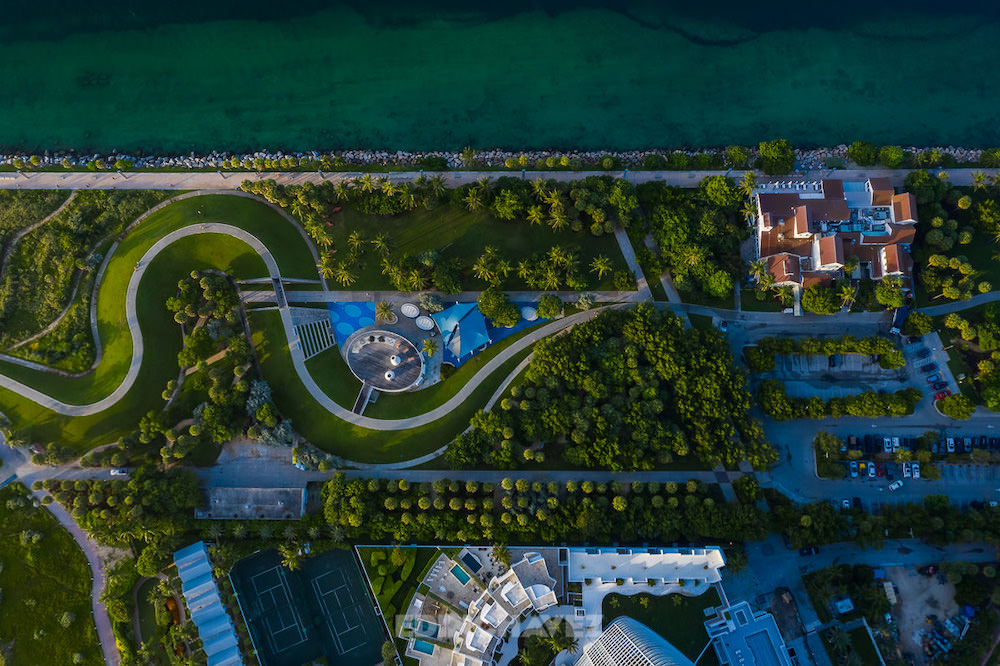
Edin’s aerial photographs here illustrate viewpoint and composition, not output from a Phantom 3 Standard. The top-down park image shows how paths and water can organize a frame. The wide Miami panorama shows a different approach: a skyline and foreground arranged across a broad horizontal view. Neither photograph is a controlled comparison or a promise that this used drone will reproduce it.
 Save
SaveScout the composition without letting the camera distract you from safe control. Keep enough attention on the aircraft and surrounding airspace, and do not fly over a crowd for a cleaner angle. When a shot requires a flight you cannot make safely or legally, find another composition.
Check today’s rules before using a 2015 aircraft
In the United States, this aircraft’s listed 1216-gram weight is well above the recreational registration threshold. Review the FAA’s current recreational-flyer requirements, including registration, TRUST, visual line of sight and airspace permission. A recreational flight and work governed by Part 107 are not interchangeable just because both use a camera.
The FAA says drones required to be registered, or that are registered, must follow Remote ID rules. Do not assume a 2015 Phantom 3 Standard has current built-in compliance. Check the exact aircraft and any proposed broadcast module against the FAA’s accepted declarations and registration requirements. An applicable FRIA is another path, with its own boundaries and visual-line-of-sight requirements.
A module listing, an app map and a successful takeoff do not independently establish compliance. Use the FAA’s Remote ID guidance and recreational flyer guidance before deciding where and how to operate. Outside the United States, check the local aviation authority and site restrictions.
Learn faster with a plan. The ShutYourAperture Academy has 22 photography courses, from the fundamentals of aperture, shutter and ISO to genre courses like landscape, portrait and street.
Frequently asked questions
Does the Phantom 3 Standard record 4K?
No. The Standard manual lists 2.7K at 30fps. The Phantom 3 Professional is a different model with a different camera specification.
Which app does it use?
DJI GO, not DJI Fly. Use DJI’s official app route and test your exact phone, controller and aircraft before buying.
Does the phone connect by USB?
The Standard uses a Wi-Fi connection between the phone and controller for its camera workflow. Do not apply the Professional’s connection instructions.
Can it shoot raw photographs?
Yes. DJI lists DNG and JPEG still files. Check the recording setting and transfer an original card file to your editor.
Does return-to-home avoid obstacles?
No. DJI’s Standard manual warns that it cannot avoid obstacles during return-to-home. Confirm the home point and suitable return settings before flight.
Is the original 25-minute flight time guaranteed used?
No. It is an approximate original specification. Battery age, condition, weather and operation affect usable time; plan a safe landing reserve.
Build a simple file-checking kit
Verify compatibility before buying. These are retailer searches, not promises of stock, genuine DJI parts or current prices.
Affiliate disclosure: Some links are affiliate links. If you buy through them, Shut Your Aperture may earn a commission at no extra cost to you. As an Amazon Associate, we earn from qualifying purchases.
Find practical photography tips at Shut Your Aperture Academy. For this aircraft, the best starting point is a verified kit, a short lawful test flight and original files you can inspect.
Sources: DJI Standard download center, Standard user manual, official Standard support and contemporary CNET review.