Delving into the mystique of the night, architectural photography transcends the realms of art and captures the structural allure of man-made edifices under the ethereal cloak of darkness. Often marred by challenges, yet fraught with immense creative opportunities, night architecture photography transforms these silent structures into poetic storytelling elements against the obscure choreography of the night. This illumination of architectural aesthetics in an unusual light translates an entire cityscape into an enchanting nocturnal canvas. With the correct equipment, advanced techniques, post-processing skills and a deep understanding of composition rules, the night architecture photography expands our perspectives, grounding us into the reality of the structurally complex world we inhabit.
Understanding Night Architecture Photography
Night architecture photography is an enthralling genre of photography that captures the beauty of human-made structures during nighttime. It’s like exploring an entirely different world when the sun sets, and it’s just you, your camera, and the splendid structures bathed in artificial lights. This hobby can start as a casual fascination but can quickly grow into an intense passion as you begin to see the urban landscape in a whole new light (quite literally too).
Understanding Exposure for Night Photography
Firstly, let’s unpack one of the most critical aspects – exposure. It involves balancing three essential elements: ISO, shutter speed, and aperture. To put it simply, ISO refers to your camera’s sensitivity to light, shutter speed is the length of time your camera’s shutter is open, and aperture is like the pupil of your camera, controlling the amount of light entering.
With night architecture photography, you’re working with a lot less light than in the daytime. As such, you’d need a slower shutter speed (for capturing more light), a higher ISO (increasing sensitivity to available light), or a wider aperture (allowing more light in). Here’s a tidbit though: higher ISO also adds more grain or noise to photos, so it can be a bit tricky to strike the right balance.
Choosing the Right Equipment
The right gear can work wonders in enhancing the night architecture photography experience. A sturdy tripod is a must-have to ensure stability during long exposures. Coupling the camera with a remote shutter release can also be a good idea as it minimizes camera shake. Wide-angle lenses are often preferred for their expansive field of view. Also, don’t forget spare batteries! Nighttime photography can rapidly drain battery power.
Picking the Perfect Time
While night architecture photography is all about shooting in the dark, timing is key. Blue hour and golden hour offer unique lighting conditions that can provide stunning shots. The blue hour is that brief period before sunrise or after sunset, where the sky has a deep blue hue. In contrast, the golden hour is shortly after sunrise or before sunset, when the light has a warm tint. Both can result in remarkably eye-catching photographs.
Composing and Framing the Shot
A visually engaging composition sets a night architecture photograph apart. Look for interesting patterns, lines, and symmetry in the buildings. Vertical or horizontal lines can guide the viewer’s eyes across the photograph, while patterns add an element of intrigue. Also, consider the rule of thirds to create balance in your shots.
Post-Processing
Post-processing is the final magic touch in night architecture photography. With the help of editing software like Adobe Lightroom or Photoshop, minor adjustments can be made to bring out the best in your photos. These tools can help increase sharpness, enhance contrasts, correct colors, reduce noise, etc.
This fascinating hobby of night architecture photography is an ever-evolving journey. Every click of the shutter in the stillness of the night can unveil new perspectives and possibilities. So, gear up and prepare to dive into this enchanting world after dark!
 Save
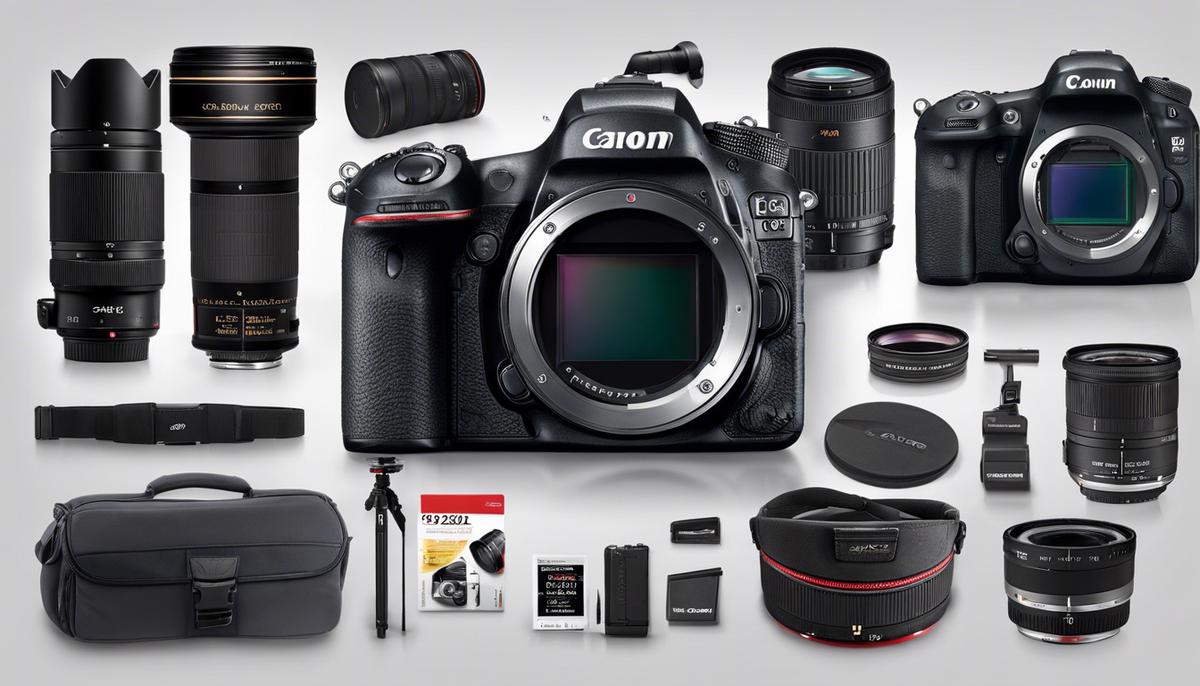
SaveCrucial Equipment for Night Architecture Photography
In the mesmerizing world of night architecture photography, fine-tuning your equipment list takes center stage with paramount importance. To capture such dramatic and captivating images, your gear must be meticulously curated. A careful balance of high-quality equipment and technical know-how can help transform the mundane into something truly radiant.
First on the list is undoubtedly a high-quality digital camera with manual controls. It should have a superior low-light performance, so frequent night photographers may want to look into Full Frame DSLR or Mirrorless cameras as they have larger sensors, which translates into more light-capturing capabilities. Nevertheless, a crop sensor camera can still get the job done for those on more of a budget or in the beginner stages of this hobby.
A fast, wide-angle lens is nearly as necessary as the camera itself. In the realm of night architecture photography, the term “fast” refers to lenses with a lower f-stop number, which allows the maximum amount of light to pass through. Wide-angle lenses allow for a greater field of view, ideal for capturing expansive architectural structures. If architecture photography is becoming your passion, lenses like a 14-24mm f/2.8 or a 16-35mm f/2.8 are excellent choices.
Without a sturdy tripod, your pursuit of capturing the enigmatic beauty of the night will be significantly hindered. At night, slower shutter speeds are needed to brighten your image due to the lack of light, amplifying any camera shake. Thus, a robust, heavy-duty tripod is vital to keep your equipment steady and ensure sharp, clear results.
Additionally, don’t underestimate the power of a remote shutter release. This essential item helps minimize camera shake when pressing the shutter button and is incredibly efficient when working with long exposures and bracketing.
Subtle light sources, such as a headlamp or a small handheld flashlight, can be beneficial in setting up and operating your equipment in the dark hours. It’s important to note that the light shouldn’t be too intense so it doesn’t spoil the scene you’re trying to capture.
Lastly, extra batteries and memory cards are always wise to have on hand. Capturing cityscapes at night often involves long exposure times, which can use up more battery than daytime photography. Also, shooting in RAW, which is often preferred for more control over your images in post-processing, can fill memory cards pretty quickly.
Remember, while your architectural ambitions may inspire you to invest in top-notch gear, understanding your equipment and mastering its use are what will truly set your photographs apart.
 Save
SaveTechniques for Capturing Night Architecture
Heading out into the late hours with camera at the ready makes way for some truly remarkable photography. But seizing the night’s beauty in an architectural context requires particular techniques. Following on from the nuts and bolts of exposure, gear choices, timing, composition, and post-production, let’s delve further into the world of night architecture photography.
Start by scouting your location during the day. Wander around the structure you wish to photograph and take note of the lighting conditions. Note down the positions from where man-made lights, such as lampposts or building lights, flood the structure. These light sources can add drama and life to the night shots.
Building reflections are another element that can turn an otherwise average photo into a stunning shot. Architecture on or near bodies of water can offer mirror-like reflections, adding depth and balance to the image. Keen eyes should be placed on puddles, rivers, or shiny surfaces as these can all provide interesting photographic elements.
Promote detail by utilising bracketing in your shots. Nighttime can obscure the intricate elements of a structure that add so much character in daytime shots. Bracketing involves taking multiple shots of the same frame at different exposure levels. Later, the preferred parts from each shot can be combined in post-processing to deliver the most dynamic and detailed image possible.
Architecture photography demands the use of leading lines. These are visual pathways that direct the viewer’s gaze to your image’s main subject. Roads, fences, light trails, and the architectural structures themselves can serve as leading lines, guiding the eyes in a particular direction and providing your photo with a sense of depth.
Find unique angles to make your photos stand out. The unusual perspective can transform a common night architectural photo into a piece of art. Try shooting from ground level looking up, or from a high vantage point looking down. If the building is taller, capturing it from the bottom and up can accentuate the height, while offering an impressive viewpoint rarely appreciated in everyday life.
Experiment with the ISO settings. It’s true that a higher ISO often means more noise in the photograph. However, in a night time setting, a controlled amount of noise could add a pleasing grain effect and certain atmospheric quality to the photo.
Indeed, the key to capturing stunning night architecture photos lies in the ability to experiment boldly while being mindful of basic photographic concepts. Balancing these factors will pave the way to creating eye-catching photos that truly illuminate the beauty of architecture under the night sky. And with each shot taken comes a lesson learned and a step closer towards mastery in this rewarding artistic endeavor.
 Save
SavePost-processing Night Architecture Photos
Perfecting Post-Production: Enhance Your Nighttime Architectural Photos
Once a session of night photography is complete, it’s time to put the cherry on the cake and enhance those artistic images through proper post-processing. This stage is quite crucial as it can greatly enrich the captivating visual drama of nighttime architectural shots.
Start with Correcting Images
Each photograph taken is unique and will require different levels of adjustment. However, it is always a good idea to begin with correcting your images before jumping into more intricate edits. Corrections may include adjusting exposure, highlights, shadows, contrast and white balance of the photos.
Harness the Power of RAW Editing
When shooting night architecture, using the RAW format allows for a considerable amount of leverage during post-processing. It preserves a lot of data from your shots, offering versatility in bringing out the desired details in the shadows and highlights during editing.
Leverage the Potential of HDR
High Dynamic Range (HDR) is an essential tool for night architecture photography. Combining multiple exposures into a single image, HDR provides a more detailed final result, capturing the different tones from the lightest lights to the darkest darks which are often present in nighttime shots.
Make Use of Noise Reduction Tools
Nighttime shooting often comes with its own set of challenges—one being noise in the image, caused by higher ISO settings used for low light conditions. Noise reduction tools, available in most editing software, can help improve image quality by smoothing out the grain in photos.
Dodging and Burning
Dodging and burning is an editing technique that can help emphasize the important features of the architecture by strategically darkening certain areas (burning) or lightening others (dodging). This can give your images more depth and provide a dramatic contrast to underscore the nocturnal mood.
Take Your Time
Honing the art of post-processing, much like the art of photography itself, takes time and practice. Delve into different software platforms, tutorials, and techniques. Trial and error are not hindrances but stepping stones to achieving the perfect night architecture image.
Every image holds a story. The better you get at post-processing, the more efficiently and effectively you can craft your story to leave your audience in awe. Enjoy the process and embrace the art of perfection through post-production. After all, striving for perfection never runs out of time or style when it comes to creating beautiful night architecture photos.
 Save
SaveNight Architecture Photography Composition Rules
The Magic of Light and Shadow
Night time architecture photography can bring out the captivating beauty of a cityscape. Using lights and shadows effectively can drastically enhance the atmospheric mood. One well-loved technique is to scout out locations that combine natural and artificial lights, like a tree-lined street with spotlights highlighting the buildings. Shadows in the foreground can give depth to the picture, with well-lit buildings appearing dramatic against the dark night sky.
Artistic Symmetry and Patterns
Look for symmetry and repetitive patterns in buildings as they can provide a visually attractive element, adding a structural harmony to the photograph. Patterns and symmetry bring order to a scene, directing the viewer’s gaze toward the reflections and designs cast by night lights. Play around with the perspective to capture these elements effectively, creating an image that draws the viewer in.
Long Exposure Mastery
Long exposure photography is another great tool in the arsenal of night photography. Apart from the use of special filters, creating stunning light trails can be a form of art itself. Light trails, produced by moving traffic, can bring an otherwise static scene to life, giving a pulsating energy to the cityscape. Patience is key here, as the best light trails often require longer waiting times.
Color Considerations
Pay attention to color tones at play during nighttime. Most artificial lights give off a warm glow, offering a contrast to the cooler colors of the night sky. Balancing these hues correctly can result in stunning photographs with enough warmth to make the buildings look inviting but without losing the cool ambience inherent to nighttime scenes.
Capturing Reflections
Including reflections in your photograph can bring another level of depth and interest to the scene. Rain puddles, parked cars, glasses, or windows can all add unexpected reflections that enhance your shot. Such moments need to be captured spontaneously and require an observant eye.
Final Note: Dress Warmly and Stay Safe
Last but not least, it’s important to remember to dress warmly for those long nights out capturing the city’s architectural beauty. Also, be aware of your surroundings and ensure your safety while focusing on the shot. Night photography challenges can also be exciting adventures!
 Save
SaveNight architecture photography is a fascinating rendezvous with art, form, light, and structure, where the world quiets and the structures speak, narrating tales of their existence wrapped in the mystery of the night. The realm of night architecture holds deep within it an unmatched potential. One can bring forth this potential through insightful understanding, application of the right techniques, use of appropriate equipment, meticulous post-processing, and thoughtful composition. The art is not merely in capturing the world post-sunset; it’s about bringing forth its palpable silence, its whispered stories, and its boundless beauty – amplifying the whispered dialogues of the night and architecture in a symphony of light and shadows.