Best Photography Spots Near San Francisco International Airport (SFO): Layover Guide
Updated
~12 min read · 2026-05-28
San Francisco International Airport (SFO) is a working photographer’s layover hub in San Francisco, United States, with a dense ring of urban and architectural spots reachable within an hour. This is the layover photographer’s field guide to San Francisco: seven plane-spotting and architectural locations within 30 minutes of the terminals, five regional photo subjects within an hour, layover length recommendations from 2 hours to 8+, gear that earns its carry-on space, and the photography law that determines what you can actually shoot at the airport itself.
Why San Francisco airport is a photographer's launchpad
San Francisco International Airport (SFO) is one of the more photographer-friendly major hubs in United States. SFO uses a centralized, multi-terminal layout with four terminals and seven concourses arranged in a circle around parking and transport facilities. The airport’s most photogenic design features are the award-winning Harvey Milk Terminal 1 expansion with a new north check-in lobby, mezzanine security checkpoint, and post-security connector, plus SFO’s extensive art program, museum galleries, and the SkyTerrace / Outdoor Terrace observation spaces. The terminals are linked post-security, which makes it easy to move between concourses for different architectural angles and airside views. [Wikivo Within a 30-minute reach, 7 priority photo vantage points sit on the public side or within walking distance of transit; within an hour, 5 additional locations open up the metropolitan core. The combination of terminal architecture, transit access, and urban density makes SFO unusually productive for layover photography.
Quick layover map: 7 spots within 30 minutes of SFO
- SkyTerrace (Terminal 2 observation deck) — approx 37.6248, -122.3853
- Outdoor Terrace (International Terminal G) — approx 37.6178, -122.3839
- Bayfront Park — approx 37.5989, -122.366
- San Bruno Point / bayside shoreline park area — approx 37.6304, -122.4166
- Coyote Point Recreation Area — approx 37.5802, -122.3206
- Millbrae Caltrain/BART area — approx 37.6008, -122.3869
- Burlingame waterfront / Coyote Point-adjacent bay trail — approx 37.5835, -122.3446
Best photography spots within 30 minutes of San Francisco International Airport
SkyTerrace (Terminal 2 observation deck)
Location: approx 37.6248, -122.3853
~5 min transit time. Best airport-adjacent plane-spotting deck; free, public, no boarding pass needed, with 180-degree runway views and landscaping.
Outdoor Terrace (International Terminal G)
Location: approx 37.6178, -122.3839
~10 min transit time. Post-security terrace with open airfield views, sculptures, and strong wide-angle compositions of large aircraft.
Bayfront Park
Location: approx 37.5989, -122.366
~15 min transit time. One of the airport’s recommended plane-spotting alternatives; good for low-angle shots of arrivals with bay-edge context.
San Bruno Point / bayside shoreline park area
Location: approx 37.6304, -122.4166
~15 min transit time. Open shoreline and marsh views west of the airport; useful for telephoto aircraft silhouettes and water-reflection frames.
Coyote Point Recreation Area
Location: approx 37.5802, -122.3206
~20 min transit time. Wide bayfront park with planes, water, and skyline separation; works well for longer lenses and sunset light.
Millbrae Caltrain/BART area
Location: approx 37.6008, -122.3869
Elevated transit structures and passing trains make this useful for urban transport compositions and airport-context shots.
Burlingame waterfront / Coyote Point-adjacent bay trail
Location: approx 37.5835, -122.3446
~25 min transit time. Calm shoreline vantage points with reeds, water, and occasional aircraft traffic above; best for minimalist compositions.
Best photography spots within 1 hour of San Francisco International Airport
 Save
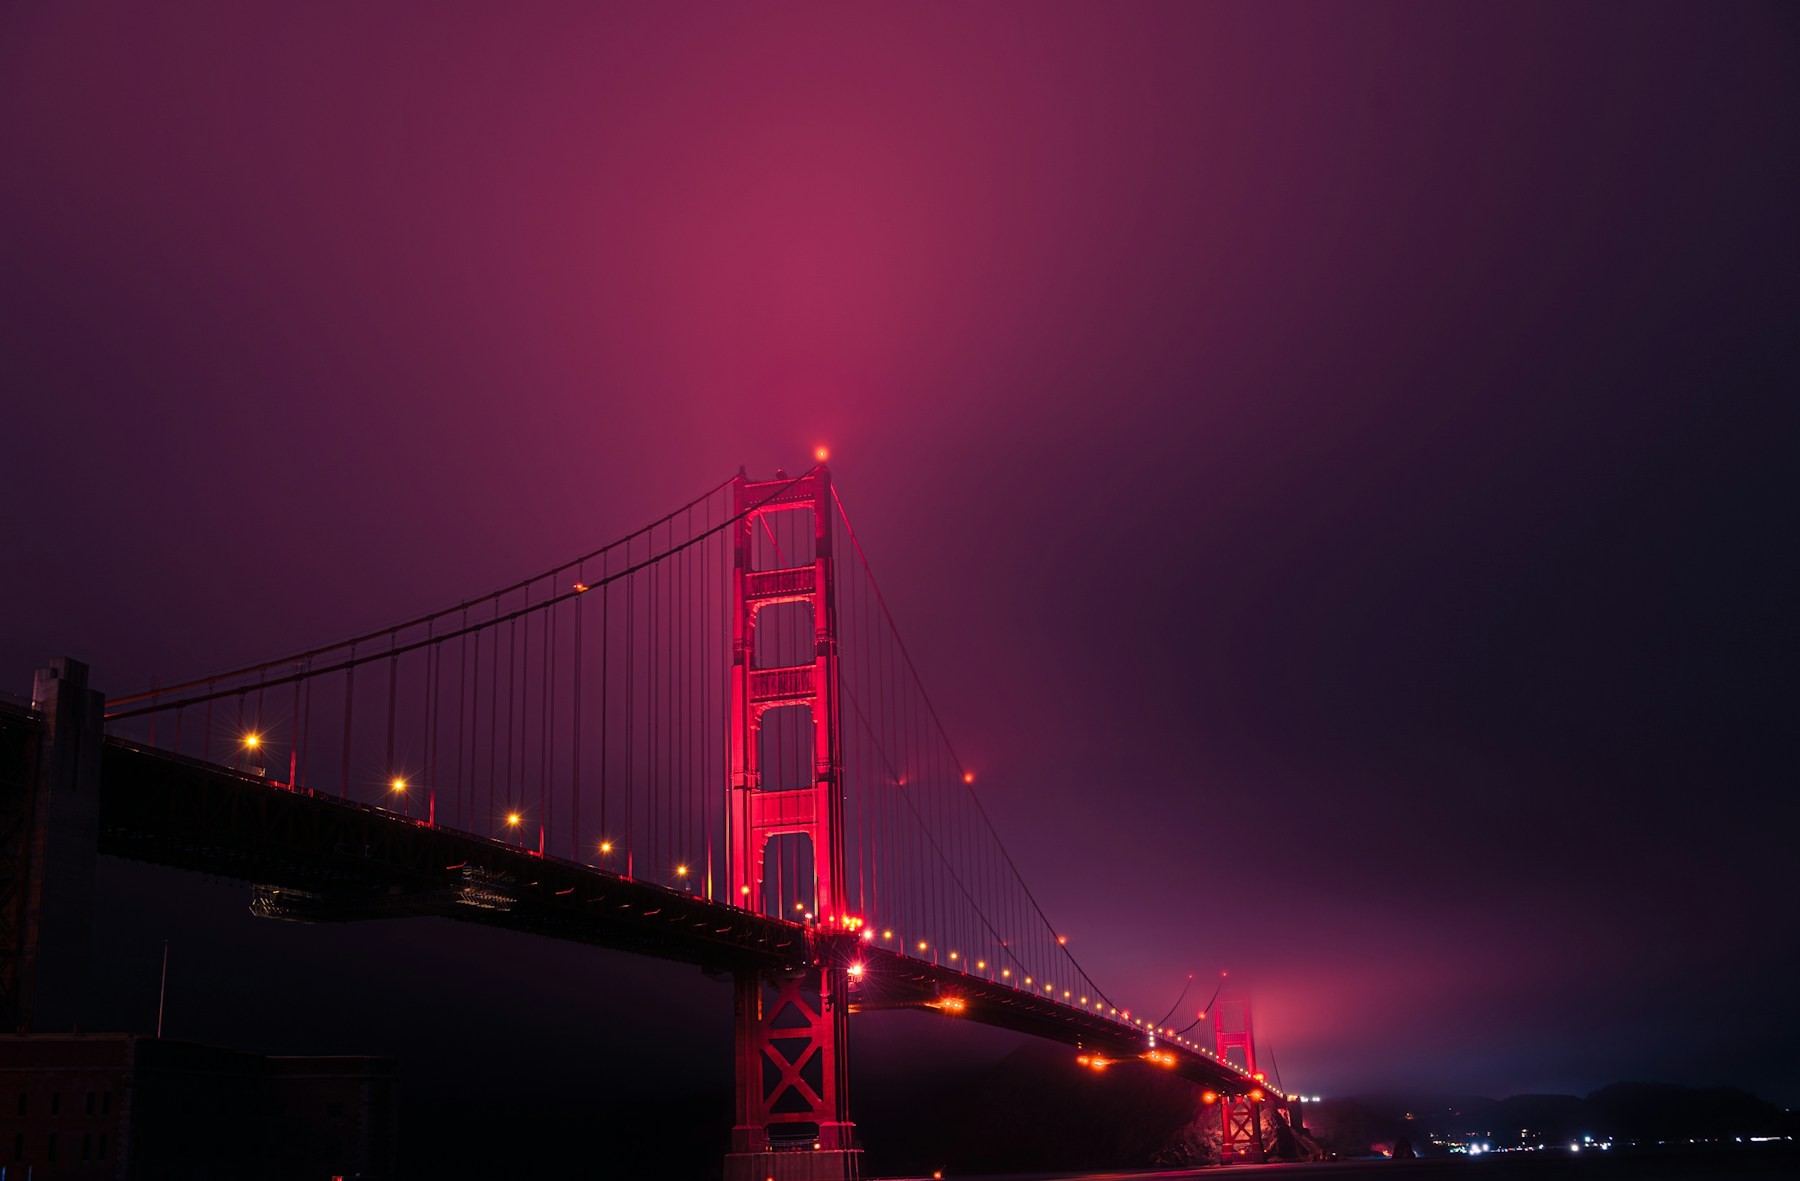
SaveSan Francisco waterfront at Fort Point
Location: approx 37.81, -122.477
~60 min transit time. Iconic bridge-and-bay vista for a full San Francisco panorama; useful for a layover if you want landmark-heavy city photography.
Twin Peaks
Location: approx 37.7544, -122.4477
~55 min transit time. Classic city overlook with sweeping skyline and Bay views; best in clear weather and for sunset/blue-hour work.
Golden Gate Bridge / Battery Spencer area
Location: approx 37.8269, -122.4798
~60 min transit time. High-impact bridge viewpoint; strong atmospheric shots, though traffic and weather can be variable.
Daly City / Thornton State Beach overlook
Location: approx 37.6956, -122.5133
~40 min transit time. Coastal bluff scenery near the airport corridor; good for surf, cliffs, and Pacific light without going deep into the city.
Downtown San Francisco / Union Square
Location: approx 37.7881, -122.407
~35 min transit time. Dense urban street photography, architecture, and reflections; easy by BART if you want a classic SF city stop.
Photographing the airport itself
 Save
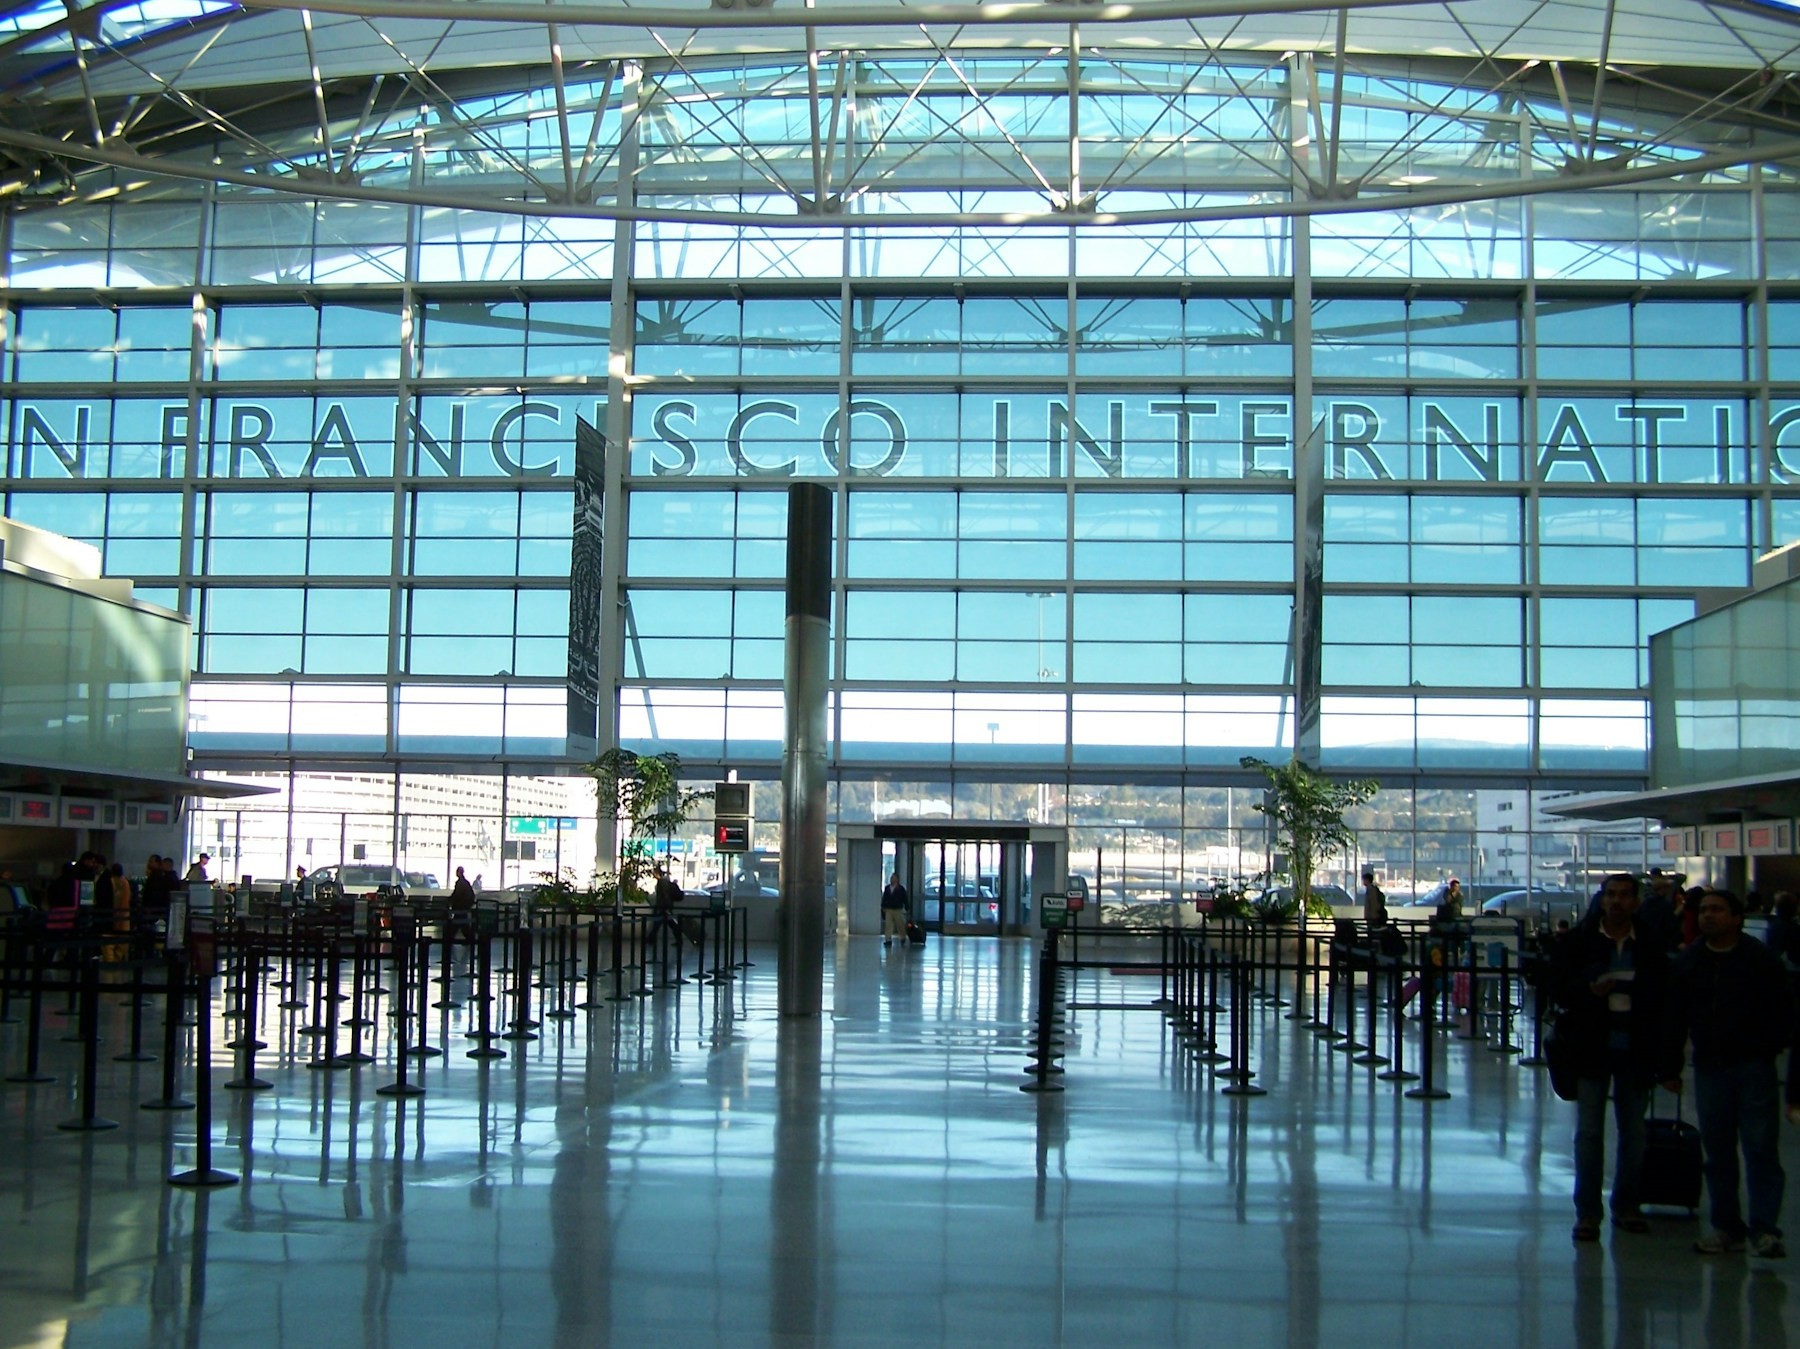
SaveSFO uses a centralized, multi-terminal layout with four terminals and seven concourses arranged in a circle around parking and transport facilities. The airport’s most photogenic design features are the award-winning Harvey Milk Terminal 1 expansion with a new north check-in lobby, mezzanine security checkpoint, and post-security connector, plus SFO’s extensive art program, museum galleries, and the SkyTerrace / Outdoor Terrace observation spaces. The terminals are linked post-security, which makes it easy to move between concourses for different architectural angles and airside views. [Wikivoyage](https://en.wikivoyage.org/wiki/San_Francisco_International_Airport), [Harvey Milk Terminal 1](https://www.flysfo.com/hmt1), [Art at SFO](https://www.flysfo.com/shop-dine-relax/art-at-sfo), [SkyTerrace](https://www.flysfo.com/skyterrace), [Outdoor Terrace](https://www.flysfo.com/about/construction/completed-projects/outdoor-terrace) Best inside-airport photo locations are the SkyTerrace in Terminal 2, the Outdoor Terrace at the end of Boarding Area G, the Harvey Milk Terminal 1 post-security connector and north check-in lobby, the SFO Museum / Aviation Museum areas, and the art-rich concourses throughout the connected post-security terminal system. The airport’s terminals are especially good for architectural lines, open sightlines, and exhibit-driven photography. [SkyTerrace](https://www.flysfo.com/skyterrace), [Outdoor Terrace](https://www.flysfo.com/about/construction/completed-projects/outdoor-terrace), [Art at SFO](https://www.flysfo.com/shop-dine-relax/art-at-sfo), [Harvey Milk Terminal 1](https://www.flysfo.com/hmt1)
Layover length guide
2-hour layover
Stay on-airport. Use the SkyTerrace if it’s open, or the Outdoor Terrace if you are already airside in the International Terminal. Keep the session tight: 20–30 minutes of photos, then return with enough buffer for security and boarding. If you only want guaranteed timing, photograph terminals, art, and runway views from the public observation deck rather than leaving the airport. [SkyTerrace](https://www.flysfo.com/skyterrace), [Gate Explorer FAQ](https://www.flysfo.com/fil/node/15792)
4-hour layover
Use BART or rideshare for a short downtown run only if you do not need to recheck bags and your arrival/departure terminals are simple to navigate. For a safer photo plan, combine one airport terrace with Bayfront Park or Coyote Point, then return with at least 90 minutes before boarding. If the weather is clear, aim for an exterior plane-spotting session first and save the city stop for the end. [Wikivoyage](https://en.wikivoyage.org/wiki/San_Francisco_International_Airport), [Plane Spotting at SFO](https://www.flysfo.com/about/community-noise/plane-spotting-sfo)
6-hour-plus layover
This is enough time for a proper photo loop: start at SkyTerrace or the International Terminal terrace, then head to Bayfront Park or Coyote Point for aircraft and bay scenery, and finally ride BART into San Francisco for a skyline or waterfront stop if conditions are good. Keep a hard return deadline because SFO security and AirTrain transfers are easy, but city traffic can be slow. If the day is foggy, stay close to the airport and prioritize water, runway, and aircraft silhouettes over distant city views. [SkyTerrace](https://www.flysfo.com/skyterrace), [Outdoor Terrace](https://www.flysfo.com/about/construction/completed-projects/outdoor-terrace), [Wikivoyage](https://en.wikivoyage.org/wiki/San_Francisco_International_Airport)
Camera and lens recommendations for layovers
Bring a wide-angle lens for terminal architecture, a 70–200mm or longer lens for aircraft and distant skyline shots, and a small tripod only if your destination allows it. A polarizer helps with bay glare; a light jacket is important because fog and wind are common; and a compact bag is best because SFO Gate Explorer visitors are limited to one personal item. [Gate Explorer FAQ](https://www.flysfo.com/fil/node/15792), [Wikivoyage](https://en.wikivoyage.org/wiki/San_Francisco_International_Airport)
Transit from SFO to top spots
BART: SFO’s BART station is inside the Dianne Feinstein International Terminal; it is the fastest public-transit option into San Francisco, with Wikivoyage noting about 30 minutes to the city and BART’s own fare calculator available for exact pricing. [SFO Gate Explorer FAQ](https://www.flysfo.com/fil/node/15792), [Wikivoyage](https://en.wikivoyage.org/wiki/San_Francisco_International_Airport), [BART Fare Calculator](https://www.bart.gov/tickets/calculator)
AirTrain: Free, 24/7, frequent service between terminals, parking, rental car center, and the BART station; ideal for moving around the airport before or after a photo stop. [Rental Cars](https://www.flysfo.com/passengers/ground-transportation/rental-cars)
Taxi/rideshare: Best for Bayfront Park, Coyote Point, or a quick downtown run when time matters more than cost; expect roughly 10–30 minutes to nearby shoreline spots and longer in peak traffic. [Travel Tips](https://www.flysfo.com/passengers/travel-tips)
Parking: Reservations are recommended if you drive in to spot planes; SFO explicitly says it strongly recommends parking reservations for its garages. [SFO Gate Explorer FAQ](https://www.flysfo.com/fil/node/15792)
Photography restrictions and aviation rules
Commercial filming, videography, and photography require airport approval and a permit process; SFO says commercial requests must be reviewed and approved, with at least three weeks required and a minimum $2,000 use fee. For public plane spotting, you must stay in publicly accessible, non-secure areas, and SFO says West Field Garage photography is no longer allowed. SkyTerrace is explicitly open for plane spotting without a permit, but visitors still undergo a security check. Drone use is not part of the public spotting guidance and should be assumed prohibited near the airport unless separately authorized under FAA and airport rules. [Filming at SFO](https://www.flysfo.com/media/filming-at-sfo), [Plane Spotting at SFO](https://www.flysfo.com/about/community-noise/plane-spotting-sfo), [SkyTerrace](https://www.flysfo.com/skyterrace)
Frequently asked questions
Can I leave SFO during a layover for photography?
Yes, if you have the right to enter the United States (ESTA or visa) and at least 5-6 hours between flights. BART runs directly from the International Terminal to downtown San Francisco in about 30 minutes, so an 8-hour layover comfortably covers a city session. Confirm your entry eligibility before exiting and leave a full hour for security on your return.
What is the best plane spotting location at SFO?
The SkyTerrace on top of Terminal 2 is the standout: a public, pre-security observation deck with real views over the airfield – one of the few sanctioned viewing spaces at a US airport. The Outdoor Terrace at International Terminal G is the second option, and Bayfront Park along the shoreline puts you near the approach paths for the 28s.
Are drones allowed near SFO?
No. The airspace around a major US airport is controlled, and drone flight there requires FAA authorization (LAANC or a waiver) – recreational flights near the airport are prohibited and violations bring heavy fines. There is no casual pathway to aerial footage near the field.
How far is downtown San Francisco from SFO?
About 30 minutes on BART from the airport station to Powell or Montgomery. The waterfront, Fort Point, and Twin Peaks are the high-value targets; fog timing matters more than transit time, so check the marine layer before committing.
Can I photograph inside the SFO terminals?
Handheld photography in public areas is generally tolerated. Do not photograph TSA checkpoints, screening lanes, customs areas, or security staff at work, and expect questions if you set up a tripod in a busy hallway. The SkyTerrace is the sanctioned place for bigger lenses.
More airport guides: browse the complete airport photography hub → for sibling guides.
- JFK New York airport photography guide
- LHR London airport photography guide
What to Pack
A landscape kit built around wide views, steady support, and changing light is a useful starting point. Compare the gear and choose what fits your camera, budget, and conditions. These links lead to B&H Photo Video and Amazon.
| What & Why | B&H | Amazon |
|---|---|---|
Sony 16-35mm f/2.8 GM Check the camera mount before buying. Choose a focal length that fits the photos you plan to make. | Shop B&H → | Shop Amazon → |
Peak Design Travel Tripod Check the load rating, packed size and local tripod rules before buying. | Shop B&H → | Shop Amazon → |
Breakthrough X4 CPL Check the filter type and lens thread size before buying. Use a filter only when the effect fits your photo. | Shop B&H → | Shop Amazon → |
Breakthrough X4 10-stop ND Check the filter type and lens thread size before buying. Use a filter only when the effect fits your photo. | Shop B&H → | Shop Amazon → |
Sony NP-FZ100 battery Use the battery type specified for your camera. Bring a spare if your shooting plan calls for one. | Shop B&H → | Shop Amazon → |
SanDisk Extreme Pro 128GB Check the card format and speed requirements specified for your camera. | Shop B&H → | Shop Amazon → |
Koh microfiber cloths Compare this option with your current kit. Check compatibility and the product details before buying. | Shop B&H → | Shop Amazon → |
B&H and Amazon links are affiliate links. We earn a small commission on purchases at no extra cost to you.