How to Photograph Machu Picchu: A UNESCO World Heritage Photo Guide
An iconic Inca citadel where stone architecture, cloud forest, and dramatic Andean peaks meet in one of the world’s great photographic landscapes.
Machu Picchu is one of the most celebrated archaeological landscapes on earth: a masterwork of Inca engineering set between high Andes and Amazonian cloud forest. UNESCO recognizes it for its artistic, architectural, and landscape achievements, plus its exceptional natural setting and biodiversity. For photographers, it offers layered compositions of terraces, temples, ridgelines, and shifting mist, with strong sunrise and late-afternoon light. It also rewards careful planning because access is time-windowed and the site is actively managed to protect its fragile fabric and viewpoints. [UNESCO World Heritage Centre](https://whc.unesco.org/en/list/274/)
Why photograph Machu Picchu
Machu Picchu is one of the most celebrated archaeological landscapes on earth: a masterwork of Inca engineering set between high Andes and Amazonian cloud forest. UNESCO recognizes it for its artistic, architectural, and landscape achievements, plus its exceptional natural setting and biodiversity. For photographers, it offers layered compositions of terraces, temples, ridgelines, and shifting mist, with strong sunrise and late-afternoon light. It also rewards careful planning because access is time-windowed and the site is actively managed to protect its fragile fabric and viewpoints. [UNESCO World Heritage Centre](https://whc.unesco.org/en/list/274/)
Best months and best time of day
Best months: May-June and September-October for clearer weather with fewer peak-crowd pressures than July-August; April and November can be good shoulder-season alternatives. [Peru Travel](https://www.peru.travel/en/attractions/machu-picchu)
Best time of day: Early morning for mist and first light, or late afternoon for warmer side light and lower visitor density. [Peru Travel](https://www.peru.travel/en/attractions/machu-picchu)
Opening hours: 6:00-17:30. [Peru Travel](https://www.peru.travel/en/attractions/machu-picchu)
| Inscription Year | 1983 |
| Criteria | (i)(iii)(vii)(ix) |
| Photo Permit | Not officially published — verify on site for current permit status. Commercial photography is commonly treated separately from ordinary visitor snapshots; expect prior authorization if you are shooting for editorial, advertising, or paid use. Tripods are often restricted or require special permission in tightly managed heritage sites, and drones are typically prohibited without explicit government approval. Flash may be restricted near delicate structures or museum-style interiors. Check the day-of entry rules at the site entrance. [UNESCO World Heritage Centre](https://whc.unesco.org/en/list/274/), [Peru Travel](https://www.peru.travel/en/attractions/machu-picchu) |
GPS vantage point map
| Vantage point | GPS | Best time | Lens |
|---|---|---|---|
| Guardhouse / Caretaker’s Hut | -13.1628, -72.546 | Sunrise | 24-70mm |
| Upper terraces near the Main Plaza | -13.1637, -72.5443 | Early morning | 35-70mm |
| Inti Punku (Sun Gate) | -13.1589, -72.5475 | Sunrise | 24-70mm |
| Huayna Picchu trail viewpoint | -13.158, -72.5456 | Late morning | 24-105mm |
| Lower agricultural terraces east of the citadel | -13.166, -72.5418 | Late afternoon | 70-200mm |
| Inca Bridge area | -13.1692, -72.5406 | Mid-morning | 35-85mm |
Detailed vantage points
Guardhouse / Caretaker’s Hut
GPS: -13.1628, -72.546 | Best time: Sunrise | Lens: 24-70mm
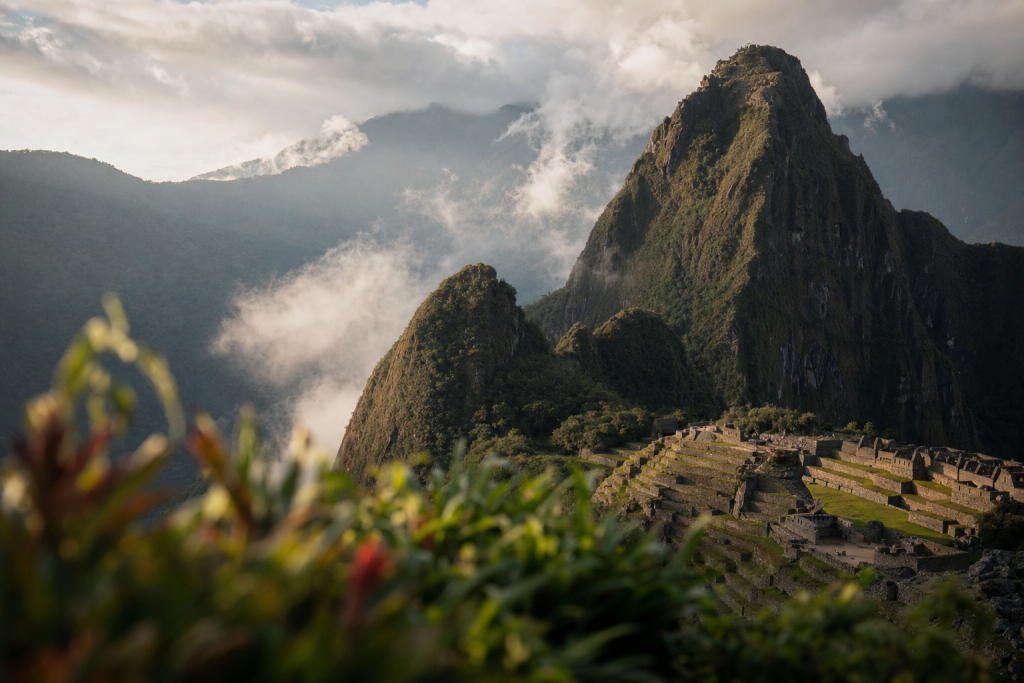
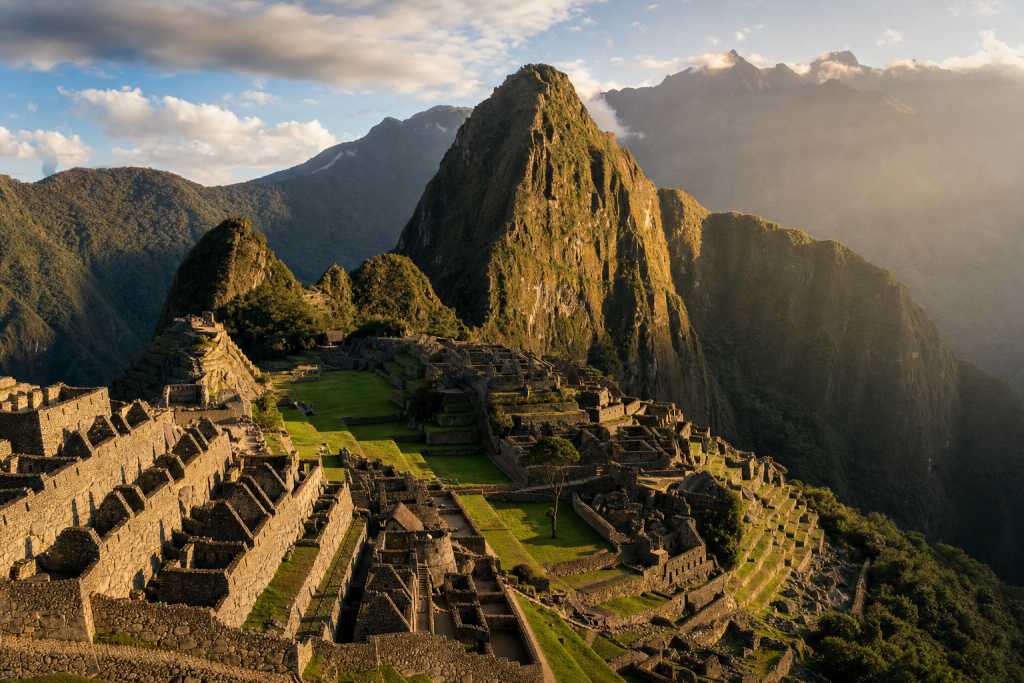
Classic elevated view of the citadel, terraces, and Huayna Picchu. Best for a balanced establishing frame with morning mist drifting through the valley. Arrive early for softer light and a better chance of clean sightlines before peak crowds build.
Upper terraces near the Main Plaza
GPS: -13.1637, -72.5443 | Best time: Early morning | Lens: 35-70mm
A strong mid-level perspective that emphasizes the urban geometry of stone walls, stairs, and agricultural terraces. Use this for layered compositions where the eye can travel from foreground architecture to the mountain backdrop.
Inti Punku (Sun Gate)
GPS: -13.1589, -72.5475 | Best time: Sunrise | Lens: 24-70mm
The classic reveal point for the citadel, especially when morning cloud breaks open above the ruins. It works well for wider environmental frames that include the valley, terraces, and the dramatic ridge line around the site.
Huayna Picchu trail viewpoint
GPS: -13.158, -72.5456 | Best time: Late morning | Lens: 24-105mm
Elevated overlook toward the core sanctuary and the Urubamba valley. The steeper angle gives scale and context, making it ideal for a more dramatic, compressed perspective of the ruins embedded in the landscape.
Lower agricultural terraces east of the citadel
GPS: -13.166, -72.5418 | Best time: Late afternoon | Lens: 70-200mm
Excellent for telephoto studies of repeating terrace patterns, stone textures, and the geometry of the mountain slopes. Afternoon side light brings out relief in the masonry and the stepped landscape design.
Inca Bridge area
GPS: -13.1692, -72.5406 | Best time: Mid-morning | Lens: 35-85mm
A quieter edge-of-site composition with cliff drama, vegetation, and the fortress-like feel of the sanctuary’s outer boundary. Best when you want detail-rich frames away from the most crowded classic viewpoints. [UNESCO World Heritage Centre](https://whc.unesco.org/en/list/274/)
Gear for unesco
Bring a lightweight camera kit that matches the site’s movement rules: one wide zoom for establishing frames, one short telephoto for compressed mountain-and-architecture scenes, and a compact tripod only if you have confirmed permission. A polarizer can help with foliage and wet stone, but keep it simple because you will be walking on uneven paths. Pack rain protection, microfiber cloths, spare batteries, and a small daypack that stays unobtrusive in crowds and narrow passages. [UNESCO World Heritage Centre](https://whc.unesco.org/en/list/274/), [Peru Travel](https://www.peru.travel/en/attractions/machu-picchu)
Restrictions, permits, and ethics
Drone use is generally restricted or forbidden without explicit authorization; do not assume recreational drone access. Flash should be avoided near fragile heritage fabric and in any signed no-flash areas. Access is managed by circuits and marked paths, so leaving designated routes, climbing on walls, or entering closed sectors is not allowed. The site is protected with clearly defined boundaries and a buffer zone, and some areas are difficult to access due to rugged topography. [UNESCO World Heritage Centre](https://whc.unesco.org/en/list/274/)
Transit and access
Reach Cusco first, then continue by train to Aguas Calientes (Machu Picchu Pueblo) and use the authorized shuttle bus or hike up to the entrance. Most visitors enter on timed tickets and specific circuits, so confirm your assigned route before travel. [Peru Travel](https://www.peru.travel/en/attractions/machu-picchu)
 Save
SavePost-processing approach
Aim for a natural, atmospheric edit that preserves the site’s mist, stone texture, and lush green palette. Keep contrast moderate so terraces and masonry remain believable, and use gentle dehaze rather than heavy clarity. Warm the highlights slightly for sunrise or sunset frames, while retaining cool shadows to reflect the mountain-cloud forest mood. Avoid oversaturating greens; subtle tonal separation between stone, vegetation, and sky will make the landscape feel majestic without becoming stylized. [UNESCO World Heritage Centre](https://whc.unesco.org/en/list/274/)
Complete lens kit for Machu Picchu
At a UNESCO heritage site like Machu Picchu your lens choice is about respecting the site and the image you want to take home. A 24-70mm zoom is the most versatile single lens because it lets you frame entire courtyards, then quickly shift to tighter architectural detail without swapping glass in a dusty environment. A 16-35mm wide angle handles narrow streets, low interior ceilings, and the kind of dramatic perspective that makes carved stone feel monumental. A 70-200mm telephoto helps when you cannot cross a barrier or get closer to a feature — compression makes distant architectural elements feel powerful and intimate. A 50mm or 35mm prime is worth carrying for low-light interiors where flash is forbidden. Bring a polarizer to manage glare on glazed surfaces, a small bean bag or table-top tripod (full tripods are often restricted), and lens cloths for dust. Most of all, bring a flexible mindset: the rule set changes between zones at Machu Picchu and respectful work earns better images.
Light and timing playbook
Light at Machu Picchu demands planning because much of what makes a UNESCO site visually powerful — carved stone, mosaics, frescoes, courtyards — needs the right angle of light to read. Sunrise gives empty foregrounds and warm raking light across textured walls, while sunset adds golden warmth to facades and silhouettes architectural details against the sky. Mid-day is often punishing for exterior architecture but excellent for skylit courtyards and interior detail because the diffused vertical light fills shadowed niches without harsh contrast. Blue hour (the 25 minutes after sunset) is one of the strongest windows for Machu Picchu because lit windows, lamps, and ambient glow balance against a deep, still-luminous sky.
Planning your UNESCO heritage site photography session
Plan a Machu Picchu session in three blocks. First, scout from home using satellite imagery, sun-position tools like PhotoPills or The Photographer’s Ephemeris, and recent images from photographers who have worked the same vantage points. Second, plan a buffer arrival of 60 to 90 minutes before your target light so you have time to set up the tripod, dial in composition, and watch the light change before you press the shutter. Third, plan a contingency: an alternate vantage point a few minutes away that works when weather, crowds, or closures spoil your first choice. Bring a paper or offline-saved map; cell coverage is unreliable at many of the best vantage points at Machu Picchu. Carry water, snacks, sunscreen, and a headlamp with red-light mode for pre-dawn and post-sunset work. Tell someone where you are going and when you expect to be back if the location is remote or off-trail in any way. Most of the best images at Machu Picchu come from photographers who arrived early, stayed late, and were willing to come back twice when the first session did not deliver the light they had hoped for.
Post-processing workflow
A reliable post-processing workflow for Machu Picchu starts in the field. Shoot RAW at the lowest native ISO that still gives you the shutter speed you need; bracket exposures when dynamic range is tight. In Lightroom or Capture One, begin with lens and chromatic-aberration corrections, then set the white balance by eye against a known neutral tone. Pull highlights down before lifting shadows so you preserve texture in the brightest part of the frame. Use the tone curve for global contrast and the HSL panel for color refinement — small luminance adjustments on the dominant colors of Machu Picchu (water, foliage, stone, sky) often do more for the image than any saturation slider. Local adjustments come last: a graduated filter to balance sky, a radial filter to draw attention to the subject, and selective sharpening on the area of detail you want the eye to land. Export at full resolution for prints and at 2048px on the long edge for web. Skylum Luminar Neo is a strong companion tool for sky replacement and atmosphere on weather-challenged days; Photoshop is the right call for composite-style edits and serious dust spot work. Save preset stacks tuned to Machu Picchu so the second visit is faster to edit than the first.
Photography ethics and permits at Machu Picchu
Photography ethics at matter both for the location and for your ability to keep working there. Stay on marked paths and viewing platforms; off-trail boot prints damage soil and vegetation that take decades to recover. Respect closures, seasonal restrictions, and the working hours of staff. If a sign or staff member tells you to move, move — those rules usually exist for safety or preservation reasons that are not always obvious. Pack out every scrap of gear, food wrapper, and microfiber cloth you bring in. Drones are restricted or banned in many protected areas — check with local civil aviation rules and the site’s own policy before flying, and never fly within sight of wildlife. Model releases are required for any identifiable person you photograph commercially; commercial-use permits are required at many sites and the fees are usually small compared with the consequences of being asked to delete a card. If you publish identifiable locations of sensitive places, consider whether geotagging will make the spot crowded for the next visitor. Leave a place better than you found it and the next photographer benefits, too.
Common mistakes and how to avoid them
A short list of avoidable mistakes will dramatically improve your hit rate at Machu Picchu. First, do not arrive at golden hour and start scouting then — scout earlier or on a separate trip so the best light is spent shooting, not finding the spot. Second, do not rely on auto white balance when warm or cool ambient color is part of the image you want; set it manually and trust the RAW file for recovery. Third, do not shoot at the highest ISO without thinking — modern sensors are clean to ISO 6400 but a polished, low-ISO long exposure on a tripod almost always beats a hand-held high-ISO frame for landscape work. Fourth, do not ignore the foreground; a strong foreground anchor is what separates a snapshot from a Machu Picchu image that people stop scrolling on. Fifth, do not over-process. A muted, restrained edit ages well; an oversaturated, over-sharpened, sky-replaced edit looks dated within a year. Finally, do not skip backup. Format one card at a time, dual-card record when possible, and back up to a portable SSD before leaving the trip.
 Save
SaveFrequently asked questions
Do I need a photo permit at Machu Picchu?
Ordinary travel photography is typically handled through your entry ticket, but commercial shoots, professional productions, or any work using special equipment may require separate authorization. Because the current photography rule set is not clearly published in the sources gathered here, verify permit needs with the site or your operator before arrival. Expect stricter controls than at an ordinary outdoor attraction. [UNESCO World Heritage Centre](https://whc.unesco.org/en/list/274/)
Are drones allowed?
Do not plan to fly a drone unless you have written approval from the responsible authorities. Heritage sites with sensitive archaeological fabric almost always enforce strict drone controls, and Machu Picchu’s managed circuits and fragile setting make unauthorized flying a bad assumption. Check current local rules before traveling, since penalties and confiscation risk can be serious. [UNESCO World Heritage Centre](https://whc.unesco.org/en/list/274/)
Can I use a tripod?
Tripods are often restricted at heavily visited heritage sites because they obstruct narrow routes and increase wear on crowded viewpoints. If you rely on one, confirm in advance whether a compact travel tripod or monopod is allowed and whether any special permit is needed. A lightweight stabilized lens may be the safer choice for most visitors. [Peru Travel](https://www.peru.travel/en/attractions/machu-picchu)
What are the best months to visit for photography?
May-June and September-October are usually the best tradeoffs, offering drier weather and clearer mountain views while avoiding some of the heaviest peak-season congestion. April and November can also work well if you want softer crowds and don’t mind a higher chance of cloud or rain. [Peru Travel](https://www.peru.travel/en/attractions/machu-picchu)
How should I handle crowds and changing weather?
Start early, keep moving with the assigned circuit, and build compositions that work even with partial obstructions. Use weather seals or rain covers, carry microfiber cloths, and be ready to shoot quickly as mist clears and returns. Telephoto compression helps you isolate architecture from people, while wider lenses capture the landscape-scale drama when the clouds open. [UNESCO World Heritage Centre](https://whc.unesco.org/en/list/274/)
All links go to B&H Photo Video, the trusted pro source. Tagged as affiliate per FTC.
What to Pack
A focused landscape kit handles every shot at Machu Picchu without breaking your back. Here is the working photographer's pack list — every link goes to B&H Photo Video (our primary supplier) or Amazon (for accessories and same-day delivery in the US).
| What & Why | B&H | Amazon |
|---|---|---|
Wide-angle zoom (14-35mm range) The single most important lens for sweeping vistas. Pair with a circular polarizer for skies and water. | Shop B&H → | Shop Amazon → |
Sturdy travel tripod Carbon fiber, packs to 15 inches, holds steady in wind off the coast. Essential for blue-hour and long-exposure work. | Shop B&H → | Shop Amazon → |
Circular polarizer (77mm or 82mm) Cuts haze, deepens sky, reveals texture in water. Non-negotiable for landscape work. | Shop B&H → | Shop Amazon → |
10-stop ND filter For 30-second exposures that turn moving water and clouds into silk. | Shop B&H → | Shop Amazon → |
Extra batteries (3 minimum) Cold weather and long exposures eat batteries. Carry triple what you think you need. | Shop B&H → | Shop Amazon → |
Fast SD/CFexpress cards V90 or CFexpress depending on your body. Two cards minimum so a failure mid-trip is recoverable. | Shop B&H → | Shop Amazon → |
Microfiber lens cloths Salt spray, mist, and dust will ruin every shot if you don't carry a cloth. | Shop B&H → | Shop Amazon → |
B&H and Amazon links are affiliate links. We earn a small commission on purchases at no extra cost to you. We only recommend gear we use or would buy ourselves.