Best Photography Spots in Tokyo: 14 Locations With GPS
edinchavez01-20). Buying through these links costs you nothing extra and helps fund our free guides.
Tokyo, Japan is one of the most photogenic cities in the world. If you have a camera and the patience to show up before dawn, Tokyo will give you images that last a career — but only if you know where and when to point it.
This is the definitive field guide to the 14 best photography spots in Tokyo, with GPS coordinates you can drop straight into Google Maps, exact camera settings tuned to Tokyo’s unique light, precise timing for every location, and the access notes nobody else bothers to document. It mirrors the intel inside our Tokyo Ultimate Photographer’s Guide ($47 PDF) — a downloadable field guide with full-page hero images, GPS maps, seasonal tables, a city safety briefing, and a complete photographer’s packing list. Get the guide →
Planning multi-city travel? See also: U.S. cities photography hub and the National Parks Photography Guides.
14 GPS-mapped locations · Exact camera settings · Multi-season shooting calendar · Free annual updates
Download the PDF guide →
Get the Tokyo Ultimate Photographer’s Guide
Every location below — pre-mapped with GPS, golden-hour timing, gear recommendations, cultural rules, and a 14-day itinerary. Downloaded by 200+ working photographers.
Quick jump to the 14 spots
- Shibuya Crossing (from Mag’s Park / Shibuya Sky)
- Tokyo Tower (from Shiba Park / Zojoji Temple)
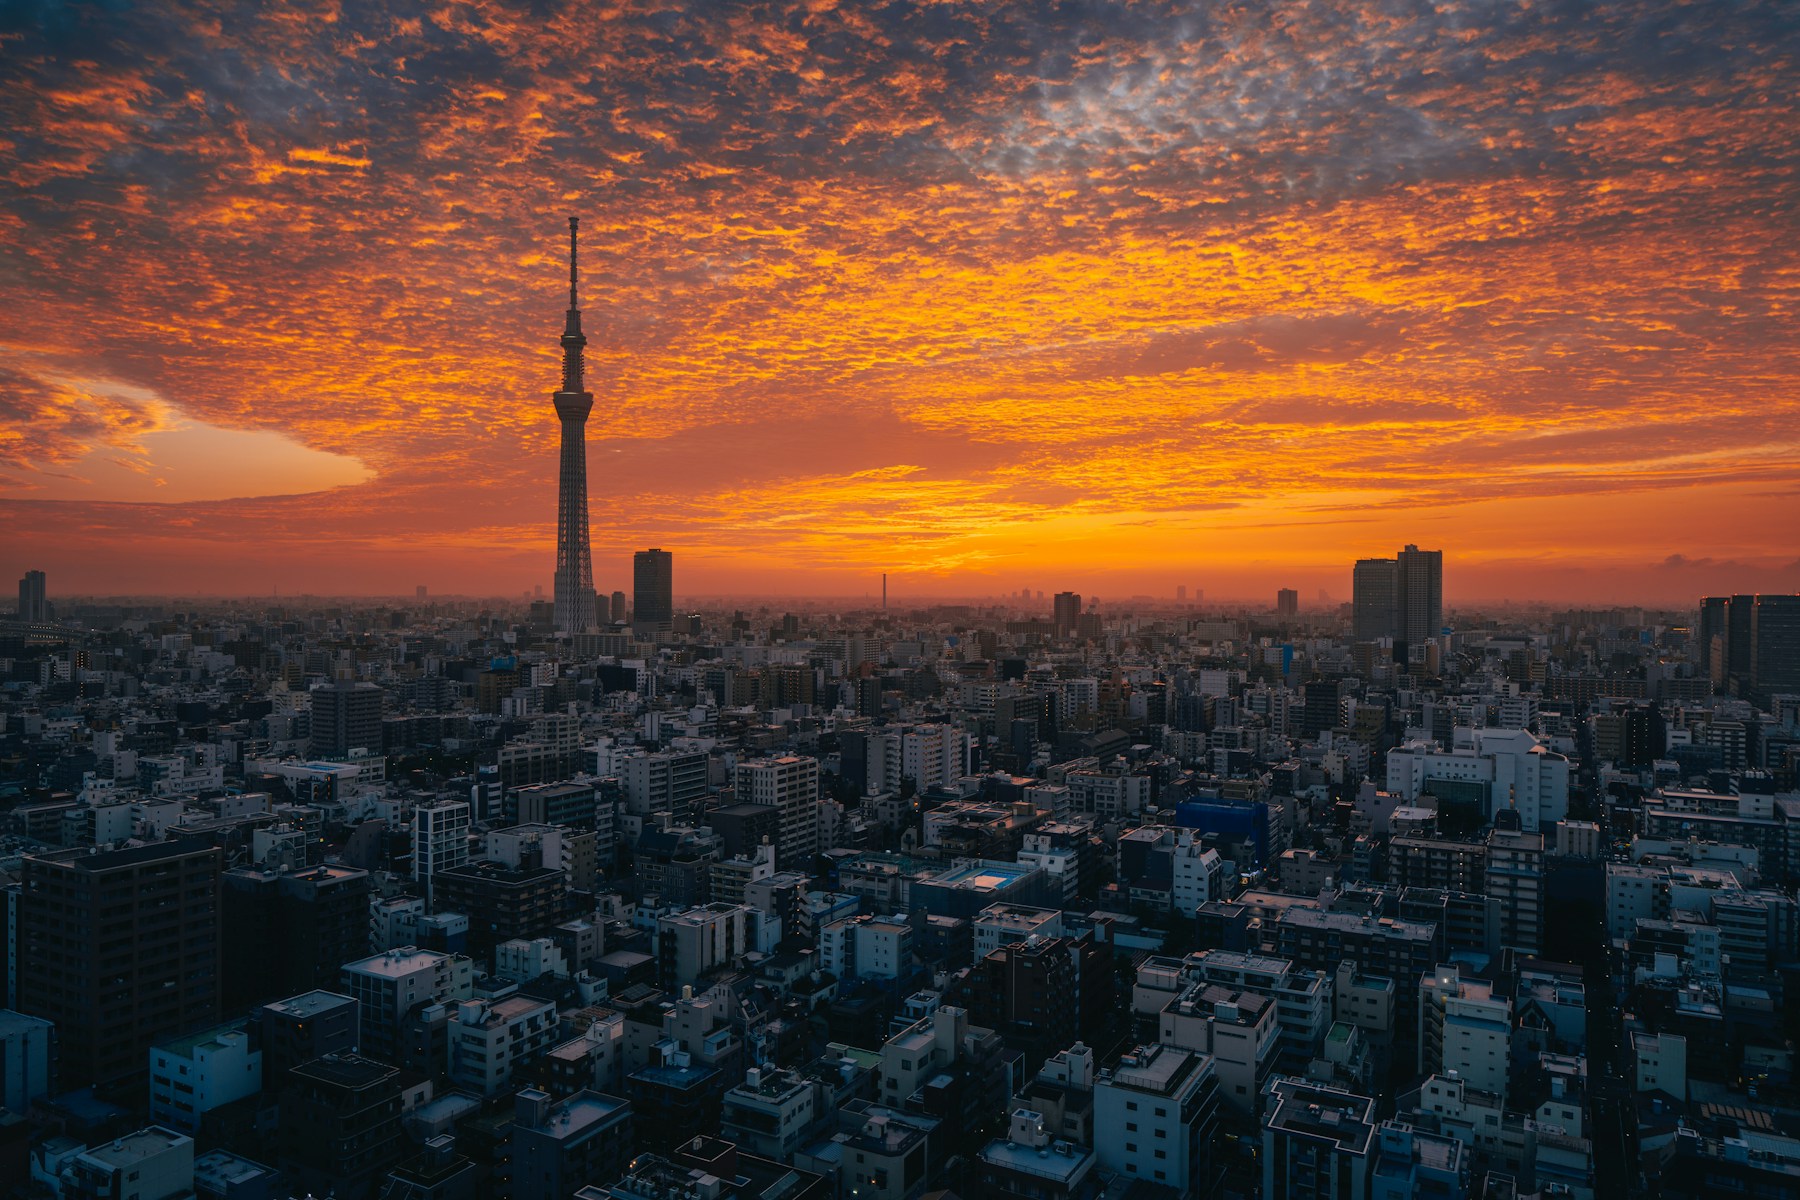
- Tokyo Skytree
- Senso-ji Temple, Asakusa
- Meiji Shrine
- Shinjuku Gyoen National Garden
- Tsukiji Outer Market
- Ginza at Night (Chuo-dori / Ginza 4-chome)
- Ueno Park
- Tokyo Imperial Palace / Nijubashi Bridge
- Roppongi Hills — Tokyo City View Observatory
- Akihabara Electric Town
- Odaiba — Rainbow Bridge & Tokyo Bay Skyline
- Yoyogi Park / Harajuku Takeshita Street
A look inside the Tokyo Photographer’s Guide
Here are three of the actual shots you’ll find inside the PDF — cinematic full-page references for the exact spots, lenses, and lighting conditions documented in the guide. The full guide includes 14 locations, each with a hero image, GPS map, settings table, and a five-shot list.
Save
Before you shoot Tokyo: the essentials
- Free public access: Senso-ji Temple grounds (24 hours), Meiji Shrine main grounds (sunrise–sunset), Yoyogi Park, Ueno Park, Imperial Palace Outer Gardens (Kokyo Gaien), Shiba Park (Tokyo Tower exterior view), Odaiba Kaihin Park (Rainbow Bridge views), Ginza streets, Akihabara district streets, Tsukiji Outer Market (free to walk), Harajuku Takeshita Street, and Shibuya Mark City walkway (Shibuya Crossing free view) are all free; Shibuya Sky observation deck ¥2,000–¥2,500; Tokyo Skytree Tembo Deck ¥2,100–¥2,600; Shinjuku Gyoen ¥500; Tokyo City View / Roppongi Hills ¥2,400–¥2,800; Tokyo Tower Main Deck ¥1,500
- Commercial permits: Personal and tourist photography in all public outdoor spaces is unrestricted. Commercial and professional shoots in Tokyo metropolitan facilities and parks require advance permission via Tokyo Location Box (locationbox.metro.tokyo.lg.jp/english). Applications must be in Japanese; hiring a local location coordinator is strongly recommended. Shrine and temple grounds (Meiji, Senso-ji) allow personal photography but prohibit commercial shoots and tripods in congested areas; some inner halls ban photography entirely. Drones are prohibited over the 23 wards of central Tokyo without special MLIT authorization. Individual shops and markets (Tsukiji vendors) request permission before close-up photography of merchandise or staff.
- Best photography seasons: Late March–April (cherry blossoms, soft spring light) and October–November (fiery autumn foliage, clear skies, less humidity than summer)
- Blue hour notes: Tokyo sits at 35.68°N — blue hour lasts 15–25 minutes after sunset, shorter than Paris but longer than tropical cities. The flat bay-side districts (Odaiba, Shiodome) and westward-facing rooftops (Shibuya Sky, Roppongi Hills) give the clearest blue-hour windows. In summer, sunset is ~7:00 PM; in winter ~4:30 PM. The illuminated Tokyo Tower and Rainbow Bridge switch on 30 minutes after sunset daily, making blue hour the prime window for tower-in-skyline compositions.
- Drone policy: Drone laws vary widely by country and city — many capital and tourist zones are no-fly. Verify the local civil aviation authority’s current rules before launching.
- Local resource: Official visitor information
The full-resolution version of every map below — plus seasonal calendars, gear notes per location, sun-angle diagrams, and a complete photographer’s packing checklist — is inside the Tokyo Photographer’s Guide PDF ($47).
1. Shibuya Crossing (from Mag’s Park / Shibuya Sky)
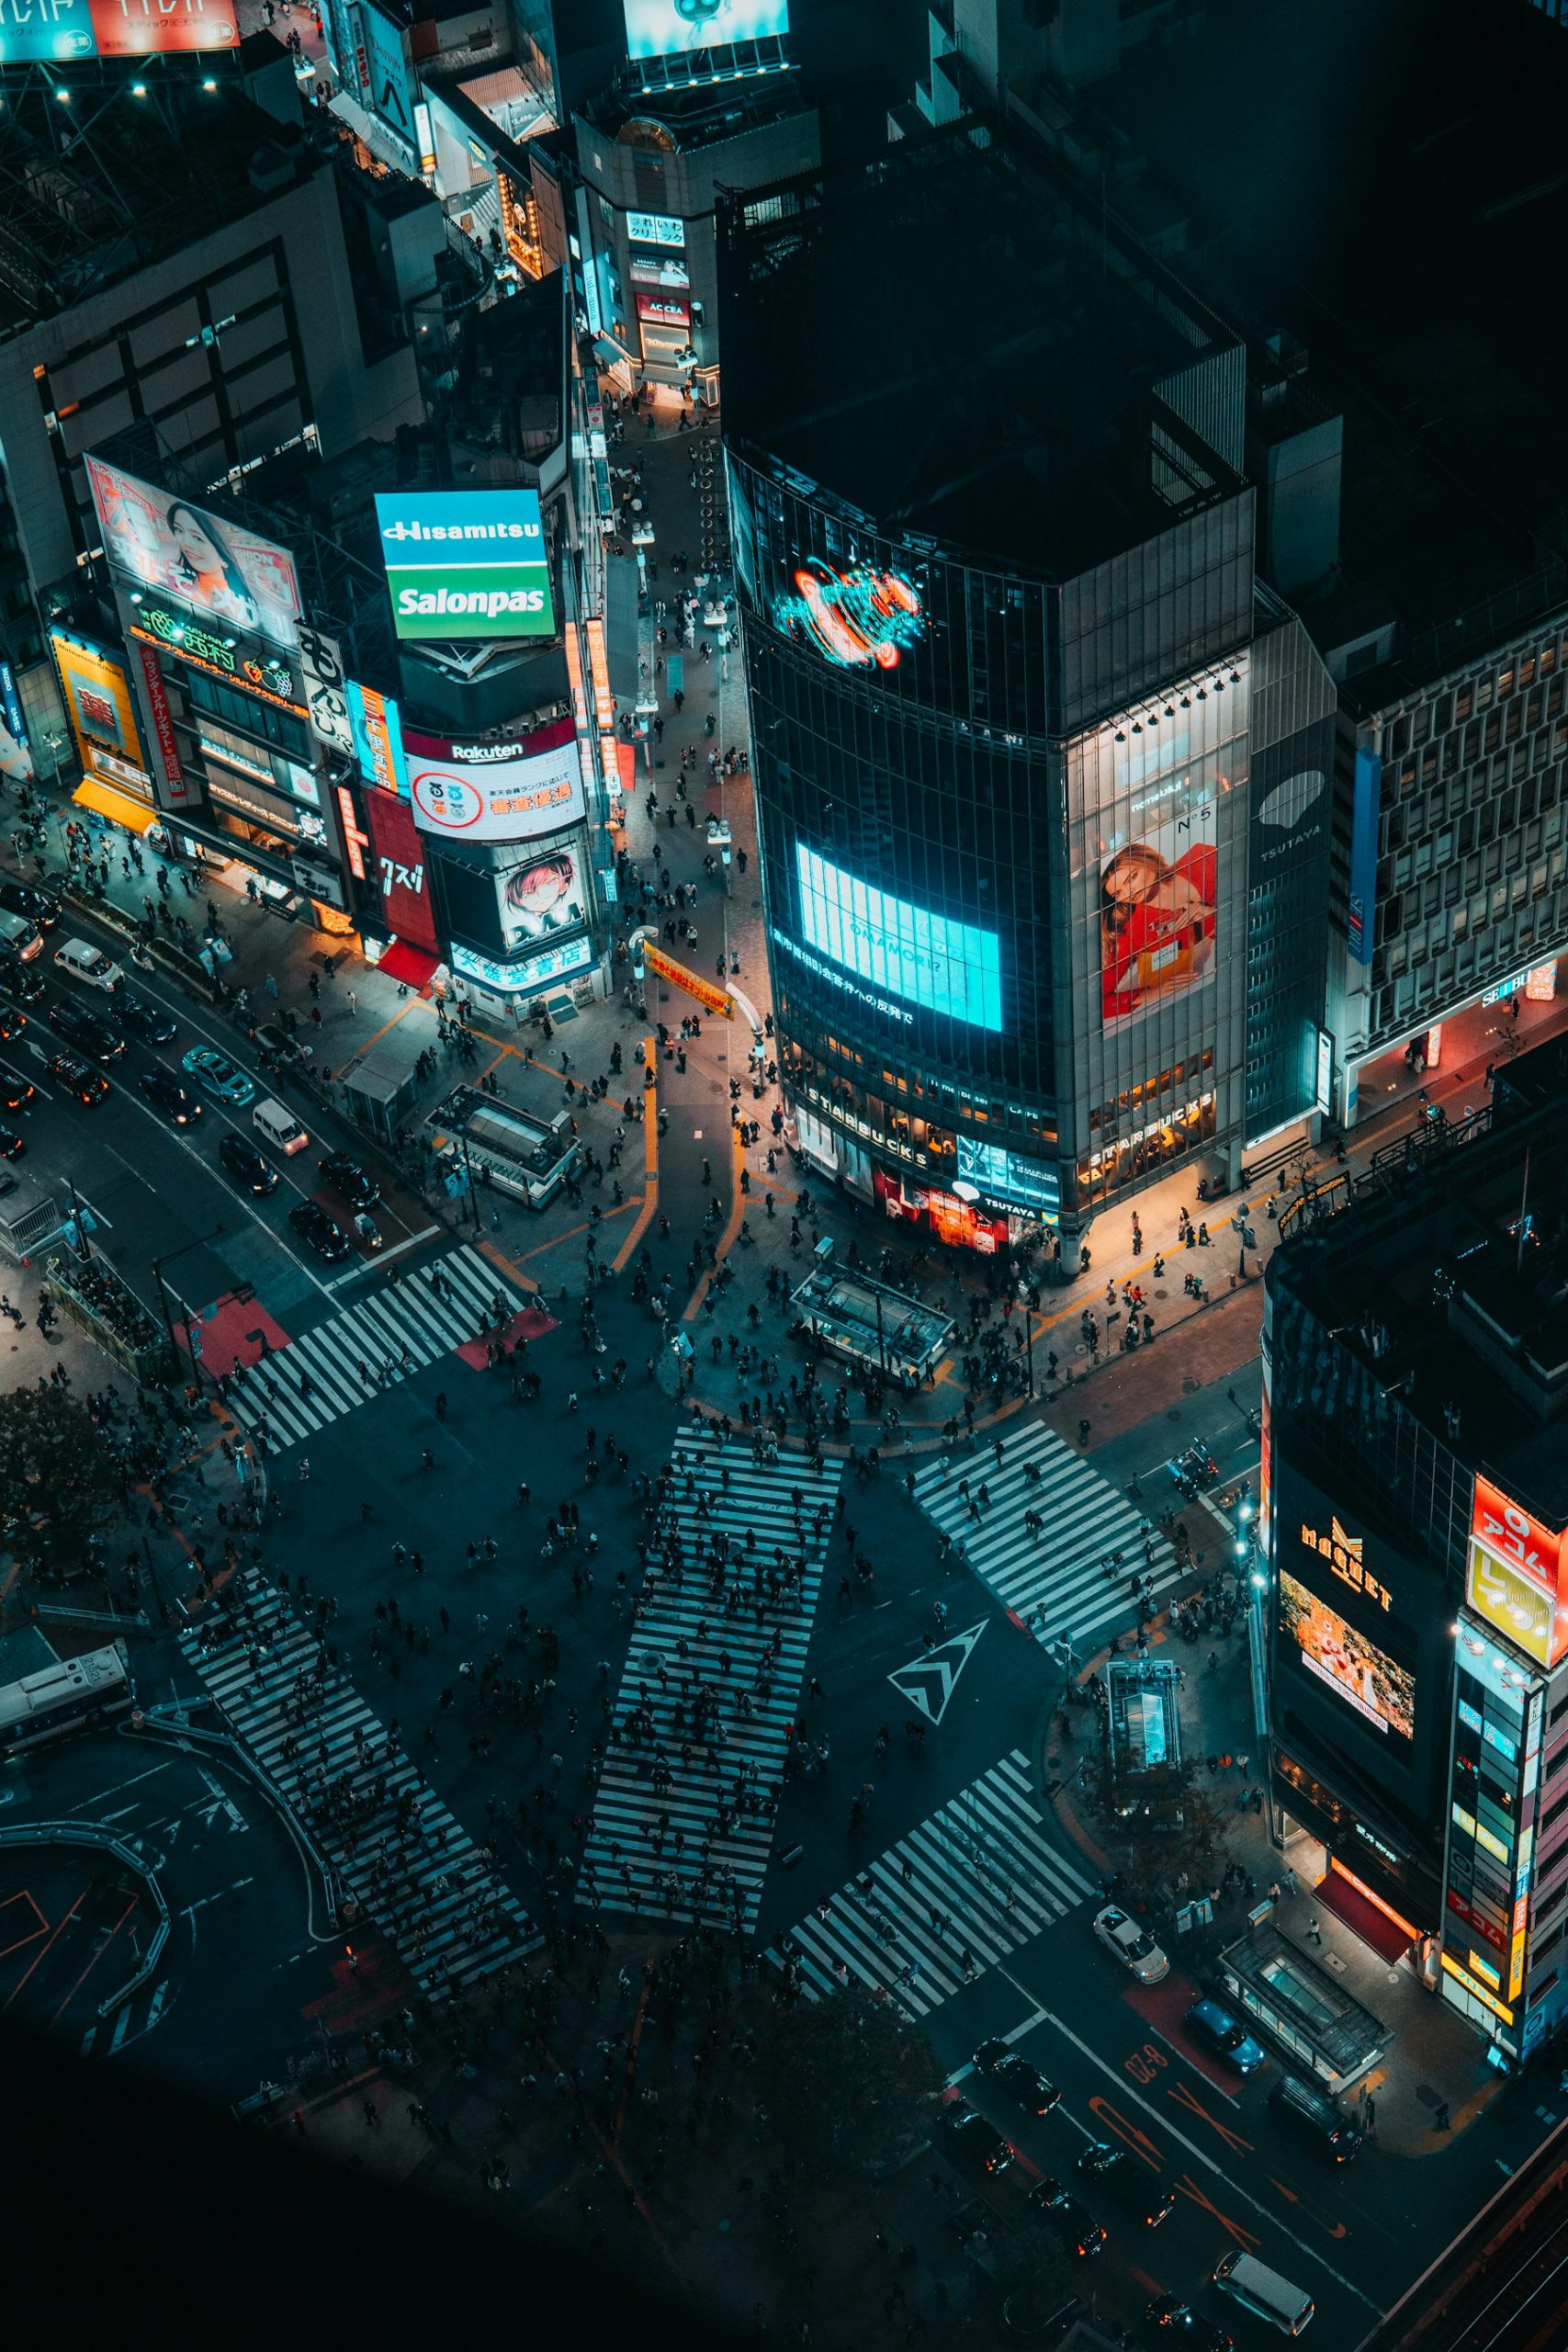
The world’s most photographed pedestrian crossing, with up to 3,000 people crossing simultaneously during peak evening rush. The five-way scramble creates a human kaleidoscope only visible from above, while ground-level long exposures produce motion-blur rivers of pedestrian flow against blazing neon. The Mag’s Park and Shibuya Sky rooftops offer totally different angles — the former is lower and more intimate, the latter gives a full Tokyo skyline context.
- GPS: 35.6595, 139.7006
- Elevation: 144 ft
- Best time of day: dusk and blue hour (30–60 minutes before and after sunset) — the crossing floods with pedestrian traffic during evening rush hour while neon signs and building lights create maximum visual energy
- Sun direction: The crossing faces roughly north–south; the best overhead vantage points (Mag’s Park and Shibuya Sky) look northwest. At sunset the sky turns gold to the west-southwest behind the Shibuya skyscrapers. After sunset, artificial neon from Shibuya 109, Q-FRONT, and surrounding towers provides directional warm light from the east and south. Overcast days eliminate harsh shadows for clean street-level crossing shots
- Access: Shibuya Scramble Crossing: public street, free, 24 hours. Mag’s Park (MAG8 Rooftop, Magnet by Shibuya 109): 8F rooftop, ¥1,800 admission includes one drink; open 10:00–22:00 (last entry 21:30); cashless only; 1-23-10 Udagawa-cho, Shibuya-ku — check for seasonal closures. Shibuya Sky (46F, Shibuya Scramble Square): ¥2,000–¥2,500 advance/day-of; open 10:00–22:30 (last entry 21:20); 2-24-12 Shibuya. Both accessible directly from Shibuya Station (JR Yamanote, Tokyu, Keio, Ginza/Hanzomon/Fukutoshin Metro lines)
- Difficulty: easy
- Recommended settings: Golden Hour Wide: f/8, 1/250 sec, ISO 200, 24mm — from Mag’s Park rooftop capturing the crossing and Shibuya 109 · Long Exposure Rush Hour: f/11, 1/4 sec, ISO 100, 35mm — tripod or railing brace for motion blur of pedestrians at street level · Blue Hour Skyline: f/11, 8 sec, ISO 100, 16mm, tripod — from Shibuya Sky outdoor deck capturing full 360° Tokyo skyline · Neon Night Street: f/2.8, 1/60 sec, ISO 3200, 35mm — handheld at street level in rain for wet neon reflections
Shots to chase:
- Top-down aerial view of the full scramble crossing with hundreds of pedestrians forming abstract human patterns, shot from Shibuya Sky or Mag’s Park
- Long-exposure street-level shot (1/4 sec) creating motion-blur pedestrian rivers converging from all five directions under neon
- Wet-street neon reflection on rainy evenings: the Q-FRONT Starbucks sign and Shibuya 109 reflected in pavement puddles
- Blue-hour panorama from Shibuya Sky outdoor deck: lit tower blocks spreading from Shinjuku to Odaiba under a deep indigo sky
- Candid vertical shot at crossing level capturing umbrella silhouettes and directional signage with Shibuya 109 as backdrop
Pro tip: For the top-down crossing shot, use Mag’s Park (lower height, ~30m) for a more intimate close-up of pedestrian patterns; use Shibuya Sky (230m) for the full urban panorama context. Time your visit for 6–8 PM on a weekday for maximum crossing density. On rainy nights, both the reflective pavement and the color-streak umbrellas create iconic images — embrace the rain and protect your gear with a rain sleeve.
Common mistake to avoid: Shooting from street level at crossing without tripod in low light produces camera shake blur (not the intentional motion-blur kind). Arriving at midday misses the neon impact entirely. On the rooftop, forgetting that Mag’s Park faces slightly to the right of the crossing center — position at the far left corner for the most symmetric overhead composition.
2. Tokyo Tower (from Shiba Park / Zojoji Temple)
Japan’s most recognizable postwar landmark — a 333m red-and-white communications tower modeled on the Eiffel Tower, built in 1958. Unlike Paris, Tokyo Tower is best photographed from multiple free viewpoints around it rather than from its decks: Zojoji Temple’s gate frames the illuminated tower perfectly, while Shiba Park’s low angle captures the full steel latticework against the sky. The surrounding low-rise shitamachi neighborhood contrasts dramatically with the tower’s scale.
- GPS: 35.6586, 139.7454
- Elevation: 1,093 ft
- Best time of day: blue hour and night — the tower illuminates 30 minutes after sunset; from Zojoji Temple the pagoda gate and tower align for the most iconic composition, best in twilight or under clear winter skies
- Sun direction: Tokyo Tower stands at 35.66°N; its façade faces southeast. From Shiba Park (south) the sun backlights the tower at midday. From Zojoji Temple (north) the afternoon light hits the tower’s southern face, giving warm-toned steel at golden hour. At night the tower glows red-orange with LED lighting visible from a 10–15 km radius. Winter nights (Nov–Feb) with low humidity offer the crispest illumination contrast
- Access: Tokyo Tower observation decks: 4-2-8 Shibakoen, Minato-ku. Main Deck (150m): ¥1,500 adult, open 9:00–23:00 (last entry 22:30). Top Deck Tour (250m): ¥3,300–¥3,500, open 9:00–22:45 (last tour 22:15). Walk-up tickets available. Nearest stations: Akabanebashi (Oedo Line, 5 min walk) or Hamamatsucho (JR Yamanote, 15 min walk). Shiba Park and Zojoji Temple grounds are free and open 24 hours for exterior tower photography
- Difficulty: easy
- Recommended settings: Golden Hour Wide: f/8, 1/250 sec, ISO 200, 24mm — from Shiba Park lawn looking up at the tower at golden hour · Zojoji Gate Night: f/8, 4 sec, ISO 100, 35mm, tripod — tower illuminated framed by Zojoji Temple’s Sangedatsu-mon gate at blue hour · Tower Detail Steel: f/8, 1/500 sec, ISO 100, 200mm — telephoto compression of the red-and-white lattice against blue sky · Main Deck Cityscape: f/11, 15 sec, ISO 100, 16mm, tripod — city lights long exposure from the Main Deck observation floor at night
Shots to chase:
- The iconic frame: Zojoji Temple’s ancient Sangedatsu-mon gate silhouetted against the illuminated tower at blue hour or night
- Wide-angle upward shot from Shiba Park lawn at golden hour with the red lattice tower filling the frame against a warm sky
- Looking south from the tower’s Main Deck at night with a 15-second exposure, capturing the highway expressway light trails below
- Telephoto compression from Minato-ku backstreets: the tower framed by residential buildings and streetlights
- Symmetrical reflection shot in the windows of buildings near Kamiyacho station, capturing the full tower inverted in glass
Pro tip: The Zojoji Temple angle (facing north from the temple’s main gate) is the single most reproduced Tokyo photograph — arrive 20 minutes before sunset to scout the exact position and set up a tripod before the light drops. In winter, the bare tree branches frame the tower naturally. For the Main Deck, buy tickets online to skip the queue; the glass floor panels on the south side offer a vertigo-inducing downward shot.
Common mistake to avoid: Going to the Top Deck in poor visibility (rain or high humidity) wastes the premium ticket price — the Main Deck view is often just as good on clear nights. Visiting Zojoji Temple before sunset when harsh overhead light flattens the scene. Forgetting that the tower’s exterior LED lighting switches off at midnight — arrive before then for illuminated compositions.
3. Tokyo Skytree
Japan’s tallest structure at 634m, the Skytree is the world’s tallest tower and Tokyo’s defining contemporary landmark. The Tembo Galleria features a spiraling glass-enclosed walkway at 450m — a unique architectural experience that allows photography while walking uphill through 360° views. The surrounding Asakusa district provides a rare modern-vs-traditional juxtaposition when photographing the tower from below through temple gates or along the Sumida River.
- GPS: 35.7101, 139.8107
- Elevation: 2,080 ft
- Best time of day: clear winter mornings (November–February) for Mt. Fuji views from Tembo Galleria; evening (5–8 PM) for golden hour transition to night lights; opening time (10 AM) on weekdays for minimal crowds
- Sun direction: The Skytree stands in eastern Tokyo at 35.71°N. From the Tembo Galleria (450m), the sun rises northeast and Mt. Fuji is visible 100 km to the southwest on clear winter mornings. The Tembo Deck (350m) has a glass floor panel on the north side that captures Asakusa and the Sumida River below. At sunset the western city spreads in warm amber; at dusk the tower’s own LED lighting (green or purple scheme) illuminates the upper structure for exterior shots from below
- Access: 1 Chome-1-2 Oshiage, Sumida City, Tokyo 131-0045. Tembo Deck (350m): ¥2,100–¥2,600 advance/day-of; Tembo Galleria (450m) combo: ¥3,100–¥3,800. Open daily 10:00–21:00 (last admission Tembo Deck 20:00). Oshiage Station (Hanzomon/Asakusa/Keisei lines, direct connection) or Tobu Skytree Station (Tobu Isesaki Line, direct connection). Advance tickets strongly recommended for weekends and holidays
- Difficulty: easy
- Recommended settings: Tembo Galleria Interior: f/8, 1/250 sec, ISO 400, 16mm — shooting along the spiral walkway with city visible through curved glass · Golden Hour City Panorama: f/11, 1/400 sec, ISO 100, 24mm — wide cityscape from Tembo Deck at golden hour · Fuji View Clear Morning: f/8, 1/500 sec, ISO 100, 200mm — telephoto shot of Mt. Fuji on the southwest horizon on clear winter mornings · Night Glass Floor: f/5.6, 1/15 sec, ISO 800, 24mm — looking straight down through the glass floor panels at the illuminated Skytree Town below
Shots to chase:
- Mt. Fuji visible 100 km to the southwest from Tembo Galleria on a clear winter morning — shoot at 200mm for maximum compression
- Looking straight down through the glass floor panel at Tembo Deck (350m) with the streets and Solamachi mall below
- The spiral walkway of Tembo Galleria: a leading-line architectural composition with Tokyo spread beyond the curved glass walls
- Blue-hour exterior shot of the Skytree from the banks of the Sumida River, with Asakusa’s low-rise neighborhood in the foreground
- Skytree framed through Senso-ji Temple’s pagoda from the Asakusa district viewpoint — blending ancient and ultramodern Tokyo
Pro tip: For the Fuji view, check the Tokyo Skytree visibility forecast on the official website (tokyo-skytree.jp) before visiting — Mt. Fuji is visible on average only 80 days per year, mostly winter mornings before noon. Buy advance tickets online for a ¥300–¥500 discount and to secure your preferred time slot. The Tembo Galleria spiral creates reflection glare at certain angles — use a circular polarizer or shoot during overcast conditions to eliminate glass reflections.
Common mistake to avoid: Booking the Tembo Galleria upgrade without checking Fuji visibility — if haze or clouds obscure the mountain, the upgrade offers minimal additional value over the Tembo Deck. Visiting on weekends without advance tickets leads to 1–2 hour queues. Shooting the tower from below only at midday when the steel structure against harsh overhead light looks flat; instead visit at dusk for the LED illumination and softer ambient light.
4. Senso-ji Temple, Asakusa
Tokyo’s oldest temple (645 AD), Senso-ji is one of Asia’s most visited sacred sites with over 30 million annual visitors. The 87m five-story pagoda, the massive Kaminarimon with its 700kg red lantern, and the 250m Nakamise shopping street create three distinct photographic zones in one compact complex. The Hozomon gate’s pair of giant straw sandals (waraji) and the incense cauldron (jokoro) in the courtyard are rarely-photographed details that reward careful exploration.
- GPS: 35.7147, 139.7967
- Elevation: 20 ft
- Best time of day: pre-dawn to sunrise (5:00–7:00 AM) for people-free compositions; illuminated night from sunset to 23:00 for dramatic red-lantern and lit-pagoda shots
- Sun direction: Senso-ji faces roughly south, with the Kaminarimon (Thunder Gate) as the main entrance at the south end of Nakamise-dori. At sunrise, the sun rises to the east-northeast and catches the five-story pagoda’s upper tiers in gold. At golden hour the Kaminarimon’s giant red lantern glows warmly from the south-facing light. The temple illumination activates at sunset (automatic) and runs until 23:00, providing steady warm-toned artificial light for night photography
- Access: 2-3-1 Asakusa, Taito-ku, Tokyo. Main grounds open 24 hours, free admission. Main Hall open Apr–Sep 6:00–17:00, Oct–Mar 6:30–17:00. Nakamise-dori shops open approximately 9:00–19:00. Nearest station: Asakusa (Ginza, Asakusa, Tobu lines — 5 min walk). Tripods permitted on grounds with good-manners notice displayed; avoid blocking entrances and walkways
- Difficulty: easy
- Recommended settings: Pre Dawn Tripod Wide: f/8, 8 sec, ISO 400, 16mm, tripod — empty Nakamise-dori with pagoda at blue hour · Golden Hour Lantern: f/5.6, 1/250 sec, ISO 200, 50mm — the Kaminarimon’s lantern from directly below at golden hour · Night Pagoda Illuminated: f/8, 4 sec, ISO 100, 35mm, tripod — lit pagoda from the courtyard with incense smoke drifting across · Crowd Long Exposure: f/11, 1/8 sec, ISO 100, 24mm, tripod — midday crowd motion blur on Nakamise-dori creating ghost-pedestrian effect
Shots to chase:
- Empty Nakamise shopping street at 5 AM with the illuminated Kaminarimon gate as a vanishing-point anchor — completely crowd-free
- Looking up at the underside of Kaminarimon’s famous red paper lantern with gold kanji carvings and the pagoda silhouetted beyond
- Incense smoke (jokoro cauldron) drifting across the lit Main Hall facade at night — 4-second exposure for silky smoke trails
- Passing through Hozomon gate at night: the gate’s giant waraji (straw sandals) in foreground with Main Hall and pagoda illuminated beyond
- Aerial-style view from the Asakusa Cultural Information Center (8F free viewpoint) showing Nakamise-dori leading to Senso-ji — free, no tickets
Pro tip: The 8th floor of the Asakusa Culture Tourist Information Center (directly across from Kaminarimon) offers a free elevated view down Nakamise-dori toward the temple — useful for an aerial perspective without paid admission. Arrive before 6:30 AM on any day for genuinely crowd-free compositions. After 23:00 when illumination shuts off, the temple is still accessible but pitch dark — the 5:30–7:00 AM window before tourist crowds arrive is unbeatable.
Common mistake to avoid: Arriving between 10 AM and 4 PM on weekends, when Nakamise-dori is packed wall-to-wall and the courtyard is standing-room only. Using flash inside the Main Hall, which is prohibited. Shooting only the Kaminarimon and missing the Hozomon gate and pagoda — the second gate and surrounding courtyard are less crowded and equally photogenic.
Want this in your pocket on the street?
The full-resolution version of every spot above — with full-page hero photography, GPS maps with gold location pins, sun direction diagrams, multi-season tables, and a complete safety + packing checklist — is inside the Tokyo Ultimate Photographer’s Guide PDF ($47). Print it, save it offline, take it on the walk. Get the guide →
5. Meiji Shrine
Save
Japan’s most important Shinto shrine, dedicated to Emperor Meiji and Empress Shoken, set within 70 hectares of forested urban sanctuary. The 12m-tall torii gate at the southern entrance is built from 1,500-year-old cypress; the central courtyard regularly hosts traditional Shinto weddings (white kimono and hakama) that are extraordinary photographic encounters. The Inner Garden iris beds in June transform the grounds into a purple impressionist canvas.
- GPS: 35.6763, 139.6993
- Elevation: 150 ft
- Best time of day: early morning (first 30 minutes after opening) for misty forest light filtering through the cedar avenue; January for New Year’s ceremonies; May–June for the Iris Garden
- Sun direction: Meiji Shrine sits in a dense 700,000-tree artificial forest in central Harajuku. The main approach (sando) runs north–south; the main gate (torii) faces south. At sunrise, low eastern light creates theatrical shafts through the cedar and camphor trees, especially on misty mornings. By midday the dense canopy filters overhead light into even, flattering diffuse illumination — unusual in that midday works well here unlike at open-sky locations
- Access: 1-1 Yoyogikamizonocho, Shibuya-ku, Tokyo. Free admission (Inner Garden ¥500; Museum ¥1,000). Open daily sunrise to sunset (ranges from 5:00 AM in summer to 6:40 AM in winter; close ranges from 4:00–6:30 PM by season). No drones, no tripods in crowded walkways, no photography during active ceremonies. Harajuku Station (JR Yamanote Line, 2 min walk) or Meijijingumae ‘Harajuku’ Station (Chiyoda/Fukutoshin lines, 1 min walk)
- Difficulty: easy
- Recommended settings: Forest Path Morning: f/5.6, 1/125 sec, ISO 800, 35mm — cedar avenue with light shafts at first morning light · Torii Gate Wide: f/8, 1/250 sec, ISO 200, 16mm — main torii gate from the approach avenue · Wedding Portrait Candid: f/2.8, 1/500 sec, ISO 400, 85mm — traditional wedding procession in the main courtyard (respect at distance) · Iris Garden June: f/5.6, 1/320 sec, ISO 200, 50mm — iris blooms in the Inner Garden with the main shrine buildings in background
Shots to chase:
- Cedar avenue approach at dawn with light shafts cutting through morning mist between the ancient trees
- The 12m torii gate from low angle looking north with the deep forest framing both sides — keep the gate perfectly centered
- Traditional Shinto wedding procession crossing the gravel courtyard — white kimono and miko shrine maidens in red and white
- Sake barrel display (kazaridaru) wall near the main courtyard: hundreds of colorful branded barrels stacked in a photogenic grid
- Inner Garden iris beds at full bloom (mid-June): purple masses at ground level with the traditional garden bridge in background
Pro tip: Wedding processions are unannounced but happen frequently on Saturday and Sunday mornings — arrive early and wait quietly in the main courtyard. Observe from a respectful distance and avoid using flash or shouting. The sake barrel display (kazaridaru) near the treasure house is a colorful and often underrated shot. For the forest light shafts, the week after rainfall with lingering morning fog (especially September–October) produces the most atmospheric results.
Common mistake to avoid: Using flash or approaching ceremonies too closely — shrine staff will redirect you firmly. Visiting on January 1–3 when 3 million people crowd the shrine for hatsumode (first shrine visit) — photo access is impossible. Skipping the 30-minute walk from Harajuku Station through the southern forest path, which is the most photogenic section of the entire complex.
6. Shinjuku Gyoen National Garden
Japan’s premier national garden combines three distinct landscape styles — French formal, English landscape, and Japanese traditional — within a single 58-hectare urban oasis flanked by Shinjuku skyscrapers. The 1,100 cherry trees represent 65 different varieties, blooming sequentially from late March to late April, offering the longest cherry blossom season in Tokyo. The contrast between the garden’s historical greenhouse (1958) and the encircling Shinjuku skyline is uniquely available nowhere else.
- GPS: 35.6852, 139.71
- Elevation: 144 ft
- Best time of day: late March–early April (cherry blossoms with ~1,100 trees and multiple varieties for extended bloom); October–November (autumn foliage in the French formal garden); 9–11 AM before crowds peak
- Sun direction: Shinjuku Gyoen runs east–west across 58 hectares. The French formal garden section faces south-southwest and receives excellent afternoon directional light for symmetrical parterre shots. The Japanese traditional garden’s central pond faces northeast and captures morning light reflecting off the water surface. The English landscape garden’s broad lawns are open to sky and offer best light at golden hour when long shadows create natural leading lines across the grass
- Access: 11 Naitomachi, Shinjuku-ku, Tokyo. Adults ¥500; Seniors (65+) and students ¥250; children (under 15) free. Cash only at ticket gates. Open Tue–Sun 9:00–16:00 (Oct–Mar) to 18:30 (peak seasons); closed Mondays (open daily during cherry blossom and autumn foliage peak seasons). Shinjuku Gyoenmae Station (Marunouchi Line, 5 min walk) or Shinjuku Station south exit (10 min walk). Alcohol banned in the garden since 2023
- Difficulty: easy
- Recommended settings: Cherry Blossom Wide: f/8, 1/400 sec, ISO 100, 24mm — blooming cherry avenue with Shinjuku skyline visible above canopy · Greenhouse Architecture: f/8, 1/500 sec, ISO 100, 35mm — Victorian-era greenhouse facade against blue sky · Japanese Garden Pond: f/8, 1/400 sec, ISO 100, 50mm — koi pond reflections with traditional wooden bridges and pagoda · Autumn Foliage Long: f/5.6, 1/250 sec, ISO 200, 85mm — telephoto compression of red maple canopy against the French formal garden
Shots to chase:
- Cherry blossom avenue with Shinjuku skyscrapers peeking above the pink canopy — shoot from the central lawn looking north
- Traditional Japanese garden’s curved wooden bridge with maple trees reflected symmetrically in the calm pond
- The French formal garden’s symmetrical parterres from an elevated position with Shinjuku’s modern towers as backdrop
- Long-exposure water feature in the Japanese garden with autumnal red maple canopy overhead (October–November)
- Wide-angle perspective inside the 1958 greenhouse with tropical palms framing the skylight ceiling architecture
Pro tip: During cherry blossom season the garden sells advance timed-entry online — book at least a week ahead. The Shinjuku Mon (north gate) area has the densest concentration of weeping cherry trees. For the classic skyline-over-blossoms shot, position yourself at the far north lawn and use a 50–85mm to compress the skyscrapers above the pink canopy. Bring a circular polarizer for the pond reflection shots in the Japanese garden section.
Common mistake to avoid: Visiting on a Monday when the garden is closed (except cherry blossom season). Arriving after 2 PM during peak seasons when the garden is fully packed and most bench spots are taken. Missing the formal French garden section at the western end, which is far less crowded than the Japanese garden but equally photogenic.
7. Tsukiji Outer Market
The last surviving traditional fish and seafood wholesale market district in central Tokyo, with over 460 shops and stalls spread across narrow pedestrian alleyways. The market has operated since 1935 and radiates an authentic working-market energy — vendors in rubber boots, charcoal grills smoking tamagoyaki (rolled egg), knife sharpeners at work, and enormous tuna being butchered. The adjacent Hama-rikyu Garden (¥300 entry) provides a contrasting traditional garden backdrop minutes away.
- GPS: 35.6654, 139.7707
- Elevation: 10 ft
- Best time of day: weekday mornings, 7:00–10:00 AM — professional buyers have priority until 9 AM, but visitors can browse the outer rows; stalls fully set up, grills lit, and energy at maximum; Tuesday, Thursday, and Friday are the busiest/best days
- Sun direction: The market alleyways run north–south and east–west in a grid pattern. Morning sun from the east-southeast creates strong directional side light that rakes across stall awnings, wet ice, and vendor faces, providing high-contrast documentary light. By midday the narrow alleys receive harsh overhead light; late afternoon stalls begin closing. Overcast mornings with soft diffuse light work beautifully for food-detail photography
- Access: 4-16-2 Tsukiji, Chuo-ku, Tokyo. Free to enter and walk. Individual shops set their own hours; most open 5:00 AM–14:00. Closed Sundays and select Wednesdays (check tsukiji.or.jp calendar). Nearest station: Tsukijishijo (Toei Oedo Line, 1 min walk) or Tsukiji (Tokyo Metro Ginza Line, 5 min walk). Ask shopkeepers before close-up photography of merchandise or staff. Narrow alleyways — be respectful of working vendors
- Difficulty: easy
- Recommended settings: Golden Hour Wide: f/5.6, 1/250 sec, ISO 400, 35mm — wide street scene with vendor activity and market atmosphere in morning sidelight · Food Detail Macro: f/4, 1/500 sec, ISO 400, 100mm macro — fresh uni, tuna cuts, or tamagoyaki in tight close-up with bokeh background · Vendor Portrait Candid: f/2.8, 1/500 sec, ISO 800, 85mm — candid vendor portrait with permission, using natural stall light · Alley Geometry: f/8, 1/250 sec, ISO 200, 24mm — narrow alley receding with stall awnings, lanterns, and distant vendor silhouettes
Shots to chase:
- Wide street-level shot looking down the central market alley at 7:30 AM with smoke from charcoal tamagoyaki grills and vendors in motion
- Close-up of a gleaming tuna cross-section or fresh uni (sea urchin) on ice with the vendor’s ice scoop as compositional element
- Knife sharpener at work on a traditional Japanese fish knife — slow shutter (1/30 sec) for motion in the sparks
- Morning light streaming between stall awnings, creating parallel light-and-shadow bands across the wet alley pavement
- Portrait of a vendor with permission: weathered face, happi coat, and the market chaos in soft background bokeh
Pro tip: The outer perimeter alleyways (not the main tourist drag) have the highest concentration of working-vendor activity and the least photographic competition — follow the smell of grilling and smoke. Always ask vendors (a simple bow and gesture toward your camera is sufficient) before photographing their merchandise or face. The Hama-rikyu Gardens (5 min walk south) make an ideal contrast second location — traditional Edo-era garden with Tokyo skyscrapers looming above.
Common mistake to avoid: Visiting on Sunday when the market is entirely closed. Arriving after 10 AM — half the interesting vendors have sold out and energy drops rapidly. Treating the market like a tourist attraction rather than a working market; vendors working at speed can’t accommodate extended lens setups in the narrow passages.
8. Ginza at Night (Chuo-dori / Ginza 4-chome)
Japan’s most prestigious shopping and luxury district, with every major international luxury brand represented in spectacular architecturally designed flagships. The Wako department store’s neoclassical clock tower (1932) anchors the Ginza 4-chome crossing — one of Tokyo’s most photographed urban landmarks. At night the district transforms into a canyon of LED and neon illumination, while rain turns the entire boulevard into a mirror of light and color.
- GPS: 35.6717, 139.7649
- Elevation: 16 ft
- Best time of day: twilight and blue hour (30–60 minutes after sunset) when neon and LED signs balance with residual sky color; Saturday and Sunday afternoons when Chuo-dori is pedestrianized (Hokodo — car-free 12:00–17:00 in winter, to 18:00 in summer)
- Sun direction: Chuo-dori (main Ginza avenue) runs north–south. The evening sun descends to the west-southwest, side-lighting the eastern facades of the Mitsukoshi and Wako department stores at golden hour. After sunset, the neon signs, LED facades of Apple Ginza, Louis Vuitton, and Chanel illuminated storefronts provide strong directional lighting from all sides. Rain dramatically multiplies photographic potential — wet pavement reflects the neon signs for classic Ginza night shots
- Access: Ginza 4-chome Crossing: 4-1-1 Ginza, Chuo-ku, Tokyo. Public streets, free, open 24 hours. Ginza Station (Tokyo Metro Ginza, Hibiya, Marunouchi lines, 1 min walk) or Higashi-Ginza (Toei Asakusa Line, 3 min walk). The pedestrianized Hokodo period (Saturdays and Sundays, daytime) allows tripod setups on the main avenue without vehicle interference
- Difficulty: easy
- Recommended settings: Golden Hour Wide: f/8, 1/250 sec, ISO 200, 24mm — Chuo-dori looking north toward the Wako clock tower at sunset · Neon Rain Reflection: f/8, 1/15 sec, ISO 800, 35mm — wet pavement reflections of Ginza neon at blue hour; use building column to stabilize · Long Exposure Traffic: f/11, 20 sec, ISO 100, 24mm, tripod — light trails of taxi traffic on Chuo-dori at night · Luxury Facade Architecture: f/8, 1/250 sec, ISO 400, 35mm — Apple Store or Louis Vuitton Ginza illuminated facade with pedestrians silhouetted
Shots to chase:
- The Wako clock tower at Ginza 4-chome crossing at blue hour: neoclassical stone facade illuminated against deep indigo sky with pedestrian crosswalk below
- Wet-pavement neon reflection on a rainy night looking south down Chuo-dori — the entire reflective boulevard becomes an abstract light painting
- Long-exposure taxi and car light trails on Chuo-dori during the weekday evening rush with luxury store LEDs as static background
- Interior of Itoya (flagship stationery store) viewed through its all-glass facade at night — warm amber interior vs. cool blue street
- Wide shot of pedestrianized Chuo-dori on a Sunday afternoon with Ginza 4-chome crossing and the Wako tower stretching to the horizon
Pro tip: Rain nights are the most productive in Ginza — the entire avenue becomes a mirror and every neon sign is doubled. Carry a lens cloth and rain sleeve. For the wide Chuo-dori avenue shot, plant a tripod during the Sunday Hokodo pedestrianization period (noon onward) when cars are banned. The Tokyu Plaza Ginza rooftop (free, Omotesando exit level) offers a mid-height view down Chuo-dori that is less crowded than Ginza rooftop bars.
Common mistake to avoid: Arriving at midday when the district is lit by flat overhead sun with no neon effect. Forgetting that the most iconic Ginza buildings face different directions — scout the Wako, Mikimoto, and Apple facades individually as each has a preferred shooting angle. Not checking the Hokodo schedule before Sunday visits — pedestrianization ends by 5 or 6 PM and vehicles resume.
9. Ueno Park
Save
Tokyo’s largest and most historic public park hosts 1,200 cherry trees along its central promenade — the most famous hanami spot in the capital. The 1882 Tokyo National Museum with its 1937 Honkan building (Imperial Crown style by Jin Watanabe) provides exceptional architectural photography. The Shinobazu Pond’s winter cormorant colonies and summer lotus blooms give year-round wildlife and botanical photography beyond the cherry season.
- GPS: 35.7156, 139.7739
- Elevation: 30 ft
- Best time of day: late March to early April for the most famous cherry blossom hanami (festival viewing) in Tokyo; early morning (5–8 AM) to photograph the cherry avenue with minimal crowds and low-angle warm light
- Sun direction: Ueno Park runs north–south on a raised terrace. The main cherry blossom promenade (sakura avenue) faces east and receives morning sunrise light directly on the pink canopy. The Shinobazu Pond (lower southwest section) faces west and provides perfect blue-hour and sunset compositions with the Benten-do shrine reflected in the water. The museum district faces east — morning sidelight is best for the Tokyo National Museum facade’s Imperial crown-roofed architecture
- Access: Uenokoen, Taito-ku, Tokyo. Open daily 5:00–23:00, free admission. Individual facilities (Tokyo National Museum ¥1,000–¥2,000, Ueno Zoo ¥600, etc.) charge separately. Ueno Station (JR Yamanote/Keihin-Tohoku/Joban lines, 2 min walk) or Ueno (Tokyo Metro Ginza/Hibiya lines, 3 min walk). Cherry blossom season (late March–early April) sees massive crowds on weekends; weekday mornings are manageable
- Difficulty: easy
- Recommended settings: Cherry Blossom Promenade: f/8, 1/400 sec, ISO 100, 24mm — cherry avenue in full bloom at 7 AM, east-facing light on pink canopy · Tnm Facade Morning: f/8, 1/400 sec, ISO 100, 35mm — Tokyo National Museum main building at 9 AM with east sidelight · Shinobazu Pond Reflection: f/11, 8 sec, ISO 100, 24mm, tripod — Benten-do shrine reflected in pond at blue hour · Cherry Blossom Detail: f/4, 1/500 sec, ISO 200, 100mm — tight cluster of blossoms against a clear blue sky at golden hour
Shots to chase:
- Cherry blossom tunnel: looking south down the main promenade with pink canopy forming a natural arch over the lantern-lined walkway
- Tokyo National Museum Honkan building with late-afternoon sidelight casting shadows across the Imperial Crown roof tiles — pair with foreground cherry branches in spring
- Benten-do shrine on its little island in Shinobazu Pond reflected perfectly in the still water at blue hour with the city lights beyond
- Festival atmosphere shot: rows of blue tarps, lanterns, and picnickers under blooming cherries during hanami season
- Early morning mist over Shinobazu Pond with lotus leaves in summer, cormorants perched on posts, with Ueno hill behind
Pro tip: The roped-off cherry-blossom core promenade between the fountain and the museum becomes impenetrably crowded between 10 AM–6 PM during peak bloom; the only solution is arriving before 7 AM. The museum’s approach path through the central gate at golden hour is a 5-minute walk from Ueno Station and consistently delivers magazine-quality architectural shots. For the Shinobazu Pond shots, the path on the eastern shore (facing west) positions you for the best sunset and blue-hour compositions.
Common mistake to avoid: Visiting solely during cherry blossom season without exploring the rest of the park — the Toshogu Shrine, zoo (Japan’s oldest), and Hanazono Inari Shrine are year-round photographic gems. Arriving after 9 AM on a peak-bloom Saturday — crowds are so dense that tripod setups become impossible. Skipping the pond section, which offers completely different subject matter from the main promenade.
Want this in your pocket on the street?
The full-resolution version of every spot above — with full-page hero photography, GPS maps with gold location pins, sun direction diagrams, multi-season tables, and a complete safety + packing checklist — is inside the Tokyo Ultimate Photographer’s Guide PDF ($47). Print it, save it offline, take it on the walk. Get the guide →
10. Tokyo Imperial Palace / Nijubashi Bridge
The symbolic heart of Japan — the Imperial Palace has occupied this site since Edo Castle was built in 1457. The stone Nijubashi bridge and the Fushimi-yagura watchtower compose what is arguably Japan’s most reproduced photograph. The 2km moat circuit combines historical stone walls, the Chidorigafuchi boat park (famous cherry blossom spot), and distant skyscraper views. The free guided tours provide access to the inner Kokyo Gaien grounds normally closed to the public.
- GPS: 35.68, 139.753
- Elevation: 30 ft
- Best time of day: morning (9:00–11:00 AM) for warm sidelight on the Nijubashi stone arch bridge and the Fushimi-yagura watchtower; spring (late March–April) and autumn (October–November) when the surrounding moat is framed by cherry blossoms or foliage
- Sun direction: The Nijubashi bridge faces roughly east from the Kokyo Gaien plaza. Morning sun from the east-southeast directly front-lights the stone arch and the Fushimi-yagura (turret) that rises above the treeline. By afternoon the watchtower is backlit. The Chidorigafuchi moat section (northwest of the palace) faces south-southeast and receives beautiful morning light on cherry blossoms overhanging the water. Autumn is particularly stunning as the zelkova trees along the outer gardens turn gold
- Access: 1-1 Chiyoda, Chiyoda-ku, Tokyo. Kokyo Gaien outer gardens: free, open daily 24 hours. Palace East Gardens (Higashi Gyoen): free, open Tue–Thu and Sat–Sun 9:00–17:00; closed Mon and Fri. Guided palace ground tours: free, 75 minutes; held Tue–Sat at 10:00 and 13:30 (not Mon, Sun, holidays); advance registration at kunaicho.go.jp. Nearest station: Nijubashimae (Tokyo Metro Chiyoda Line, 1 min walk) or Tokyo (JR lines, 10 min walk)
- Difficulty: easy
- Recommended settings: Golden Hour Wide: f/8, 1/400 sec, ISO 100, 24mm — Nijubashi bridge and Fushimi-yagura from the plaza at morning golden hour · Moat Reflection: f/8, 1/500 sec, ISO 100, 50mm — stone walls and turret reflected in the glassy moat at 9 AM · Cherry Blossom Chidorigafuchi: f/8, 1/400 sec, ISO 100, 24mm — pink cherry branches overhanging the Chidorigafuchi moat with paddleboat silhouettes · Telephoto Tower Compression: f/11, 1/500 sec, ISO 100, 200mm — Fushimi-yagura compressed against the modern Tokyo skyline in the background
Shots to chase:
- The quintessential shot: Nijubashi’s double stone arch framed symmetrically with the Fushimi-yagura turret rising above the treeline at 9 AM
- Chidorigafuchi moat at cherry blossom peak — overhanging branches with pink blossoms and bright red paddle boats below
- Wide-angle shot along the outer moat wall looking south with the modern Marunouchi business district towers framed between ancient stone walls
- Autumn foliage walk along the palace outer gardens with golden zelkova trees lining the straight pine-tree avenue
- Free palace guided tour: the Kokyo Gaien inner grounds accessible only on tours — the gravel courtyard and formal gateway rarely seen
Pro tip: For the Nijubashi shot, position yourself at the plaza’s Meganebashi (Eyeglass Bridge) viewpoint directly south for the most symmetric composition. Register for the free guided palace ground tour at least several days in advance at the Imperial Household Agency website — same-day registration is often possible at the Kikyomon Gate but is not guaranteed. The Chidorigafuchi cherry blossom experience (northwest moat) peaks about a week after Ueno Park and can be less crowded.
Common mistake to avoid: Visiting on Monday or Friday when the East Gardens are closed. Shooting the Nijubashi from the wrong angle — the plaza viewpoint directly south is specifically designed for this composition; other angles miss the bridge-and-turret pairing. Missing the Chidorigafuchi moat section (a 10-minute walk northwest) which is entirely separate from the main palace plaza and often less crowded during cherry season.
11. Roppongi Hills — Tokyo City View Observatory
Tokyo City View provides the best clear-glass observation deck for photographing Tokyo Tower directly at eye level — uniquely, the tower appears neither far below nor far above, but at the same height as the observation deck windows. The wide arc from the bay to Mt. Fuji captures the full geographic drama of Tokyo’s setting. The Mori Art Museum shares the 53F, and the combination of contemporary art and panoramic city view is unique among Tokyo observation decks.
- GPS: 35.6605, 139.7292
- Elevation: 709 ft
- Best time of day: evening (5–10 PM) for the Tokyo Tower illumination and city lights; clear winter evenings for maximum air clarity and visible Mt. Fuji at dusk on the western horizon
- Sun direction: The 52F observation deck sits at 238m in Minato-ku, offering a 360° panorama. The most dramatic view faces north and west: Tokyo Tower is directly northwest at 1.5 km, the Tokyo Skytree is northeast at 12 km, and Mt. Fuji is southwest at 100 km (visible on clear winter days). At sunset the western arc glows gold; Tokyo Tower illuminates ~30 minutes after sunset; Skytree lights activate at the same time. The outdoor Skydeck (55F, additional fee in summer) provides open-air shooting
- Access: 52F Roppongi Hills Mori Tower, 6-10-1 Roppongi, Minato-ku, Tokyo. Tokyo City View (52F): Adults ¥2,400 (weekdays) / ¥2,800 (weekends); students and children discounted; open 10:00–22:00 (last admission 21:30). Skydeck (55F outdoor) available for additional fee in warm seasons. Nearest stations: Roppongi (Tokyo Metro Hibiya/Toei Oedo lines, 4 min walk). Buy tickets at 3F ticket counter
- Difficulty: easy
- Recommended settings: Golden Hour Wide: f/8, 1/400 sec, ISO 200, 24mm — wide panorama from the glass window facing northwest at golden hour · Tokyo Tower Telephoto: f/8, 1/250 sec, ISO 400, 85mm — Tokyo Tower illuminated from the 52F window at dusk; use lens pressed against glass to eliminate reflections · Night City Long Exposure: f/11, 15 sec, ISO 100, 16mm, tripod on Skydeck — city lights long exposure in open air (no glass reflections) · Blue Hour Tower Pair: f/11, 8 sec, ISO 100, 24mm, tripod — Tokyo Tower and Skytree both illuminated at blue hour from the Skydeck outdoor level
Shots to chase:
- Tokyo Tower at eye level framed in the full-height glass window at blue hour — press the lens against the glass to eliminate reflections
- 360° panoramic stitch from the Skydeck outdoor level capturing both Tokyo Tower (northwest) and Skytree (northeast) simultaneously
- Mt. Fuji on the southwestern horizon at dusk in winter: the perfect cone backlit by the last pink of sunset at 100x zoom
- Straight down from 238m looking at the Roppongi Hills complex, the Mohri Garden, and the helipad rooftop below
- Night long exposure (Skydeck) with expressway light trails radiating outward from central Tokyo and the bay glittering beyond
Pro tip: Press your lens directly against the glass and use a rubber lens hood (or your hands as a shade) to completely eliminate interior reflections — this makes or breaks indoor observation deck shots. On the Skydeck outdoor level (warm seasons), a carbon-fiber travel tripod is ideal for long exposures. For the Mt. Fuji view, check visibility forecasts at tcv.roppongihills.com before purchasing tickets.
Common mistake to avoid: Shooting through the glass without eliminating reflections — interior lighting reflects off the glass and ruins the image unless the lens is pressed flush against the surface. Visiting during a temporary closure (the deck closed Sept–Oct 2025 for maintenance; check the website before going). Arriving without planning for the ticket purchase queue on weekend evenings — buy online or arrive 20 minutes before your target time.
12. Akihabara Electric Town
The global epicenter of Japanese electronics, anime, manga, and gaming culture. Akihabara’s sensory overload — six-story electronics retailers, maid cafes with costumed staff promoting outside, anime figure billboards climbing building facades, and neon signs layered 10 stories high — creates an urban photography environment unlike anywhere else on Earth. The contrast between the chaos of Chuo-dori and the narrow electronics-and-cables back alleys is equally compelling.
- GPS: 35.7023, 139.7745
- Elevation: 20 ft
- Best time of day: late afternoon and dusk (3–7 PM) when the neon signs activate and the pedestrian overcrossing provides an elevated street photography platform; Saturday evenings for peak street energy
- Sun direction: Chuo-dori (main Akihabara avenue) runs roughly north–south. In the afternoon, the sun descends behind western buildings and creates deep shadow canyons in the side streets — ideal for high-contrast neon and shadow street photography. The elevated railway overpass (JR Sobu Line) running east–west creates dramatic light-and-shadow bands at midday. Late afternoon golden light hits the south-facing neon sign clusters on the east side of Chuo-dori at a low, flattering angle
- Access: Sotokanda, Chiyoda-ku, Tokyo. Public streets, free, open 24 hours. Most shops open 10:00–20:00 or later. Akihabara Station (JR Yamanote/Sobu/Keihin-Tohoku lines, 2 min walk) or Suehirocho (Tokyo Metro Ginza Line, 5 min walk). Photography generally permitted on public streets; some shops restrict interior photography. The Akihabara UDX building’s 2F passageway offers a sheltered elevated view of the street
- Difficulty: easy
- Recommended settings: Golden Hour Wide: f/8, 1/250 sec, ISO 400, 24mm — Chuo-dori looking north in late afternoon with neon signs active and pedestrians in motion · Neon Night Street: f/2.8, 1/60 sec, ISO 3200, 35mm — handheld neon street photography at dusk with motion blur from passing crowds · Maid Cafe Street Portrait: f/2.8, 1/500 sec, ISO 800, 85mm — maid cafe staff promoter portrait with the store frontage and neon as background (with permission) · Building Facade Architecture: f/8, 1/400 sec, ISO 100, 24mm — Yodobashi Akiba or Laox multi-story electronics facade with layered sign clusters
Shots to chase:
- Wide-angle shot from ground level looking up at the neon-sign canyon of Chuo-dori at dusk — six stories of electronics and anime signs framing a sliver of purple sky
- Maid cafe promotional staff in costume outside a shop entrance — vibrant uniforms against the neon background (ask permission first)
- The elevated train overpass as a dramatic foreground with the neon strip below and the UDX tower in the background
- Back alley detail: shelves of electronic components, coils of cable, and hand-lettered price signs in tight geometric composition
- Long-exposure light trails from JR trains passing overhead on the railway viaduct against an illuminated Akihabara nightscape
Pro tip: The side streets parallel to Chuo-dori (particularly the small alleyways between the main avenue and the Akihabara UDX building) contain the densest concentration of authentic electronics shops and create a human-scale alternative to the overwhelming main boulevard. Dusk is the sweet spot — neon is active but there’s still some sky color. Use a fast prime lens (35mm or 50mm f/1.8–f/2.8) handheld for documentary-style street captures that work with the chaotic energy rather than fighting it.
Common mistake to avoid: Visiting on a Tuesday mid-morning when the district is at its least active and shop signage is obscured by daytime glare. Trying to shoot static architecture here misses the point — Akihabara is about people, energy, and the collision of subcultures. Photographing staff inside shops without permission, which is universally refused and creates awkward confrontations.
13. Odaiba — Rainbow Bridge & Tokyo Bay Skyline
Odaiba offers the only unobstructed low-level view of the full Tokyo skyline across Tokyo Bay — a 180° panorama including the Rainbow Bridge, Tokyo Tower (9 km distant), the Skytree (12 km), and the Shinjuku high-rises. The artificial beach allows tripod setups at water level for long reflections. The Statue of Liberty replica in the park and the Fuji TV spherical building provide iconic foreground elements. On Saturday evenings in December, fireworks launched from the bay illuminate the bridge.
- GPS: 35.6302, 139.7761
- Elevation: 10 ft
- Best time of day: 30–60 minutes after sunset (blue hour to full night) when the Rainbow Bridge’s 368 floodlights activate and the Tokyo Tower and Skytree are both illuminated across the bay; summer evenings for clear air and later sunsets
- Sun direction: Odaiba Kaihin Park faces north-northwest across Tokyo Bay toward the Shiodome and Shibaura skyline. At sunset, the sun descends to the west-northwest behind the city — the bay acts as a mirror for the post-sunset pink sky and the illuminated bridge. The Rainbow Bridge runs northwest to southeast; from Odaiba Beach the bridge is photographed from the south-southeast, with the full Tokyo skyline (Skytree, Tokyo Tower, Shinjuku towers) spread behind it. Bridge illumination runs from 30 min after sunset until midnight
- Access: Odaiba Kaihin Park (Odaiba Seaside Park): 1-4 Odaiba, Minato-ku, Tokyo. Free, open 24 hours. Yurikamome Line: Odaiba Kaihin Koen Station (3 min walk) or Tokyo Teleport (Rinkai Line, 7 min walk). Rainbow Bridge promenade: free walking path on bridge; open Apr–Oct 9:00–21:00, Nov–Mar 10:00–18:00; closed 3rd Monday. The park’s artificial beach Odaiba Beach provides ground-level bay access for skyline and bridge photography
- Difficulty: easy
- Recommended settings: Golden Hour Wide: f/8, 1/250 sec, ISO 100, 16mm — wide panorama from Odaiba Beach at golden hour with bridge and skyline · Blue Hour Long Exposure: f/11, 20 sec, ISO 100, 24mm, tripod — city lights reflected in calm bay water at blue hour · Rainbow Bridge Telephoto: f/8, 1/500 sec, ISO 200, 200mm — telephoto compression of the bridge towers with Tokyo Tower behind · Night Fireworks December: f/8, 4 sec, ISO 100, 24mm, tripod — December Saturday fireworks bursting above the lit Rainbow Bridge
Shots to chase:
- Blue-hour panorama from Odaiba Beach: Rainbow Bridge spanning the frame with Tokyo Tower and Skytree both illuminated behind it and reflected in still bay water
- Liberty Statue silhouette at golden hour with the Rainbow Bridge and city skyline as backdrop — the ultimate Odaiba postcard shot
- Long-exposure with water silk: 20-second exposure from the shoreline with the lit bridge and city reflected in rippled bay water
- Telephoto compression of the Rainbow Bridge towers with Tokyo Tower appearing to emerge directly from behind the bridge
- December Saturday fireworks bursting gold and white above the lit bridge, captured at 4 seconds from a tripod at the water’s edge
Pro tip: The beach access point directly in front of the Statue of Liberty replica is the optimal position for the classic angle — from here the bridge spans left-to-right with the full skyline behind. Arrive 45 minutes before sunset to scout and set up; the best light transitions happen quickly. On very still winter nights the bay becomes a perfect mirror — February and March evenings with no wind are optimal for long-exposure reflection shots.
Common mistake to avoid: Coming on a windy day hoping for a reflection — wind chop destroys the mirror effect completely. Shooting from the elevated promenades of Decks Tokyo Beach rather than from beach level, which loses the dramatic low-angle reflection. Missing the December fireworks by confusing the date — they run only on Saturday evenings in December, not other months.
14. Yoyogi Park / Harajuku Takeshita Street
Yoyogi Park is Tokyo’s weekend culture stage — on any Sunday, Rockabilly dancers in 1950s pompadours perform near the Harajuku entrance, cosplay groups assemble under the trees, street musicians play, and the park lawns become a mosaic of picnicking sub-cultures. Takeshita Street — a 350m pedestrian lane off the park — is the birthplace of Harajuku fashion and houses the most concentrated collection of candy-colored, extreme fashion boutiques and decora culture anywhere in the world.
- GPS: 35.6716, 139.6951
- Elevation: 150 ft
- Best time of day: Sunday afternoons (noon–5 PM) for Yoyogi Park cosplay culture, Rockabilly dancers, and festival atmosphere; spring (late March–April) for cherry blossoms along the southern avenues; Takeshita Street any weekend afternoon after 11 AM for peak Harajuku fashion energy
- Sun direction: Yoyogi Park’s main lawns face south and southwest, making afternoon (2–5 PM) the optimal light direction for open-lawn portrait and landscape photography. The zelkova-tree-lined central avenue runs north–south and receives dramatic sidelight in the morning. Takeshita Street runs east–west and is a narrow canyon — midday overhead light creates harsh conditions, but diffuse overcast light works well for fashion photography in the street’s colorful context. The street faces northwest in the afternoon, providing a warm backlit quality
- Access: Yoyogi Park: 2-1 Yoyogikamizonocho, Shibuya-ku. Free, open 5:00–20:00 (spring/summer) to 17:00 (autumn/winter). Harajuku Station (JR Yamanote, 3 min to park) or Meijijingumae (Chiyoda/Fukutoshin Metro, 1 min to Takeshita Street). Takeshita Street: public pedestrian lane, free, open all hours. Be respectful when photographing cosplay individuals — a smile and gesture for approval is standard etiquette; most welcome photography
- Difficulty: easy
- Recommended settings: Golden Hour Wide: f/5.6, 1/500 sec, ISO 200, 35mm — Rockabilly dancers on the open lawn at golden hour with the Harajuku tree canopy behind · Takeshita Street Wide: f/5.6, 1/400 sec, ISO 400, 24mm — wide street perspective with the fashion crowd and colorful storefronts converging · Cosplay Portrait: f/2.8, 1/500 sec, ISO 400, 85mm — cosplay portrait with blurred park or street bokeh background (with permission) · Cherry Blossom Avenue: f/8, 1/400 sec, ISO 100, 35mm — zelkova/cherry avenue at golden hour in April with blossom canopy
Shots to chase:
- Rockabilly dancers in 1950s dress performing choreographed routines near the Harajuku entrance every Sunday — wide and telephoto captures of the performance
- Looking down Takeshita Street from the entrance at the weekend peak (2–4 PM): a river of extreme Harajuku fashion flowing toward you
- Cosplay group portraits in the park’s southern lawn — elaborate anime character costumes against the soft green tree background
- Cherry blossom tunnel in Yoyogi Park’s main avenue in late March–early April: the zelkova and cherry trees create a pink-and-green canopy overhead
- Candid shot at Takeshita Street’s famous crepe stands: the colorful crepe decorations and fashion-forward customers as a street-photography tableau
Pro tip: Yoyogi Park’s Rockabilly dancers are a genuine subculture institution (performing since the 1980s) — they are accustomed to photography and generally appreciate an appreciative audience and a smile. Arrive before noon to get context shots before the crowds build. For Takeshita Street, the entrance archway at the Harajuku Station end provides the best vantage for the classic street-canyon shot when the crowd is at peak density (2–4 PM weekends). Avoid school holidays for Takeshita Street photography — the street is physically impassable on Golden Week.
Common mistake to avoid: Photographing cosplay participants without a nod of approval, which is culturally disrespectful and can cause offended reactions. Visiting Takeshita Street on a weekday morning when the shops are open but the street is 90% empty of the youth culture that makes it photogenic. Forgetting that Yoyogi Park’s Sunday culture is concentrated near the southern Harajuku Gate — entering from other gates leads to quiet picnic areas with no performers.
When to photograph Tokyo: a year-round breakdown
Tokyo is photogenic every month of the year — but the conditions differ radically by season. Here is what to expect:
Late March–April (cherry blossoms, soft spring light) and October–November (fiery autumn foliage, clear skies, less humidity than summer)
Photographer safety in Tokyo: read this
City photography has its own risks: gear visibility, neighborhood timing, traffic, weather. Read the briefing before you go.
- Gear visibility: Use a discreet bag with no obvious camera branding. Keep a body strapped under a jacket on transit.
- Neighborhood timing: Pre-dawn and post-sunset shoots reward early scouting. Cross-reference each location with current local guidance and choose well-lit transit routes.
- Situational awareness: Headphones out. One eye in the viewfinder, one on the street.
- Traffic: Bridges, medians, and bike lanes are not setup zones. Shoot from sidewalks and pedestrian areas only.
- Weather: Summer storms move quickly; winter cold drains batteries. Layer up, keep gear dry, watch for ice on cobblestones at blue hour.
The complete safety briefing is inside the Tokyo Photographer’s Guide PDF.
Take this guide into the city
This post is the complete field reference. The Tokyo Ultimate Photographer’s Guide PDF is the field-deployable version: full-page resolution hero photography, GPS maps with gold pins for every location, multi-season shooting calendars, gear notes per location, sun-angle diagrams, the full city safety briefing, and a print-ready editorial layout in Framehaus black and gold. Save it offline. Print it. Take it on the walk.
Tokyo Ultimate Photographer’s Guide
Downloadable PDF · 14 GPS-mapped locations · Multi-season calendar · City safety briefing · Packing checklist
Get the Tokyo guide — $47
Get the Tokyo Guide + Preset Pack
Photograph it. Edit it. Done.
All links go to Viator (a TripAdvisor company), the world’s largest marketplace for guided experiences. Tagged as affiliate per FTC.
Quick Amazon shortcuts to the gear most useful for this kind of shot. Use them if Prime shipping or Amazon credit makes more sense than B&H. As an Amazon Associate ShutYourAperture earns from qualifying purchases.
Take Tokyo home in your pocket.
Every shot location, every angle, every time of day worth shooting. Printable PDF + GPS-tagged map.
Instant download. Works on phone, tablet, and printed.
Continue reading
- International Cities Photography Guides — every city, mapped
- U.S. Cities Photography Hub
- National Parks Photography Guides
- Travel photography destinations
- Travel photography pillar
- How to shoot golden hour like a pro
- Blue hour photography settings and locations
← Back to International Cities Photography Guides
Related guides nearby
Three more photography guides within striking distance — perfect for combining into one trip.
The complete Tokyo guide is $47
All vantage points above + 5 bonus secret spots, printable map, gear pack list, and editing recipes. One-time payment, instant download, lifetime updates.
Common questions about the Tokyo guide
Is the Tokyo photography guide worth $47?
For most photographers, yes. The guide saves 8-12 hours of trip-planning research and prevents the most common mistake of Tokyo photography: shooting at the wrong time of day. If a single better frame is worth $47 to you, the guide pays for itself on day one. Buyers get every GPS coordinate, every golden-hour window, every cultural rule, and a printable shot list.
Does the Tokyo guide include GPS coordinates?
Yes — every vantage point in the guide has Google Maps-ready GPS coordinates so you can pin them before you fly. The guide also includes a printable map showing all locations clustered by walking distance, so you can build efficient half-day routes.
What's in the Tokyo PDF that isn't in this article?
The article shows the highlights. The PDF includes: 5 additional secret spots not published online, a 14-day itinerary with daily routes, the full camera-settings cheat sheet for every scenario in Tokyo, a printable gear packing list, post-processing recipes with screenshot examples, and a list of local guides we trust for portrait commissions.
Do I get the Lightroom presets too?
The $47 guide is the PDF only. The matching Tokyo preset pack is a separate $19 download — most buyers grab both as a bundle and save the editing time. Both are instant download, both work on Lightroom Classic and Lightroom Mobile.
Will the guide work for a Tokyo trip in 2026?
Yes. The guide is updated annually as fees, restrictions, and new vantage points change. All buyers get free lifetime updates. The 2026 edition includes the latest drone rules, museum photography policies, and seasonal light data for the year.
Visiting more than Tokyo?
Bundle multiple destination guides and save planning time across the trip:
- Bali Photographer’s Guide ($47)
- Kyoto Photographer’s Guide ($47)
- Singapore Photographer’s Guide ($47)
- Bangkok Photographer’s Guide ($47)
- Hong Kong Photographer’s Guide ($47)
Or get all 60+ destinations in one bundle: Photo Atlas — every guide, every map, $97.