Best Photography Spots in Grand Canyon National Park: 12 Locations With GPS

Tours & experiences disclosure: This guide includes affiliate links to Viator, the world’s largest tour and experiences marketplace. If you book through these links, ShutYourAperture may earn a small commission at no extra cost to you.

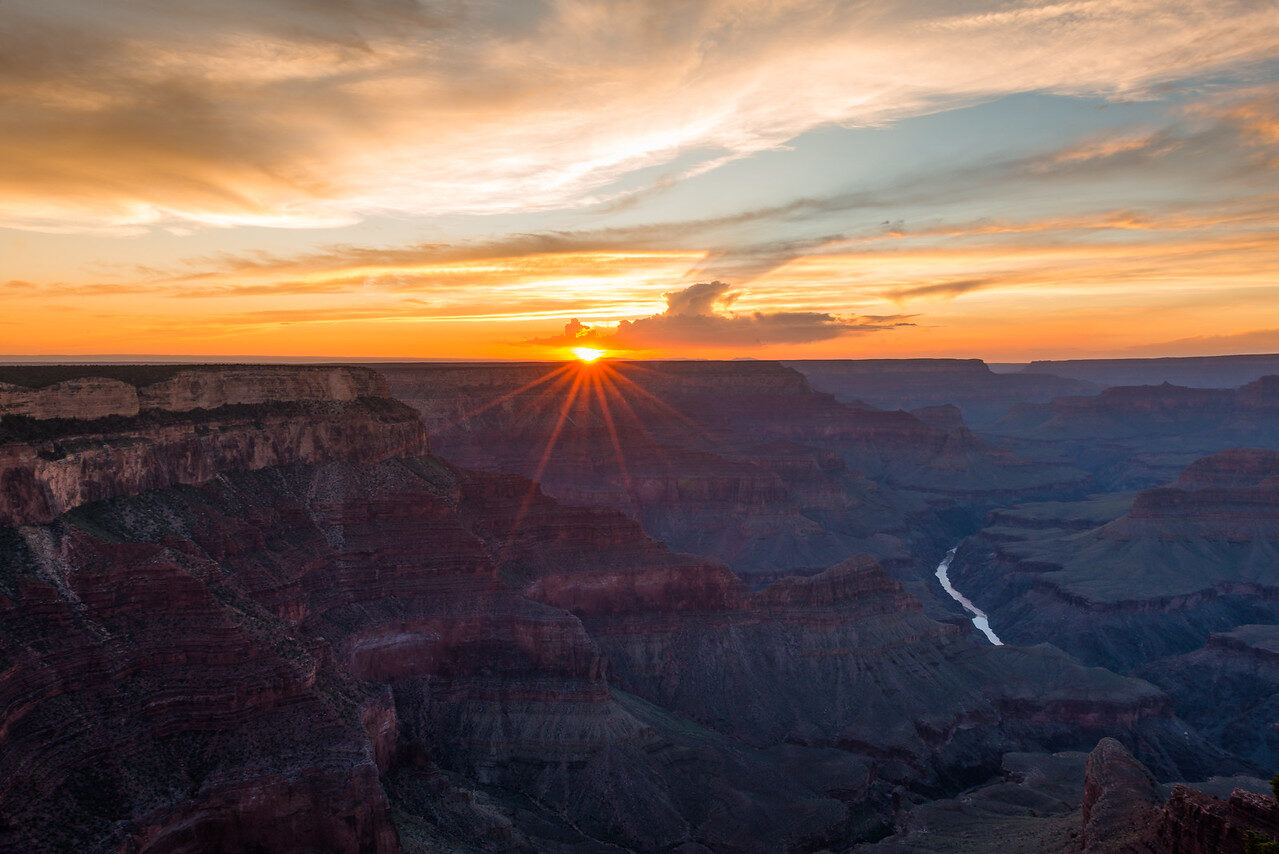
Grand Canyon National Park from the South Rim — one of the most photographed landscapes on EarthSave

Amazon Associates disclosure: ShutYourAperture is a participant in the Amazon Services LLC Associates Program. As an Amazon Associate we earn from qualifying purchases. Some links below go to Amazon (Store ID edinchavez01-20). Buying through these links costs you nothing extra and helps fund our free guides.
Editing software disclosure: This guide includes affiliate links to Skylum (Luminar Neo, Aperty, Luminar Mobile). If you buy through these links, ShutYourAperture may earn a commission at no extra cost to you. We only recommend tools we use ourselves.
Skip the planning. Get the Grand Canyon National Park PDF. All locations, GPS coordinates, golden-hour times, gear tips. Instant download.

Grand Canyon National Park is 1,904 square miles of the most dramatic geology on the planet. A mile-deep chasm. Walls that record two billion years of Earth’s history in color-coded strata. A certified International Dark Sky Park. Monsoon lightning in July. Snow on red Kaibab Limestone in January. Cottonwood gold along the Colorado River in October. If you have a camera and the patience to wait past the first shuttle, Grand Canyon will give you images that last a career — but only if you know where and when to point it.

This is the definitive field guide to the 12 best photography spots in Grand Canyon National Park, with GPS coordinates you can drop straight into Google Maps, exact camera settings tuned to Grand Canyon’s unique light and scale, precise timing for every location, and the access notes nobody else bothers to document. It mirrors the intel inside our Grand Canyon Ultimate Photographer’s Guide ($47 PDF) — a downloadable field guide with full-page hero images, GPS maps, seasonal tables, a safety briefing, and a complete photographer’s packing list. Get the guide →

Planning multiple parks? See also: best photography spots in Zion and the full National Parks Photography Guides hub.

Grand Canyon Ultimate Photographer’s Guide — $47
12 GPS-mapped locations · Exact camera settings · Monsoon lightning + Milky Way + golden hour tactics · Free annual updates

Download the PDF guide →
Skip the planning

Get the Grand Canyon Ultimate Photographer’s Guide

Every location below — pre-mapped with GPS, golden-hour timing, gear recommendations, cultural rules, and a 14-day itinerary. Downloaded by 200+ working photographers.

Get the PDF · $47
Instant download · Lifetime updates

Quick jump to the 12 spots

  1. Mather Point
  2. Hopi Point
  3. Yavapai Point
  4. Yaki Point
  5. Desert View Watchtower
  6. Lipan Point
  7. Moran Point
  8. Grandview Point
  9. Powell Point
  10. Pima Point
  11. Hermit’s Rest
  12. Cape Royal

Before you shoot Grand Canyon: the essentials

  • Park entrance fee (2026): $35 per vehicle (7-day pass); $30 motorcycle; $20 individual/pedestrian/cyclist; $70 Grand Canyon annual pass; $80 America the Beautiful annual pass. No cash accepted — credit/debit only. Children under 16 free. Current rates at nps.gov/grca.
  • Shuttle system: Free shuttle buses operate on the South Rim. All shuttles use the Visitor Center Shuttle Bus Terminal as the hub. Hermit Road CLOSED to private vehicles March 1 – November 30, 2026. Shuttle and commercial tours only during this period. Foot and bicycle traffic permitted year-round. Yaki Point Road permanently closed to private vehicles all year. Current shuttle schedule at nps.gov.
  • North Rim 2026 status: North Rim partially reopened May 15, 2026 (phased access) following destruction from the Dragon Bravo Fire of July 4–13, 2025, which destroyed Grand Canyon Lodge, North Rim Visitor Center, and many historic structures. No potable water, fuel, lodging, or visitor services on North Rim in 2026. Day use and limited backcountry only. Check current conditions at nps.gov/grca.
  • Best photography seasons: Spring (Mar–May) and Fall (Sep–Nov) for stable weather and moderate crowds; Summer (Jul–Sep) for dramatic monsoon skies and lightning; Winter (Dec–Feb) for snow on rim and near-empty viewpoints.
  • Dark sky designation: International Dark Sky Park since 2019 — exceptional Milky Way conditions from May through October.
  • Drone policy: Drones are completely prohibited on all NPS land, including Grand Canyon, under 36 CFR § 1.5. Fines up to $5,000. No exceptions for recreational operators.

The full-resolution version of every map below — plus seasonal calendars, camera body/lens recommendations per location, monsoon lightning tactics, Milky Way shooting guide, and a complete photographer’s packing checklist — is inside the Grand Canyon Photographer’s Guide PDF ($47).

1. Mather Point

Mather Point delivers the most iconic ‘first reveal’ of the Grand Canyon — the standard panorama that has appeared on more magazine covers and postcards than any other vantage. Two rock peninsulas jut into the void and create natural framing for canyon depth; from the eastern peninsula, you can see distant slivers of the Colorado River, Phantom Ranch in the inner gorge, and the layered Kaibab Limestone, Coconino Sandstone, and Redwall Limestone geology in textbook clarity. The proximity to the Visitor Center (and its parking) makes it the most accessible pre-dawn location on the entire rim — you can park, walk 5 minutes, and be set up for sunrise without a shuttle or long hike.

  • GPS: 36.0616, -112.1079
  • Elevation: 7,119 ft
  • Best time of day: Sunrise (primary) / sunset (secondary)
  • Sun direction: Faces northeast into the canyon interior. At sunrise (azimuth ~70–100° depending on season), the first light paints the North Rim’s Bright Angel Canyon and Phantom Ranch area in warm amber. The South Rim platform itself remains in shadow until the sun clears the east horizon, creating dramatic contrast between lit North Rim walls and shadowed foreground. At sunset, canyon walls ahead receive gorgeous side-light from the west; turn 180° for silhouette shots. The canyon floor stays dark while upper walls glow — expose for the walls, not the sky.
  • Access: 0.3-mile paved walk south from Grand Canyon Visitor Center (Parking Lots 1–4). Open all year; no shuttle required. Kaibab Rim (Orange) shuttle stops at Mather Point on westbound trips.
  • Difficulty: Easy — fully paved, ADA accessible
  • Recommended settings: Sunrise: aperture: f/11, shutter: 1/60s, iso: 200, lens: 16-35mm, notes: Bracket ±2 EV: sky is bright, canyon floor still in shadow. Use grad ND or blend exposures in post.  ·  Sunset: aperture: f/11, shutter: 1/30s, iso: 100, lens: 24-70mm, notes: Point camera east (away from sun) to capture alpenglow on canyon walls. Polarizer cuts haze and deepens rock color.  ·  Blue Hour: aperture: f/2.8, shutter: 15s, iso: 800, lens: 16-35mm, notes: Canyon depth goes inkblack — use foreground rim rocks for silhouette contrast against cooling blue sky.  ·  Milky Way: aperture: f/2.8, shutter: 20s, iso: 3200, lens: 14-24mm, notes: North Rim is preferred for Milky Way (south-facing view). From Mather, the galaxy rises over the south/southeast horizon but the canyon interior is in the foreground — NPS confirms this works as a viable location.

Shots to chase:

  • Pre-dawn blue hour: walk 200–300 m east along the Rim Trail from the main platform to escape tripod crowds; shoot the layered canyon walls with a 16-35mm from a lone pinyon pine as foreground anchor
  • Sunrise panorama: use a telephoto (100-200mm) to compress the stacked buttes of Brahma Temple and Zoroaster Temple rising above the inner canyon — this telescopic view is counterintuitively more dramatic than the wide angle
  • Silhouette composition: position a lone visitor or twisted juniper on the rim against the glowing eastern sky — the black silhouette against salmon-to-gold gradient is a standout social media image
  • HDR bracket at golden hour: 3-shot bracket at -2/0/+2 EV; blend in Lightroom or Photoshop for full tonal range from shadowed canyon floor to bright sky
  • Condor watch: California condors are frequently spotted soaring near Mather — telephoto 400-600mm for portraits of these 9.5-foot wingspan birds against canyon backdrop

Pro tip: Arrive 45 minutes before sunrise in summer (sun rises ~5:10 AM MST in June), 30 minutes in winter. Walk east past the main amphitheater platform to find uncrowded rim positions with natural foreground elements (rocks, shrubs, twisted trees). The NPS notes Mather can be ‘very crowded, even at daybreak’ — the half-mile Rim Trail eastward solves this completely. Bring a headlamp for pre-dawn navigation. In winter, black ice forms on the paved path — microspikes recommended.

Common mistake to avoid: Shooting directly into the rising sun produces blown-out skies and silhouetted canyon with no detail. Point the camera into the canyon (northeast) and let the sun light the walls from behind you. Also: arriving at official sunrise time instead of 30-45 minutes before, missing the pre-sunrise pink alpenglow which is often the best light of the day.

2. Hopi Point

Hopi Point is the gold standard of Grand Canyon sunset photography precisely because it extends into the canyon like a ship’s prow — the 270-degree panoramic view means you can pivot from west (setting sun over the Esplanade) to east (alpenglow hitting Brahma Temple) to north (deep canyon and Colorado River glinting below) without moving your tripod more than a few steps. The Colorado River is visible at five distinct bends below. California condors (#234 and #280) have a documented nest site in nearby rock faces, making telephoto condor portraits a real possibility on any visit.

  • GPS: 36.0744, -112.1552
  • Elevation: 7,071 ft
  • Best time of day: Sunset (premier) / Sunrise (secondary)
  • Sun direction: The park service officially calls Hopi Point the premier sunset viewpoint on the South Rim. It projects farther into the canyon than any other Hermit Road overlook, providing unobstructed views both east and west. At sunset, face east to photograph the canyon walls and buttes glowing in warm cross-light while the sun descends behind you. Five distinct views of the Colorado River are visible on clear days, including the river’s east-west course far below. At sunrise, east-facing compositions capture Vishnu Temple and Wotans Throne silhouetted against dawn sky (NPS official tip).
  • Access: Hermit Road (Red Route) shuttle from Grand Canyon Village — Hermit Road CLOSED to private vehicles March 1 – November 30, 2026. Shuttle runs 8:00 AM to one hour after sunset. In winter (Dec 1 – Feb 28), drive personal vehicle on Hermit Road (vehicles under 22 feet). Also reachable by 2.5-mile walk along the Rim Trail from Yavapai Point.
  • Difficulty: Easy — paved viewpoint; walk from shuttle stop is ~100 m
  • Recommended settings: Sunrise: aperture: f/11, shutter: 1/60s, iso: 100, lens: 100-400mm, notes: Telephoto compresses Vishnu Temple and Wotans Throne — NPS explicitly recommends this view at dawn.  ·  Sunset: aperture: f/11, shutter: 1/60s-1/15s, iso: 100, lens: 16-35mm or 24-70mm, notes: Face east; use circular polarizer to cut haze and deepen canyon color. As light drops post-sunset, extend shutter to 1/8s or longer.  ·  Blue Hour: aperture: f/8, shutter: 10s, iso: 400, lens: 16-35mm, notes: The western sky holds color 20-30 min after sunset; turn west for gradient sky over canyon silhouette.  ·  Lightning: aperture: f/11, shutter: 20-30s bulb, iso: 100, lens: 24-70mm, notes: Gary Hart has captured some of the most famous Grand Canyon lightning images from Hopi Point. Use lightning trigger or manual bulb on a clear foreground night — face south for monsoon storm approach.

Shots to chase:

  • Classic sunset: face due east 20 minutes before sunset and shoot canyon walls illuminated by low-angle cross-light — this is the Grand Canyon image that wins photo awards, not the shot of the sun itself
  • River compression: with 200-400mm telephoto, frame the Colorado River bend visible to the northwest and compress the layered buttes behind it into a flat tapestry of color
  • Condor silhouette: California condors frequent this area (documented nest nearby) — telephoto burst mode as they circle the thermal updrafts rising from the canyon below
  • Lightning long exposure: July-September monsoon season brings storms from the south; from Hopi’s western exposure you can see cells building and fire lightning across the canyon — Gary Hart’s gallery documents multiple captures here
  • Walk 100 m east or west from the crowded platform along the unfenced rim for a lone juniper or pinyon pine foreground against the lit canyon walls

Pro tip: Arrive 60-90 minutes before sunset to claim a rim position before the 200-300 summer evening visitors arrive. The main platform railing area will be packed — walk just 50-100 meters east or west along the unfenced rim for an unobstructed private composition. The last Red Route shuttle runs one hour after sunset — never miss it (Hermit Road is 7 miles from the village). In summer, the shuttle runs every 8 minutes, making it the most shuttle-friendly Hermit Road viewpoint.

Common mistake to avoid: Pointing the camera at the setting sun instead of east into the illuminated canyon — the cross-light on the buttes and temples is the money shot. Also: standing at the crowded railed platform when 100 steps in any direction gets you superior unfenced views. Avoid midday — canyon looks flat and washed out with overhead sun.

3. Yavapai Point

Yavapai uniquely pairs a world-class geology museum with a premier photo viewpoint — the Yavapai Geology Museum displays a relief map of the full canyon visible from the rim, letting photographers cross-reference what they’re photographing with its geological history. The viewpoint’s rocky knoll drops steeply on all sides, creating a genuine ‘surrounded by void’ feeling absent at the fenced Mather Point platforms. The panorama sweeps 270 degrees from Bright Angel Canyon in the west to the distant Desert View horizon in the east — the widest natural horizon of any easily-accessed South Rim stop near the village.

  • GPS: 36.0667, -112.1182
  • Elevation: 7,040 ft
  • Best time of day: Sunrise and Sunset / Geology Museum for rainy-day photography
  • Sun direction: Yavapai sits on a broad rocky outcrop facing primarily north into the canyon, with views spanning east (toward Desert View Watchtower on the horizon) and west (toward Hopi Point). Sunrise lights the North Rim walls opposite the viewpoint. Sunset casts side-light across the canyon from the west — face east to capture the alpenglow on layered buttes. The elevated knoll nature of the point means you can position yourself on either side of the crest to control your east/west orientation.
  • Access: 0.7-mile walk west from Mather Point along the Rim Trail, or Kaibab Rim (Orange) shuttle westbound stop. Dedicated parking area at Yavapai Geology Museum (Parking Area C). Open all year; easy self-drive access.
  • Difficulty: Easy — paved path, ADA accessible to the museum and main overlook
  • Recommended settings: Sunrise: aperture: f/11, shutter: 1/60s, iso: 100, lens: 16-35mm, notes: Rocky knoll allows multiple compositions; shoot from multiple positions on the outcrop within 15 minutes.  ·  Sunset: aperture: f/11, shutter: 1/30s, iso: 100, lens: 24-70mm, notes: Face east (canyon interior) for alpenglow; face west for sun-backlit rim silhouette.  ·  Blue Hour: aperture: f/4, shutter: 8s, iso: 400, lens: 16-35mm, notes: Less crowded than Mather at blue hour; the rocky knoll foreground adds texture absent at the flat platforms.

Shots to chase:

  • 360-degree pan from the knoll crest — stand at the highest point and shoot a 6-10 frame panoramic sequence with a 24mm lens; stitch for a wall-print-worthy wide-field image
  • Geology museum exterior at sunrise: the building’s stone facade and relief map window are unique architectural subjects unlike anything at other viewpoints
  • East-facing telephoto toward the distant Desert View Watchtower silhouetted on the horizon 25 miles away — requires 400mm+ but produces a distinctive canyon-depth image
  • Moonrise over the canyon: Yavapai’s eastern exposure makes it ideal for capturing the full moon rising over the canyon walls — plan with PhotoPills for exact monthly dates

Pro tip: Less crowded than Mather Point because most visitors drive past to the Visitor Center. Has its own parking lot. The Yavapai Geology Museum opens at 8 AM (hours vary by season) — the interior relief map of the canyon is worth photographing for educational content. California condors are also spotted regularly here; keep a telephoto handy.

Common mistake to avoid: Treating this as just a transit point to Mather — the knoll itself offers superior unfenced vantage positions. In peak season, photographers skip Yavapai because Mather is ‘the famous one,’ but the lack of crowds makes compositional freedom here far greater.

4. Yaki Point

Yaki Point delivers one of the South Rim’s most technically superior sunrise compositions: Vishnu Temple (7,619 ft) and Wotans Throne appear directly in the frame at northeast, glowing like molten copper as the sun rises. The permanent private-vehicle ban creates a built-in crowd limiter — NPS explicitly notes that ‘the lack of private vehicles provides a bit more solitude than other canyon vistas.’ This is the only South Rim viewpoint where the South Kaibab Trail switchbacks are visible carving dramatically down O’Neill Butte directly below — a unique compositional element showing human scale against geological immensity.

  • GPS: 36.0586, -112.0838
  • Elevation: 7,260 ft
  • Best time of day: Sunrise (premier) / Afternoon rainbows after summer storms
  • Sun direction: Yaki Point faces predominantly east — the NPS photography guide explicitly states ‘best to shoot here at dawn.’ Vishnu Temple and Wotans Throne rise directly to the northeast and are silhouetted against the dawn sky before sunrise, then lit with golden side-light as the sun clears the horizon. To the west below the viewpoint, O’Neill Butte and the South Kaibab Trail switchbacks are illuminated by early-morning sidelight — a uniquely photogenic scene absent from other viewpoints. The Colorado River section here runs east-west, visible both upcanyon and downcanyon.
  • Access: YEAR-ROUND shuttle-only: Kaibab Rim (Orange Route) from Visitor Center Shuttle Terminal. First shuttle 6:00 AM (perfect for sunrise). Shuttle runs every 15-20 minutes early morning. Yaki Point Road is permanently closed to private vehicles — no exceptions. 9-minute ride from Visitor Center.
  • Difficulty: Easy — flat paved viewpoint; shuttle-required access naturally limits crowds
  • Recommended settings: Sunrise: aperture: f/11, shutter: 1/60s–1/250s, iso: 100, lens: 100-400mm, notes: Telephoto (200-400mm) to isolate Vishnu Temple and Wotans Throne against the dawn sky. NPS specifically recommends this east-facing shot.  ·  Sunset: aperture: f/11, shutter: 1/30s, iso: 100, lens: 24-70mm, notes: Western exposure also viable; canyon walls receive warm light.  ·  Afternoon Rainbow: aperture: f/8, shutter: 1/125s, iso: 100, lens: 24-70mm, notes: After summer monsoon showers (2-5 PM), face east for rainbow arching over canyon; polarizer maximizes rainbow contrast.

Shots to chase:

  • Telephoto isolation: shoot Vishnu Temple (7,619 ft) and Wotans Throne at 200-400mm — these Precambrian rock pillars lit by dawn light with no other manmade elements in frame is the defining Yaki Point image
  • South Kaibab Trail switchbacks on O’Neill Butte: a wide-angle (16-24mm) shot looking west-southwest captures hikers as tiny orange dots descending dramatic red switchbacks — a powerful human-scale image
  • Pre-dawn silhouette: arrive 40 min before sunrise; Vishnu Temple and Wotans Throne are solid black forms against a purple-to-orange gradient sky — pure graphic minimalism
  • Afternoon rainbow chase: stay near the shuttle after a summer storm — rainbows arc over canyon interior here and Gary Hart documents them from Yaki, Grandview, and Mather

Pro tip: Take the 6:00 AM Kaibab Rim shuttle — it arrives at Yaki Point before civil twilight begins in summer, giving you 30+ minutes to scout and compose before first light. The shuttle departs from Bright Angel Lodge at 6:00 AM; from Visitor Center shuttle terminal at 6:10 AM. On return, the shuttle continues to Pipe Creek Overlook before looping back — you can stay for a second composition angle.

Common mistake to avoid: Missing the first shuttle. Without a car, photographers often skip Yaki because it requires planning — this is the crowd-control mechanism that makes it great. Also: using only wide angle when the telephoto shots of Vishnu Temple are the real prize here.

Want this in your pocket on the trail?
The full-resolution version of every spot above — with full-page hero photography, GPS maps with gold location pins, sun direction diagrams, multi-season tables, and a complete safety + packing checklist — is inside the Grand Canyon Ultimate Photographer’s Guide PDF ($47). Print it, save it offline, take it into the canyon. Get the guide →

5. Desert View Watchtower

Desert View offers the only ground-level architectural foreground on the South Rim: the 70-foot stone Watchtower, designed by architect Mary Colter in 1932 to mimic ancestral Puebloan towers, creates a vertical subject unavailable at any other viewpoint. From the tower’s top floor (85 steps), photographers gain an elevated 360° view at 7,438 ft — the highest accessible South Rim overlook. The interior Hopi murals painted by artist Fred Kabotie are a unique cultural photography subject. NPS confirms Desert View and Lipan Point as prime South Rim Milky Way locations — the galactic core rises in the south, and the Watchtower silhouette against the Milky Way arch has become one of the park’s signature night images.

  • GPS: 36.0439, -111.8258
  • Elevation: 7,438 ft
  • Best time of day: Sunset (tower as foreground) / Milky Way (South Rim’s best astrophotography foreground)
  • Sun direction: Desert View sits at the easternmost accessible point of the South Rim, 25 miles from Grand Canyon Village. The overlook faces both north (down into the canyon toward Marble Canyon) and west (toward the park interior). At sunset, the Watchtower stands as a dark silhouette against an orange western sky while the canyon turns gold behind it — compose with the tower in the right third and canyon in left two-thirds. At sunrise, face east for dawn light across the Painted Desert, Navajo Nation, and Little Colorado River gorge on the horizon. The Colorado River’s 90-degree bend is visible both north (upriver to Marble Canyon) and west (downriver toward the park interior) — unique to this viewpoint.
  • Access: Private vehicle via Desert View Drive (AZ-64) — 25 miles/40 km east of Grand Canyon Village; approximately 40-minute drive. No shuttle service. Small fee area ($15 separate fee historically; confirm at entry). East Entrance to the park; separate from South Entrance.
  • Difficulty: Easy — flat paved overlook; 85 interior steps to climb the Watchtower (optional)
  • Recommended settings: Sunset: aperture: f/11, shutter: 1/30s, iso: 100, lens: 16-35mm, notes: Gary Hart tip: use hard-stop graduated ND filter for dynamic range when composing into the sun. Compose with Watchtower left/center and canyon/river right.  ·  Milky Way: aperture: f/2.8, shutter: 20s, iso: 3200, lens: 14-24mm, notes: NPS officially designates Desert View as the premier South Rim Milky Way foreground. The Watchtower silhouette against the galactic core arch is the hero shot. Use 500 rule: 500 ÷ 14mm = 35s max (round down to 20s for modern sensors).  ·  Blue Hour: aperture: f/5.6, shutter: 30s, iso: 400, lens: 16-35mm, notes: Watchtower interior lights glow through windows during blue hour — shoot from 30m away to capture both lit windows and canyon in frame.

Shots to chase:

  • Watchtower + Milky Way arch: NPS officially highlights this as the premier South Rim night shot; Milky Way core rises in southeast Apr-Oct; position tower in left third and galactic core arching right
  • Interior Hopi murals: bring a 24-70mm and shoot Fred Kabotie’s 1932 murals — mixed window/artificial light requires ISO 800-1600; unique cultural content no other viewpoint offers
  • Colorado River double-bend: from the tower top, a wide 14-20mm shot captures both the northward-flowing upper reach toward Marble Canyon and the westward lower reach — the only place on the South Rim where both bends are visible simultaneously
  • Painted Desert sunrise: face east at dawn for the Painted Desert and Navajo Nation stretching to the horizon — with few canyon rim obstacles in this direction, a 24-70mm captures the open plateau landscape with canyon beginning at your feet
  • Tower silhouette at sunset: shoot from the canyon overlook ~50m south of the tower; compose tower in silhouette against orange-to-deep-red western sky at civil twilight

Pro tip: Check Watchtower hours before planning a night shoot — interior access closes at a set time. The tower top requires climbing 85 steps. For Milky Way, go new moon phase April–October; the galactic core is in the south, which Desert View’s open eastern face accommodates better than most South Rim viewpoints (North Rim still superior overall). Bring a wider spread of focal lengths here than anywhere else on the South Rim — architecture, wide canyon, Painted Desert, and night sky all call for different optics.

Common mistake to avoid: Driving 25 miles from the village, taking one photo of the tower, and driving back — this viewpoint rewards 2-3 hours of exploration. Missing the interior murals and tower-top view. For Milky Way, arriving without checking moon phase (a half-moon destroys the shot).

6. Lipan Point

Lipan Point delivers the widest and most geological compositionally rich view on the South Rim east side. The exposed Grand Canyon Supergroup — ancient tilted formations predating the canyon-forming Kaibab Limestone — creates distinctly angled geology seen as a dark wedge cutting through the horizontal strata. The Unkar Delta, visible below, is a broad alluvial plain that was home to ancestral Puebloan farmers 1,000 years ago and represents one of the canyon’s most historically significant archaeological sites. The drive required to reach it means ‘on many mornings, you might share sunrise with fewer than 10 people’ — extraordinary given the park receives nearly 5 million annual visitors.

  • GPS: 36.0331, -111.853
  • Elevation: 7,360 ft
  • Best time of day: Sunrise (premier) / Sunset (also excellent) / Milky Way
  • Sun direction: Lipan Point is one of the few South Rim viewpoints where sunrise is truly spectacular from the eastern orientation and sunset is equally rewarding from the west-facing views. The NPS calls the views ‘incredible.’ The unique angle captures the Colorado River’s Hance Rapids and Unkar Delta to the northwest, while the southeast view reveals the Grand Canyon Supergroup — ancient tilted rock strata visible in only a handful of canyon locations. San Francisco Peaks (Flagstaff, 75 miles south) appear on the clear-day horizon. The Painted Desert stretches northeast. NPS night skies page lists Lipan Point alongside Desert View as a prime stargazing location on Desert View Drive.
  • Access: Private vehicle only — 6 miles west of Desert View Watchtower on Desert View Drive (AZ-64); approximately 18 miles east of Grand Canyon Village. No shuttle service. Access via short spur road off the main drive.
  • Difficulty: Easy — short walk from parking to overlook
  • Recommended settings: Sunrise: aperture: f/11, shutter: 1/60s, iso: 100, lens: 16-35mm and 100-400mm, notes: Bring both wide (for canyon sweep and Supergroup geology) and telephoto (for Colorado River compression and Unkar Delta detail).  ·  Sunset: aperture: f/11, shutter: 1/30s, iso: 100, lens: 24-70mm, notes: Grand Canyon Trust calls this ‘a photographer’s golden hour dream’ — face east for saturated hues before and after sunset.  ·  Milky Way: aperture: f/2.8, shutter: 20s, iso: 3200, lens: 14-24mm, notes: NPS lists Lipan alongside Desert View and Moran as the three best Desert View Drive stargazing spots. Minimal light pollution from the east.

Shots to chase:

  • Grand Canyon Supergroup wide shot: at sunrise, the tilted dark Dox Sandstone and Bass Limestone wedge cutting through horizontal strata is visually unique — shoot wide (16-24mm) to capture the full geological cross-section
  • Unkar Delta telephoto: 200-400mm isolates the flat alluvial plain and its sinuous river channels — looks almost like a satellite image; beautiful color contrast of river sediment vs. dark canyon walls
  • Near-360 sweep: the overlook has almost unobstructed views from northeast to southwest — shoot a 12-15 frame panoramic for a print-quality wide-field image
  • San Francisco Peaks on the horizon: on clear days (best fall after rains), the Peaks rise above the south rim — long telephoto (400mm) creates a compelling ‘canyon + volcano’ juxtaposition
  • Lightning and storm photography: Gary Hart documents multiple lightning captures from Lipan Point during monsoon season — elevated position and wide sight lines to the south make storm approach visible from miles away

Pro tip: Historically considered one of the clearest-air viewpoints on the South Rim for haze-free photography — the eastern position is upwind of most vehicle exhaust from the village. Visit mid-week to maximize solitude. Combine with Desert View in a half-day Desert View Drive shoot: sunrise at Lipan, mid-morning at Moran Point, lunch at Desert View, explore the Watchtower.

Common mistake to avoid: Skipping it because it ‘sounds like another viewpoint’ — Lipan is one of a handful of South Rim spots where you can count on near-solitude. Also: not bringing a telephoto for the Unkar Delta and river corridor — the wide-angle-only approach misses the geological story that makes this viewpoint distinct.

7. Moran Point

Moran Point is named for Thomas Moran (1837–1926), the painter whose Grand Canyon canvases helped persuade Congress to preserve it. The geology here directly replicates his palette: the black Cardenas Basalt (1.1 billion years old), purple Bass Limestone, orange Hakatai Shale, and brown Shinumo Sandstone are visually distinct and exposed in clear horizontal and tilted layers unavailable at the western rim viewpoints. The Colorado River is visible in multiple braided channels below. The NPS lists Moran Point as a prime stargazing and Milky Way location alongside Desert View and Lipan — an underappreciated night photography stop.

  • GPS: 36.0055, -111.9243
  • Elevation: 7,080 ft
  • Best time of day: Sunrise / Sunset / Milky Way (listed by NPS as a prime stargazing spot)
  • Sun direction: Moran Point sits approximately 14 miles east of Grand Canyon Village on Desert View Drive, with views spanning from northeast (into the upper canyon and Marble Canyon direction) to south. The Colorado River is visible in multiple channels far below. At sunrise, northeast-facing views receive warm early light on canyon walls and the river; at sunset, the western orientation allows warm cross-lighting on the distinctive Cardenas Basalt layers. Named for landscape painter Thomas Moran — the same geological color palette that inspired his iconic 1873 painting is visible here: black Cardenas Basalt, purple Bass Formation, orange Hakatai Shale, and brown Shinumo Sandstone.
  • Access: Private vehicle via Desert View Drive (AZ-64), approximately 14 miles east of Grand Canyon Village — 25-minute drive. Small signed pullout off the main road. Less visited than Desert View.
  • Difficulty: Easy — steps from parking to overlook
  • Recommended settings: Sunrise: aperture: f/11, shutter: 1/60s, iso: 100, lens: 16-35mm, notes: Wide angle captures the full Supergroup geological cross-section lit by low eastern light.  ·  Sunset: aperture: f/11, shutter: 1/30s, iso: 100, lens: 24-70mm, notes: Cross-lighting from the west accentuates the textured canyon walls and Cardenas Basalt dark bands.  ·  Telephoto Detail: aperture: f/8, shutter: 1/125s, iso: 100, lens: 100-400mm, notes: Isolate individual rock formation layers to create abstract geology images — the Cardenas Basalt dark band makes a strong graphic element against lighter strata.  ·  Milky Way: aperture: f/2.8, shutter: 20s, iso: 3200, lens: 14-24mm, notes: NPS night skies page confirms Moran Point as one of three Desert View Drive prime stargazing spots. Galactic core rises SSE.

Shots to chase:

  • Thomas Moran reference recreation: study the 1873 painting ‘Grand Chasm of the Colorado’ and attempt to recreate the composition — the canyon view from Moran Point most closely approximates his vantage
  • Geological color study: telephoto (100-300mm) shots of the Cardenas Basalt dark band against orange Hakatai Shale create striking abstract images with clear geological narrative
  • Colorado River multiple bends: wide angle captures the river as multiple silver threads 4,500 feet below — unique braided appearance not replicated at other viewpoints
  • Milky Way with canyon foreground: NPS-confirmed excellent dark-sky site; pair Milky Way arch with canyon silhouette
  • Foreground pine trees: walk along the overlook rim to find isolated pinyon or ponderosa pines at the edge for foreground framing

Pro tip: Often passed over in favor of Grandview or Lipan by photographers who don’t know the Moran name connection — use the painting hook in your blog post to differentiate this viewpoint. Less crowded than Desert View, with comparable views and Milky Way quality. Combine with a Lipan Point stop in the same Desert View Drive excursion.

Common mistake to avoid: Visiting without knowing what the Cardenas Basalt looks like — the dark layer is obvious once you know to look for it, and it transforms the shot from generic canyon view to a specific geological story. Also: skipping this because it’s ‘just another pullout’ between Grandview and Desert View.

8. Grandview Point

Grandview is the only South Rim viewpoint offering multiple distinctly different foreground compositions from a single parking area — the curved rim allows photographers to select their orientation based on where the light and clouds are best at any given moment. Professional photographer Adam Marland’s assessment: ‘sweeping views with multiple foregrounds, allowing the photographer to choose their favorite frame depending on where the light is best as the sun rises.’ The Horseshoe Mesa below (visible from the rim) juts far into the canyon and offers an incomparable below-rim vantage for the 6-mile round-trip hike — the only South Rim trailhead where the first mile of descent offers spectacular panoramic views.

  • GPS: 35.9961, -111.986
  • Elevation: 7,400 ft
  • Best time of day: Sunrise (multiple photographers’ top pick for entire park) / Afternoon rainbows
  • Sun direction: Grandview faces east with a sweeping panoramic rim that curves both north and south, providing multiple foreground orientation options at the same time. At sunrise, the eastern views receive direct early light while the canyon below remains in deep shadow — the contrast is extreme and textbook. Gary Hart lists Grandview among the top sites for both sunrise and afternoon rainbows (east-facing for morning rainbows after overnight rain). The blog We Dream of Travel’s professional assessment calls Grandview ‘the best overall sunrise location in Grand Canyon National Park, North or South Rim’ — higher praise than given to any other single viewpoint.
  • Access: Private vehicle — 12.5 miles east of Grand Canyon Village on Desert View Drive (AZ-64), approximately 20-minute drive. Separate Grandview Point parking area. The Grandview Trail begins here (strenuous 6-mile round trip to Horseshoe Mesa for advanced photographers seeking below-rim vantages).
  • Difficulty: Easy to the rim viewpoint; strenuous for the Grandview Trail below (permit required for overnight)
  • Recommended settings: Sunrise: aperture: f/11, shutter: 1/60s, iso: 100, lens: 16-35mm and 24-70mm, notes: Multiple foreground orientations mean you can change position during the 30-minute golden hour window — bring both a wide and a standard zoom.  ·  Golden Hour: aperture: f/11, shutter: 1/125s, iso: 100, lens: 100-400mm, notes: Gary Hart gallery includes ‘Sunrise Sunstar, Grandview Point’ — shoot directly into the rising sun at the moment it clears the horizon for a starburst effect at f/16.  ·  Afternoon Rainbow: aperture: f/8, shutter: 1/125s, iso: 100, lens: 24-70mm, notes: Gary Hart lists Grandview among top sites for afternoon rainbows — face east after monsoon passes; polarizer maximizes rainbow saturation.

Shots to chase:

  • Multi-orientation sunrise: at first light, shoot east (sunrise over canyon), then pivot southeast (rim curving away), then north (canyon depth toward Horseshoe Mesa) — all possible within 15 minutes from one spot
  • Sunstar at golden hour: at f/16 or f/22, shoot directly into the rising sun the instant it clears the canyon rim horizon — the diffraction starburst appears when any part of the disk is occluded by rock
  • Horseshoe Mesa aerial comp: from the rim, shoot Horseshoe Mesa jutting into the canyon with a 100-200mm for a compressed view showing the mesa’s dramatic peninsular form and Vishnu Temple beyond
  • Grandview Trail first mile: 2.5 hrs round trip (no permit required for day use); the exposed trail gives canyon-interior perspective impossible from the rim; shoot back toward the rim at golden hour for rim-as-background composition
  • Rainbow after afternoon storm: east-facing orientation is ideal for post-storm double rainbows — Gary Hart documents this as a top rainbow location

Pro tip: 20-minute drive from the village means leaving at 4:45–5:00 AM in summer for sunrise arrival. This self-drive requirement paradoxically makes it less crowded than shuttle-dependent Yaki Point — only motivated photographers make the pre-dawn drive. Combine with Moran Point (14 miles further east) and Desert View/Lipan on a full Desert View Drive shooting day.

Common mistake to avoid: Visiting only at sunset — Grandview is primarily a sunrise location because of its east-facing orientation (multiple photographers call it the #1 sunrise spot in the park). Also: parking, walking to one viewpoint, and leaving without exploring the curved rim both east and west from the parking area.

Want this in your pocket on the trail?
The full-resolution version of every spot above — with full-page hero photography, GPS maps with gold location pins, sun direction diagrams, multi-season tables, and a complete safety + packing checklist — is inside the Grand Canyon Ultimate Photographer’s Guide PDF ($47). Print it, save it offline, take it into the canyon. Get the guide →

9. Powell Point

Powell Point bears a monument to John Wesley Powell, the Civil War veteran who in 1869 led the first documented river expedition through the Grand Canyon — one of the greatest feats of American exploration. The stone memorial obelisk serves as a unique historical foreground object for canyon photography that no other viewpoint offers. As a stop one shuttle before Hopi, it captures nearly identical canyon angles with a fraction of the crowd. Gary Hart specifically recommends Powell as a quieter alternative to the 200-300 person Hopi Point sunset crowds.

  • GPS: 36.0747, -112.1521
  • Elevation: 6,793 ft
  • Best time of day: Sunset / Blue Hour
  • Sun direction: Powell Point is the eastern neighbor of Hopi Point on Hermit Road, approximately 0.3 miles before Hopi. It provides views north and east into the canyon — complementary to Hopi’s western panorama but available with consistently fewer people. At sunset, cross-light from the west illuminates the buttes visible to the north and east. John Wesley Powell monument (a squat stone memorial to the first explorer to navigate the Colorado River) stands at the overlook — a historically significant architectural foreground unique among all 12 locations.
  • Access: Hermit Road (Red Route) shuttle — same shuttle as Hopi Point; Powell Point is one stop before Hopi moving west. CLOSED to private vehicles March 1 – November 30, 2026. In winter, drive Hermit Road (vehicles under 22 ft). 5-10 minute walk from Powell Point to Hopi Point along the rim — many photographers combine both stops.
  • Difficulty: Easy — paved overlook
  • Recommended settings: Sunset: aperture: f/11, shutter: 1/30s, iso: 100, lens: 16-35mm, notes: Include the Powell monument obelisk in the foreground-left for historical context — unique compositional element.  ·  Blue Hour: aperture: f/4, shutter: 10s, iso: 400, lens: 16-35mm, notes: The monument’s stone texture picks up the cooling blue-hour light beautifully; long exposure smooths any wind-blown vegetation in foreground.  ·  Wide Sunset: aperture: f/11, shutter: 1/60s, iso: 100, lens: 16-35mm, notes: Face north-northeast for canyon buttes lit by low-angle western cross-light.

Shots to chase:

  • Powell monument at sunset: the historic stone obelisk silhouetted or lit by golden light with canyon panorama behind — a historically distinctive image unlike any other viewpoint’s generic railing shots
  • Walk to Hopi and back at golden hour: use the 0.3-mile rim walk to catch both viewpoints during the 30-minute golden window; get uncrowded Powell compositions then join (or avoid) the crowd at Hopi
  • Twilight long exposure: Powell Point’s lower elevation (vs. Hopi) and north-facing orientation frames the canyon differently at blue hour — 10-20 second exposures capture sky gradient and smooth out any haze
  • Silhouette portrait: use the monument obelisk as a mid-ground between your foreground rocks and the glowing canyon — a layered composition in three distinct planes

Pro tip: If Hopi Point is packed, get off the shuttle at Powell Point — it’s one stop before Hopi and half as crowded with equivalent sunset quality. The Powell-to-Hopi rim walk is straightforward, well-worn, and safe. Mention the monument in your caption — it gives historical storytelling angle that social media audiences engage with strongly.

Common mistake to avoid: Only using this as a transit stop to Hopi — Powell Point deserves 20-30 minutes in its own right. The monument foreground elevates what would otherwise be a standard canyon view into a documented historical site.

10. Pima Point

Pima Point is the ‘quiet insider’s sunset spot’ — the Grand Canyon Trust and multiple professional photographers recommend it as the answer to overcrowded Hopi Point. The view north into the canyon gives visibility of the Colorado River further downstream than from Hopi, with Hermit Creek drainage visible as a dramatic side-canyon below. The western exposure means excellent sunset sky photography even when the canyon floor is already in shadow. Grandcanyon.com’s sunset guide says Pima Point gets 60-70% fewer visitors than Hopi for equivalent light.

  • GPS: 36.0719, -112.2002
  • Elevation: 6,575 ft
  • Best time of day: Sunset / Milky Way (west-facing dark sky)
  • Sun direction: Pima Point sits near the western end of Hermit Road with a broad view spanning north (canyon interior) and west (toward Hermit Creek and the Colorado River to the northwest). NPS lists Pima Point as a viewpoint ‘where you can photograph the setting sun’ — the western orientation provides wide sky for sunset colors. Hermit Rapid — one of the Colorado River’s most powerful rapids (9 on a 10-point scale) — is audible from the rim on quiet days and visible through binoculars. Fewer crowds than Hopi Point while providing equivalent light quality.
  • Access: Hermit Road (Red Route) shuttle — third-to-last stop before Hermit’s Rest (the route terminus). CLOSED to private vehicles March 1 – November 30, 2026. In winter, drive Hermit Road.
  • Difficulty: Easy — paved overlook
  • Recommended settings: Sunset: aperture: f/11, shutter: 1/30s, iso: 100, lens: 16-35mm or 24-70mm, notes: Face north for Colorado River views; face west for sunset sky palette over the Esplanade.  ·  Blue Hour: aperture: f/4, shutter: 15s, iso: 400, lens: 16-35mm, notes: Blue hour here is often more photogenic than during actual sunset because the crowd-to-quality ratio is unmatched.  ·  Telephoto River: aperture: f/8, shutter: 1/125s, iso: 200, lens: 200-400mm, notes: Hermit Rapid can be compressed from this vantage — the white water appears as a bright thread against dark canyon walls.

Shots to chase:

  • Hermit Rapid telephoto: 300-400mm isolates the powerful rapid (audible from the rim on still days) as a bright white-water feature against dark canyon walls — unique river-photography angle
  • Sunset color in empty space: arrive 30 min before sunset and you’ll often have the viewpoint nearly to yourself — wide 16-35mm with foreground rim vegetation and Colorado River in upper-left frame
  • River + canyon + sky panorama: north-facing orientation frames the canyon’s full depth from rim to river; 6-frame panoramic at 24mm creates a wall-worthy horizontal print
  • Evening transition: stay through blue hour — the canyon turns deep indigo while the western sky holds warm peachy color; this complementary color contrast (warm/cool) is a compositional winner

Pro tip: Take the shuttle past Hopi Point — the crowds at Hopi are visually obvious from the bus; if you want solitude, stay seated and get off at Pima. The Grand Canyon Trust’s sunset guide explicitly names Pima as the alternative to Hopi for ‘equally spectacular views with fewer crowds.’ Last shuttle from Pima is one hour after sunset — same as all Hermit Road stops.

Common mistake to avoid: Getting off at Hopi because ‘everyone else does.’ Pima Point requires only one extra shuttle stop (5-10 minutes more) for dramatically less competition for rim positions.

11. Hermit’s Rest

Hermit’s Rest is one of Mary Colter’s two masterworks at Grand Canyon (alongside the Desert View Watchtower) — the 1914 stone building appears to have grown organically from the canyon rim, with a massive stone arch entrance, rough-hewn fireplace, and deliberately ‘weathered’ exterior. The building’s interior features a grand fireplace and rustic Craftsman-era design. It provides the only canyon-side historic architecture on the Hermit Road accessible to photographers, plus the view west over the canyon is the furthest-west accessible paved viewpoint on the South Rim — sunsets here are unobstructed by crowds and the canyon opens wide to the northwest.

  • GPS: 36.0574, -112.2067
  • Elevation: 6,640 ft
  • Best time of day: Sunset / Architecture photography year-round
  • Sun direction: Hermit’s Rest is the western terminus of Hermit Road at 7 miles from the village — the furthest west point on the paved rim road. The canyon view here opens north and northwest, with views down the Hermit Creek drainage toward the Colorado River far below. The Hermit Trail descends from here into the canyon (backcountry permit required for camping). At sunset, warm light bathes the stone building’s rustic facade and the canyon interior to the north glows with cross-light.
  • Access: Hermit Road (Red Route) shuttle — route terminus/turnaround point; 80-minute round trip from village without stopping. CLOSED to private vehicles March 1 – November 30, 2026. Winter: drive Hermit Road. Shuttle first bus 8:00 AM, last bus one hour after sunset.
  • Difficulty: Easy — flat paved area around the building
  • Recommended settings: Sunset Architecture: aperture: f/8, shutter: 1/60s, iso: 200, lens: 16-35mm, notes: Wide angle captures the full stone arch entrance framing canyon beyond; approach from the east for arch + sunset sky composition.  ·  Sunset Canyon: aperture: f/11, shutter: 1/30s, iso: 100, lens: 24-70mm, notes: Northwest-facing canyon view; cross-lighting from the west illuminates Hermit Creek canyon walls.  ·  Interior Fireplace: aperture: f/4, shutter: 1/30s, iso: 800, lens: 24-70mm, notes: Interior low-light requires boosted ISO; the massive stone fireplace at the end of the room is the hero shot; available light only (no flash in historic buildings).

Shots to chase:

  • Stone arch entrance framing: position inside the arch entrance and shoot through toward the canyon and setting sun — the rough stone frame creates one of the park’s most unique architectural-landscape compositions
  • Building exterior at golden hour: low-angle western light rakes across the deliberately rough stone facade — shoot at 35-50mm from 10-15m distance to capture full building silhouette against golden sky
  • Interior fireplace with available light: the grand stone fireplace in the main room is a warm amber scene at dusk when building lights are on — f/4, ISO 800-1600, handheld or monopod
  • Hermit Trail head-of-trail shot: shoot down the first switchbacks of the Hermit Trail at golden hour — the trail disappears into deep canyon shadow with lit canyon walls beyond
  • Comparison shot with 1914 photograph: the building has barely changed since construction — find a historic reference image and recreate the composition for a before/after storytelling piece

Pro tip: The building architecture is a completely different visual subject from the canyon itself — bring a lens range from 16mm (for the wide arch + canyon) to 50mm (for full building composition) to 24mm (interior). The shuttle schedule means the last tourists arrive with each bus and disperse quickly — arriving 15 minutes after a bus departure gives you a brief window of near-solitude. The Hermit Trail is the park’s most remote rim trailhead on the South Rim — the canyon view from here differs from all other Hermit Road stops because the drainage goes southwest rather than north.

Common mistake to avoid: Treating Hermit’s Rest as just a restroom stop and gift shop at the end of the shuttle line. The building’s architectural photography is among the park’s most distinctive, and most visitors never photograph it seriously. Also: not timing the shuttle correctly — arrive on the last bus before sunset to have the evening light without a crowd.

12. Cape Royal

Multiple professional photographers independently name Cape Royal as the single best photography viewpoint in all of Grand Canyon National Park — not just the best on the North Rim. It provides 300+ degrees of view (NPS description) and is the only location that simultaneously works for sunrise, sunset, AND Milky Way. The horseshoe-shaped rock wall at the trail’s end faces south with the Milky Way arching vertically behind it in summer (galactic core prominent). Angel’s Window — a natural arch visible from the trail — frames the Colorado River 5,000 feet below. Gary Hart: ‘the North Rim is the best place for Milky Way photography because views face south.’ Cape Royal is the premiere site within the North Rim for this.

  • GPS: 36.1172, -111.9488
  • Elevation: 7,865 ft
  • Best time of day: Sunrise, Sunset, and Milky Way — considered best overall viewpoint in the park by multiple expert photographers
  • Sun direction: Cape Royal’s extraordinary value is its sweeping views to the east, south, AND west — the only Grand Canyon viewpoint providing strong compositions in three cardinal directions. At sunrise, east-facing views capture the canyon as the sun clears the distant horizon with no canyon rim in the way. At sunset, a thrilling west view aligns precisely with where the sun sets and features the canyon in perfect alignment. The southern view catches all angular sunset light and shadow play on canyon layers. The Milky Way galactic core rises due south in summer — making Cape Royal’s southern canyon view the North Rim’s premier Milky Way composition. Angel’s Window, a natural rock arch visible from the Cape Royal trail, provides a unique framing element.
  • Access: North Rim only: 23-mile drive south from North Rim Entrance Station, then left on Cape Royal Road; approximately 1 hour from Jacob Lake. 0.6-mile paved walk from parking to the cape. In 2026: no shuttle service, no lodging — arrive fully self-sufficient with water, food, and fuel.
  • Difficulty: Easy — flat paved trail 0.6 miles to cape (slight elevation gain at end)
  • Recommended settings: Sunrise: aperture: f/11, shutter: 1/60s, iso: 100, lens: 16-35mm, notes: East-facing view has clear horizon; clouds often from southeast add sky color without shooting directly into sun.  ·  Sunset: aperture: f/11, shutter: 1/30s, iso: 100, lens: 16-35mm and 24-70mm, notes: Three shooting directions simultaneously — set up for west (setting sun over canyon), pivot to south (angular light on layers), then east (alpenglow).  ·  Milky Way: aperture: f/2.8, shutter: 20s, iso: 3200, lens: 14-24mm, notes: North Rim Bortle Class 1-2 skies; face south from the horseshoe rock wall at trail’s end; galactic core visible Apr-Oct. Gary Hart explicitly recommends Cape Royal over Bright Angel Point for Milky Way due to less light pollution from South Rim village.  ·  Angel Window: aperture: f/11, shutter: 1/125s, iso: 100, lens: 24-70mm, notes: Shoot in morning or midday when light comes through the arch (NPS photography page recommends morning); afternoon the arch interior is shadowed.

Shots to chase:

  • Milky Way over horseshoe wall: the hero shot — face south from the trail’s end, position the horseshoe-shaped rock formation in the lower frame, and shoot the Milky Way arching vertically above; galactic core peaks SSE in July-August
  • Angel’s Window: the natural arch frames a vertical slice of the Colorado River 5,000 ft below — shoot at 24-35mm with the arch as the compositional frame; NPS recommends morning light
  • Triple-direction golden hour: with three viable shooting directions from one location, execute a planned rotation: west (10 min before sunset), south (at sunset), east (15 min after) — three completely different images from one position
  • Below-rim perspective of Wotan’s Throne: from Cape Royal’s south-facing edge, Wotan’s Throne appears almost at eye level across the canyon — telephoto 200-400mm creates a dramatic ‘standing on equal ground’ impression
  • Forest post-fire recovery: 2026 visitors will witness post-Dragon Bravo Fire landscape recovery — charred snag trees against the vivid canyon panorama is historically unique documentary imagery available only in 2026-2028

Pro tip: In 2026, NO services on the North Rim — bring all water (minimum 2 liters per person for the round-trip drive and photography session), food, and a full fuel tank from Jacob Lake (84 miles from the cape). Cape Royal is a 23-mile drive from where the main North Rim paved road begins — plan on a full half-day commitment. For Milky Way: the North Rim has Bortle Class 1-2 skies (some of the darkest accessible locations in the lower 48); arrive 2 hours before midnight in June-August for galactic core positioning. Bright Angel Point was partially compromised for Milky Way by South Rim light pollution even before the fire — Cape Royal’s greater distance from the South Rim village makes it the superior choice.

Common mistake to avoid: Visiting only at sunrise or only at sunset — Cape Royal is one of the rare viewpoints where you gain completely different images at all three lighting windows. In 2026, not preparing for the completely self-service environment (no water, no ranger assistance, limited emergency response).

When to photograph Grand Canyon: a year-round breakdown

Grand Canyon is photogenic every month of the year — but the conditions differ radically by season. Here is what to expect and what to shoot:

Spring (March–May)

Most reliable photography weather — clear air, moderate temperatures (40–70°F on rim), lingering snowpack on North Rim through April. South Rim fully operational. North Rim typically opens mid-May (check current year — 2026 phased reopening May 15). Spring wildflowers along rim trail (Cliffrose, Indian Paintbrush) by April.

Highlights: Best air quality and visibility of any season — 50+ mile views common. Pre-dawn rim temperatures cold enough to produce ground-level mist in the canyon interior on some mornings — rare but extraordinary photography opportunity. Hermit Road shuttle begins March 1.

Challenges: Spring winds can be severe (40+ mph gusts) — wide-angle shots with slow shutter may show camera shake even on tripod. Weight your tripod bag. April can produce winter storms with snow on the rim — check forecasts carefully.

Summer (June–August)

Hottest season with peak crowds (June–August highest visitor counts). Monsoon season begins mid-July through mid-September: afternoon thunderstorms, lightning, dramatic cloud formations. Rim temps 75–95°F, inner canyon 105–115°F.

Highlights: Monsoon photography: dramatic anvil clouds, lighting striking the canyon, double rainbows after storms — Gary Hart’s most celebrated canyon images were shot here during monsoon season. July–August has most frequent and intense storm activity. Milky Way visible Apr–Oct (peak Jun–Aug). Long daylight hours mean both 5:00 AM sunrise and 8:00 PM sunset are achievable in same day.

Challenges: Extreme crowds at all South Rim viewpoints June–August (Hopi Point regularly draws 200–300 at sunset). Heat (bring 3+ liters water even for rim-only photography). Storms develop suddenly — build time for shelter. Hermit Road packed shuttles.

Fall (September–November)

Best overall photography season — monsoon rains end by mid-September leaving extraordinarily clear, clean air. Crowds thin after Labor Day. Cottonwood trees along Colorado River and Bright Angel Creek turn gold in late October (visible from rim viewpoints with telephoto). North Rim closes seasonally (typically mid-October; in 2026 check specific closure dates due to fire recovery).

Highlights: Post-monsoon air clarity is the highest of any season — visibility exceeds 100 miles on clear days. Canyon walls are richest in color under lower-angle autumn sun. October foliage from rim: cottonwood and aspen golds visible at Phantom Ranch and Bright Angel Creek area through telephoto from Bright Angel area overlooks. Fewer crowds, easier shuttle access.

Challenges: North Rim closes mid-October (important if Cape Royal or Point Imperial are on your list). October still draws peak crowds on weekends. First frosts hit the rim in late October — ice on trails pre-dawn.

Winter (December–February)

Snow on South Rim multiple times per season (average 58 inches annually), creating extraordinary red-rock + white-snow contrast. North Rim CLOSED (typical seasonal closure; Dragon Bravo Fire has complicated 2026 North Rim access — check nps.gov/grca for current status). Hermit Road opens to private vehicles (no shuttle restriction Dec 1 – Feb 28). Visitor numbers lowest of any season.

Highlights: Snow photography: red Kaibab Limestone dusted with white snow is among the most dramatic canyon images possible — rare enough to be genuinely distinctive in any portfolio. Near-empty viewpoints — Mather Point alone on a December sunrise. Crisp, cold air provides excellent visibility. Cloud inversions (fog filling the canyon below while rim remains clear) occur a few times per winter — spectacular phenomenon only winter visitors witness.

Challenges: Dangerous ice on all rim trails pre-dawn — microspikes mandatory for winter photography. Hermit Road viewpoints beyond Hopi Point may be icy or partially snow-covered. Inner canyon trails treacherous with ice — below-rim photography not recommended in winter without proper equipment. Shorter daylight hours (sunrise 7:30 AM, sunset 5:15 PM in December) compress the shooting day. Temperatures 10–35°F on rim nights — battery life reduced significantly (carry 3+ batteries per camera body).

How to get to Grand Canyon National Park

Grand Canyon sits in northwestern Arizona. The South Rim — where 11 of the 12 locations in this guide are located — is the year-round hub. The North Rim (Cape Royal, location 12) requires a separate 200-mile drive and is only accessible mid-May through mid-October.

Nearest airports

  • FLG — Flagstaff Pulliam Airport: 1.5 hours to South Rim entrance. Closest airport; limited major airline service (American Eagle). Most photographers arriving from FLG.
  • PHX — Phoenix Sky Harbor International Airport: 3.5–4 hours to South Rim. Largest nearby airport; full airline hub; I-17 north to AZ-64 north. Most international visitors route through PHX.
  • LAS — Harry Reid International Airport, Las Vegas: 4.5 hours to South Rim (shorter to North Rim: 3.5 hours via Highway 89A). Popular gateway for combination Las Vegas/Grand Canyon itineraries.
  • GCN — Grand Canyon National Park Airport, Tusayan: 5 minutes to South Entrance. Limited charter/tour flights; helicopter tour operations. Not a major hub.

South Entrance: South Entrance Station on AZ-64, 1 mile north of Tusayan. Open 24 hours/day, 7 days/week year-round. Credit/debit card only — no cash. Vehicle pass ($35) valid 7 days. East Entrance at Desert View also available for Desert View Drive access — check for winter hours. Free entrance days in 2026: check nps.gov/grca for specific dates.

North Rim (2026 status): 2026 status: North Rim reopened May 15, 2026 (phased access following Dragon Bravo Fire). Day use and limited backcountry only. NO potable water, fuel, lodging, or visitor services. North Rim Entrance Station on Highway 67, approximately 30 miles south of Jacob Lake Junction. Road typically open mid-May through mid-October (seasonal closure for snow; check nps.gov/grca for exact 2026 dates). Fill fuel tank at Jacob Lake — 84 miles from Cape Royal. Bring minimum 2 liters water per person.

Photographer lodging tip: For South Rim sunrise photography, staying inside the park (El Tovar, Bright Angel Lodge, Mather Campground) eliminates the parking scramble and allows pre-dawn walking access to Mather Point — a significant advantage over staying in Tusayan and driving in.

Photographer safety at Grand Canyon: read this

The Grand Canyon kills visitors every year. Falls, heat, and lightning are the primary causes. The same rim that makes your photographs extraordinary has no continuous railing, and the rocks are often loose and crumbly.

  • Elevation Awareness: South Rim averages 6,800–7,400 ft — altitude sickness is possible for visitors arriving from sea level, especially children and elderly. Symptoms include headache, dizziness, nausea. Drink 2–3 liters of water daily. Allow 24 hours to acclimate before strenuous activity. North Rim averages 8,200+ ft — more pronounced altitude effects.
  • Weather Warnings: Lightning storms July–September (monsoon season): storms build rapidly from the south by afternoon; if you hear thunder, descend from exposed rim viewpoints immediately. Lightning strikes kill multiple visitors per year at the canyon. Winter (Dec–Feb): black ice on paved rim trails, especially pre-dawn hours before the sun reaches the rim; microspikes recommended. Spring windgusts can exceed 40 mph on exposed viewpoints — secure your tripod and wide-angle shots may show motion blur from camera shake. Flash floods in canyon side drainages (June–September) — check NPS flash flood risk before below-rim hikes.
  • Wildlife: California Condors: documented nesting near Hopi Point; maintain 300-foot distance; use telephoto (400mm+) for photos. Elk: frequent rim area especially at dawn and dusk — heavy animals, stay back 100 feet. Rattlesnakes (Grand Canyon Pink Rattlesnake, endemic species): watch where you place hands and feet on rocky rim outcrops; most active April–October in warm hours. Kaibab squirrels (North Rim, endemic): do not feed; bites transmit disease. Mule deer, coyotes, ravens: common at all viewpoints.
  • Drone Policy: BANNED — Launching, landing, or operating any unmanned aircraft (drone) on any NPS land or water is prohibited under 36 CFR § 1.5. This applies to both recreational and commercial drone pilots. Grand Canyon has additional specific closures. Violators face fines up to $5,000. Special Use Permits (SUPs) are theoretically available from the park superintendent but are extremely rarely granted and require documented scientific or search-and-rescue justification. Source: https://www.ecfr.gov/current/title-36/chapter-I/part-1/section-1.5
  • Permits: Below-rim overnight camping: backcountry permit required; apply through NPS Backcountry Information Center at least 4 months in advance (permit lottery for popular dates). Phantom Ranch: separate mule trip or Phantom Ranch lodging reservation — book 13 months in advance. Day hikes below rim: no permit required but NPS strongly advises against hiking below the rim and back in one day (multiple deaths annually from heat exhaustion). Hermit Trail: no day-use permit; backcountry permit for overnight.
  • Edge Safety: CRITICAL — the Grand Canyon has no continuous railing. Multiple visitors die each year from falls at unfenced viewpoints, including at popular spots like Mather Point environs, Hopi Point, and viewpoints along Desert View Drive. NPS safety guidance: maintain at least 6 feet (2 meters) from the rim edge at all times. Never climb over or under barriers. Do not sit on the rim edge for photos. Rocks are often loose and crumbly. Most fatalities involve stepping back for a photo. Tripods increase risk — never lean over a tripod set near the edge. Wear shoes with grip, not sandals or flip-flops, on any rim trail.
  • Heat: Inner canyon hiking temperatures exceed 110°F (43°C) in summer. NPS advises against hiking below the rim during summer between 10 AM–4 PM. Heat kills more Grand Canyon visitors than any other cause. Rim temperatures in summer reach 85–95°F but inner canyon is 20–30° hotter. Carry electrolyte supplements for any below-rim hiking.

The complete safety briefing — lightning protocols, heat illness signs, altitude sickness recovery, edge-safety rules, and wildlife protocols — is inside the Grand Canyon Photographer’s Guide PDF.

Edit smarter: AI tools for landscape photography

Luminar Neo’s Sky AI, atmosphere AI and SuperSharp are designed for landscape work — replace flat skies, add depth, and recover detail in seconds. Tagged as affiliate per FTC.

Related guides nearby

Three more photography guides within striking distance — perfect for combining into one trip.

  • Zion 159 km away · national park · USA
  • Bryce Canyon 171 km away · national park · USA
  • Las Vegas 277 km away · city · USA

Browse all 78 guides → · Open the map

Also on Amazon: gear that helps with this technique

Quick Amazon shortcuts to the gear most useful for this kind of shot. Use them if Prime shipping or Amazon credit makes more sense than B&H. As an Amazon Associate ShutYourAperture earns from qualifying purchases.

Frequently asked questions

What is the best time of year for Grand Canyon photography?

Fall (September–November) is the consensus best season — post-monsoon air is the clearest of any season, crowds thin after Labor Day, lower-angle autumn sun creates richer canyon color, and October cottonwood foliage turns gold along the Colorado River (visible by telephoto from rim). Spring (March–May) is nearly as good with comparable visibility and occasional snow on the rim for red-rock/snow contrast. Summer brings dramatic monsoon storm photography in July–August but with peak crowds and extreme heat. Winter offers empty viewpoints and snow photography but with ice hazards and shorter days.

Can I fly a drone at Grand Canyon?

No — drones are completely banned from all National Park Service lands under 36 CFR § 1.5, which prohibits launching, landing, or operating any unmanned aircraft on NPS land and waters. This applies to both recreational and commercial operators with no distinction. Violators face fines up to $5,000. Special Use Permits are theoretically available from the park superintendent but are extremely rarely granted (limited to search/rescue, fire response, and research). Helicopter tours from Grand Canyon Airport in Tusayan (5 minutes south of the entrance) are the legal aerial photography alternative.

What lens should I prioritize for Grand Canyon photography?

Bring three focal lengths if possible: (1) Ultra-wide 14-24mm f/2.8 for grand canyon sweeps, cloud formations, and Milky Way; (2) Standard zoom 24-70mm f/2.8 as the workhorse for viewpoints, golden hour shooting, and versatile compositions; (3) Telephoto 100-400mm for compressing distant buttes, photographing California condors, isolating the Colorado River, and shooting Vishnu Temple from Yaki Point. Expert photographer Gary Hart warns that ’20-200mm is insufficient — prefer 200-400mm for isolating features.’ The telephoto is the most underused and highest-reward lens at the canyon.

Is sunrise or sunset better at the Grand Canyon?

Depends on the viewpoint — the South Rim faces north. For sunrise: Mather Point, Yaki Point, and Grandview Point (east-facing views) are the best. For sunset: Hopi Point, Pima Point, Powell Point, and Hermit’s Rest (west-facing views) are premier. Multiple expert photographers independently rate Grand Canyon sunrise as slightly superior to sunset because (a) the eastern North Rim walls light up with direct first-light warmth while the photographer stands in cool shadow — more dramatic contrast; (b) crowds are smaller at sunrise by 50% or more. Best single strategy: sunset on Day 1 at Hopi Point (orienting yourself), sunrise on Day 2 at Yaki Point or Grandview (for serious photography with fewer people).

How do I avoid crowds at Grand Canyon photography viewpoints?

Five proven strategies: (1) Shoot sunrise instead of sunset — viewpoints are 50-80% less crowded. (2) Use Desert View Drive (eastern South Rim) — Lipan Point, Moran Point, and Grandview Point each have a fraction of the Hopi/Mather crowd. (3) Walk 200-300 meters along the unfenced Rim Trail from any major viewpoint — the crowds are concentrated at the railed platform; 200 steps away you’re often alone. (4) On Hermit Road, ride the shuttle past Hopi Point to Pima Point or Hermit’s Rest — 60-70% fewer people for equivalent light. (5) Visit in fall (September–November) or winter (December–February) — the dramatic light is identical but crowds at summer peak simply don’t exist.

Take this guide into the canyon

This post is the complete field reference. The Grand Canyon Ultimate Photographer’s Guide PDF is the field-deployable version: full-page resolution hero photography, GPS maps with gold pins for every location, multi-season shooting calendars, gear matrices per location, monsoon lightning + Milky Way tactics, sun-angle diagrams, the full safety briefing, and a print-ready editorial layout in Framehaus black and gold. Save it offline. Print it. Take it into the canyon.

Grand Canyon Ultimate Photographer’s Guide
Downloadable PDF · 12 GPS-mapped locations · Monsoon lightning + Milky Way tactics · Sun direction diagrams · Multi-season calendar · Safety briefing · Packing checklist

Get the Grand Canyon guide — $47   Or get the National Parks Bundle — $197

Combo Deal

Get the Grand Canyon National Park Guide + Preset Pack

Photograph it. Edit it. Done.

$66
$54
Save $12
PDF Guide Every spot, GPS, golden hour
Preset Pack 20 Lightroom presets
Book your tours & experiences in Grand Canyon National Park

All links go to Viator (a TripAdvisor company), the world’s largest marketplace for guided experiences. Tagged as affiliate per FTC.

Take Grand Canyon National Park home in your pocket.

Every shot location, every angle, every time of day worth shooting. Printable PDF + GPS-tagged map.

Instant download. Works on phone, tablet, and printed.

Continue reading

More park photography guides

← Back to National Parks Photography Guides

Save your trip-planning hours

The complete Grand Canyon guide is $47

All vantage points above + 5 bonus secret spots, printable map, gear pack list, and editing recipes. One-time payment, instant download, lifetime updates.

Buy Grand Canyon PDF →

Common questions about the Grand Canyon guide

Is the Grand Canyon photography guide worth $47?

For most photographers, yes. The guide saves 8-12 hours of trip-planning research and prevents the most common mistake of Grand Canyon photography: shooting at the wrong time of day. If a single better frame is worth $47 to you, the guide pays for itself on day one. Buyers get every GPS coordinate, every golden-hour window, every cultural rule, and a printable shot list.

Does the Grand Canyon guide include GPS coordinates?

Yes — every vantage point in the guide has Google Maps-ready GPS coordinates so you can pin them before you fly. The guide also includes a printable map showing all locations clustered by walking distance, so you can build efficient half-day routes.

What's in the Grand Canyon PDF that isn't in this article?

The article shows the highlights. The PDF includes: 5 additional secret spots not published online, a 14-day itinerary with daily routes, the full camera-settings cheat sheet for every scenario in Grand Canyon, a printable gear packing list, post-processing recipes with screenshot examples, and a list of local guides we trust for portrait commissions.

Do I get the Lightroom presets too?

The $47 guide is the PDF only. The matching Grand Canyon preset pack is a separate $19 download — most buyers grab both as a bundle and save the editing time. Both are instant download, both work on Lightroom Classic and Lightroom Mobile.

Will the guide work for a Grand Canyon trip in 2026?

Yes. The guide is updated annually as fees, restrictions, and new vantage points change. All buyers get free lifetime updates. The 2026 edition includes the latest drone rules, museum photography policies, and seasonal light data for the year.

Get the Grand Canyon guide · $47