Let’s be real for a second: AI photo editing is like a shiny new sports car. It’s fast, it’s powerful, and it makes you feel like a total pro until you accidentally drive it into a ditch.
In the last couple of years, the world of photography has flipped upside down. We’ve gone from spending three hours meticulously masking a tree branch to clicking a single button and watching the AI do it in three seconds. But here’s the kicker, just because the tool is "smart" doesn't mean it’s perfect. In fact, relying too heavily on AI without a critical eye is the quickest way to make your photos look like a cheap video game from 2012.
At Shut Your Aperture, we’re all for innovation. We love a good shortcut as much as the next guy. But we also care about the craft. Whether you’re using Photoshop’s Generative Fill, Luminar, or any of the dozens of new AI-powered plugins, there are some glaring mistakes that almost every photographer is making right now.
If you want your work to stand out in a world flooded with AI-generated content, you need to know how to use these tools with finesse. Here are the 7 biggest AI photo editing mistakes and, more importantly, how to fix them before your next export.
1. The "One-Click Wonder" Trap
We’ve all seen the ads. "Edit your entire wedding gallery in five minutes!" It sounds like a dream, especially if you’ve got a backlog of 2,000 RAW files staring you in the face. The problem is that AI presets and "auto-enhance" buttons are trained on averages. They look at your photo and say, "Okay, this is a landscape, so let’s crank the blues and greens."
The result? A photo that looks exactly like everyone else’s. When you rely solely on one-click AI adjustments, you lose your unique artistic voice. Your images start to lose the "soul" that comes from intentional editing.
How to fix it:
Treat the AI as a starting point, not the finish line. Use tools like Luminar’s AI Enhancer to get the heavy lifting done, but then jump into the manual sliders. Adjust the exposure, fine-tune the white balance, and add your own color grade. Remember, the AI doesn't know the vibe you were going for; it only knows the pixels. If you’re just starting out, check out our guide on how to use manual mode to understand the fundamentals before letting the software take over.
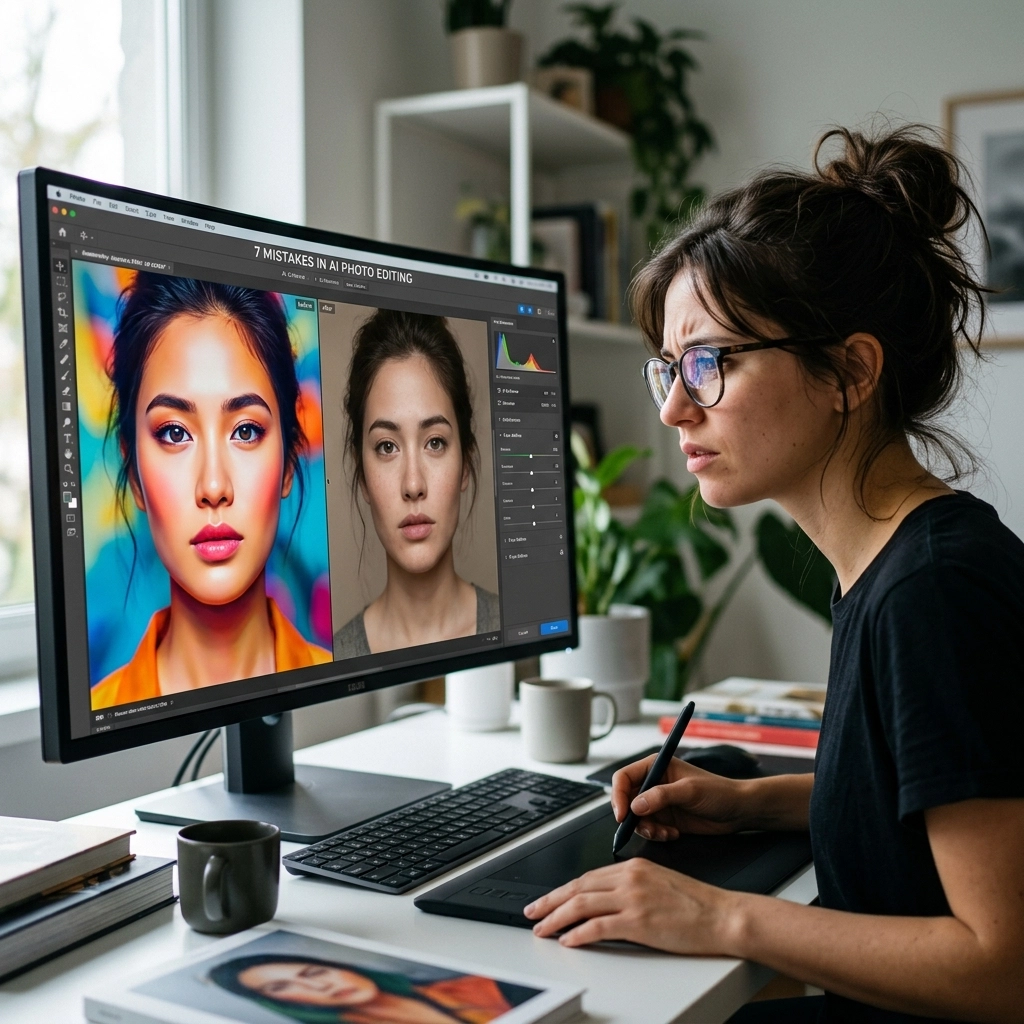
2. Skin Retouching That Looks Like Plastic
This is probably the most common mistake in portrait photography. AI skin smoothing is incredible, it can remove blemishes and even out skin tones in a heartbeat. But if you push that slider to 100%, your subject ends up looking like a wax figure at Madame Tussauds.
Human beings have texture. We have pores, fine lines, and character. When AI wipes all of that away, it triggers the "uncanny valley" response in viewers. It looks almost right, but just wrong enough to be creepy.
 Save
Save
How to fix it:
The secret is in the "Amount" or "Opacity" slider. If the AI suggests a setting of 70, try dropping it to 35 or 40. You want to clean up the distractions, not rewrite the person's DNA. A good rule of thumb: if you can’t see any skin texture when you zoom in to 100%, you’ve gone too far. For more professional tips on making people look their best without losing their humanity, take a look at our ultimate guide to portrait techniques.
3. Ignoring Lighting Mismatches in Generative Fill
Photoshop’s Generative Fill is basically magic. Want a mountain in the background of your beach shot? Done. Want to turn a casual shirt into a tuxedo? No problem. But AI often struggles with the physics of light.
It might generate a beautiful mountain range, but if the sun in your original photo is coming from the left and the AI-generated mountains have shadows falling to the left, the whole image will feel "off" to the viewer, even if they can't pinpoint why.
How to fix it:
Always analyze the light source in your original image before using generative tools. If the AI gets it wrong, you’ll need to do some manual dodge and burn to match the light direction. Look at the highlights and shadows on your subject and make sure your new background follows the same rules. If you're struggling with how light works, Shut Your Aperture has some great resources on natural lighting.
4. The "Nuclear" Saturation and Contrast
AI-powered "Sky Replacement" and "Atmosphere" tools are a blast to play with. You can take a gray, boring sky and turn it into a fiery sunset with two clicks. The mistake here is that the AI often boosts the saturation and contrast to "match" the new sky, resulting in a photo that looks like it was taken on another planet.
We call this the "Nuclear Look." It’s when the colors are so vibrant they practically vibrate on the screen. It’s a dead giveaway that the image has been heavily manipulated.
How to fix it:
When replacing a sky or adding atmospheric effects in a program like Luminar, pay close attention to the "Relight" settings. Make sure the foreground colors match the sky naturally. If you have a warm sunset sky, your foreground shouldn't have cool, blue shadows. Use the "Saturation" and "Vibrance" sliders with extreme restraint. Sometimes, less is significantly more.
 Save
Save
5. Artifacts and "Ghosting" in Complex Selections
AI masking has gotten scary good. It can find a person, a sky, or a subject in a split second. However, it still struggles with complex edges, think frizzy hair, tree leaves, or glass. If you apply a heavy adjustment (like darkening a background) using an AI mask that isn't perfect, you’ll end up with a "halo" or "ghosting" effect around your subject.
This is a hallmark of amateur AI editing. It makes the subject look like they’ve been cut out of a magazine and pasted onto a different background.
How to fix it:
Never trust an AI mask blindly. Always use the "Refine Edge" tool or a manual brush to fix the areas where the AI missed the mark. Zoom in on the hair and the edges of clothing. If you see a weird glow or a jagged line, take thirty seconds to mask it out manually. It’s a small step that makes a massive difference in the professional quality of your work. For those looking to see how the pros handle complex scenes, checking out Peter Lik’s landscape techniques can provide some serious inspiration.
6. Over-Sharpening and AI Upscaling Errors
AI upscaling (taking a small image and making it large) and AI sharpening are life-savers when you’ve missed focus slightly or need to print a crop. But these tools work by "guessing" what the detail should look like. If you push them too hard, the AI starts to invent detail that wasn't there.
This usually manifests as "wormy" artifacts or weird geometric patterns in out-of-focus areas. It looks crunchy, digital, and distracting.
How to fix it:
Only use AI sharpening as a last resort, and always apply it locally rather than to the whole image. You want the eyes of your subject to be sharp, but you don't need the blurry background bokeh to be "sharpened" into digital noise. If you're looking for gear that helps you get it right in-camera so you don't have to rely on these fixes, read our guide on choosing the best mirrorless camera in 2026.
7. Losing the Narrative (The Prompter vs. The Photographer)
With the rise of generative AI, it’s easy to stop being a photographer and start being a "prompter." You start asking the AI to "add a bird here" or "make this more cinematic." While these features are fun, they can quickly lead to a loss of composition and story.
A great photograph earns its place in a body of work through what was actually there. When you start adding elements that weren't part of the original scene just because you can, you risk making your work feel hollow.
 Save
Save
How to fix it:
Ask yourself: "Does this addition actually improve the story I'm trying to tell?" If you’re editing a street photography shot, adding a fake rain effect might look cool, but does it stay true to the moment you captured? Before you reach for the AI "add" button, try experimenting with creative street photography ideas that rely on your eye rather than an algorithm.
Staying Ahead of the Curve
AI isn't going anywhere. In fact, it's only getting better. We’ve seen major camera releases and software updates recently that integrate AI directly into the hardware. The goal isn't to fight the tech, it's to master it.
To stay updated on how the industry is shifting, you can always check out more insights at blog.edinchavez.com or dive into professional workflows at proshoot.io.
The Golden Rule of AI Editing
If there’s one thing you take away from this, let it be the Golden Rule of AI: It should be invisible.
The best AI edit is the one where the viewer has no idea AI was involved. They should just think, "Wow, that’s a beautiful photo." If the first thing they notice is how smooth the skin is or how perfect the sky looks, you’ve failed.
Use the technology to remove distractions, save time on tedious tasks, and enhance the beauty that’s already there. But don't let it replace your vision. You’re the artist; the AI is just the brush.
 Save
Save
Quick Checklist for Your Next Edit:
- Check the Edges: Is there a halo around my subject?
- Check the Texture: Can I still see skin pores and fabric weave?
- Check the Light: Does the light on the subject match the background?
- Check the Intensity: Did I drop the AI slider to a natural level (usually under 50%)?
- Check the Intent: Am I editing this to make it better, or just to make it "AI-ish"?
By avoiding these seven common mistakes, you’ll produce work that looks professional, polished, and: most importantly: human.
If you’re hungry for more tips, we’ve got plenty of photography tutorials to help you level up your game. And remember, the best way to get a great photo is still to get it right in the camera first. Go out, shoot something awesome, and use these tools to make it shine.
For more deep dives into the world of photography and high-end imagery, don't miss our exploration of ethereal real estate listings or the role of luminosity in professional photography. Keeping your skills sharp is the only way to ensure that while the tools change, your quality remains timeless.
Stay creative, keep shooting, and don't let the robots have all the fun. Keep an eye on our daily news updates to see what's coming next in the world of AI and imaging. We're just getting started!
Skylum’s Luminar Neo runs as a Lightroom plugin and adds AI-powered sky replacement, portrait retouching and noise reduction to your existing workflow. Tagged as affiliate per FTC.


