Charleston rewards patience. The light slides slow across pastel stucco at sunrise, the marshes catch a copper sheen by 7 PM, and the harbor breeze cools your battery grip just enough to let you shoot well past blue hour. Most photographers blow into the city for a weekend, knock out Rainbow Row before lunch, and miss the parts of Charleston that actually make portfolios. This guide walks the spots in the order I’d shoot them on a focused 48-hour run, with the gear notes and gotchas that matter when you’re standing there at 6 AM with one battery and a forecast turning humid.
The shortlist below covers the city itself plus two short drives that deliver coastal landscape work most travel photographers ignore. Each spot includes a working composition idea, lens range, and the time of day that consistently delivers. None of it is theoretical. I’ve shot Charleston in three different seasons and the spots that earn return trips are the ones that change with light, weather, and tide.
 Save
SaveRainbow Row at sunrise
Rainbow Row, the stretch of thirteen pastel Georgian houses along East Bay Street, is the photograph everyone takes home from Charleston. The problem is that everyone takes it between 10 AM and noon, in flat light, with delivery trucks blocking the frame. Show up at first light, around 6:15 AM in summer or 7:00 AM in winter, and you’ll have the entire block to yourself for roughly forty-five minutes. The east-facing facades catch a warm side-light that makes the pinks and yellows glow without looking saturated.
Shoot from across the street using a 35mm or 50mm focal length to compress the row slightly. A 24mm makes the buildings look like they’re falling backward unless you correct in post. If you want the textbook compressed look — five houses stacked tight, color blocks reading like a stripe — set up at the south end near Tradd Street with a 70-200mm pulled back to about 100mm. Stop down to f/8 for edge-to-edge sharpness across the row.
This is also a smart place to practice aperture control for architectural sharpness: keep your aperture at f/8 to f/11 for the row itself, then open to f/2.8 if you want to isolate a single doorway or window detail with the others softening behind. The cobblestones add foreground texture if you crouch low.
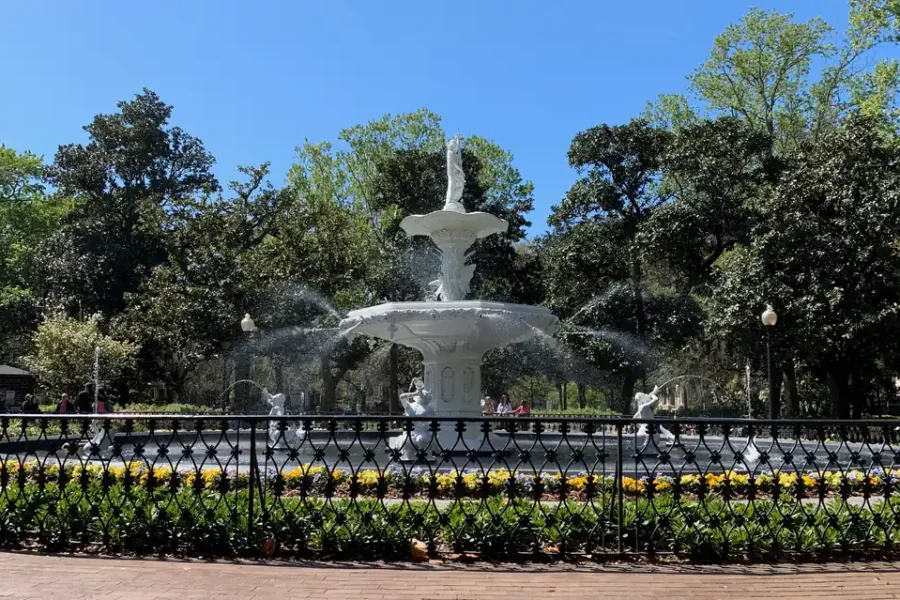
Waterfront Park and the Pineapple Fountain
 Save
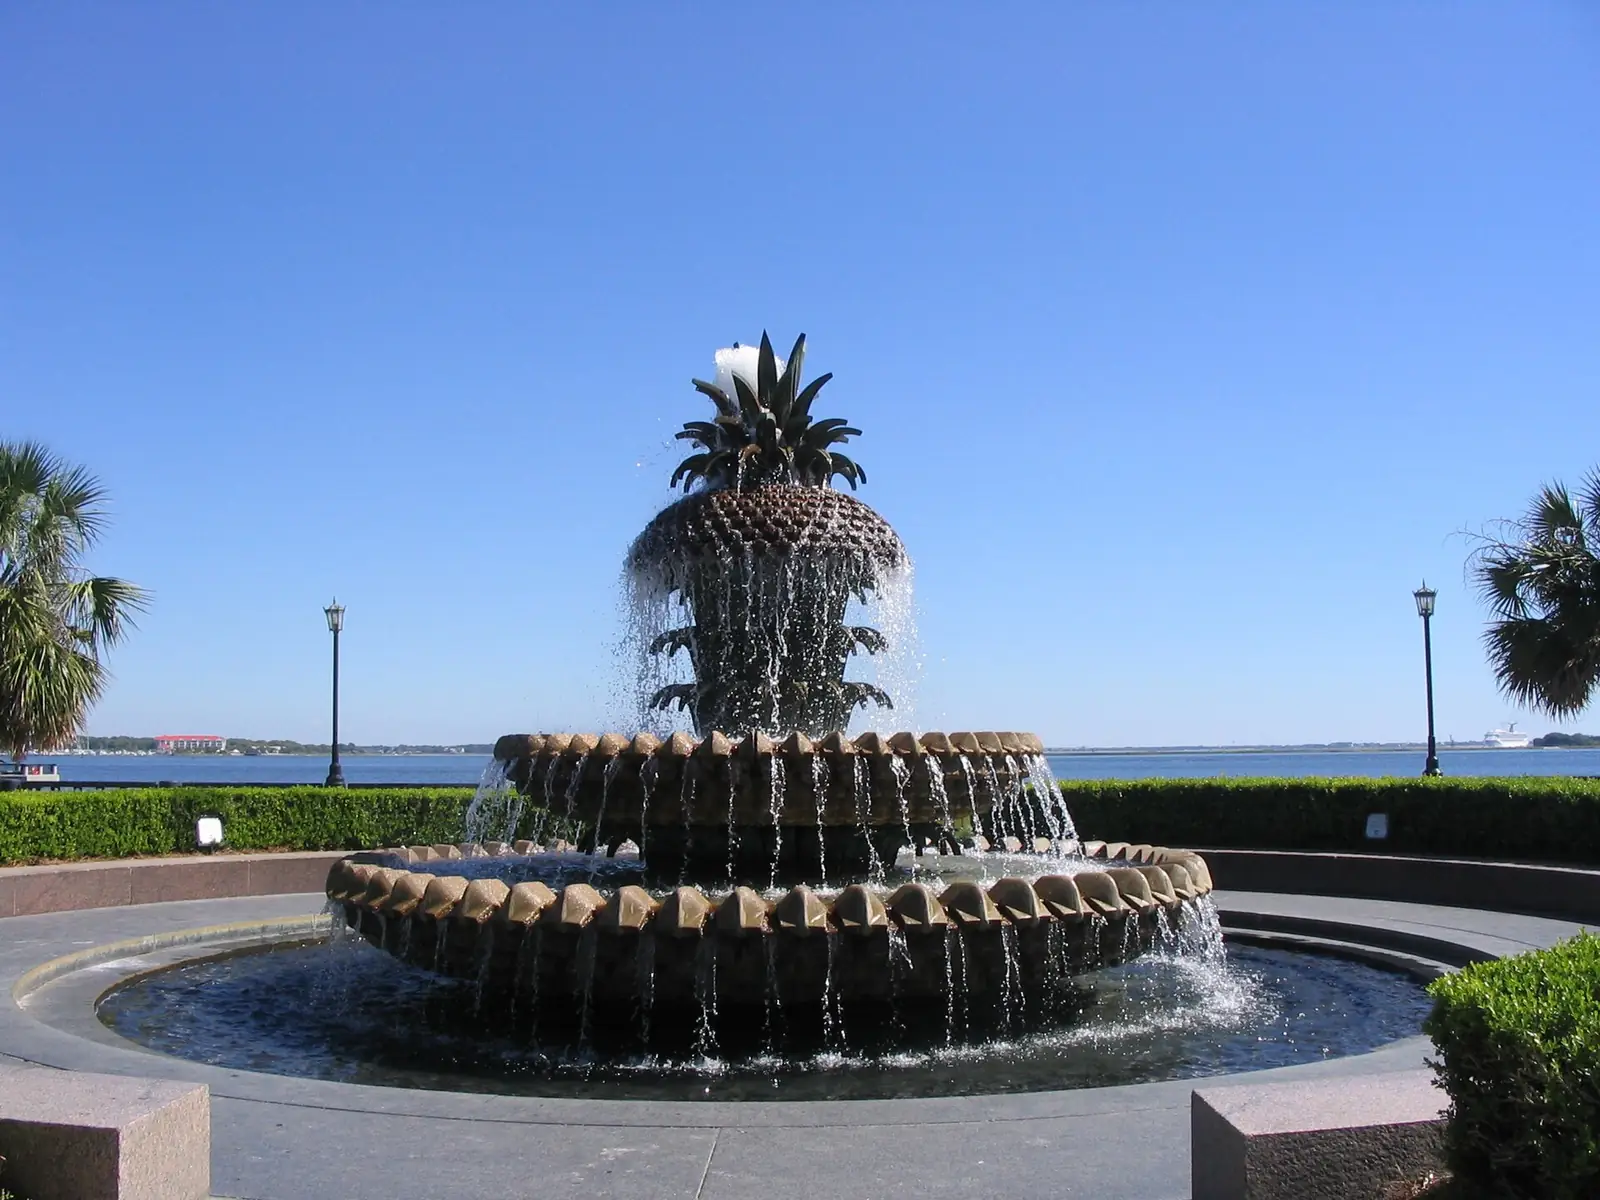
SaveThe Pineapple Fountain sits a five-minute walk south of Rainbow Row, and it’s the strongest symmetrical subject in the city. Shoot it at the same morning visit if you’re efficient. The fountain itself is two-tiered, the path leading to it lines up dead-center with the Cooper River behind, and the matching pier on the right side gives you a leading line into the frame. A 24mm at f/11 gives you everything sharp from the fountain edge to the horizon.
The trick most people miss: the fountain runs in cycles. Water sometimes turns off entirely for maintenance and you’ll get a flat pineapple shape with no movement. Check the city’s parks schedule or just allow yourself fifteen minutes of waiting. When the water is flowing, drop your shutter to 1/30 second on a tripod to keep the cascade silky without going full long exposure. Shutter speed choices for moving water deserve some attention here — 1/30 is the sweet spot for visible texture without total smear.
Side composition: walk to the long wooden pier extending into the harbor. From the pier looking back, the city skyline plus Cooper River Bridge frame the fountain in distance. This works best at golden hour with a 50mm or 70mm.
Battery Park and White Point Garden
The southern tip of the peninsula is where Charleston puts its grandest antebellum mansions and a row of Civil War cannons facing the harbor. Battery Park itself wraps around the seawall, and the elevated promenade gives you a clean horizon over Fort Sumter. Shoot here in mid-afternoon when the light hits the mansions on East Battery from the front, then move to White Point Garden for golden hour under the live oaks. The Spanish moss hanging from the oaks creates natural framing for any wide composition.
Bring a polarizer. The harbor light off the water is intense, and a circular polarizer cuts the glare while pulling color out of the sky. For the mansion row along East Battery, a 35mm or 50mm captures three houses without distortion. If you want a single house with portico detail, 85mm at f/4 isolates well.
Sunset here is reliable. The sun drops behind the West Ashley side of the harbor, lighting the mansions in warm side-light for the last twenty minutes before it disappears. Walk the seawall during this window with a 24-70mm and you’ll burn through a card.
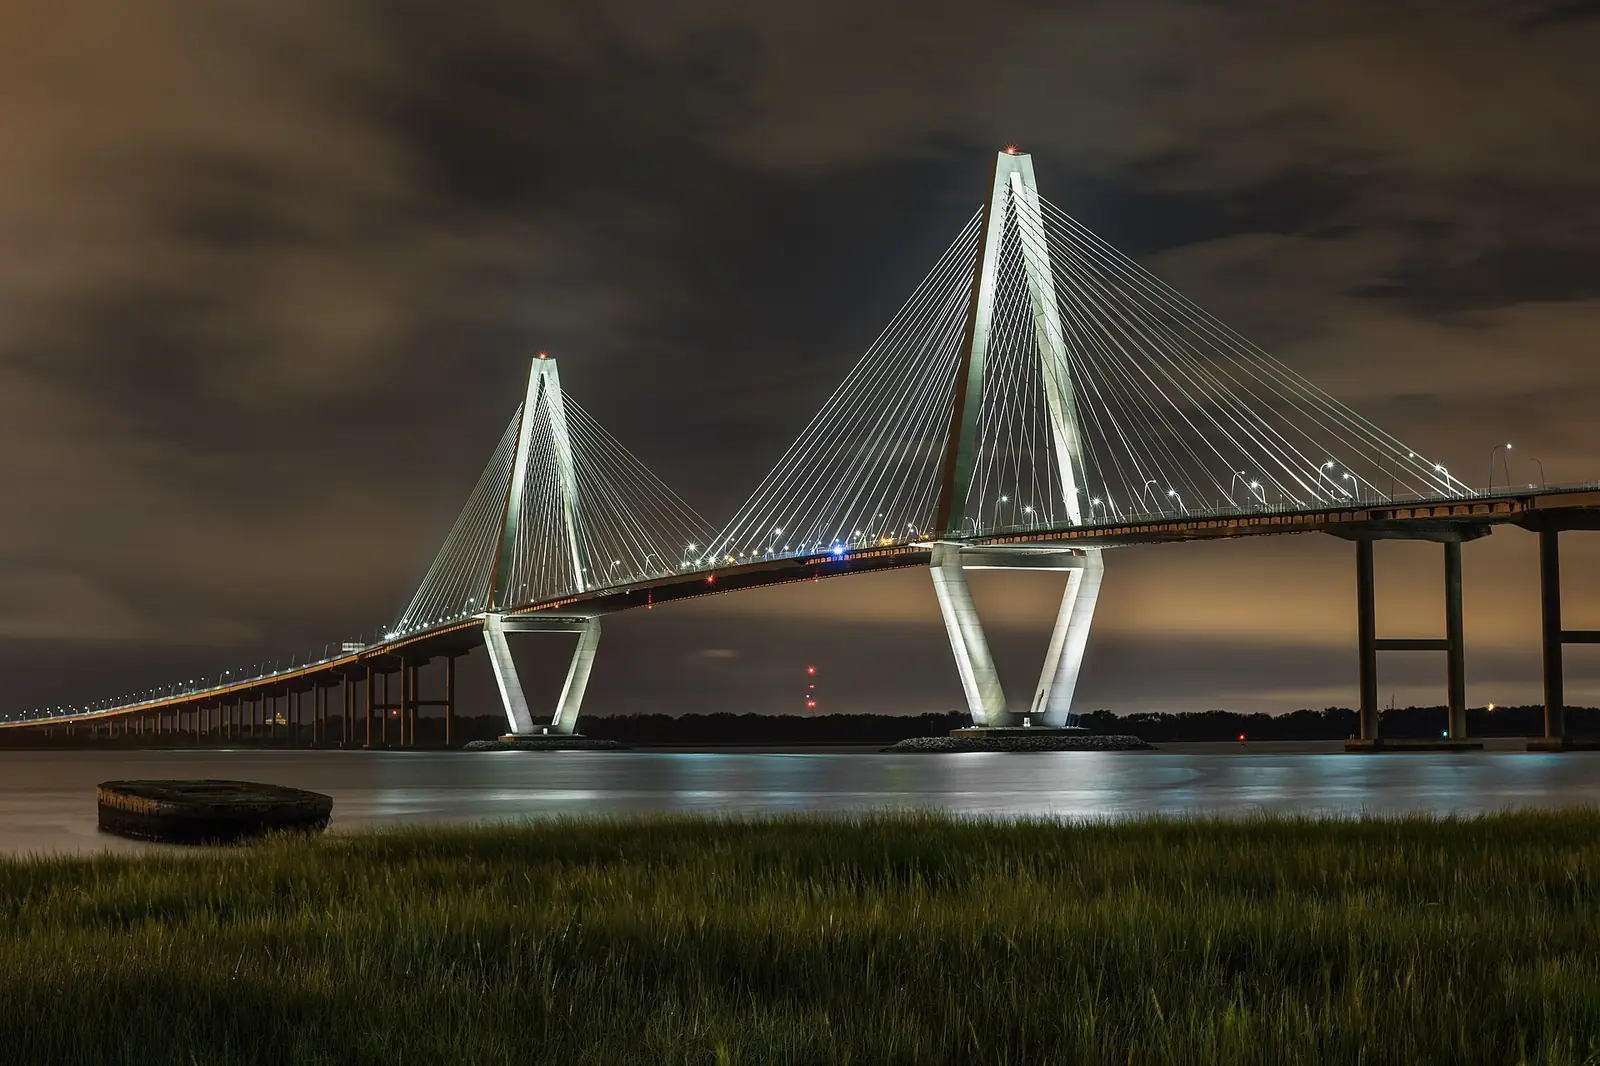
Arthur Ravenel Jr. Bridge at blue hour
 Save
SaveThe Ravenel Bridge is Charleston’s modern icon, a cable-stayed span connecting the peninsula to Mount Pleasant. The classic shot is from across the harbor in Mount Pleasant, at Memorial Waterfront Park, looking back at the bridge during blue hour. Drive over twenty minutes before sunset, set up on the pier extending from the park, and wait for the city lights to balance with the residual sky glow. That balance window lasts roughly twelve minutes.
This is a tripod shot. A solid travel-photography tripod that locks down quickly matters because the boardwalk vibrates when other people walk past. Set ISO to 100, aperture to f/11, and let the shutter run between 15 and 30 seconds depending on how dark the sky has dropped. The cables on the bridge will read sharp, the water will smooth out, and the city lights will pinpoint without bleeding.
A second composition: walk the bridge itself (the south side has a pedestrian path) and shoot the cables in symmetrical perspective looking up. Best done late afternoon, not blue hour, because the path lighting at night is harsh sodium-vapor that ruins white balance.
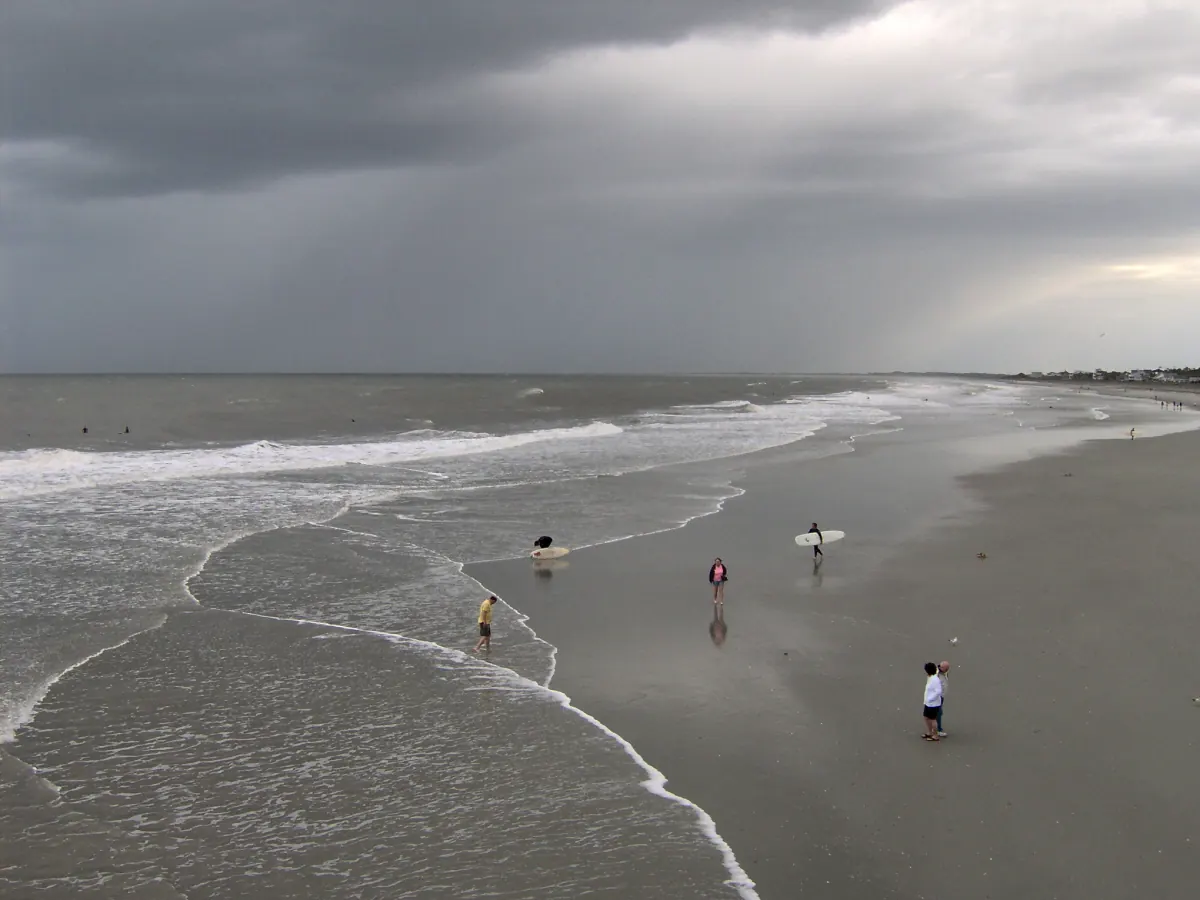
Folly Beach Pier and the morning drive
 Save
SaveFolly Beach is thirty minutes south of downtown by car. The pier juts roughly a thousand feet into the Atlantic and is the closest reliable beach landscape spot to the city. Shoot at sunrise — actual sunrise, meaning you leave the hotel at 5:15 AM in summer. The east-facing shoreline catches the first warm light directly on the pier pilings, and the wave action is usually calmer in the morning than the afternoon.
Two compositions work consistently. First, the long-exposure pier shot: tripod planted in wet sand, 24mm wide, 30-second exposure with a 10-stop ND filter, capturing the silky ocean and pier extending into the frame. Second, walk to the south side of the pier and frame it from underneath with the pilings creating a tunnel — 35mm at f/8, no filter needed.
Bring something to clean salt spray off your front element. A microfiber and a small spray bottle of distilled water live in my bag for any coastal shoot. Sand gets into gear easily here, so keep your bag closed when not actively shooting and don’t change lenses on the beach if you can avoid it.
Boone Hall Plantation oak avenue
Boone Hall sits twenty minutes north of downtown in Mount Pleasant. The avenue of oaks — a 3/4-mile drive lined with 200-year-old live oaks dripping Spanish moss — is the most cinematic single composition near Charleston. The plantation charges an admission fee (around $30 in 2026) and opens at 9 AM, which means you’ll be shooting in harsh mid-morning light unless you ask the staff about photographer access or visit on an overcast day.
Overcast is actually ideal here. The avenue’s natural canopy creates a dim tunnel even on bright days, and full sun produces blown highlights on the oak leaves with deep shadow on the road. A soft cloudy day gives you even light end to end. Shoot at 35mm to 50mm, dead-center down the avenue, and use a tripod because the canopy is dim. ISO 400, f/5.6, 1/60 second is a reasonable starting exposure on an overcast morning. Try this with the lessons in our ISO photography guide when the light gets really low under the canopy.
Magnolia Plantation gardens at golden hour
Magnolia Plantation is a separate property a few miles further out on Ashley River Road. Skip the house tour and head straight to the gardens. The romantic-style landscape — winding paths, white footbridges, reflecting pools — is what brings landscape and wedding photographers back to this property. The white footbridge over the cypress pond is the signature composition, and it’s strongest in the last hour of daylight when the warm sun rakes across the bridge and the water reflects the cypress canopy in deep green.
Use a 24-70mm here. The bridge frame works at 35mm with the pond filling the foreground. For close detail of cypress roots, swap to a 24mm low to the water. A polarizer cuts surface reflection on the pond if you want to see down into the water, or leave it off to keep the mirror reflection.
Cypress Gardens swamp at first light
Cypress Gardens is the deepest pull on this list — forty minutes northwest of downtown in Moncks Corner. The black-water swamp with red-stained reflection is unlike anything else on the East Coast, and during winter and early spring the cypress knees and Spanish moss combine into atmospheric compositions that look like they belong in a fairy tale. The garden opens at 9 AM and you’ll want to be among the first vehicles in.
The boat rental — flat-bottom skiffs you paddle yourself — is the unique angle. Shooting from water level with a 35mm and your tripod balanced across the boat seat gives a perspective most photographers never get. Stick to faster shutter speeds because the boat will drift. 1/250 second at f/8, ISO 400 is a safe starting point. If you want still water for reflections, time your trip for a windless dawn in February or November.
What to pack for Charleston photography
Charleston runs hot and humid most of the year. Salt air, sand, and condensation on cold lenses moving into warm rooms all eat gear if you ignore them. Here’s the kit that handles a 48-hour run cleanly.
- Wide-to-mid zoom (24-70mm equivalent): the workhorse for street, architecture, and harbor work. Browse 24-70mm f/2.8 options at B&H or on Amazon.
- Telephoto zoom (70-200mm): for compressed Rainbow Row, mansion details, and pier compositions from a distance. See 70-200mm options at B&H.
- Sturdy travel tripod: mandatory for blue hour, long exposure, and dim plantation interiors. Carbon-fiber travel tripods at B&H handle the salt air better than aluminum.
- Circular polarizer + 10-stop ND filter: the polarizer kills harbor glare and the ND gets you 30-second exposures at Folly Beach without dropping ISO into noise. Find 10-stop ND filters on Amazon.
- Extra batteries and SD cards: heat and humidity drain batteries faster than you’d expect. Stock up via SD cards on Amazon.
- Lens cleaning kit: microfiber, lens-cleaning solution, blower brush. Sand and salt don’t care about your warranty.
If you want a guided experience to round out the trip — Lowcountry sunset cruises, kayak tours through the marshes, or guided walks through the historic district — Viator’s Charleston tours include several photographer-friendly options. Sunset harbor cruises in particular get you angles on the Ravenel Bridge that aren’t reachable from shore.
Suggested two-day shot list
Day one: 6 AM Rainbow Row, then walk to Waterfront Park and the Pineapple Fountain. Coffee break, then drive to Folly Beach for late-morning pier work or save it for the next sunrise. Afternoon, Battery Park and White Point Garden in soft light. Sunset, sea wall along East Battery, then walk to the Ravenel Bridge crossing at Memorial Waterfront Park in Mount Pleasant for blue hour.
Day two: 6 AM Folly Beach Pier. Late morning, Boone Hall Plantation if the sky is overcast. Afternoon, Magnolia Plantation gardens. Sunset, return to downtown for any spot you missed or shoot the alleys off Tradd Street, which catch warm last light beautifully.
Charleston is one of those cities where the light does most of the work if you show up at the right hours. The mistake is treating it like a 10 AM to 4 PM tourist itinerary. Lock in your sunrise and golden hour windows, plan your transitions, and the city delivers more keepers per hour than almost anywhere on the East Coast.