Best Photography Spots in Washington, D.C.: 12 Locations With GPS

Tours & experiences disclosure: This guide includes affiliate links to Viator, the world’s largest tour and experiences marketplace. If you book through these links, ShutYourAperture may earn a small commission at no extra cost to you.

Washington, D.C. photography guide hero imageSave

Amazon Associates disclosure: ShutYourAperture is a participant in the Amazon Services LLC Associates Program. As an Amazon Associate we earn from qualifying purchases. Some links below go to Amazon (Store ID edinchavez01-20). Buying through these links costs you nothing extra and helps fund our free guides.
Skip the planning. Get the Washington, D.C. PDF. All locations, GPS coordinates, golden-hour times, gear tips. Instant download.

Washington, D.C., District of Columbia is one of the most photogenic cities in the United States. If you have a camera and the patience to show up before dawn, Washington, D.C. will give you images that last a career — but only if you know where and when to point it.

This is the definitive field guide to the 12 best photography spots in Washington, D.C., with GPS coordinates you can drop straight into Google Maps, exact camera settings tuned to Washington, D.C.’s unique light, precise timing for every location, and the access notes nobody else bothers to document. It mirrors the intel inside our Washington, D.C. Ultimate Photographer’s Guide ($47 PDF) — a downloadable field guide with full-page hero images, GPS maps, seasonal tables, a city safety briefing, and a complete photographer’s packing list. Get the guide →

Planning multi-city travel? See also: U.S. cities photography hub and the National Parks Photography Guides.

Washington, D.C. Ultimate Photographer’s Guide — $47
12 GPS-mapped locations · Exact camera settings · Multi-season shooting calendar · Free annual updates

Download the PDF guide →
Skip the planning

Get the Washington DC Ultimate Photographer’s Guide

Every location below — pre-mapped with GPS, golden-hour timing, gear recommendations, cultural rules, and a 14-day itinerary. Downloaded by 200+ working photographers.

Get the PDF · $47
Instant download · Lifetime updates

Quick jump to the 12 spots

  1. Lincoln Memorial Reflecting Pool — West End View
  2. US Capitol from the National Mall
  3. Jefferson Memorial — Cherry Blossom Tidal Basin View
  4. Washington Monument — WWII Memorial Fountain Foreground
  5. Library of Congress — Main Reading Room Interior
  6. Georgetown Waterfront Park — Key Bridge & Potomac
  7. Tidal Basin — Cherry Tree Walk & MLK Memorial
  8. Georgetown — M Street & Wisconsin Avenue Historic Corridor
  9. Smithsonian Institution Castle — Enid Haupt Garden
  10. Franklin Delano Roosevelt Memorial
  11. Korean War Veterans Memorial — Night Haunting
  12. Old Post Office Tower — 360° Skyline Observation

A look inside the Washington, D.C. Photographer’s Guide

Here are three of the actual shots you’ll find inside the PDF — cinematic full-page references for the exact spots, lenses, and lighting conditions documented in the guide. The full guide includes 12 locations, each with a hero image, GPS map, settings table, and a five-shot list.

Lincoln Memorial Reflecting Pool — West End View — from the Washington, D.C. Photographer's GuideSave
Lincoln Memorial Reflecting Pool — West End View — sample reference photo from the Washington, D.C. Photographer’s Guide PDF

Before you shoot Washington, D.C.: the essentials

  • Free public access: All National Mall monuments and memorials are free and open 24/7 year-round; no admission fees at any NPS site on the Mall; Library of Congress Main Reading Room overlook open Mon–Sat 8:30am–5pm, free; Old Post Office Tower free, daily 9am–4pm
  • Commercial permits: Under the EXPLORE Act (signed January 4, 2025), NPS does not require a photography permit for groups of 8 or fewer using hand-carried equipment in publicly open areas that do not require exclusive use of a site. Groups of 9+ or commercial shoots with props/crews/lights require a still photography permit from NPS Division of Permits Management (1100 Ohio Drive SW, DC 20242; FAX 202-475-2216). Non-refundable $90 application fee plus $50/day (1–10 people) or $150/day (11–30 people) location fee. Restricted areas where photography is prohibited include: inside the Jefferson Memorial’s outer columns, Lincoln Memorial above the white marble steps, within Washington Monument’s circle of flags, FDR Memorial (copyright required), Korean War Veterans Memorial (contact KWVMF for commercial use), and the Vietnam Veterans Memorial Apex. The US Capitol exterior requires separate permit from US Capitol Police (fax 202-228-2429). Library of Congress prohibits tripods, lights, and photography in the Main Reading Room overlook for private sessions; groups capped at 5 including photographer.
  • Best photography seasons: Spring (cherry blossoms, late March–early April) and autumn (golden foliage, October–November); winter snow adds drama to white marble monuments
  • Blue hour notes: Blue hour (20–30 minutes after sunset) is optimal for all illuminated monuments; the Reflecting Pool doubles the light towers during blue hour, and the Capitol dome glows sapphire from the east plaza; use a tripod and 15–30 second exposures at ISO 200–400
  • Drone policy: Most major U.S. cities restrict drone flight in airspace and via local ordinances. Check FAA + city rules before launching.
  • Local resource: Official visitor information

The full-resolution version of every map below — plus seasonal calendars, gear notes per location, sun-angle diagrams, and a complete photographer’s packing checklist — is inside the Washington, D.C. Photographer’s Guide PDF ($47).

1. Lincoln Memorial Reflecting Pool — West End View

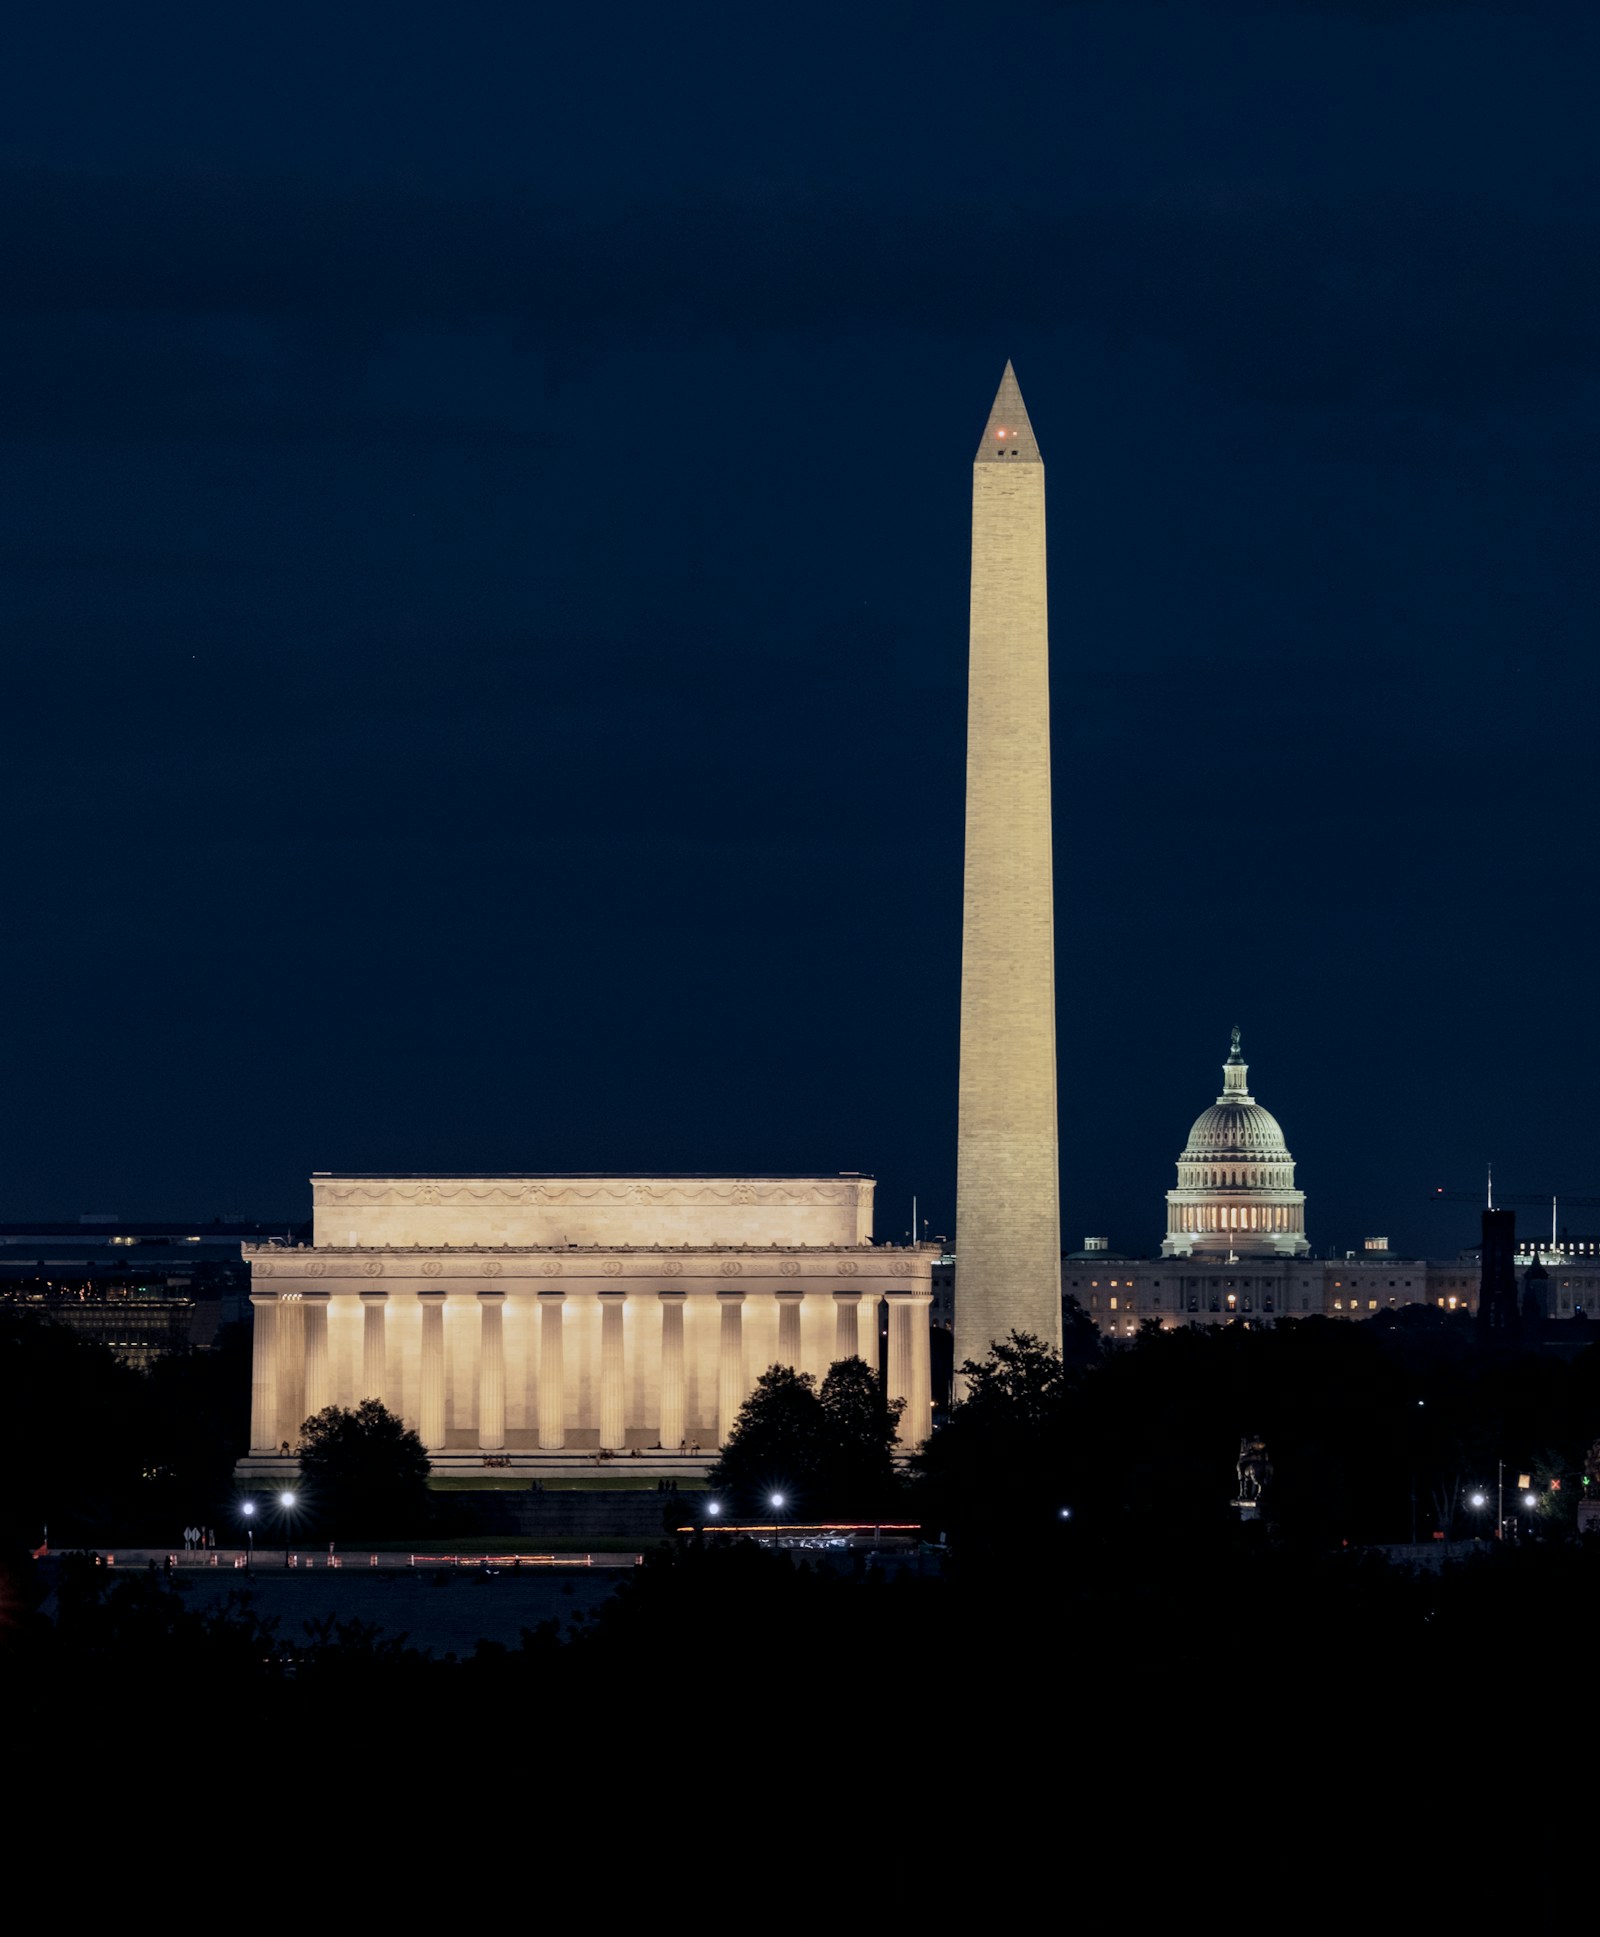
The 2,029-foot pool creates a mirror-flat reflection of both the Washington Monument and Lincoln Memorial simultaneously, producing the most replicated symmetrical composition in American photography. On perfectly still mornings, the water surface becomes an almost-perfect mirror, doubling the sky gradient from deep blue to amber.

  • GPS: 38.8893, -77.045
  • Elevation: 15 ft
  • Best time of day: Sunrise (arrive 45 minutes before first light); blue hour before sunrise delivers a deep indigo sky reflected in still water before joggers disturb the surface
  • Sun direction: Sun rises almost due east directly behind the Washington Monument obelisk, which sits on the pool’s central axis. At equinoxes (mid-March and mid-September) the sunrise azimuth aligns almost perfectly with the pool centerline, creating a fiery orb framed by the obelisk’s reflection. In summer, sunrise shifts north-northeast; compose tighter on the Lincoln steps side. The pool faces west, so the Lincoln Memorial façade receives full warm backlight at sunrise.
  • Access: No admission fee. Open 24/7. Nearest Metro: Foggy Bottom–GWU (Blue/Orange/Silver, 15-min walk) or Smithsonian (Blue/Orange/Silver, 20-min walk). Limited free street parking on Ohio Drive SW and West Basin Drive SW. No vehicle access to the Mall itself. Restrooms at the Lincoln Memorial base. NPS rangers on site daily.
  • Difficulty: easy
  • Recommended settings: Pre Sunrise Blue Hour: f/11, 20 sec, ISO 200, 24mm  ·  Golden Hour After Sunrise: f/8, 1/60 sec, ISO 400, 50mm  ·  Midday Overcast: f/8, 1/250 sec, ISO 100, 35mm  ·  Night Illuminated: f/8, 30 sec, ISO 400, 24mm

Shots to chase:

  • Centerline symmetry: tripod at the east end of the pool, lens at knee height, Lincoln Memorial and Washington Monument aligned on the pool’s central axis with perfect reflection
  • Side-angle long compression: from the south bank at 200mm, compress the obelisk and Lincoln portico into a single layered frame with reflections
  • Blue-hour pre-dawn: shoot west toward the Lincoln with the sky still dark violet, monument lit from within, and mirror-flat water
  • Equinox sunrise alignment: in mid-March or mid-September, the sun rises directly behind the Washington Monument — use the reflection to double the orb
  • Autumn fog: October mornings produce low fog that rolls across the pool surface, with the obelisk silhouetted above the mist

Pro tip: Arrive no later than 45 minutes before sunrise; even midweek at peak tourist season the pool is still-water only for a 20-minute window before the first joggers create surface ripples. Place your tripod legs in the shallow edge gutter (legal, on paved path) for the lowest possible water-line angle. The NPS Explore Act (Jan 2025) exempts groups of 8 or fewer with hand-carried gear from requiring a permit.

Common mistake to avoid: Shooting at midday produces harsh shadows and washed-out sky; the white marble monuments blow out easily. Do not stand on the pool’s retaining wall for stability — it is slippery and prohibited. Many photographers aim east and underexpose the water; meter off the sky instead and let the monument fall slightly dark, then recover shadows in post.

2. US Capitol from the National Mall

The 289-foot cast-iron dome is one of the largest in the world, and shooting from the east-side reflecting pool at blue hour produces a perfectly symmetrical illuminated dome mirrored in dark water — one of the signature night shots in American civic photography. The Mall’s western approach offers the added depth of the Washington Monument in the far background.

  • GPS: 38.8899, -77.009
  • Elevation: 88 ft
  • Best time of day: Sunset (golden hour from the east plaza) and blue hour after sunset; the east-facing white dome receives full warm side-light at late afternoon; blue hour turns the dome luminescent from the Capitol Reflecting Pool
  • Sun direction: Capitol faces west. Shooting from the west (Mall side) means the dome is backlit at sunset — effective for silhouettes. Shooting from the east (1st St SE) at sunset places the sun behind you, lighting the dome warmly. The Capitol Reflecting Pool (east side) provides the best mirror reflections 20–30 minutes after sunset during blue hour. Sunrise from the Capitol Reflecting Pool places the east-facing façade in warm front-light.
  • Access: Grounds open 24/7, free. US Capitol exterior and grounds managed by US Capitol Police; tripods are generally allowed on grounds but officers may request removal. No admission to photograph exterior. Visitor Center (beneath East Front Plaza) open Mon–Sat 8:30am–4:30pm, free. Nearest Metro: Capitol South (Blue/Orange/Silver) or Union Station (Red). Street parking on East Capitol St. Photography permit for commercial shoots from US Capitol Police Special Events Division (119 D St NE, Room 102; fax 202-228-2429).
  • Difficulty: easy
  • Recommended settings: Golden Hour East Side: f/8, 1/100 sec, ISO 200, 70mm  ·  Blue Hour Reflecting Pool: f/11, 25 sec, ISO 200, 35mm  ·  Midday Wide Angle Mall: f/11, 1/400 sec, ISO 100, 24mm  ·  Night Dome Detail: f/8, 15 sec, ISO 400, 135mm

Shots to chase:

  • Capitol Reflecting Pool symmetry at blue hour: low tripod on the east-side pool, dome and its perfect mirror image bisected by the waterline
  • Mall wide-angle: from 3rd Street NW looking east, a 24mm frame captures the Mall’s full breadth with the Capitol dome as the vanishing-point terminus
  • East-side sunset light: stand east of the dome on East Capitol St at golden hour for warm raking light across the neoclassical columns and frieze
  • Vertical compression: at 200mm from 3rd St, compress the Monument and dome into an improbable single vertical frame
  • Pennsylvania Avenue light trails: 30-second exposures from the intersection of Pennsylvania Ave NW and 1st St at blue hour, red/white car trails leading to the illuminated dome

Pro tip: The Capitol Reflecting Pool on the east side (between 1st and 3rd Streets SE) is far less crowded than the Lincoln pool and delivers the cleanest dome reflections. Bring a remote shutter release; any tripod vibration is visible in 25-second exposures. Fall and winter are best because the low sun angle produces longer shadow raking across the steps.

Common mistake to avoid: Shooting exclusively from the Mall’s west approach misses the reflection pool and the warm front-lighting on the east dome. During peak tourist hours, groups constantly walk in front of your composition from the Mall side — the east-side pool is almost always crowd-free. Avoid zoom settings under 35mm from the Mall or the dome appears small relative to the foreground tourists.

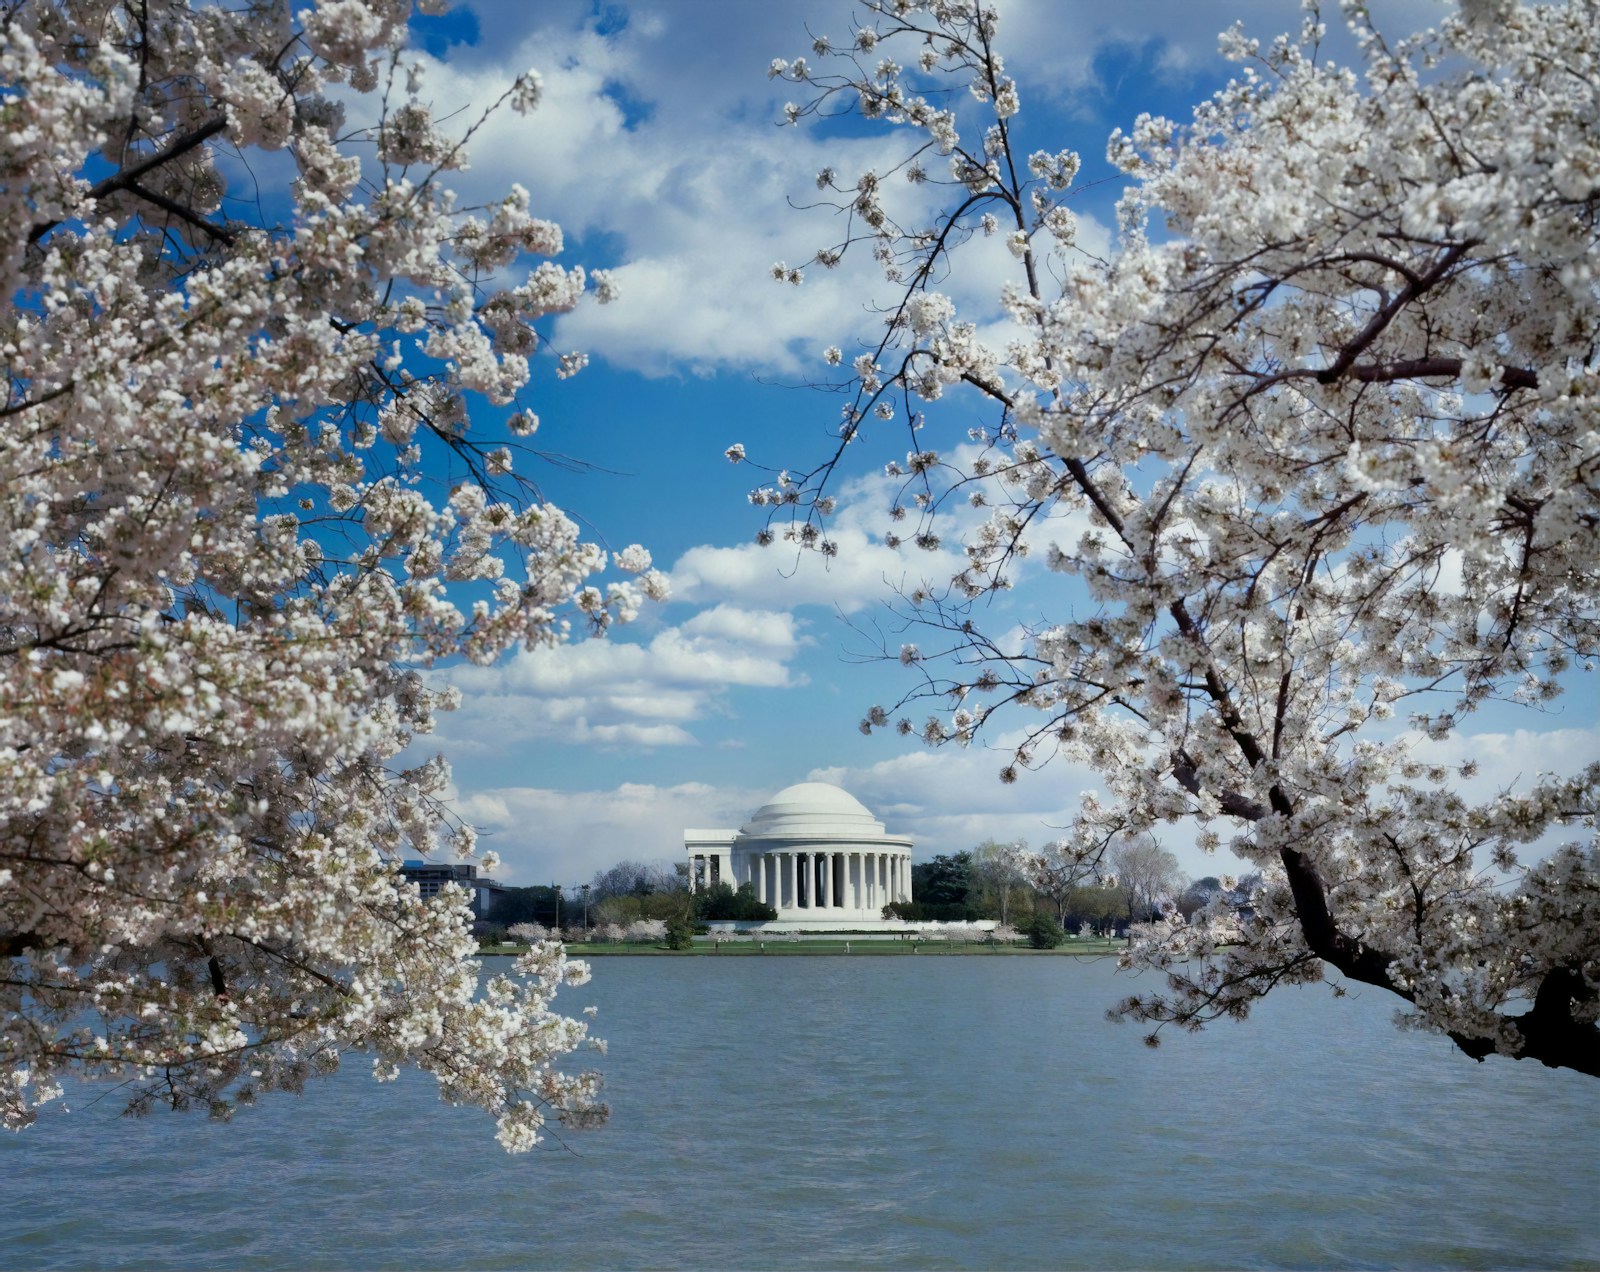
3. Jefferson Memorial — Cherry Blossom Tidal Basin View

The only place in America where a neoclassical rotunda is surrounded by approximately 3,800 cherry trees that bloom simultaneously, turning the entire Tidal Basin perimeter cotton-pink; the memorial’s reflection in the water, framed by blossoms, is the definitive American spring image.

  • GPS: 38.8814, -77.0365
  • Elevation: 10 ft
  • Best time of day: Sunrise during peak cherry blossom bloom (late March to early April); arrive 60 minutes before sunrise to claim position on the northwest bank before crowds descend; also beautiful at blue hour year-round
  • Sun direction: The Jefferson Memorial faces northwest, so sunrise comes from over the right shoulder of a photographer standing on the northwest bank of the Tidal Basin. Pre-sunrise, the dome is rim-lit and reflections are at their sharpest on calm water. After sunrise, the sun swings around to backlight the dome — ideal for silhouettes or flare effects through the cherry trees. Sunset is dramatic from the east bank, with the dome glowing orange.
  • Access: Free, open 24/7. No permit required for personal photography under Explore Act (≤8 people, hand-carried gear). Commercial shoots inside the outer columns require NPS permit ($90 app + $50 location fee) and photography is prohibited within the outer columns without a permit. Nearest Metro: Smithsonian (Blue/Orange/Silver, 30-min walk) or L’Enfant Plaza (Blue/Orange/Silver/Yellow/Green, 25-min walk). Free parking at Ohio Drive SW (early morning only; fills by 7am during blossom season). During peak bloom, Ohio Drive closes to traffic — arrive by transit or on foot.
  • Difficulty: easy
  • Recommended settings: Pre Sunrise Blossom Reflection: f/11, 30 sec, ISO 100, 24mm  ·  Golden Hour Blossoms: f/5.6, 1/250 sec, ISO 400, 50mm  ·  Long Exposure Water Smoothing: f/13, 45 sec, ISO 100, 30mm  ·  Detail Blossom With Dome: f/2.8, 1/1000 sec, ISO 200, 135mm

Shots to chase:

  • Classic northwest-bank reflection: tripod at water’s edge on the basin’s northwest shore, cherry branches drooping into the frame from above, dome centered in glassy water
  • Foreground blossom compression: at 135mm, isolate a dense pink blossom cluster with the dome soft in the background using f/2.8
  • Pre-sunrise silhouette: shoot east before sunrise with the dome as a dark mass against a gradient sky reflected in still water
  • Long-exposure water: 30–45 second exposure at f/13 during blue hour smooths the basin to glass, making any ripple vanish
  • Petals on water: macro or 100mm close-up of fallen petals floating on the basin surface, memorial softly out of focus behind

Pro tip: Check the NPS cherry blossom forecast at nps.gov/subjects/cherryblossom; bloom timing shifts 1–3 weeks year to year based on winter temperatures. The window between ‘Stage 5 – Peak Bloom’ and ‘Stage 6 – Post Peak’ is only 5–7 days; plan for the weekend before predicted peak for lighter crowds. Post-peak ‘sakura fubuki’ (petal snowfall on windy days) is equally photogenic and crowds drop sharply.

Common mistake to avoid: Arriving after 8am during peak blossom weekend means shoulder-to-shoulder crowds that are nearly impossible to exclude from wide-angle compositions. Do not rely on a small aperture (f/16+) in low light without a tripod — camera shake kills sharpness on long exposures. The east bank path is less crowded and gives a wider view of the dome with blossoms overhead.

4. Washington Monument — WWII Memorial Fountain Foreground

At 555 feet, the Washington Monument is the tallest obelisk in the world and the city’s absolute height limit — it can be seen from every direction across the flat mall, making it an ever-present compositional anchor. The WWII memorial’s Atlantic and Pacific Pavilions and Rainbow Pool provide architectural foreground depth that separates expert shots from tourist snapshots.

  • GPS: 38.8895, -77.0353
  • Elevation: 30 ft
  • Best time of day: Sunrise (warm eastern light on the obelisk) and golden hour before sunset (low raking light creates texture on the 555-foot marble shaft); the WWII memorial fountains catch the light beautifully at golden hour
  • Sun direction: The obelisk faces all directions by design. At sunrise, the east face lights first and the shadow edge creeps westward — shoot the east face from the Mall. At sunset, the west face glows amber; position at the WWII memorial (east of the monument) facing west to backlight the spire. The monument interior is closed pending elevator repairs (check nps.gov for current status); exterior grounds open 24/7.
  • Access: Grounds free and open 24/7. Photography within the circle of flags surrounding the base is prohibited. Monument interior timed-entry tickets required when open (reserve at recreation.gov, $1 fee). NPS permit required for commercial photography anywhere on monument grounds. Nearest Metro: Smithsonian (Blue/Orange/Silver). Parking: Ohio Drive SW. No vehicles on the Mall.
  • Difficulty: easy
  • Recommended settings: Golden Hour Obelisk Glow: f/8, 1/200 sec, ISO 200, 70mm  ·  Wwii Fountain Foreground: f/11, 1/15 sec, ISO 100, 35mm  ·  Blue Hour Night Reflection: f/8, 20 sec, ISO 400, 50mm  ·  Dramatic Low Angle Upshot: f/8, 1/500 sec, ISO 200, 16mm

Shots to chase:

  • WWII memorial fountain foreground: shoot from between the Rainbow Pool fountains looking west toward the monument at golden hour, water jets framing the obelisk
  • Reflecting pool east-end: stand at the WWII memorial’s west steps and compress the monument-obelisk with the Reflecting Pool extending to the Lincoln Memorial behind it
  • Low-angle upshot: lie on the ground looking up from the base approach ring at 16mm — the obelisk appears to pierce the sky
  • American flag frame: position so one of the 50 perimeter flags blows across the lower frame edge, obelisk centered behind at 85mm
  • Blue hour mirror: from the south side of the Reflecting Pool, the illuminated white obelisk mirrors in dark water with the Lincoln as a backdrop

Pro tip: The WWII memorial’s Rainbow Pool fountains are controlled — they shut off around 10pm and restart at dawn. The window between fountain start and full daylight is perhaps 30 minutes of perfect conditions: fountains running, sky still blue, obelisk catching first light. Carry a circular polarizer to deepen the sky and eliminate glare from the white marble.

Common mistake to avoid: Photography within the circle of flags at the obelisk’s base is prohibited — rangers enforce this actively. Do not attempt to climb the monument’s base steps for a higher angle; it is restricted. Shooting at midday from the south produces flat, overlit marble with a washed-out sky.

Want this in your pocket on the street?
The full-resolution version of every spot above — with full-page hero photography, GPS maps with gold location pins, sun direction diagrams, multi-season tables, and a complete safety + packing checklist — is inside the Washington, D.C. Ultimate Photographer’s Guide PDF ($47). Print it, save it offline, take it on the walk. Get the guide →

5. Library of Congress — Main Reading Room Interior

Library of Congress — Main Reading Room Interior Washington, D.C. photography sampleSave
Library of Congress — Main Reading Room Interior — cinematic reference from the Washington, D.C. Photographer’s Guide PDF

The Beaux-Arts dome of the Main Reading Room is arguably the most beautiful interior space in the United States government — 160 feet high, ringed with 16 bronze statues, mosaics, marble columns, and a central colonnaded reading hall still in active daily use. It is the only major NPS-adjacent interior on this list, representing the ‘cultural interior’ diversity category.

  • GPS: 38.8888, -77.0046
  • Elevation: 88 ft
  • Best time of day: Midday on a sunny weekday when the 160-foot coffered dome lantern fills with natural light; arrive before 10:30am or after 3:30pm (Mon–Sat) to avoid tour group congestion
  • Sun direction: The Main Reading Room receives indirect natural light through the dome’s oculus — direct sun does not enter the circular room. Light quality is even and warm from approximately 10am to 3pm in spring and summer. The ornate stained glass gallery level (above the reading desks) catches warmer late-afternoon light filtering through the exterior windows. The overlook balcony above the main floor is the primary photography vantage point; photography in the Reading Room itself is prohibited for private sessions.
  • Access: Free admission, open Mon–Sat 8:30am–5pm (closed Sundays and federal holidays). Enter via Jefferson Building at 1st St SE. Security screening required. Photography guidelines: max 1-hour session, groups of 5 maximum (including photographer), NO tripods/monopods/lights/selfie sticks inside, no photography on or near the Main Reading Room overlook stairs or exhibition galleries, no flash, no photography of staff or other visitors without consent. Personal handheld cameras permitted. Nearest Metro: Capitol South (Blue/Orange/Silver, 5-min walk).
  • Difficulty: moderate
  • Recommended settings: Natural Dome Light Handheld: f/2.8, 1/60 sec, ISO 3200, 24mm  ·  Detail Mosaic Columns: f/4, 1/80 sec, ISO 1600, 50mm  ·  Looking Up At Dome: f/5.6, 1/30 sec, ISO 3200, 16mm  ·  Overlook Floor Pattern: f/8, 1/15 sec, ISO 1600, 35mm

Shots to chase:

  • Dome overhead from the overlook balcony: lean the camera over the rail, shoot straight down to capture the concentric circular desk pattern with the oculus above
  • Vertical compression from the second gallery: 24mm aimed upward to capture all four levels of balustrades, columns, and the lantern dome in a single frame
  • Stained glass detail: 85mm handheld to isolate individual mosaic medallions in the upper gallery lunettes against the diffused natural light
  • Statue silhouette: position a bronze statue figure at the gallery level against the diffuse dome light for a high-contrast silhouette
  • Wide environmental context: 16mm from the north overlook corner to capture the entire circular sweep of mahogany reading desks, arched windows, and dome above

Pro tip: The best natural light enters between 10am and 1pm; on overcast days the diffused overhead glow is soft and even, eliminating the bright hot-spots that appear on sunny days when the lantern throws a strong beam. Brace against the overlook railing for your longest exposures (up to 1/15s at ISO 3200 is achievable with image stabilization). Arrive just after opening at 8:30am on a weekday for a near-empty room.

Common mistake to avoid: Attempting to use a tripod will result in immediate removal by security — this is strictly enforced. Do not photograph the reading room floor level itself (where active researchers work); the overlook balcony is the only photography area. Flash photography creates harsh reflections off the varnished mahogany and blown-out white marble.

6. Georgetown Waterfront Park — Key Bridge & Potomac

One of DC’s best waterfront panoramas — the 70-acre Potomac River here combines the graceful arches of the historic Francis Scott Key Bridge, the Kennedy Center’s white travertine mass, rowers on the water at dawn, and Georgetown’s 18th-century roofline — no two sunrise or sunset shots look the same across seasons. This is the waterfront/water feature required category entry for the itinerary.

  • GPS: 38.9028, -77.0643
  • Elevation: 15 ft
  • Best time of day: Blue hour and sunset (sun sets north-northwest in summer, directly behind the Key Bridge arch from the south bank); golden hour in late spring/summer lights up the Virginia shore and the bridge’s arches; also excellent for night photography of Georgetown’s illuminated skyline
  • Sun direction: The park faces the Potomac to the south and southwest. In summer, the sun sets roughly behind the Key Bridge (northwest), creating a silhouette of the arched steel bridge against a warm sky. In winter, the sun sets due southwest, illuminating the Virginia treeline in warm light. The Kennedy Center glows at blue hour from the right (west) of the park, reflected in the river.
  • Access: Free, open dawn to dusk. No permit required. Nearest Metro: Foggy Bottom–GWU (Blue/Orange/Silver, 20-min walk) or Georgetown Circulator bus from Rosslyn Metro. Paid parking at Washington Harbour (3000 K St NW). Georgetown Waterfront Park, K Street NW at 31st St NW. Restrooms at Washington Harbour complex.
  • Difficulty: easy
  • Recommended settings: Sunset Key Bridge Silhouette: f/11, 1/30 sec, ISO 200, 35mm  ·  Blue Hour River Reflection: f/8, 20 sec, ISO 400, 24mm  ·  Golden Hour Rowers: f/5.6, 1/500 sec, ISO 400, 200mm  ·  Night Kennedy Center Glow: f/8, 25 sec, ISO 400, 50mm

Shots to chase:

  • Key Bridge arch silhouette: shoot west from the waterfront park promenade at sunset, the bridge’s arches framed against a warm-toned sky reflecting in the river
  • Georgetown roofline panorama: wide 24mm shot from the central waterfront plaza looking northeast, capturing the Georgian brick facades rising from the river embankment
  • Kennedy Center blue hour: shoot west from the park’s east edge, the travertine Kennedy Center glowing warm against a dark blue sky, with the Potomac as foreground
  • Rowing crew action: on weekend mornings, crews from multiple universities row past — use 200mm at 1/1000s to freeze the motion with the DC skyline as backdrop
  • Fog and river morning: on humid fall mornings, mist rises from the Potomac, creating ethereal layers between the water, the Virginia shore, and the bridge steel

Pro tip: The Ichiban mural (JFK portrait) on the 3400 block of K Street NW, just steps from the park entrance, is one of Georgetown’s most photographed street-art pieces — include it in your morning walk-around before the light gets harsh. For the cleanest Key Bridge arch shots, position yourself on the waterfront’s easternmost point (near 31st St) to catch the full arch sweep.

Common mistake to avoid: The Washington Harbour fountain area (north of the waterfront) blocks sightlines if you stay too close to the restaurant terrace; walk to the actual river’s edge for unobstructed water shots. Avoid shooting directly into the sun at any angle brighter than golden hour — the Potomac’s surface creates harsh specular highlights that blow out even with a polarizer.

7. Tidal Basin — Cherry Tree Walk & MLK Memorial

The 1.6-mile walkway encircles a basin surrounded by approximately 3,800 Yoshino and Akebono cherry trees, with three of DC’s most powerful memorials (Jefferson, FDR, MLK) visible simultaneously from any point on the northwest bank. This is also one of the few urban locations in America where geese, herons, and ducks frequently enter the foreground of architectural photos.

  • GPS: 38.8837, -77.0388
  • Elevation: 10 ft
  • Best time of day: Sunrise during cherry blossom peak (late March–early April); MLK ‘Stone of Hope’ monument is also excellent at sunrise year-round; late spring/summer morning for the cleanest water reflections of the FDR and MLK memorials
  • Sun direction: The basin is oriented northeast–southwest. Sunrise comes from the northeast, lighting the Jefferson Memorial dome and the MLK Stone of Hope from the front in golden light. Shooting from the northwest bank (between the MLK and FDR memorials) means the sun rises to your right at golden hour, lighting the blossoms from the south. The best reflection shots come from the west bank facing east, with the sun behind you.
  • Access: Free, open 24/7 year-round. The 1.6-mile perimeter path is wheelchair accessible. Ohio Drive SW provides car access but closes to vehicles during peak cherry blossom season. Nearest Metro: Smithsonian (Blue/Orange/Silver, 30-min walk) or L’Enfant Plaza. During blossom season, arrive on foot or by transit — road closures make driving impractical. No permit required for personal photography. NPS permit required for commercial shoots: $90 application + $50/day location fee (FDR Memorial requires additional copyright clearance for commercial use).
  • Difficulty: easy
  • Recommended settings: Blossom Reflection Pre Sunrise: f/11, 25 sec, ISO 100, 24mm  ·  Mlk Stone Of Hope Golden Hour: f/8, 1/200 sec, ISO 200, 70mm  ·  Blossom Bokeh Detail: f/2.8, 1/1000 sec, ISO 200, 135mm  ·  Overcast Flat Light Wide: f/8, 1/200 sec, ISO 400, 24mm

Shots to chase:

  • Three-memorial panorama: from the northwest bank between FDR and MLK memorials, a 24mm shot captures Jefferson’s dome, MLK’s granite face, and cherry trees reflected in flat water
  • MLK Stone of Hope detail: 70–135mm from the east side of the memorial, the white granite ‘Stone of Hope’ emerges from the mountain mass at golden hour with warm raking light
  • Cherry blossom tunnel: the northwest walking path forms a natural blossom arch — shoot looking southwest for a tunnel of pink with the FDR memorial wall as terminus
  • Wildlife foreground: Canada geese or mallards often enter the frame from the water — wait for them to position against the memorial backgrounds
  • Post-peak petal fall: on windy days after peak bloom, petals blanket the basin surface and path — use close focus with the dome blurred behind

Pro tip: NPS publishes a five-stage bloom forecast at nps.gov/subjects/cherryblossom starting in February. Stage 5 (Peak Bloom: 70%+ flowers open) lasts 4–7 days depending on wind and temperature. Arrive 90 minutes before sunrise to secure the north bank position directly opposite the Jefferson Memorial — this is the most contested 10 feet of sidewalk in DC during blossom season. Note: commercial photography at the MLK Stone of Hope requires copyright clearance from Intellectual Properties Management (404-526-8968).

Common mistake to avoid: Confusing the Tidal Basin walkway with East Potomac Park’s Hains Point — the latter blooms 2 weeks later and has different tree species. During peak bloom, the basin is so crowded that any shot including the sidewalk will contain dozens of people; shoot at water level looking across the basin to minimize human presence. Do not attempt to photograph the MLK inner memorial ‘Stone of Hope’ for commercial use without copyright authorization.

8. Georgetown — M Street & Wisconsin Avenue Historic Corridor

Georgetown’s M Street is one of the oldest continuously commercial streets in America, lined with Federal-style and Victorian brick storefronts from the 1790s–1890s. The intersection with Wisconsin Avenue is the de facto Georgetown photo hub, with the gold-domed PNC Bank (former Farmers & Mechanics Bank, 1920s) at the corner, historic theater signage, and the C&O Canal towpath a half-block north. This location covers the street-art/mural diversity category via the surrounding neighborhood’s walls.

  • GPS: 38.9053, -77.0625
  • Elevation: 50 ft
  • Best time of day: Golden hour (1 hour before sunset for warm sidelighting on brick facades); blue hour when storefronts and gas-lamp-style streetlights activate; weekend evenings for street life and neon glow
  • Sun direction: M Street runs roughly east–west. In the afternoon, the sun comes from the southwest, casting diagonal shadows across the brick facades and illuminating north-side storefronts. At blue hour, the street lamps along M Street create warm pools of amber light that contrast beautifully with the deep blue sky. The Exorcist Steps (one block west on Canal Road) face east — ideal at morning golden hour.
  • Access: Public street, no permit or fee. Open continuously. Street parking along M Street (metered, limited); recommend Metro Circulator bus from Foggy Bottom–GWU (Blue/Orange/Silver) or a 20-min walk from Rosslyn Metro via Key Bridge. Street photography of people in public spaces is legal; use judgment on commercial publication. Nearby murals: Hokusai-inspired mural at 3510 O Street NW, Alma Indigena mural at 1564 Wisconsin Ave NW.
  • Difficulty: easy
  • Recommended settings: Golden Hour Facade Sidelight: f/8, 1/200 sec, ISO 400, 50mm  ·  Blue Hour Street Lamps: f/5.6, 3 sec, ISO 800, 35mm  ·  Street Life Candid: f/2.8, 1/500 sec, ISO 800, 85mm  ·  Light Trails Traffic: f/11, 15 sec, ISO 200, 24mm

Shots to chase:

  • M Street & Wisconsin Avenue intersection: frame the gold-domed PNC Bank building from the southeast corner at golden hour — dome glows against warm brick facades
  • Blue hour light trails: 15-second exposure from the sidewalk at M & Wisconsin, red and white car trails threading through the historic storefronts
  • Exorcist Steps atmosphere: the stone stairway between Canal Road and Prospect St NW at night, lit from below, framed by the ivy-covered stone retaining wall — moody vertical composition
  • Alma Indigena mural (1564 Wisconsin Ave NW): photograph the 2021 indigenous elder mural by Victor Quinonez at golden hour when raking light illuminates the detailed polychrome figures
  • C&O Canal towpath reflection: one block north of M Street, the canal’s still water mirrors the stone lock houses and overhanging trees at early morning

Pro tip: The Georgetown red-and-white neon theater sign above the Compass Coffee (M & Wisconsin NW) is one of DC’s most recognizable street-level icons — it dates to 1945 and looks best in blue hour when the neon contrasts the darkening sky. For the Exorcist Steps, visit on a weekday evening when tourist crowds thin; the steps are perpetually busy on weekend afternoons.

Common mistake to avoid: Shooting M Street at midday with harsh overhead light flattens the brick textures and creates deep shadow cuts across faces in street portraits. Do not use wide-angle below 28mm for building facades — barrel distortion makes the historic facades look warped. The C&O Canal towpath becomes very dark after sunset; bring a flashlight for navigating the gravel path.

Want this in your pocket on the street?
The full-resolution version of every spot above — with full-page hero photography, GPS maps with gold location pins, sun direction diagrams, multi-season tables, and a complete safety + packing checklist — is inside the Washington, D.C. Ultimate Photographer’s Guide PDF ($47). Print it, save it offline, take it on the walk. Get the guide →

9. Smithsonian Institution Castle — Enid Haupt Garden

Smithsonian Institution Castle — Enid Haupt Garden Washington, D.C. photography sampleSave
Smithsonian Institution Castle — Enid Haupt Garden — cinematic reference from the Washington, D.C. Photographer’s Guide PDF

The 1855 James Renwick Jr.-designed Smithsonian Castle is the most architecturally unique building on the Mall — its Norman Revival red sandstone towers and asymmetrical roofline stand in striking contrast to the surrounding Neoclassical white marble. The 4.2-acre Enid Haupt Garden features Magnolia grandiflora trees, Victorian parterre beds, and a moat-like cast-iron fountain that frames the towers beautifully from the south.

  • GPS: 38.8888, -77.0259
  • Elevation: 25 ft
  • Best time of day: Sunrise and early morning (the red sandstone towers glow warm amber at first light from the north); spring for the Enid Haupt Garden’s magnolia blooms; autumn for golden foliage framing the Victorian towers
  • Sun direction: The Castle faces north toward the National Mall. At sunrise, the south face (garden side) is backlit but the red towers glow from indirect reflected light. Shooting from the Mall’s south edge (Jefferson Drive) facing south, the Castle catches direct sunrise light from the east — the best position is from the east end at 7am. The Enid Haupt Garden (south side) receives direct morning sun from the east starting around 8am in summer.
  • Access: Smithsonian Castle grounds and Enid Haupt Garden are free and open daily (garden hours: dawn to dusk). The Castle building itself is closed for major renovation (expected to reopen Spring 2026 for the America 250 celebration). Nearest Metro: Smithsonian (Blue/Orange/Silver), directly adjacent. No permit required for personal photography. Mall-side ground photography covered by NPS permit rules for commercial use.
  • Difficulty: easy
  • Recommended settings: Sunrise North Facade: f/8, 1/200 sec, ISO 400, 50mm  ·  Garden Spring Magnolias: f/5.6, 1/500 sec, ISO 200, 85mm  ·  Twilight Tower Silhouette: f/11, 10 sec, ISO 400, 35mm  ·  Wide Approach From Mall: f/11, 1/400 sec, ISO 100, 24mm

Shots to chase:

  • North facade from the Mall: shoot from Jefferson Drive at 50mm at golden hour, the red Norman towers bookending the frame with the Mall’s green lawn as foreground
  • Enid Haupt Garden symmetry: from the garden’s south entrance, a 24mm shot captures the parterre beds with the Castle’s central tower rising behind, framed by magnolia branches in spring
  • Tower silhouette at dusk: from the south side at blue hour, the serrated roofline and nine towers create a dramatic silhouette against the purple-blue sky
  • Autumn framing: in October, the garden’s mature trees turn amber and gold — shoot at 85mm with a golden maple branch in the near foreground, Castle soft behind
  • Detail arched windows: at 135mm, isolate the Gothic arched windows and red sandstone tracery, lit at golden hour from the east

Pro tip: The Castle’s two primary wings are of different heights and dates of construction — approach from the east lawn for the most photogenic asymmetrical view showing all nine towers. The Enid Haupt Garden’s cast-iron Victorian fountain (switched on spring through fall) creates a reflecting pool for the Castle’s south face. Magnolia blooms in the garden typically peak in late April, about 2–3 weeks after the cherry blossoms fade.

Common mistake to avoid: The Castle renovation scaffolding (ongoing since 2022) still partially obstructs the west wing exterior — check si.edu for current closure status before planning interior shots. Shooting from the busy Jefferson Drive sidewalk at midday produces images filled with tour bus groups; the garden side is consistently less crowded and offers cleaner compositions.

10. Franklin Delano Roosevelt Memorial

The only presidential memorial occupying a full 7.5 acres, with four outdoor ‘rooms’ narrating the four terms of FDR’s presidency through massive granite wall engravings, bronze sculpture groups, and four sequential waterfall systems — the park category entry in the diversity requirements, combining green space, water features, and monumental sculpture in a single circuit.

  • GPS: 38.8836, -77.0439
  • Elevation: 10 ft
  • Best time of day: Blue hour and early morning golden hour; the memorial’s four outdoor rooms with cascading waterfalls and bronze sculptures glow in warm light; avoid midday harsh shadows in the stone corridors
  • Sun direction: The FDR Memorial runs north–south along the Tidal Basin’s west bank. The memorial opens to the east (Tidal Basin side), meaning sunrise light enters the memorial’s open rooms from the east. The granite walls and bronze sculptures are best lit from the east in early morning. The waterfall sequences (Rooms 2–4) face inward and receive indirect light all day — overcast days are preferred for even illumination of the water curtains and granite faces.
  • Access: Free, open 24/7. NPS permit required for commercial photography ($90 application fee + $50/day location fee), plus additional copyright clearance from sculpture copyright holders (George Segal Foundation, Neil Estern, Robert Graham Studio — see NPS permit page). Photography is prohibited at the FDR Memorial without copyright approval from respective sculpture holders for commercial use. Personal photography unrestricted. Nearest Metro: Smithsonian or L’Enfant Plaza (both 30-min walk); best reached by bicycle via the Tidal Basin path. Parking on Ohio Drive SW.
  • Difficulty: easy
  • Recommended settings: Waterfall Long Exposure: f/16, 4 sec, ISO 100, 35mm  ·  Bronze Sculpture Sidelight: f/8, 1/200 sec, ISO 400, 85mm  ·  Blue Hour Granite Glow: f/8, 20 sec, ISO 400, 24mm  ·  Quotation Wall Detail: f/11, 1/100 sec, ISO 200, 50mm

Shots to chase:

  • Room 3 waterfall cascade: position in Room 3 looking south, the multi-tiered granite waterfall centered, FDR’s ‘New Deal’ quotation wall flanking the shot
  • FDR in wheelchair bronze: from slightly above and to the side, capture the Robert Graham ‘FDR in Wheelchair’ statue in Room 1 (Prologue Room) with warm eastern morning light casting long shadows
  • Long-exposure water: 4-second exposure at f/16 smooths the falling water to silk against the rough-hewn granite — use a mini-tripod on the flat granite path
  • Bas-relief detail at golden hour: raking light from the east at 7am creates dramatic depth across the stone-carved ‘Breadline’ bas-relief in Room 2
  • Tidal Basin framing: from the east bank of the basin, the memorial’s wooded west embankment reflects in the water with FDR’s tall redwoods above — use a 50mm in spring for cherry blossoms overlapping the canopy

Pro tip: The FDR Memorial is the least-visited major presidential memorial on the Mall, making it feasible to photograph without crowds even on summer weekends — particularly in early morning before 8am. The four rooms create natural framing alcoves for portraits and architectural details. Note that commercial photography here is particularly complex due to multiple separate copyright holders for different sculptures; always obtain NPS permit and individual sculptor clearances before commercial use.

Common mistake to avoid: Attempting to photograph the FDR bronze sculptures for commercial purposes without copyright clearance from each individual sculptor is a common mistake with serious legal implications. The memorial’s lighting at night is atmospheric but uneven — some sculptures are completely dark while others are flooded; arrive at blue hour when ambient sky light balances the artificial floods.

11. Korean War Veterans Memorial — Night Haunting

One of the most haunting night photography subjects in the US: 19 over-life-size stainless steel infantrymen seem to patrol the triangle of junipers and granite in absolute silence, their polished surfaces reflecting 2,500 photographic etchings of soldiers from the granite mural wall beside them. The Pool of Remembrance at the north apex doubles the soldier count to 38 in reflection — one for each month of the war. This is the night/blue-hour required diversity category entry.

  • GPS: 38.8878, -77.0472
  • Elevation: 13 ft
  • Best time of day: Pre-dawn blue hour and night (the 19 stainless steel soldier statues are lit from below by ground floods, creating a spectral green-silver glow in darkness); winter nights when thin snowfall or frost adds atmospheric detail
  • Sun direction: The memorial is oriented northeast–southwest, with the mural wall on the northeast side. The stainless steel soldiers march southwest toward the Pool of Remembrance. At night, the soldiers’ polished surfaces reflect the surrounding mural wall’s sandblasted images. Before dawn, the combination of ground flood uplighting and deep blue sky creates the memorial’s most striking photographic conditions. Note: Per NPS regulations and contact with KWVMF, commercial photography of the Korean War Veterans Memorial requires clearance from Korean War Veterans Memorial Foundation (1-888-567-2927).
  • Access: Free, open 24/7. No admission fee. Night photography strongly recommended. NPS commercial photography permit required ($90 + $50/day) plus contact with Korean War Veterans Memorial Foundation for commercial use. Personal photography unrestricted. Nearest Metro: Foggy Bottom–GWU (Blue/Orange/Silver, 20-min walk). Parking: West Potomac Park lots off Independence Ave SW.
  • Difficulty: moderate
  • Recommended settings: Pre Dawn Uplighting Blue Sky: f/8, 15 sec, ISO 400, 24mm  ·  Soldier Reflection Mural Wall: f/8, 20 sec, ISO 400, 50mm  ·  Pool Of Remembrance Night: f/11, 30 sec, ISO 200, 35mm  ·  Detail Etched Mural Faces: f/4, 1/30 sec, ISO 1600, 135mm

Shots to chase:

  • Pre-dawn silhouette patrol: tripod at the southwest end looking northeast, 19 backlit soldiers receding into darkness with the mural wall glowing behind them
  • Mural wall reflection: the polished stainless soldier surfaces reflect the etched faces on the granite wall — focus on the reflection in a soldier’s chest plate at 135mm
  • Pool of Remembrance: the circular pool at the north end perfectly doubles the soldier count in its reflection — shoot at f/11 for 30 sec with the American flag poles in the background
  • Snowy night patrol: in winter snowfall, the white-dusted soldiers and silver-frosted junipers create a spectral monochrome scene with dramatic ground lighting
  • Soldier face detail: at 135mm, isolate a single soldier’s face lit from below with the dark treeline behind — the expression registers with eerie intensity at low angles

Pro tip: National Geographic photographer Mark Thiessen specifically names this memorial as one of his top pre-dawn DC targets — ‘The oversized soldiers are lit from below and look haunting.’ Focus on the soldiers’ reflective surfaces rather than the soldiers themselves for unique compositions. A tripod is essential for exposures 10 seconds and longer; the memorial is on relatively dark NPS grounds with no nearby streetlights. Arrive at 4:30am on weekdays to shoot without any other visitors.

Common mistake to avoid: Visiting at midday produces flat, overlit stainless steel with washed-out backgrounds. Many photographers forget the Pool of Remembrance at the north end — walk the full circuit before setting up. The mural wall requires careful framing at 50–85mm to show the etched figures clearly; wide-angle shots make the images unreadably small.

12. Old Post Office Tower — 360° Skyline Observation

At 315 feet, the Old Post Office Clock Tower is the only fully open-air observation platform in central DC (the Washington Monument interior elevator is periodically closed), offering an unobstructed 360-degree perspective of the height-limited skyline — the Capitol dome, Washington Monument, Lincoln Memorial, and National Cathedral are all visible simultaneously. This satisfies the ‘elevated skyline view’ required diversity category.

  • GPS: 38.8942, -77.0275
  • Elevation: 315 ft
  • Best time of day: Late afternoon golden hour and blue hour (the tower closes at 4pm, limiting access to daytime; blue-hour views must be timed carefully for the shortest winter days when blue hour falls before 4pm); clear days in autumn and winter offer the best visibility
  • Sun direction: At 315 feet, the tower offers true 360-degree views above DC’s 130-foot building height limit. In the afternoon, the western views down Pennsylvania Avenue to the Washington Monument and Lincoln Memorial are backlit in a warm haze. The eastern view shows Capitol Hill, Union Station, and the Library of Congress. Note: photography through the tower’s metal-bar open windows is easiest with a smartphone or narrow-lens compact camera — DSLR telephoto lenses exceed bar spacing.
  • Access: Free admission. Open daily 9am–4pm (last entry 3:45pm), closed Thanksgiving and Christmas. Enter via 12th & C Streets NW (within the Waldorf Astoria Washington DC, formerly Trump International Hotel). NPS-managed National Park Service tower; rangers provide free orientation. Nearest Metro: Federal Triangle (Blue/Orange/Silver, 3-min walk) or Metro Center. Street parking on 12th St NW (metered). No permit required for personal photography; commercial shoots require NPS permit.
  • Difficulty: easy
  • Recommended settings: Midday Clear Day Wide: f/11, 1/500 sec, ISO 100, 24mm  ·  Telephoto Mall Compression: f/8, 1/400 sec, ISO 200, 200mm  ·  Smartphone Through Bars: auto, auto, ISO auto, 26mm equivalent  ·  Late Afternoon Warm Cityscape: f/8, 1/200 sec, ISO 200, 35mm

Shots to chase:

  • Pennsylvania Avenue corridor: from the west-facing window, compress 200mm to stack the FBI Building, National Archives, and Washington Monument in a single layered frame
  • Capitol dome from above roofline: from the east window, the Capitol dome rises to the same level as the tower (both at ~280ft) — rare equal-height perspective impossible elsewhere
  • 360-degree panorama stitch: shoot 8 landscape frames at 35mm and stitch in post for a complete Washington DC skyline panorama
  • Federal Triangle roofscape: the three sides of the Federal Triangle buildings directly below create a classical stone canyon visible only from this altitude
  • Smartphone narrow-format: slip a smartphone sideways between the bars for a clean portrait-mode shot looking down Pennsylvania Avenue toward the Capitol

Pro tip: The tower’s metal observation bars are spaced approximately 6 inches apart — standard DSLR lenses (67mm+ filter diameter) will not pass through. Smartphone cameras or compact cameras work best. Arrive by 3pm to ensure enough time for a full circuit before the 4pm closing; rangers begin clearing the tower at 3:50pm. Visit on weekdays for minimal wait times at the small elevator.

Common mistake to avoid: Bringing a large DSLR with a telephoto lens and discovering the bars block wide-format shots is the most common frustration — plan for smartphone or compact camera as primary tool. The tower closes at 4pm, which in winter means shooting in harsh midday light; winter blue hour (around 5:30pm) is not accessible. Summer haze reduces visibility on hot humid days — autumn and winter provide the clearest air.

When to photograph Washington, D.C.: a year-round breakdown

Washington, D.C. is photogenic every month of the year — but the conditions differ radically by season. Here is what to expect:

Spring (cherry blossoms, late March–early April) and autumn (golden foliage, October–November); winter snow adds drama to white marble monuments

Photographer safety in Washington, D.C.: read this

City photography has its own risks: gear visibility, neighborhood timing, traffic, weather. Read the briefing before you go.

  • Gear visibility: Use a discreet bag with no obvious camera branding. Keep a body strapped under a jacket on transit.
  • Neighborhood timing: Pre-dawn and post-sunset shoots reward early scouting. Cross-reference each location with current local guidance and choose well-lit transit routes.
  • Situational awareness: Headphones out. One eye in the viewfinder, one on the street.
  • Traffic: Bridges, medians, and bike lanes are not setup zones. Shoot from sidewalks and pedestrian areas only.
  • Weather: Summer storms move quickly; winter cold drains batteries. Layer up, keep gear dry, watch for ice on cobblestones at blue hour.

The complete safety briefing is inside the Washington, D.C. Photographer’s Guide PDF.

Take this guide into the city

This post is the complete field reference. The Washington, D.C. Ultimate Photographer’s Guide PDF is the field-deployable version: full-page resolution hero photography, GPS maps with gold pins for every location, multi-season shooting calendars, gear notes per location, sun-angle diagrams, the full city safety briefing, and a print-ready editorial layout in Framehaus black and gold. Save it offline. Print it. Take it on the walk.

Washington, D.C. Ultimate Photographer’s Guide
Downloadable PDF · 12 GPS-mapped locations · Multi-season calendar · City safety briefing · Packing checklist

Get the Washington, D.C. guide — $47

Combo Deal

Get the Washington, D.C. Guide + Preset Pack

Photograph it. Edit it. Done.

$66
$54
Save $12
PDF Guide Every spot, GPS, golden hour
Preset Pack 20 Lightroom presets
Book your tours & experiences in Washington Dc

All links go to Viator (a TripAdvisor company), the world’s largest marketplace for guided experiences. Tagged as affiliate per FTC.

Also on Amazon: gear that helps with this technique

Quick Amazon shortcuts to the gear most useful for this kind of shot. Use them if Prime shipping or Amazon credit makes more sense than B&H. As an Amazon Associate ShutYourAperture earns from qualifying purchases.

Take Washington, D.C. home in your pocket.

Every shot location, every angle, every time of day worth shooting. Printable PDF + GPS-tagged map.

Instant download. Works on phone, tablet, and printed.

Continue reading

← Back to U.S. Cities Photography Guides

Related guides nearby

Three more photography guides within striking distance — perfect for combining into one trip.

Browse all 78 guides → · Open the map

Save your trip-planning hours

The complete Washington DC guide is $47

All vantage points above + 5 bonus secret spots, printable map, gear pack list, and editing recipes. One-time payment, instant download, lifetime updates.

Buy Washington DC PDF →

Common questions about the Washington DC guide

Is the Washington DC photography guide worth $47?

For most photographers, yes. The guide saves 8-12 hours of trip-planning research and prevents the most common mistake of Washington DC photography: shooting at the wrong time of day. If a single better frame is worth $47 to you, the guide pays for itself on day one. Buyers get every GPS coordinate, every golden-hour window, every cultural rule, and a printable shot list.

Does the Washington DC guide include GPS coordinates?

Yes — every vantage point in the guide has Google Maps-ready GPS coordinates so you can pin them before you fly. The guide also includes a printable map showing all locations clustered by walking distance, so you can build efficient half-day routes.

What's in the Washington DC PDF that isn't in this article?

The article shows the highlights. The PDF includes: 5 additional secret spots not published online, a 14-day itinerary with daily routes, the full camera-settings cheat sheet for every scenario in Washington DC, a printable gear packing list, post-processing recipes with screenshot examples, and a list of local guides we trust for portrait commissions.

Do I get the Lightroom presets too?

The $47 guide is the PDF only. The matching Washington DC preset pack is a separate $19 download — most buyers grab both as a bundle and save the editing time. Both are instant download, both work on Lightroom Classic and Lightroom Mobile.

Will the guide work for a Washington DC trip in 2026?

Yes. The guide is updated annually as fees, restrictions, and new vantage points change. All buyers get free lifetime updates. The 2026 edition includes the latest drone rules, museum photography policies, and seasonal light data for the year.

Get the Washington DC guide · $47