By Edin Chavez | Updated October 2026
A small room is not the problem. Trying to make it hold three sets, a giant modifier, every piece of furniture, and no clear walking route is the problem. Strip it back. Give the person room to breathe. Then build a frame that does not need the whole room.
Small-room boudoir photography rewards choices. One clean background, one comfortable working area, and a camera angle with a purpose can do more than an overstuffed studio. The trick is to plan the space around the session, not plan the session around whatever furniture happens to be there.
This guide is about layout, privacy, distance, and a light footprint that fits. It is not a gear shopping contest or a list of poses. You will map the room, choose a simple set, and test whether it works before inviting someone into it.
 Save
SaveSome links are affiliate links. If you buy through them, we may earn a commission.
Decide whether the room is suitable at all
This is an adults-only workflow. Agree on coverage, boundaries, whether any touch is permitted, who will attend, support-person preferences, and retouching before shooting. The participant can pause or stop at any time. A cramped room does not justify rushing those agreements.
Check privacy from doors, windows, mirrors, and adjacent spaces. A room that looks private in a photograph may be visible from a hallway or neighboring building. Ask what the participant expects and make a plan that matches it. Do not promise absolute confidentiality or assume a closed curtain solves every sightline.
Identify a private changing area before arranging the set. If there is none, solve that problem or use another location. Changing in a corner while the photographer faces away is not automatically equivalent to a private area. The participant’s comfort defines what is acceptable.
Check permission to use the space, including any rules that affect moving furniture or setting up equipment. Do not assume a rented room permits every use. Keep doors and exits accessible. If a usable set requires blocking the exit, placing an unstable stand next to someone, or removing space they need, the room is not suitable for that setup.
Make a room map before moving a single thing
Draw a rough rectangle and mark the door, windows, fixed furniture, and electrical outlets. Add the changing area and the route to it. Then mark where the photographer can stand without backing into furniture. You are mapping relationships, not producing an architectural drawing.
Photograph the empty room from its corners if permission allows. Those views reveal background clutter and sightlines that are easy to miss while standing in the middle. Keep these scouting images private when they reveal someone else’s home or belongings.
Choose a potential subject area and a camera area. Check the route between them. Now add the light or reflector footprint. If the footprint consumes the only walking lane, do not pretend that folding the stand a little narrower is a safe solution. Select a different setup or room.
Make this map before the participant arrives when possible. A prepared room makes the session feel considered. A room you are still wrestling with makes every ordinary adjustment take longer.
Protect a walking lane first
The walking lane is not leftover space after the photograph is planned. It is a requirement. The participant needs to reach the changing area, cover, seating, and exit without stepping over bags, cables, or stand legs. The photographer needs to move without bumping equipment toward someone.
Put cases and unused accessories in a designated storage area outside that lane. Do not hide them behind the participant merely because the camera cannot see them. A hazard outside the frame is still a hazard.
If powered equipment needs cables, choose a route that does not cross normal movement where possible. Follow suitable equipment guidance for securing any necessary run, and inspect it after changes. Battery-powered equipment may reduce cables, but it does not remove stand legs or other obstacles.
Walk the route yourself before shooting. Then explain the layout to the participant and ask if it works for them. Do not assume everyone moves comfortably through the same narrow gap. If it does not work, simplify the set. The picture can be smaller; the person’s space should not have to be.
 Save
SaveRemove clutter by subtraction, not by hiding it everywhere
Start with objects that are not part of the intended scene. Remote controls, charging leads, bright packaging, loose clothing, and extra pillows often create distractions. Move only what you have permission to move, and keep a note or reference photograph so the room can be restored.
Next, inspect the background through the camera. A decoration that looks harmless in the room may create a bright shape next to the face. A mirror may reveal equipment, a doorway, or a private area. Do not rely on background blur to erase those problems.
Keep the few elements that support the image. A textured sheet, an ordinary chair, or a plain wall can be enough. More props do not necessarily create more variety; they may only leave less room to work.
If furniture is heavy, fixed, or awkward, change the angle rather than moving it recklessly. Never ask the participant to help lift equipment or furniture as part of the session. A clean crop is often the fastest safe way to solve a background.
Build one set that can make several frames
Choose a primary set: a simple sheet area, a stable chair, or an uncluttered wall. Then test how it looks from two or three safe camera positions. You may get a tighter frame, a little environmental context, and a different background relationship without moving the entire room.
Keep the changes about framing and light rather than forcing a list of physical positions. The participant’s agreed comfort comes first. If a particular set does not feel right, use another option already discussed or pause to decide together.
A small room benefits from short sequences with modest adjustments. Finish one arrangement, then change it deliberately. Do not leave two unused sets half-built while trying to shoot a third. Every extra object costs floor space and attention.
Think in terms of what the camera needs to see. A sheet can fill a tight frame without transforming the whole room into a bedroom set. A chair can provide a simple visual anchor without requiring a wall of accessories. You are making photographs, not furnishing a showroom.
A sheet set without the improvised construction project
Use clean fabric arranged on an appropriate existing surface or another safe, agreed setup. Inspect wrinkles, bright folds, and edges through the camera. Some texture may support the image; a chaotic pile may not. Make the decision in the frame rather than ironing everything into an artificial-looking flatness.
Do not improvise raised platforms from stacked furniture. Do not stretch fabric across supports that could collapse or ask someone to climb onto a surface that was not made to bear their weight. If you cannot build the intended set with suitable stable support, change the idea.
A floor-level arrangement can be an option only when it is comfortable, accessible, clean, and agreed. Do not assume everyone can comfortably get down or up from the floor. Offer a suitable alternative rather than treating the set as a test of willingness.
Keep coverings nearby and leave enough room to step away. If the sheet setup takes over the walking route or prevents the changing-area door from opening, reduce it. A photograph that shows only part of the set does not need the rest spread across the room.
Choose a chair for stability before style
Use a sound chair appropriate for ordinary seated use and the participant’s needs. Inspect its legs, seat, and floor contact. A beautiful chair that rocks on an uneven surface is not ready for the session. Do not treat furniture’s decorative appearance as evidence of its load capacity.
Place it where the participant can approach and leave without navigating a stand. Check the chair’s relationship to the background and the light, then frame a test. Often a small rotation changes a distracting line or reveals a cleaner patch of wall.
Do not recommend standing or climbing on a chair to get a higher camera position. Change your own framing from a safe floor position or choose a different composition. If a photograph needs a specialized elevated viewpoint, plan suitable equipment separately rather than improvising during an intimate session.
Keep the chair set simple. One useful surface and a clear background often give you more room for expression than a pile of props that demand attention.
 Save
SaveUse subject-background distance where it earns its space
Moving the subject away from the background can change separation, background detail, and how artificial light reaches the wall. But distance is limited in a small room. Spend it deliberately. Do not move the participant into a narrow lane just to chase a theoretical amount of separation.
Test a near-background position and a farther position if both are comfortable and safe. Keep the framing comparable and inspect the result. Look at shadows, reflections, background sharpness, and the room visible around the edges. The farther option is not automatically the better photograph.
When more distance is unavailable, simplify the visible background and choose a framing that suits it. A plain wall can remain readable instead of being blurred into nothing. A curtain can be part of the scene rather than an obstacle you must hide.
Avoid promising that a fast lens will rescue a cluttered space. Depth of field, subject distance, background distance, and the actual frame all matter. This is a room-layout problem first, not a camera-buying problem.
Give the camera enough room too
The photographer’s working area matters. If you cannot make the intended frame without pressing into furniture or stepping backward blindly, choose a different frame. Plan where your feet will be before the session starts.
A doorway may offer a useful viewpoint if it does not block access or reveal a private space. Test the framing and maintain an open route. Do not assume the hallway outside the room is available for you to occupy, especially in a shared or rented location.
For wider environmental frames, inspect the relationship between your position and nearby body parts. Moving very close can change perspective noticeably. Instead of prescribing a lens as a fix, compare a slightly more distant position or a tighter composition when the room allows.
Keep the session’s goal clear. You do not owe the room a full-body environmental frame if it cannot support one safely. Strong close and medium frames can make a coherent sequence without pretending you have a larger studio.
Fit the light to the usable floor, not the ceiling height
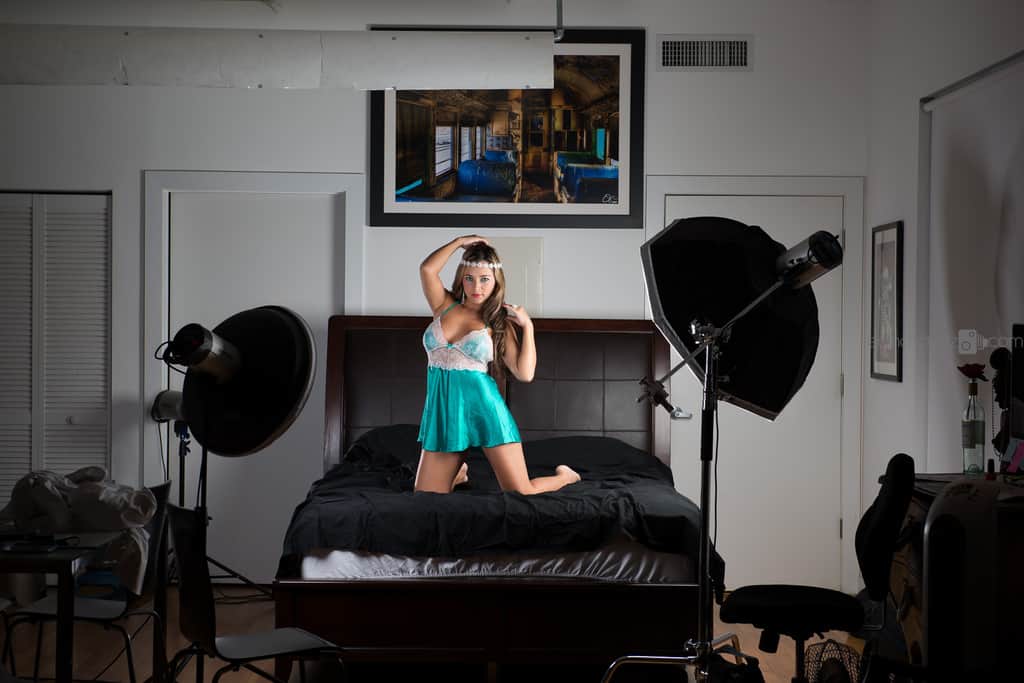
A tall ceiling does not create more floor space for stand legs. Measure the assembled footprint of the stand and modifier, not just the flash body. Account for tilt, brackets, and the direction the modifier occupies. The setup must leave both the participant’s movement area and the walking lane clear.
A window may reduce the need for a powered-light stand, but a reflector still needs safe support. If the reflector holder creates the same crowding problem, use the room’s existing bounce or choose a different angle. Fewer tools can be the correct technical choice.
For artificial light, test one source outside the participant’s movement area before considering more. Do not reduce the stand’s intended spread to make it fit. Match the equipment to its rated use and follow the manufacturer’s instructions.
The researched 13-foot Impact stand has a 52-inch footprint. That is not a compact-room recommendation just because its folded size looks manageable. A smaller support needs its own load and footprint checks. The correct gear box should reflect those checks, not a guess based on the product photograph.
 Save
SaveMirrors and windows deserve their own check
A mirror can reveal the changing area, the camera, equipment, or people outside the intended frame. Examine reflections from every planned camera position. Moving a little can change what appears. Check again after the light or chair moves.
Windows raise both lighting and privacy questions. A bright exterior can dominate the frame; an uncovered pane can expose the set to a sightline outside. Treat those as separate problems. Exposure adjustments do not solve visibility from a neighboring building.
If a curtain is needed for privacy, confirm what it actually covers. If closing it removes your only useful daylight, adapt the lighting or use another space. Do not ask the participant to accept less privacy to preserve the shot.
Review the frame edges too. A cropped doorway or partial reflection can carry information you did not intend to include. Catching it before shooting is easier than trying to remove it from every delivered image.
Keep the participant comfortable through transitions
Leave an agreed cover and personal items accessible. Ask about temperature rather than choosing a universal number. Take breaks when needed. Small rooms can feel crowded quickly, especially when equipment, heat, and several people are involved.
Discuss who will be present, including any assistant, makeup artist, or support person. Do not reduce someone’s support simply to fit more gear. If the planned people and equipment do not fit comfortably, the setup needs to change.
Before moving a stand or chair, pause the sequence and explain the change. Offer cover and space while you adjust. Do not swing a modifier through the participant’s area or reach across them to fix a cable.
Your directions should remain clear and unhurried. The room may be small, but the session does not need to feel like a race through a narrow obstacle course.
Run a complete rehearsal before the session
Set up the primary frame without a participant or with a consenting fully clothed volunteer. Walk from the entrance to the changing area, then to the set, then back out. Check whether any door, case, or stand interrupts that route.
Make three test frames from the planned safe viewpoints. Inspect backgrounds, reflections, and the room’s edges. Then change only one element, such as chair angle or visible sheet area, and repeat. Keep the arrangement that gives useful variety without increasing crowding.
Finish by practicing a transition: where does the cover go, where do you stand while changing equipment, and what happens to the walking lane? A set that works for one static photograph may fail during an ordinary break. The rehearsal should catch that.
Write down the final arrangement and restore the room after the session. Good preparation and a tidy wrap are part of making the location usable again, not extras someone else should have to fix.
 Save
SaveQ&A: small-room boudoir photography
How small is too small for a boudoir session?
There is no universal room-size cutoff. The room needs a suitable private changing arrangement, clear movement and exit routes, and enough space for the agreed session and safely supported equipment. If those needs cannot fit, choose another setup or location.
Do I need a bed?
No. A stable chair, plain wall, or suitable sheet arrangement can support a simple set. Choose what is comfortable and accessible for the participant. Do not build improvised raised platforms to imitate a bedroom.
Should I use a wide lens to make the room look larger?
Not automatically. First choose a safe camera position and inspect perspective and frame edges. A tighter composition or a different angle may solve the room problem without forcing a wide environmental view.
Can I use the hallway as my camera position?
Only when its use is permitted and it does not block access or expose private areas. Test the actual sightline and keep the route clear. A useful doorway is not permission to occupy a shared hallway.
What should I remove first when the setup feels cramped?
Remove unused equipment and nonessential props, then reassess the light footprint and set. Do not take away the participant’s movement space, changing privacy, or agreed support to make room for more gear.
For the full session workflow, start with our boudoir photography beginner guide. For the next room decision, read window-light boudoir guide and one-light boudoir guide.
Continue with Dark and moody boudoir, High-key boudoir, Session preparation checklist, Lightroom editing, Black-and-white boudoir, Photo privacy and delivery.
Recommended gear for this workflow
Keep this box small. The best purchase may be no purchase once you have simplified the room.
- Smaller reflector or diffusion option: the Impact R2522-51 22-inch reflector at B&H is a researched option. Its listed surfaces include diffusion, white, silver, gold and black. Select a size you can support without blocking movement; a smaller disc does not remove the need for safe support.
- Suitable stand and holder: the Impact 8-foot stand and reflector-holder kit at B&H uses a stand with a 36-inch footprint, smaller than the researched 52-inch-footprint stand but still a real floor-space requirement. Check the assembled load, reflector frame and holder fit. If the footprint blocks the walking lane, choose a different setup rather than narrowing the legs.
- Appropriate ballast: the Impact filled 15-pound black saddle sandbag at B&H is a researched candidate, not a stability guarantee or a substitute for correct support.
- File storage after the session: the Samsung T7 Shield 1TB at B&H is a researched portable-drive option. It is not a complete backup or confidentiality system.
For the finished files, explore SmugMug and verify your gallery settings before sharing. For color, masking, detail, and export, use the Lightroom editing course. It teaches general editing, not a dedicated boudoir workflow. The separate portrait cleanup guide covers editing after the room and light are handled.
A small room can make a photograph with serious presence. Give every object a reason to be there, leave the person space, and choose the frame you can make well. You do not need to pretend the room is bigger. You need to use it better.
Source note: room and lighting guidance checked against Amateur Photographer’s boudoir studio guide; boundaries informed by Icon Photography School. Photos illustrate scenes and mood, not documented room dimensions or lighting recipes. Product and link checks are in the editorial ledger.