Best Photography Spots in Reykjavik: 10 Locations With GPS

Tours & experiences disclosure: This guide includes affiliate links to Viator, the world’s largest tour and experiences marketplace. If you book through these links, ShutYourAperture may earn a small commission at no extra cost to you.

Reykjavik photography guide hero imageSave

Amazon Associates disclosure: ShutYourAperture is a participant in the Amazon Services LLC Associates Program. As an Amazon Associate we earn from qualifying purchases. Some links below go to Amazon (Store ID edinchavez01-20). Buying through these links costs you nothing extra and helps fund our free guides.
Skip the planning. Get the Reykjavik PDF. All locations, GPS coordinates, golden-hour times, gear tips. Instant download.

Reykjavik, Iceland is one of the most photogenic cities in the world. If you have a camera and the patience to show up before dawn, Reykjavik will give you images that last a career — but only if you know where and when to point it.

This is the definitive field guide to the 10 best photography spots in Reykjavik, with GPS coordinates you can drop straight into Google Maps, exact camera settings tuned to Reykjavik’s unique light, precise timing for every location, and the access notes nobody else bothers to document. It mirrors the intel inside our Reykjavik Ultimate Photographer’s Guide ($47 PDF) — a downloadable field guide with full-page hero images, GPS maps, seasonal tables, a city safety briefing, and a complete photographer’s packing list. Get the guide →

Planning multi-city travel? See also: U.S. cities photography hub and the National Parks Photography Guides.

Reykjavik Ultimate Photographer’s Guide — $47
10 GPS-mapped locations · Exact camera settings · Multi-season shooting calendar · Free annual updates

Download the PDF guide →
Skip the planning

Get the Reykjavik Ultimate Photographer’s Guide

Every location below — pre-mapped with GPS, golden-hour timing, gear recommendations, cultural rules, and a 14-day itinerary. Downloaded by 200+ working photographers.

Get the PDF · $47
Instant download · Lifetime updates

Quick jump to the 10 spots

  1. Hallgrímskirkja — Skólavörðustígur Façade
  2. Hallgrímskirkja Tower — Rooftop Panorama
  3. Sun Voyager (Sólfarið) — Sæbraut Waterfront
  4. Harpa Concert Hall — Harbour Façade
  5. Old Harbour (Gamla Höfnin)
  6. Perlan — 360° Observation Deck
  7. Tjörnin — City Pond Shoreline
  8. Laugavegur — Rainbow Street and Street Art
  9. Grótta Lighthouse — Northern Lights Peninsula
  10. Mount Esja — Viewpoint over Reykjavik

A look inside the Reykjavik Photographer’s Guide

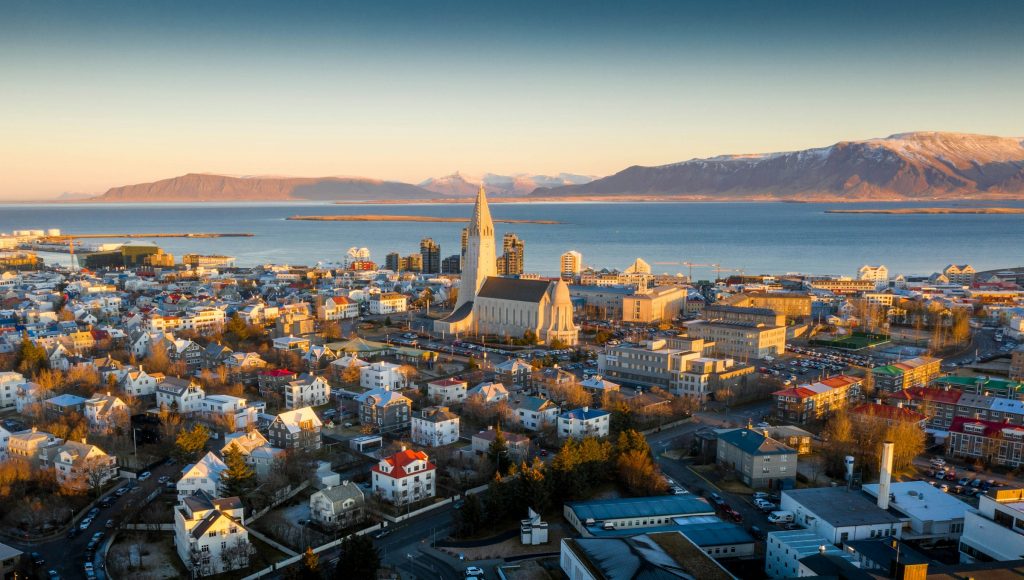
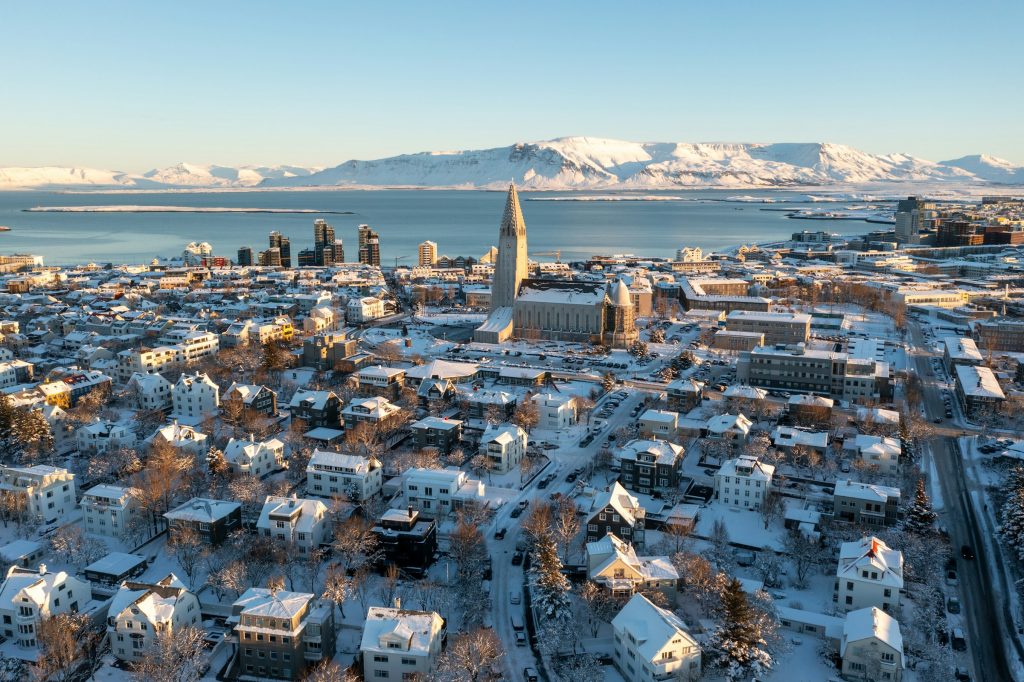
Here are three of the actual shots you’ll find inside the PDF — cinematic full-page references for the exact spots, lenses, and lighting conditions documented in the guide. The full guide includes 10 locations, each with a hero image, GPS map, settings table, and a five-shot list.

Hallgrímskirkja — Skólavörðustígur Façade — from the Reykjavik Photographer's GuideSave
Hallgrímskirkja — Skólavörðustígur Façade — sample reference photo from the Reykjavik Photographer’s Guide PDF

Before you shoot Reykjavik: the essentials

  • Free public access: Sun Voyager sculpture, Old Harbour waterfront, Tjörnin pond shoreline, Skólavörðustígur (Rainbow Street), Laugavegur shopping street, Harpa exterior, Grótta Lighthouse peninsula (tide-dependent), and all public streets and parks are free. Hallgrímskirkja church nave is free; tower observation deck 1,500 ISK/adult, 200 ISK children 7–16 (tickets at church shop, no advance booking). Perlan museum and observation deck: from ~3,490 ISK/adult (perlan.is). Mount Esja trailhead parking is free. Hallgrímskirkja opening hours: 10:00–20:00 summer (May 16–Sept 30), 10:00–17:00 winter.
  • Commercial permits: Personal and tourist photography throughout all public spaces in Iceland is unrestricted. Commercial shoots on public land require coordination with Reykjavík City (reykjavik.is) and, for national parks or nature reserves, a permit from the Icelandic Environment Agency (ust.is). Drone use is regulated by the Icelandic Transport Authority (samgongustofa.is): max altitude 120 m without special permission; prohibited within 2 km of Reykjavík Domestic Airport (BIRK) and Keflavík International Airport (BIKF) without airport operator consent; may not fly within 50 m of residential buildings or 150 m of public buildings. No drone flights over crowds. Many major tourist sites display ‘No Drone’ signs — obey them. Register commercial drones with the ITA.
  • Best photography seasons: June–August (Midnight Sun — golden hour lasts 3–5 hours near midnight, near-24-hour daylight, vivid colours) and September–October (first Northern Lights windows, crisp air, dramatic autumn skies, manageable crowds)
  • Blue hour notes: Reykjavik sits at 64.13°N — one of the highest-latitude capitals in the world. The sun travels a very flat arc across the sky, meaning golden hour and blue hour together can last 2–5 hours depending on season. In mid-summer (June), the sun never sets; instead, it skims the northern horizon around midnight creating a near-continuous golden hour. In deep winter (December–January), the sun rises only around 11:30 AM, climbs to ~3° above the horizon at solar noon, and sets around 3:30 PM — giving just 4–5 hours of usable light, all of it golden-hour quality. Spring and autumn offer the most versatile shooting conditions: 8–16 hours of dramatic low-angle light, genuine blue hours of 30–45 minutes, and dark enough skies for Northern Lights (September–April).
  • Drone policy: Drone laws vary widely by country and city — many capital and tourist zones are no-fly. Verify the local civil aviation authority’s current rules before launching.
  • Local resource: Official visitor information

The full-resolution version of every map below — plus seasonal calendars, gear notes per location, sun-angle diagrams, and a complete photographer’s packing checklist — is inside the Reykjavik Photographer’s Guide PDF ($47).

1. Hallgrímskirkja — Skólavörðustígur Façade

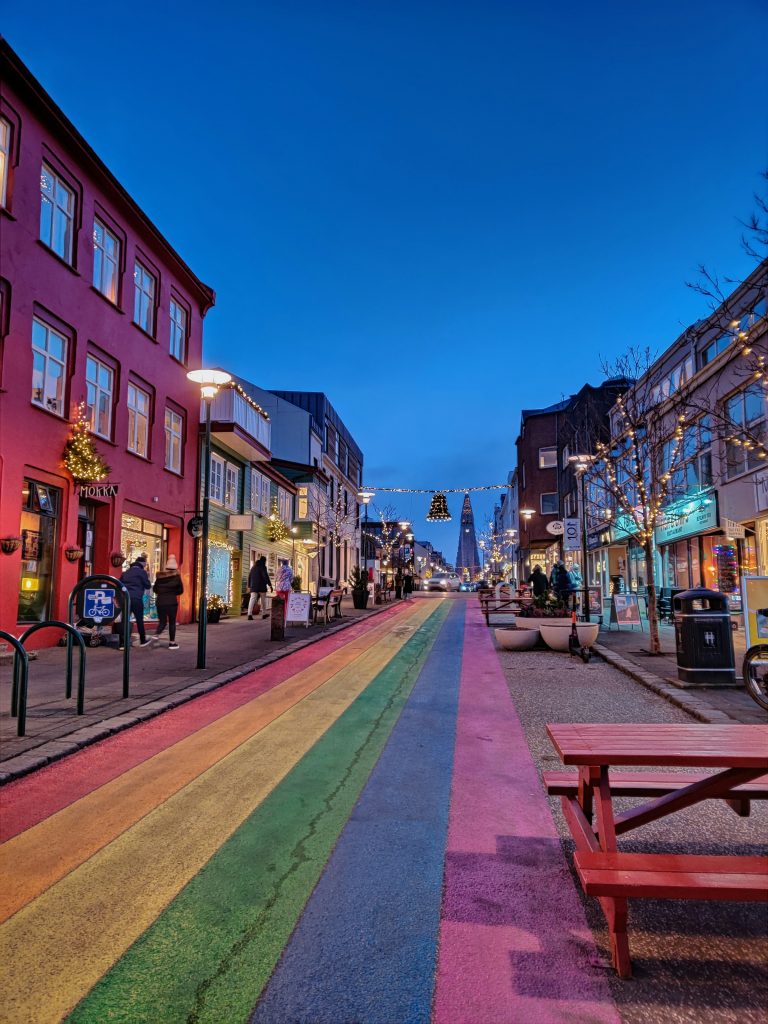
At 74.5 m, Hallgrímskirkja is the tallest building in Iceland and the undisputed icon of Reykjavik’s skyline. The expressionist façade — designed by Guðjón Samúelsson in 1937 and inspired by the columnar basalt lava flows of the Icelandic highlands — creates an endlessly sculptural surface for directional light. The long axis of Skólavörðustígur provides a natural leading-line composition, with colourful Icelandic houses converging on the church spire at the vanishing point. The Leif Eriksson statue in the forecourt adds a mid-ground element and human scale. Few buildings in Europe are so photogenic in overcast flat light as in golden sun.

  • GPS: 64.1417, -21.9266
  • Elevation: 203 ft
  • Best time of day: golden hour — roughly 30–60 minutes before sunset when low-angle light rakes the basalt-column buttresses from the south or southwest, carving deep shadows into the stepped concrete; also strong at civil twilight and blue hour when the illuminated façade glows against cobalt sky
  • Sun direction: The church faces due west down Skólavörðustígur. At Reykjavik’s latitude (64.13°N) the sun rises roughly northeast (azimuth ~40°) in summer and southeast (~130°) in winter. In summer, the north-facing buttresses on the right flank are lit by the near-midnight sun arcing north of due west; the frontal west-facing façade catches warm sidelight from the southwest in late afternoon and is fully front-lit near the summer solstice midnight. In winter, the sun sets to the south-southwest (~220°), throwing golden raking light across the textured concrete surface from low elevation angles — the most dramatic conditions for revealing the basalt-column texture. Sunrise backlight in winter comes from the southeast, silhouetting the tower against a pale sky for moody minimalist shots.
  • Access: Hallgrímstorg 1, 101 Reykjavík. Church nave free; tower 1,500 ISK adults, 200 ISK children 7–16 (no advance booking; tickets at church shop). Opening hours: 10:00–20:00 summer (May 16–Sept 30), 10:00–17:00 winter. Walk up Skólavörðustígur from city centre (~10 min from Laugavegur). No dedicated parking; metered street parking on surrounding streets. Bus routes 1, 3, 6, 14 stop nearby.
  • Difficulty: easy
  • Recommended settings: Golden Hour Facade: f/8, 1/250 sec, ISO 200, 24–35mm, slight upward tilt to capture full spire  ·  Blue Hour Illuminated: f/8, 4 sec, ISO 100, 24mm, tripod  ·  Overcast Texture: f/11, 1/60 sec, ISO 400, 50mm to compress the buttress layers  ·  Rainbow Street Leading Lines: f/8, 1/200 sec, ISO 200, 16–20mm from street level

Shots to chase:

  • Standing at the bottom of Skólavörðustígur looking up the rainbow-painted street with the church filling the frame — classic leading-line composition using the colourful facades of the flanking shops
  • Ultra-wide low-angle shot from the base of the steps emphasising the towering spire against sky
  • In winter after snowfall: church façade dusted white, foreground snow on cobblestones, warm illumination against deep blue hour sky
  • Long telephoto (200mm+) from the Old Harbour to compress Hallgrímskirkja rising above lower buildings for a telephoto cityscape
  • Leif Eriksson statue silhouetted against illuminated church at dusk — shoot from the side to align statue and spire

Pro tip: Arrive before 8 AM on weekdays to have Skólavörðustígur nearly to yourself for the leading-line shot. The rainbow paint on the street is on the pedestrian/cycling zone — the best angle is from the middle of the street, so wait for a gap in foot traffic. For tower shots, arrive when it opens (10 AM) to avoid mid-day queues. The bell rings every 15 minutes and is extremely loud inside — time interior shots between chimes.

Common mistake to avoid: Shooting at mid-day under flat overhead light erases the basalt-column texture entirely. Standing too close with a wide lens (14mm or shorter) creates extreme keystoning — 24–35mm from further back produces a more natural, imposing result. Forgetting to include the Leif Eriksson statue as foreground anchor loses scale context.

2. Hallgrímskirkja Tower — Rooftop Panorama

At 73 m above the hill on which the church stands, the tower gives the highest publicly accessible viewpoint in central Reykjavik. The 360° outdoor walkway reveals the entire city grid, the corrugated-iron rooftops in every colour, the Old Harbour, Harpa, Tjörnin pond, and the ring of mountains (Esja, Akrafjall, Snæfellsjökull on clear days) — all within a single rotational sweep. It is the only vantage in the city that shows Reykjavik as the compact, colourful, sea-wrapped capital it is.

  • GPS: 64.1417, -21.9266
  • Elevation: 446 ft
  • Best time of day: late afternoon in summer when the Midnight Sun hangs to the north-northwest, lighting the multi-coloured corrugated-iron rooftops in warm amber and the harbour glitters; in winter, shoot at the narrow midday solar window (11:30 AM–3:00 PM) when the sun briefly clears the horizon
  • Sun direction: From the tower at 64.13°N the entire city spreads below. The harbour and Harpa Concert Hall lie to the north-northwest; Mount Esja dominates the northern horizon. In summer the sun sweeps from northeast at dawn through a low northern arc to northwest at midnight, providing warm raking sidelight across the roofscape for almost the entire 24-hour period. In winter the sun arcs low along the southern sky — at solar noon it reaches only ~3° elevation — creating hour-long golden light across the southern suburbs. The tower’s observation windows face outward in all four directions.
  • Access: Hallgrímstorg 1, 101 Reykjavík. Tower ticket 1,500 ISK adults; purchase at church shop (ground floor, left of entrance lobby). Elevator to the top (small cabin, ~4 people). Open 10:00–20:00 summer, 10:00–17:00 winter. Last admission 15 min before closing. No advance booking possible. Tripods allowed on the observation walkway but space is limited.
  • Difficulty: easy
  • Recommended settings: City Panorama Clear Day: f/11, 1/500 sec, ISO 200, 24mm  ·  Golden Hour Rooftops: f/8, 1/250 sec, ISO 200, 50mm to isolate colour blocks  ·  Winter Midday Low Sun: f/8, 1/250 sec, ISO 400, 24mm  ·  Overcast Wide: f/8, 1/125 sec, ISO 400, 16mm

Shots to chase:

  • 360° panning series of the colourful rooftop patchwork — stitch into a panorama in post
  • Harpa Concert Hall and Old Harbour framed together from the north-facing window with Mount Esja as backdrop
  • Telephoto (100–200mm) isolating individual colourful corrugated-iron house blocks with the mountains behind
  • Sun Voyager sculpture visible as a tiny silver glint on the Sæbraut waterfront — compress with a 200mm lens
  • In winter: the full city under a deep indigo twilight sky with the harbour lights just switching on

Pro tip: The observation walkway is narrow and exposed — wind can be extreme at any season, so weight tripod legs or use a low-profile bean bag against the railing. Go at opening time (10 AM) in summer to avoid tour-group queues that build by 11 AM. In winter, the midday light window is very brief (~3 hrs) — time your ascent for solar noon (approximately 12:45 local time) to catch the sun at maximum elevation. Bring a polarising filter to reduce haze and saturate the harbour water.

Common mistake to avoid: Using a very wide lens and shooting straight down produces extreme converging verticals in the streets below — a mid-range zoom (24–70mm) gives more natural proportions. Forgetting that the observation windows have glass panels in some sections — check for reflections before shooting. Arriving too late in winter when the sun has already set at 3:30 PM.

3. Sun Voyager (Sólfarið) — Sæbraut Waterfront

Jón Gunnar Árnason’s 1990 dreamboat sculpture is Iceland’s most photographed modern artwork — and for good reason. The 18-metre stainless steel vessel, set directly on the sea-facing shoreline, mirrors and transforms any available light: golden at dusk, silver under cloud, spectral under the Northern Lights. Mount Esja (914 m) rises directly across the bay as a natural backdrop that changes with every weather system. The sculpture’s open lattice ribs allow creative framing, and its polished base provides a secondary reflection in calm conditions.

  • GPS: 64.1476, -21.9223
  • Elevation: 16 ft
  • Best time of day: summer midnight sun — during the weeks surrounding the June solstice the sun dips to the north-northwest around midnight and bathes the steel hull in warm amber; also outstanding at civil twilight in any season when the sky behind the sculpture shifts through cobalt to deep blue
  • Sun direction: The Sun Voyager faces northwest across the Faxaflói Bay toward the Esja massif. In summer, the midnight sun arc passes almost directly behind the sculpture from the camera’s standard northeast-facing shooting position, creating spectacular backlit silhouette and rim-lit steel effects. In winter, the sun rises to the southeast and sets to the south-southwest (~215°), giving side-light rather than backlight — the steel reflects warm tones from 10:30 AM through 2:00 PM. At dawn in all seasons, shooting from the southwest looks back at the sculpture with the sunrise sky behind Esja as backdrop. The sculpture acts as a giant light-collecting mirror — even on overcast days the polished steel surfaces gather and reflect diffused sky light beautifully.
  • Access: Sæbraut, 101 Reykjavík (along the waterfront road between Harpa and the Höfði house). Free, open 24 hours. 15-minute walk east from Harpa Concert Hall along the seafront promenade. Parking available along Sæbraut (no fee in most sections). No nearby bus stop on the waterfront; nearest bus stop is inland on Lækjargata. Wheelchair accessible. Steps down to the sculpture can be icy in winter.
  • Difficulty: easy
  • Recommended settings: Midnight Sun Backlit: f/11, 1/500 sec, ISO 100, 24mm — expose for sky to silhouette ribs  ·  Blue Hour Long Exposure: f/11, 15 sec, ISO 100, 24mm, tripod — blurs any water movement  ·  Northern Lights: f/2.8, 5–10 sec, ISO 1600–3200, 14–24mm, manual WB ~4000K  ·  Overcast Steel Texture: f/8, 1/125 sec, ISO 400, 50–85mm to isolate rib details

Shots to chase:

  • Front-on wide-angle with Mount Esja centred between the steel ribs — shift slightly off-centre for stronger leading lines
  • Low-angle perspective at sea level looking up through the rib lattice with the sky filling the negative space
  • Northern Lights arching over the sculpture (September–April): foreground sculpture silhouetted by green aurora above the bay
  • Summer midnight-sun silhouette: sculpture as a stark black dreamboat shape against a horizon glowing amber at 1 AM
  • Long exposure (30 sec) blurring the Faxaflói Bay water into silk beneath the sculpture with Esja sharp on the horizon
  • Telephoto shot framing the full moon (or rising sun) through the central opening of the hull

Pro tip: In winter, arrive an hour before sunrise (~9:30 AM) to set up composition before the brief golden-hour window opens. The exposed seafront is consistently one of the windiest spots in Reykjavik — weight your tripod heavily or brace against the stone railing. A 4-stop ND filter allows 10–15 second exposures in daylight for water-blur effects. To remove the constant flow of tourists, a 3–5 minute exposure at f/16 in midday flat light will ghost them out entirely. For Northern Lights, set white balance manually to ~4000K to prevent the city’s sodium-vapour streetlights from yellowing the aurora; adjust further in post.

Common mistake to avoid: Shooting straight-on from the standard tourist position at mid-day under flat light — the steel appears grey and featureless. Always orient toward the light source. Neglecting to check tide and wind conditions; calm nights give water reflections, rough conditions give dramatic spray. Standing too far back loses the sculptural detail that makes the individual ribs compelling.

Want this in your pocket on the street?
The full-resolution version of every spot above — with full-page hero photography, GPS maps with gold location pins, sun direction diagrams, multi-season tables, and a complete safety + packing checklist — is inside the Reykjavik Ultimate Photographer’s Guide PDF ($47). Print it, save it offline, take it on the walk. Get the guide →

4. Harpa Concert Hall — Harbour Façade

Designed by Henning Larsen Architects and artist Olafur Eliasson, Harpa’s façade is built from 714 quasi-brick glass cells inspired by Iceland’s basalt columns. Each panel is unique in shape and curvature, creating a fractal, kaleidoscopic surface that transforms with every shift of light, cloud, and angle. The building simultaneously reflects the sky, the harbour water, Mount Esja, and the changing Icelandic weather in a constantly moving composition. Inside, the geometric ceiling panels create dramatic abstract photography possibilities with a wide-angle lens pointed upward.

  • GPS: 64.1499, -21.9332
  • Elevation: 10 ft
  • Best time of day: blue hour — 20–40 minutes after sunset when the 714 LED-lit hexagonal glass panels ignite in colour-shifting light while the last cobalt sky still illuminates the harbour; also excellent during daytime for interior abstract geometries
  • Sun direction: Harpa faces east toward the inner harbour. In summer, the sunrise at azimuth ~40°–50°NE catches the south and east façades at low angle, creating intense prismatic reflections as the hexagonal glass panels fracture the light. At Reykjavik’s 64°N latitude the sun never rises high — even at summer solar noon it reaches only ~49° elevation — so the glass panels are always hit at an angle, maximising refraction and colour effect. In winter the sun rises to the southeast (~130°) and arcs across the southern sky; the southeast-facing panels glow amber from 11 AM–1 PM. After dark, the programmable LED system creates its own light show independent of the sun.
  • Access: Austurbakki 2, 101 Reykjavík. Exterior public space open 24 hours, free. Interior lobby open 10:00–22:00 (check harpa.is for event days). Underground parking garage on site. 5-minute walk from Lækjartorg Square. Bus stop on Geirsgata (multiple routes). Fully wheelchair accessible.
  • Difficulty: easy
  • Recommended settings: Blue Hour Exterior: f/8, 4 sec, ISO 100, 24mm, tripod  ·  Daytime Facade Reflections: f/8, 1/250 sec, ISO 200, 24–50mm  ·  Interior Abstract Ceiling: f/8, 1/60 sec, ISO 800, 14–16mm, pointed upward  ·  Golden Hour Harbour Wide: f/11, 1/250 sec, ISO 200, 16mm to include harbour and Esja

Shots to chase:

  • Full south façade reflection shot from the harbour boardwalk at blue hour: LED panels in colour, mirror-like harbour water below
  • Close-up of individual hexagonal panels refracting sunrise light — at 50mm each cell becomes an abstract prism
  • Interior wide-angle ceiling shot: the quasi-brick ceiling viewed straight up creates a honeycomb geometric abstraction
  • Telephoto compression from the Old Harbour pier compressing Harpa, the waterfront, and Esja into three distinct layers
  • Long exposure from the south at night with boat light trails streaking across the black harbour water in the foreground

Pro tip: For exterior reflections, shoot from the floating harbour boardwalk directly to the east — the water reflection of the lit façade doubles the visual impact at blue hour. Use a circular polariser during daylight to selectively control how much sky appears in each glass panel. Interior shots of the lobby and ceiling are free of charge even without a concert ticket. Check harpa.is — on concert nights the building is lit in themed colour programs visible from the waterfront for up to an hour before and after performances.

Common mistake to avoid: Shooting the exterior at mid-day under overcast sky reduces the glass panels to dull grey hexagons with no visual differentiation. Any light — even a pale winter sun at 10° elevation — ignites the prism effect, so prioritise angled light over bright light. Forgetting to include harbour foreground loses the vital reflection layer that defines the composition.

5. Old Harbour (Gamla Höfnin)

Old Harbour (Gamla Höfnin) Reykjavik photography sampleSave
Old Harbour (Gamla Höfnin) — cinematic reference from the Reykjavik Photographer’s Guide PDF

The Old Harbour is Reykjavik’s working maritime core — commercial trawlers, research vessels, coast guard ships, and whale-watching tour boats all share the same quays. The harbour offers authentic nautical atmosphere: salt-bleached ropes, rusting hulls, colourful nets, and the smell of salt air. The southern shore is lined with corrugated-iron warehouses in traditional Icelandic colours. From the northern pier, Harpa and Hallgrímskirkja appear together on the skyline over the boat masts — one of the few spots in the city where both icons share a single wide-angle frame.

  • GPS: 64.1516, -21.9421
  • Elevation: 6 ft
  • Best time of day: dawn in summer — the sun rises to the northeast over the inner harbour around 3–4 AM, igniting the trawler hulls and the Harpa glass in simultaneous gold; in winter, the calm midday window (11 AM–2 PM) when low sun catches the boat masts and corrugated warehouse walls
  • Sun direction: The main pier faces north-northeast toward the open bay. In summer the sun rises at ~40°NE and passes to the north of the harbour, giving extended low-angle sidelight from the northeast all morning and northwest all evening. Boats moored along the western quay catch warm sidelight from mid-morning; the colourful corrugated fish-warehouse buildings on the south side of the harbour catch light all day in summer. In winter the sun rises to the southeast (~130°) and tracks low across the southern sky — harbour buildings on the southern pier are front-lit from 11 AM–1 PM and the boats silhouette dramatically against a bright southern sky at midday.
  • Access: Geirsgata, 101 Reykjavík. Public waterfront, free, open 24 hours. 10-minute walk west of Harpa along the waterfront. Street parking along Geirsgata and Ægisgarður. Bus routes 14, 15 serve the area. Whale-watching, puffin, and boat tours depart from the eastern quay — arrive 30–60 minutes before tour departure for harbour activity shots.
  • Difficulty: easy
  • Recommended settings: Dawn Golden Hour: f/8, 1/250 sec, ISO 200, 24–50mm  ·  Boat Mast Silhouettes: f/11, 1/500 sec, ISO 200, 70–200mm, shoot toward the light  ·  Long Exposure Water Reflections: f/11, 30 sec, ISO 100, 24mm, tripod — smooths harbour water to glass  ·  Overcast Flat Colour: f/8, 1/125 sec, ISO 400, 50mm to saturate hull colours

Shots to chase:

  • Wide-angle from the eastern end of the main quay: boat masts, Harpa, and Hallgrímskirkja tower in a single 16mm composition
  • Long exposure at dusk or dawn smoothing the harbour water into a mirror while boat hulls remain sharp
  • Tight telephoto details of rusting hull textures, coiled ropes, and orange life rings — maritime abstract compositions
  • Colourful corrugated-iron warehouse facades on the southern harbour side: symmetrical frontage shots in flat light maximise colour saturation
  • Whale-watching or puffin boats departing from the quay — capture spray and departure activity with a fast shutter

Pro tip: The harbour is most atmospheric in the very early morning (3–5 AM in summer) when trawlers return from overnight trips and the light is extraordinary. In winter, frozen harbour ice on unusually cold days (rare but spectacular) transforms the reflections entirely. Pair a harbour visit with Harpa: walk the 5-minute stretch between them at blue hour for a continuous waterfront long-exposure sequence. The green and red boathouses on the far western end of the harbour add strong colour accents that work especially well on overcast days when saturation is highest.

Common mistake to avoid: Only visiting during midday tourist rush when tour boats and crowds clutter compositions. Ignoring the southern warehouse facades in favour of the open water view — the buildings are some of the most colourful architectural subjects in the city. Forgetting that a polariser eliminates unwanted sky reflections in boat window glass.

6. Perlan — 360° Observation Deck

Perlan’s hemispherical glass dome sits atop six former geothermal hot-water storage tanks on Öskjuhlíð hill — the highest point in the immediate Reykjavik urban area. The outdoor observation deck on the 4th floor encircles the dome, providing an unobstructed 360° view that no other city viewpoint matches: north over the harbour and across Faxaflói Bay to Esja; east to Hallgrímskirkja and the inner city; south across Kópavogur and the lava fields; west to Seltjarnarnes peninsula and the open Atlantic. The Snæfellsjökull glacier appears above the ocean horizon on the clearest winter days.

  • GPS: 64.1292, -21.9189
  • Elevation: 397 ft
  • Best time of day: clear day from late morning to mid-afternoon in winter (the entire light window), or evening golden hour in summer when the glass dome glows amber and the city below is bathed in warm light
  • Sun direction: Perlan sits atop Öskjuhlíð hill (~60 m above city level), elevating the camera to roughly 100 m total above sea level. The 360° deck faces all directions. In summer, the northern view across the city to the bay and Esja is lit from the north by the midnight-sun arc — shooting north at midnight catches golden backlight on Hallgrímskirkja tower and the harbour. In winter, the low southern sun illuminates the entire southern suburban sprawl from 11 AM–2 PM; the northern view toward the bay and Esja is in soft fill light. On exceptionally clear winter days, the Snæfellsjökull glacier (~100 km northwest) appears as a white pyramid above the horizon — a rare but spectacular wide-angle opportunity.
  • Access: Varmahlíð 1, 105 Reykjavík. Museum ticket required for observation deck (~3,490 ISK/adult; perlan.is). Open daily 10:00–21:00 (last entry 20:30). 3 km southwest of city centre; easiest by car (free parking on site) or taxi. Bus route 18 stops at the base of Öskjuhlíð hill (~10 min walk to Perlan entrance). Note: observation deck is fully outdoor and extremely exposed — wind speeds at deck level regularly exceed 40 km/h.
  • Difficulty: easy (with ticket)
  • Recommended settings: Panoramic Cityscape: f/11, 1/500 sec, ISO 200, 24mm  ·  Telephoto City Detail: f/8, 1/500 sec, ISO 200, 200mm to isolate Hallgrímskirkja against Esja  ·  Snowy Suburbs Winter: f/11, 1/500 sec, ISO 400, 50mm  ·  Golden Hour Rooftops: f/8, 1/250 sec, ISO 200, 35mm

Shots to chase:

  • 360° panning series: stitch into a full-circle panorama showing city, bay, mountains, and lava fields simultaneously
  • Hallgrímskirkja tower in the middle distance with the full Esja massif and bay behind it — 70–200mm for compression
  • On a clear winter day: Snæfellsjökull’s snow-capped cone appearing above the western horizon — 200mm framing its peak over the rooftops
  • Harpa Concert Hall glinting on the waterfront with boats in the Old Harbour below at golden hour — ~100mm
  • Aerial-perspective map-like shot at f/16 showing the suburban street grid spreading south into the lava field

Pro tip: Check the weather forecast obsessively before visiting — even slight haze reduces visibility dramatically at this elevation, and wind regularly makes tripod use difficult. Bring a sturdy leg-weighted tripod or use a monopod braced against the railing. For the Snæfellsjökull glacier shot, clear frosty winter mornings after a cold northerly system passes offer the best visibility. Combine with a visit to the forest trails on Öskjuhlíð below — the forested hillside with views up toward the dome’s geometric silhouette offers a different, more intimate perspective.

Common mistake to avoid: Visiting on a marginally cloudy day and finding the view reduced to grey suburban sprawl — the observation deck only delivers its full value in clear or mostly-clear conditions. Not allowing enough time; the full 360° sequence of shooting positions takes 45–60 minutes to cover properly.

Want this in your pocket on the street?
The full-resolution version of every spot above — with full-page hero photography, GPS maps with gold location pins, sun direction diagrams, multi-season tables, and a complete safety + packing checklist — is inside the Reykjavik Ultimate Photographer’s Guide PDF ($47). Print it, save it offline, take it on the walk. Get the guide →

7. Tjörnin — City Pond Shoreline

Tjörnin is Reykjavik’s urban centrepiece — a small lake in the heart of the downtown grid that provides the city’s most accessible and versatile reflection surface. On calm mornings the still water mirrors Hallgrímskirkja, the City Hall, the Fríkirkjan church spire, and the distant Esja — four major photographic subjects captured in a single composition. Year-round resident birds (arctic terns, swans, eider ducks, geese) provide wildlife photography opportunities. In winter, partial or full freezing transforms the pond into a surreal ice field with birds sliding on the surface.

  • GPS: 64.142, -21.9422
  • Elevation: 30 ft
  • Best time of day: early morning at golden hour — the pond surface acts as a perfect mirror in calm conditions; in winter when the pond freezes over, midday light on the ice and surrounding snowscape creates striking monochromatic compositions; also notable on winter nights with Northern Lights
  • Sun direction: Tjörnin runs roughly north–south in the city centre. Looking northeast from the southern shore, the view captures Hallgrímskirkja on the hillside above the rooftops with the City Hall (Ráðhús) on the northern shore in the foreground. In summer, the sun rises northeast (~45°) and arcs north, back-lighting the view from the south shore for a short window at dawn; by mid-morning the church is side-lit from the east. In winter the low sun comes from the southeast, illuminating the east-facing rooftops and casting warm light on the church tower from around 11 AM. The Fríkirkjan (Lutheran Free Church) on the west shore catches late-afternoon sidelight in all seasons.
  • Access: Tjarnargata, 101 Reykjavík. Public park and promenade, free, open 24 hours. Central location — 5-minute walk from Laugavegur; 8-minute walk from Harpa. Metered street parking on Tjarnargata and Vonarstræti. Bus routes 1, 3, 6 stop nearby. The southern end merges with Hljómskálagarður Park, which extends the accessible shoreline.
  • Difficulty: easy
  • Recommended settings: Mirror Reflection Calm Dawn: f/11, 1/60 sec, ISO 200, 24mm — split composition 50:50 sky and reflection  ·  Winter Ice Overcast: f/8, 1/250 sec, ISO 400, 35mm  ·  Bird Wildlife: f/5.6, 1/1000 sec, ISO 800, 200–400mm  ·  Northern Lights Reflection: f/2.8, 8–15 sec, ISO 1600–3200, 14–24mm, manual WB

Shots to chase:

  • Pre-dawn mirror reflection: Hallgrímskirkja and City Hall reflected symmetrically in the glassy pond surface — shoot from the south bank with a polariser removed to maximise reflections
  • Wide-angle encompassing the Fríkirkjan spire, swans on the water, and Esja behind the City Hall — autumn or spring for colour contrast
  • Winter ice: close-up abstracts of fractured ice patterns with nesting birds stepping across the surface
  • Northern Lights (September–April): aurora reflected in the dark water — combine with City Hall outline for a uniquely urban Northern Lights composition
  • The City Hall bridge crossing: leading-line shot with the bridge guiding the eye across the water toward the downtown skyline

Pro tip: The best reflections occur on windless mornings within 30 minutes of sunrise — even light wind ripples destroy the mirror effect. Bring a polariser but leave it off when shooting reflections. The southern end at Hljómskálagarður Park is less crowded than the City Hall north shore and gives a wider unobstructed southward composition toward Hallgrímskirkja. For Northern Lights, position at the southern shore: darker sky overhead, no city light behind you, pond reflecting the aurora. In January–February when Tjörnin freezes solid, local residents skate on it — genuine candid street photography opportunities.

Common mistake to avoid: Arriving in the afternoon when the sun has already passed the optimal angle for the Hallgrímskirkja reflection. Shooting with a polariser applied at maximum effect — this removes the reflection entirely; rotate to 90° from maximum to fine-tune. Missing the geothermal-heated sections of the pond in winter, which stay unfrozen and swirl with steam — a dramatic contrast to the icy surroundings.

8. Laugavegur — Rainbow Street and Street Art

Laugavegur is one of the oldest and most architecturally varied commercial streets in northern Europe, lined with 19th-century corrugated-iron shopfronts painted in every conceivable colour alongside modernist cafés and boutiques. Skólavörðustígur — the cross-street painted in rainbow colours (added for LGBTQ+ Pride) — provides one of the most iconic leading-line compositions in the city, pointing directly at Hallgrímskirkja. The surrounding blocks are dense with independently commissioned murals: large-format pieces by Icelandic and international street artists cover entire building gables, making the neighbourhood a de facto open-air gallery.

  • GPS: 64.1405, -21.9231
  • Elevation: 82 ft
  • Best time of day: early morning (before 8 AM on weekdays) when the streets are empty and the rainbow paint on Skólavörðustígur is unobstructed; at dusk in any season when warm amber shop-window light spills onto the rain-wet street surface
  • Sun direction: Laugavegur runs roughly east–west through the city centre. The intersecting Skólavörðustígur (Rainbow Street) runs south to north, ending at Hallgrímskirkja. In summer, early morning sun from the northeast (~50°) side-lights the colourful building facades from the right and creates long ground shadows down the street. In winter, the low southern midday sun at ~130° azimuth illuminates south-facing facades and creates strong contrast between lit and shadowed sides of the street. The rainbow-painted street surface on Skólavörðustígur reflects and emphasises whichever direction light falls.
  • Access: Laugavegur, 101 Reykjavík (the street runs ~2 km through downtown from Laekjartorg square in the west to Rauðarárstígur in the east). Public street, free, open 24 hours. Skólavörðustígur (Rainbow Street) intersects at roughly the mid-point. Most shops open 10 AM–6 PM; cafés earlier. Limited metered street parking; buses 1, 3, 6, 14 serve the route. Walking is the only practical mode during peak hours.
  • Difficulty: easy
  • Recommended settings: Rainbow Street Leading Lines: f/8, 1/250 sec, ISO 200, 24mm — from street level, slightly off-centre  ·  Shop Facade Colour Study: f/8, 1/125 sec, ISO 400, 50mm  ·  Wet Street Reflections: f/8, 1/60 sec, ISO 400, 35mm after rain  ·  Street Art Murals: f/8, 1/250 sec, ISO 200, 24mm — shot perpendicular to wall to avoid keystoning

Shots to chase:

  • Standing on Skólavörðustígur looking north uphill toward Hallgrímskirkja: rainbow paint in foreground, converging facades, church filling the top of the frame
  • After rain: the rainbow street reflected on wet cobblestones doubles the colour saturation — shoot at dusk when shop light adds warm highlights
  • Large-scale murals on Nylendugata near Ægisgata (close to the Old Harbour) — frame mural against clear sky for maximum impact
  • Slow-shutter pedestrian blur: 1/10 sec at dusk captures ghosted shoppers against sharp building facades
  • Detail series: colourful corrugated-iron facades, hand-painted signs, Icelandic wool shop windows with knitwear — 85mm for natural compression

Pro tip: Rainbow Street is photogenic in virtually any light but is always crowded after 9 AM in summer. In winter, snow or frost on the rainbow paint creates a genuinely rare image. The best mural concentration is east of Hlemmur (bus terminal) toward Frakkastígur and on Nylendugata near the Old Harbour — explore on foot with a 35mm prime. After Reykjavik’s frequent rain showers, move fast: the wet reflections last only minutes before traffic and foot traffic disturbs them. The street is entirely pedestrian/cycling-priority on Rainbow Street — stand freely in the centre of the road for composition.

Common mistake to avoid: Only photographing Rainbow Street at mid-day when crowds peak and overhead light flattens the paint colours. Not exploring the back streets east of the main commercial strip where the most original murals are concentrated. Using too wide a lens from too close — the rainbow leading lines work best at ~24mm from 15–20 m back, not at 14mm from 5 m.

9. Grótta Lighthouse — Northern Lights Peninsula

Grótta Lighthouse — Northern Lights Peninsula Reykjavik photography sampleSave
Grótta Lighthouse — Northern Lights Peninsula — cinematic reference from the Reykjavik Photographer’s Guide PDF

Grótta is the only location within the greater Reykjavik city area that combines a genuine Northern Lights viewing window (minimal light pollution from the open ocean to the north and west), a photogenic lighthouse silhouette for foreground anchoring, and a rocky sea-swept shoreline for dramatic seascape elements. Unlike any location inside the city proper, Grótta’s north-facing open horizon allows aurora photography without city glow contaminating the sky. The geothermal hot pot nearby creates steam-above-cold-air photo opportunities in winter.

  • GPS: 64.1625, -22.014
  • Elevation: 13 ft
  • Best time of day: September–April nights when the aurora season is active — clear dark skies combined with the lighthouse and open ocean provide a world-class Northern Lights foreground within city limits; also outstanding at dusk and dawn year-round for seascape photography
  • Sun direction: Grótta sits at the western tip of the Seltjarnarnes peninsula, surrounded by water on three sides. It faces northwest toward the open North Atlantic. In summer, the midnight sun sets close to due north (~355°) and rises again in the northeast — from Grótta, the sun traces the northern horizon, meaning the lighthouse is bathed in prolonged warm sidelight from both northeast and northwest during the midnight hours. In winter, the sun arcs far to the south and barely affects the northern-facing lighthouse directly; instead, the sky behind the lighthouse glows at civil twilight in muted pinks and purples. For Northern Lights (September–April), no buildings obstruct the northern and eastern sky, making this the darkest publicly accessible aurora-viewing spot within the greater Reykjavik urban area.
  • Access: Gróttuvegur, 170 Seltjarnarnes (approximately 6 km west of central Reykjavik). Free, open area — but access to the islet is tide-dependent: at high tide the sandbar causeway is submerged and crossing is impossible. Always check the tide schedule before visiting (tide tables at vegagerdin.is or Tides.net for Reykjavik). The nature reserve and nearby nesting area is closed May–July. Parking on Gróttuvegur (free). Bus route 11 to Seltjarnarnes, then 20-minute walk. A natural geothermal hot pot is adjacent to the lighthouse approach path (GPS ~64.1624°N, 22.0083°W) — popular year-round.
  • Difficulty: easy–moderate (tide awareness required)
  • Recommended settings: Northern Lights Strong: f/2.8, 5 sec, ISO 1600, 14–24mm, manual focus to infinity  ·  Northern Lights Faint: f/2.8, 10–15 sec, ISO 3200, 14–24mm  ·  Lighthouse Blue Hour: f/8, 20 sec, ISO 400, 24mm, tripod  ·  Seascape Long Exposure: f/11, 30 sec, ISO 100, 24mm, 6-stop ND filter

Shots to chase:

  • Northern Lights arching over the lighthouse beacon (September–April): foreground lighthouse in slight exposure-blend to show structure, aurora filling the upper sky
  • Long exposure of waves breaking over the rocks at the lighthouse base with blurred aurora trails above
  • Blue hour from the sandbar causeway: lighthouse silhouetted against cobalt western sky over the Atlantic — perfect symmetry
  • Winter dawn: the geothermal hot pot steaming in -5°C air with the lighthouse and snow-covered Esja in the distance
  • Midnight Sun (June): lighthouse at 1 AM in warm amber northern light — surreal summer scene

Pro tip: Always check both the aurora forecast (en.vedur.is/weather/forecasts/aurora) and cloud cover before driving out — aurora without clear sky is nothing. The hot pot near the path is lit by a single lamp and provides good foreground light for compositions that frame the hot pot, its steam, and the sky simultaneously. For Northern Lights, cool your lens to ambient temperature before shooting (leave camera outside the car for 10 min) to prevent fogging. Bring warm layers — the Seltjarnarnes headland is fully exposed to North Atlantic wind and can drop several degrees below air temperature with wind chill. The Northern Lights season in Iceland runs September–April; peak activity correlates with the solar cycle and equinox windows in September–October and March–April.

Common mistake to avoid: Arriving at high tide and finding the causeway submerged — always consult tide tables. Shooting in January–February and finding the sky perpetually overcast (Iceland’s cloudiest months); the shoulder months (September–October, February–March) offer better clear-sky odds. Using auto white balance for Northern Lights — the camera reads the green aurora as a colour cast and neutralises it; always shoot in manual WB at ~4000K and RAW.

10. Mount Esja — Viewpoint over Reykjavik

Esja is the backdrop to every photograph of Reykjavik — the snow-streaked table mountain that appears behind the Sun Voyager, behind Harpa, behind the city skyline. To ascend it and look back is to see Reykjavik as Iceland sees itself: a compact capital wrapped tightly against a lava-edged bay, surrounded by pure wilderness. The Þverfellshorn viewpoint at 780 m gives a near-aerial perspective that no urban vantage point can replicate — the entire metro, both airports, the Reykjanes peninsula, and the open Atlantic.

  • GPS: 64.2684, -21.8697
  • Elevation: 2,559 ft
  • Best time of day: clear days from late May to mid-September — the 2–4 hour hike to Þverfellshorn (780 m) gives unrestricted views south over the entire Reykjavik metro, Faxaflói Bay, and on the clearest days the Reykjanes peninsula; winter offers dramatic snow and ice conditions but requires crampons and experience
  • Sun direction: From the summit plateau the view looks south across the bay to Reykjavik. In summer, the sun rises northeast and arcs high to the south; from mid-morning to late afternoon the city below is fully illuminated. The most photogenic light occurs 1–2 hours before sunset when the low sun from the southwest (~230°–280°) rakes across the rooftops and glints off Harpa’s glass panels and Tjörnin pond. In winter, the low midday sun at ~3° elevation casts extremely long shadows across the snow-covered city — surreal from the mountain perspective, but visibility must be exceptional for the snow-dusted city to read clearly. Golden hour at the summit is in reverse — the city glows warm while the mountain itself falls into shadow.
  • Access: Mógilsá, 270 Mosfellsbær (trailhead parking). Approximately 20 km (25 min) northeast of Reykjavik city centre via Route 1 and the Esja/Þverfell turnoff. Free parking at the trailhead. No local bus; car or taxi required. Trail to Þverfellshorn (~5 km one way, 780 m elevation gain, rated moderate). Allow 4–5 hours return. Trail is open year-round but can be icy and dangerous in winter without microspikes or crampons. Nearest facilities at the Volcano Huts base station at the trailhead.
  • Difficulty: moderate (980 m elevation gain to marked viewpoint Steinn; suitable for fit walkers with proper footwear)
  • Recommended settings: City Panorama Clear Day: f/11, 1/500 sec, ISO 200, 24mm  ·  Telephoto City Detail: f/8, 1/500 sec, ISO 200, 200mm  ·  Mountain Selfie With City: f/8, 1/500 sec, ISO 200, 24mm wide  ·  Winter Ice And Snow: f/11, 1/1000 sec, ISO 200, 24mm — watch for overexposure on bright snow

Shots to chase:

  • Wide panorama from Þverfellshorn looking south: entire Reykjavik metro, Faxaflói Bay, and Reykjanes peninsula in a 16mm composition
  • Telephoto compression (200mm) isolating Hallgrímskirkja rising above the dense roofscape from mountain height
  • Person on the rocky summit ridge as tiny foreground silhouette against the city-and-bay panorama — classic scale shot
  • Winter ascent: dramatic snow/ice foreground with the colourful city miniaturised below under low-angle winter light
  • Looking back toward Esja’s own ridge from the city (reverse: Sun Voyager with Esja behind) — scout from the trailhead for the best counter-composition

Pro tip: Start before 7 AM in summer to reach the viewpoint before afternoon haze builds and while the city rooftops are still catching warm morning sidelight. Bring a 200mm lens — the city is 20+ km distant and requires telephoto compression for meaningful detail. Check the mountain weather forecast (en.vedur.is) separately from city forecast: summit conditions can be 15–20°C colder and winds 3× stronger than at sea level. In winter, the trail above 400 m frequently requires microspikes — the Volcano Huts reception can advise on current conditions.

Common mistake to avoid: Attempting the summit in cloud — if Esja’s summit is capped, you will spend the entire descent in fog with no view. Always check the forecast and be willing to delay a day. Arriving without telephoto — the city appears tiny without at least 100mm focal length. Forgetting that the hike back is equally demanding; allow ample daylight buffer especially in winter.

When to photograph Reykjavik: a year-round breakdown

Reykjavik is photogenic every month of the year — but the conditions differ radically by season. Here is what to expect:

June–August (Midnight Sun — golden hour lasts 3–5 hours near midnight, near-24-hour daylight, vivid colours) and September–October (first Northern Lights windows, crisp air, dramatic autumn skies, manageable crowds)

Photographer safety in Reykjavik: read this

City photography has its own risks: gear visibility, neighborhood timing, traffic, weather. Read the briefing before you go.

  • Gear visibility: Use a discreet bag with no obvious camera branding. Keep a body strapped under a jacket on transit.
  • Neighborhood timing: Pre-dawn and post-sunset shoots reward early scouting. Cross-reference each location with current local guidance and choose well-lit transit routes.
  • Situational awareness: Headphones out. One eye in the viewfinder, one on the street.
  • Traffic: Bridges, medians, and bike lanes are not setup zones. Shoot from sidewalks and pedestrian areas only.
  • Weather: Summer storms move quickly; winter cold drains batteries. Layer up, keep gear dry, watch for ice on cobblestones at blue hour.

The complete safety briefing is inside the Reykjavik Photographer’s Guide PDF.

Take this guide into the city

This post is the complete field reference. The Reykjavik Ultimate Photographer’s Guide PDF is the field-deployable version: full-page resolution hero photography, GPS maps with gold pins for every location, multi-season shooting calendars, gear notes per location, sun-angle diagrams, the full city safety briefing, and a print-ready editorial layout in Framehaus black and gold. Save it offline. Print it. Take it on the walk.

Reykjavik Ultimate Photographer’s Guide
Downloadable PDF · 10 GPS-mapped locations · Multi-season calendar · City safety briefing · Packing checklist

Get the Reykjavik guide — $47

Combo Deal

Get the Reykjavik Guide + Preset Pack

Photograph it. Edit it. Done.

$66
$54
Save $12
PDF Guide Every spot, GPS, golden hour
Preset Pack 20 Lightroom presets
Book your tours & experiences in Reykjavik

All links go to Viator (a TripAdvisor company), the world’s largest marketplace for guided experiences. Tagged as affiliate per FTC.

Also on Amazon: gear that helps with this technique

Quick Amazon shortcuts to the gear most useful for this kind of shot. Use them if Prime shipping or Amazon credit makes more sense than B&H. As an Amazon Associate ShutYourAperture earns from qualifying purchases.

Take Reykjavik home in your pocket.

Every shot location, every angle, every time of day worth shooting. Printable PDF + GPS-tagged map.

Instant download. Works on phone, tablet, and printed.

Continue reading

← Back to International Cities Photography Guides

Related guides nearby

Three more photography guides within striking distance — perfect for combining into one trip.

Browse all 78 guides → · Open the map

Save your trip-planning hours

The complete Reykjavik guide is $47

All vantage points above + 5 bonus secret spots, printable map, gear pack list, and editing recipes. One-time payment, instant download, lifetime updates.

Buy Reykjavik PDF →

Common questions about the Reykjavik guide

Is the Reykjavik photography guide worth $47?

For most photographers, yes. The guide saves 8-12 hours of trip-planning research and prevents the most common mistake of Reykjavik photography: shooting at the wrong time of day. If a single better frame is worth $47 to you, the guide pays for itself on day one. Buyers get every GPS coordinate, every golden-hour window, every cultural rule, and a printable shot list.

Does the Reykjavik guide include GPS coordinates?

Yes — every vantage point in the guide has Google Maps-ready GPS coordinates so you can pin them before you fly. The guide also includes a printable map showing all locations clustered by walking distance, so you can build efficient half-day routes.

What's in the Reykjavik PDF that isn't in this article?

The article shows the highlights. The PDF includes: 5 additional secret spots not published online, a 14-day itinerary with daily routes, the full camera-settings cheat sheet for every scenario in Reykjavik, a printable gear packing list, post-processing recipes with screenshot examples, and a list of local guides we trust for portrait commissions.

Do I get the Lightroom presets too?

The $47 guide is the PDF only. The matching Reykjavik preset pack is a separate $19 download — most buyers grab both as a bundle and save the editing time. Both are instant download, both work on Lightroom Classic and Lightroom Mobile.

Will the guide work for a Reykjavik trip in 2026?

Yes. The guide is updated annually as fees, restrictions, and new vantage points change. All buyers get free lifetime updates. The 2026 edition includes the latest drone rules, museum photography policies, and seasonal light data for the year.

Get the Reykjavik guide · $47