Best Photography Spots in London: 14 Locations With GPS

Tours & experiences disclosure: This guide includes affiliate links to Viator, the world’s largest tour and experiences marketplace. If you book through these links, ShutYourAperture may earn a small commission at no extra cost to you.

London photography guide hero imageSave

Amazon Associates disclosure: ShutYourAperture is a participant in the Amazon Services LLC Associates Program. As an Amazon Associate we earn from qualifying purchases. Some links below go to Amazon (Store ID edinchavez01-20). Buying through these links costs you nothing extra and helps fund our free guides.
Skip the planning. Get the London PDF. All locations, GPS coordinates, golden-hour times, gear tips. Instant download.

London, United Kingdom is one of the most photogenic cities in the world. If you have a camera and the patience to show up before dawn, London will give you images that last a career — but only if you know where and when to point it.

This is the definitive field guide to the 14 best photography spots in London, with GPS coordinates you can drop straight into Google Maps, exact camera settings tuned to London’s unique light, precise timing for every location, and the access notes nobody else bothers to document. It mirrors the intel inside our London Ultimate Photographer’s Guide ($47 PDF) — a downloadable field guide with full-page hero images, GPS maps, seasonal tables, a city safety briefing, and a complete photographer’s packing list. Get the guide →

Planning multi-city travel? See also: U.S. cities photography hub and the National Parks Photography Guides.

London Ultimate Photographer’s Guide — $47
14 GPS-mapped locations · Exact camera settings · Multi-season shooting calendar · Free annual updates

Download the PDF guide →
Skip the planning

Get the London Ultimate Photographer’s Guide

Every location below — pre-mapped with GPS, golden-hour timing, gear recommendations, cultural rules, and a 14-day itinerary. Downloaded by 200+ working photographers.

Get the PDF · $47
Instant download · Lifetime updates

Quick jump to the 14 spots

  1. Tower Bridge from Butler’s Wharf
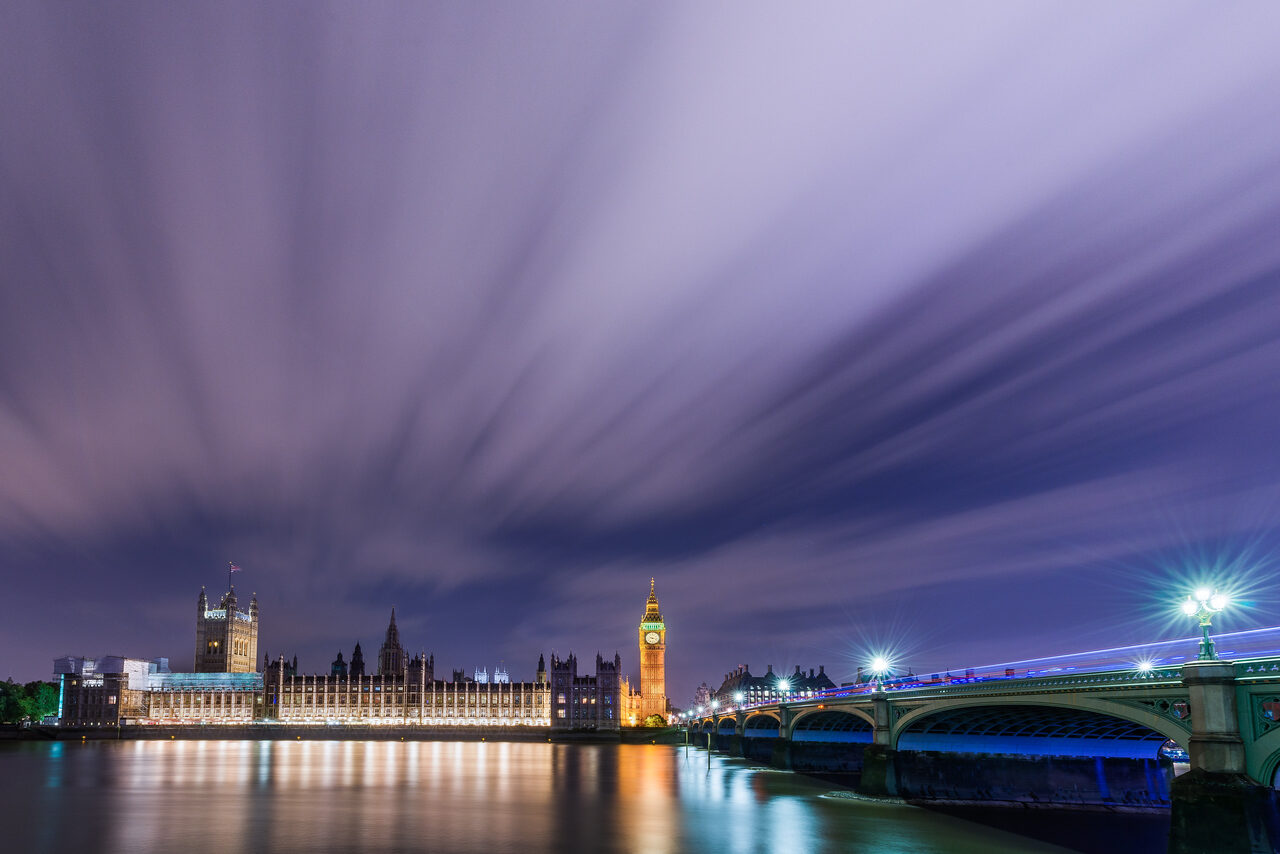
  2. Big Ben & Westminster Bridge
  3. London Eye + South Bank
  4. St Paul’s Cathedral from Millennium Bridge
  5. Tower of London
  6. Buckingham Palace + The Mall
  7. Sky Garden (20 Fenchurch Street)
  8. Notting Hill (Lancaster Road / Portobello)
  9. Camden Market + Regent’s Canal
  10. Trafalgar Square + Nelson’s Column
  11. Borough Market
  12. Greenwich Observatory (Canary Wharf Skyline View)
  13. Leadenhall Market
  14. Primrose Hill (Panoramic London Skyline)

A look inside the London Photographer’s Guide

Here are three of the actual shots you’ll find inside the PDF — cinematic full-page references for the exact spots, lenses, and lighting conditions documented in the guide. The full guide includes 14 locations, each with a hero image, GPS map, settings table, and a five-shot list.

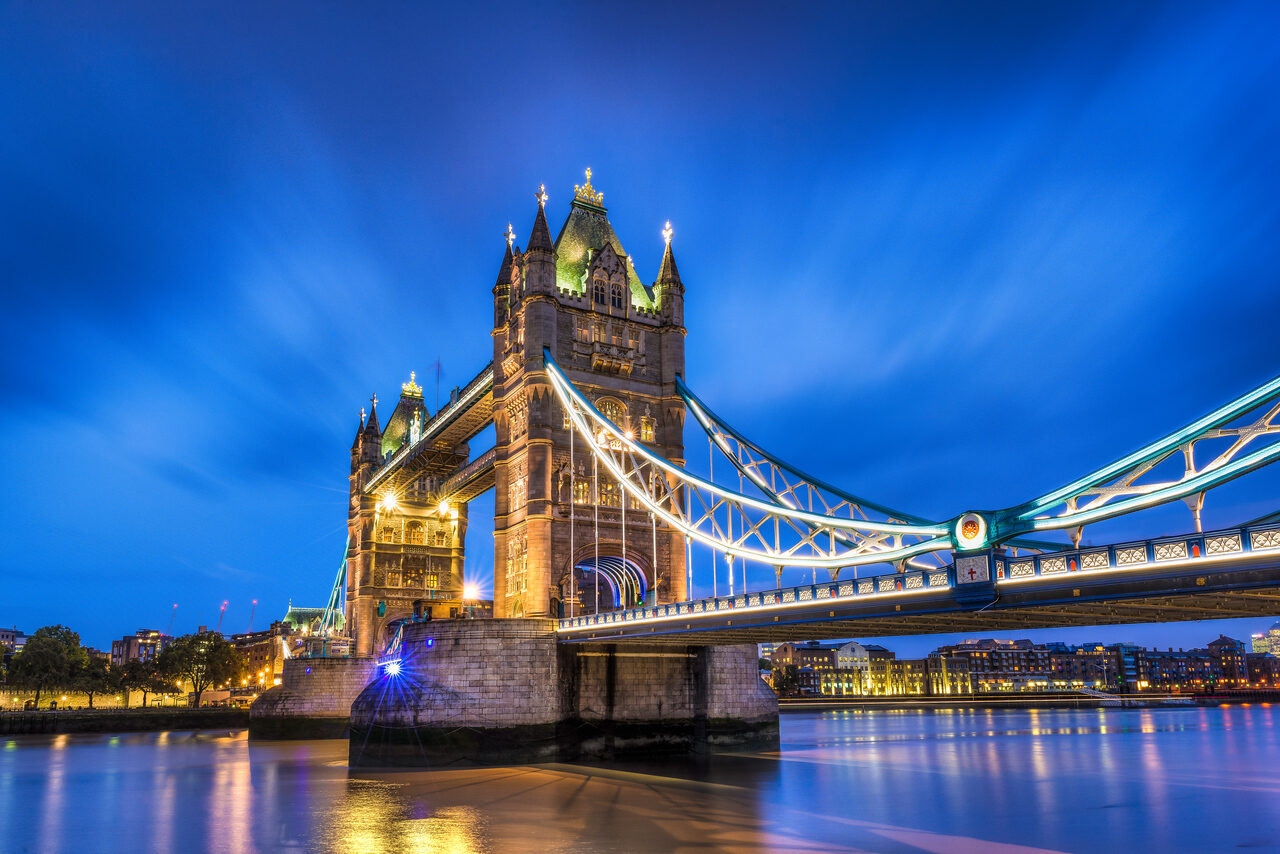
Tower Bridge from Butler's Wharf — from the London Photographer's GuideSave
Tower Bridge from Butler’s Wharf — sample reference photo from the London Photographer’s Guide PDF

Before you shoot London: the essentials

  • Free public access: Butler’s Wharf riverside walk, Westminster Bridge, South Bank, Millennium Bridge, Trafalgar Square, Notting Hill streets, Camden Market exterior & canal towpath, Borough Market (interior free Mon–Sat), Primrose Hill, Greenwich Park and Observatory viewpoint are all free; Sky Garden rooftop requires free timed reservation; Tower of London charges £37/adult; London Eye charges from £29/adult online; Buckingham Palace State Rooms open summers only (July–September) with paid tickets ~£33/adult
  • Commercial permits: Commercial and professional photography on the Thames foreshore (below the tidal line) requires a Port of London Authority permit; Changing of the Guard at Buckingham Palace is free to watch but tripods may be asked to be removed in crowded areas; filming inside the Tower of London requires an HRP filming permit; Sky Garden requires free online reservation via skygarden.london up to 3 weeks in advance; photo ID required for Sky Garden entry
  • Best photography seasons: April–September (longer golden hours, fewer overcast days, late sunsets past 9 PM in June); October–March for dramatic moody skies, mist on the Thames, Christmas lights, and blue-hour windows that fall in the early evening
  • Blue hour notes: London sits at 51.5°N — blue hour lasts 25–40 minutes after sunset, longer than tropical cities. Summer sunsets occur past 9 PM (BST), placing blue hour after 9:30 PM. Winter sunsets around 4 PM give a blue-hour window perfectly timed for rush-hour light trails. The Thames corridor faces roughly east–west, making South Bank faces ideal for westward blue-hour cityscapes; Tower Bridge and the City of London skyline are best shot from the South Bank at blue hour
  • Drone policy: Drone laws vary widely by country and city — many capital and tourist zones are no-fly. Verify the local civil aviation authority’s current rules before launching.
  • Local resource: Official visitor information

The full-resolution version of every map below — plus seasonal calendars, gear notes per location, sun-angle diagrams, and a complete photographer’s packing checklist — is inside the London Photographer’s Guide PDF ($47).

1. Tower Bridge from Butler’s Wharf

Butler’s Wharf provides the most dramatic framing of Tower Bridge from the south bank — the ornate Victorian Gothic towers rise directly above the old warehouse facades of Shad Thames, with The Gherkin, Cheesegrater, and Walkie-Talkie skyscrapers framed perfectly between the towers. The wrought-iron walkway of Shad Thames adds leading lines toward the bridge, and at blue hour the tower illumination reflects in both the Thames and the wet cobblestones.

  • GPS: 51.5036, -0.0764
  • Elevation: 5 ft
  • Best time of day: blue hour — 20–35 minutes after sunset when the bridge’s Gothic towers are fully illuminated and the sky turns deep indigo, reflecting in the Thames
  • Sun direction: Tower Bridge runs roughly north-northeast to south-southwest across the Thames. From Butler’s Wharf on the south bank (looking northwest), the sun sets to the right (west-northwest) in summer and drops nearly behind the bridge in winter, creating dramatic silhouette opportunities December–January. At sunrise the sun rises to the east-northeast, back-lighting the City of London skyline behind the bridge. Golden-hour shots from Butler’s Wharf are best in the afternoon when warm westerly light falls on the bridge’s west-facing stonework. At 51.5°N, sunrise azimuth ranges from ~55° (northeast, summer solstice) to ~128° (southeast, winter solstice)
  • Access: Butler’s Wharf, Shad Thames, London SE1 2YE. Public riverside walkway, free and open 24 hours. Nearest Tube: Tower Hill (Circle/District) or London Bridge (Jubilee/Northern), both ~10-min walk. Buses 42, 78, 188 serve Tower Bridge Rd. No parking on Shad Thames; nearest NCP at Tower Bridge Rd. Restaurants at Le Pont de la Tour provide shelter for wet-weather waits
  • Difficulty: easy
  • Recommended settings: Blue Hour Long Exposure: f/11, 15–25 sec, ISO 100, 24mm, tripod  ·  Golden Hour Handheld: f/8, 1/250 sec, ISO 400, 35mm  ·  Night City Reflection: f/8, 30 sec, ISO 100, 16mm, tripod  ·  Overcast Architectural Detail: f/8, 1/125 sec, ISO 400, 50mm

Shots to chase:

  • Wide-angle blue-hour shot from the riverside railing with bridge reflections in the wet cobblestones of Shad Thames
  • Telephoto compression framing The Gherkin and Cheesegrater between Tower Bridge’s two Gothic towers at dusk
  • Long-exposure light trails from passing river traffic under the raised bascules during a bridge lift
  • Leading-lines composition down the iron-balconied Shad Thames alleyway with the illuminated bridge at the end
  • Symmetrical reflection of the bridge in a puddle at low tide on the foreshore steps

Pro tip: Check the Tower Bridge lifting schedule at towerbridge.org.uk — bridge lifts (occurring ~1,000 times per year) offer a rare shot of the raised bascules. Arrive 30 minutes before blue hour to scout the exact railing position opposite the restaurant Le Pont de la Tour, where the bridge frame is most symmetrical. The wrought-iron balcony alley of Shad Thames (running east behind the wharf) provides a unique narrow-alley framing shot rarely seen in tourist imagery.

Common mistake to avoid: Shooting from too close at wide angle distorts the Gothic towers. Arriving only at golden hour and missing the 20-minute blue-hour window when illumination kicks in. Using a high ISO at night instead of a tripod — the reflection shots require exposures of 15+ seconds for smooth water.

2. Big Ben & Westminster Bridge

The most photographed view in the United Kingdom — the Elizabeth Tower (housing Big Ben) and the Gothic Revival Palace of Westminster reflected in the Thames from Westminster Bridge. The bridge itself provides a natural leading-line composition, and the South Bank vantage delivers a front-on view of both the tower and the full parliament facade in a single 24mm frame. The tunnel/arch under the south end of the bridge provides a dramatic framing element unique among London viewpoints.

  • GPS: 51.5009, -0.1238
  • Elevation: 10 ft
  • Best time of day: blue hour / golden hour — 45 minutes before sunset or 25 minutes after, when the Elizabeth Tower clock face is illuminated and the Palace of Westminster stonework glows amber
  • Sun direction: The Palace of Westminster faces roughly east across the Thames (the main facade on the north bank looks north). Westminster Bridge runs east-west. At sunrise (~7 AM in winter, 4:45 AM in summer) the sun rises to the east-northeast and catches the east-facing face of the Elizabeth Tower — the best morning light is from the South Bank (Lambeth side). At sunset in summer the sun sets to the west-northwest directly up the river, creating a dramatic backlit silhouette shot from Lambeth Bridge. The south side of Westminster Bridge (SE1 7PB) faces slightly northwest toward the tower, providing the classic frontally-lit afternoon shot
  • Access: Westminster Bridge, SE1 7PB. Public bridge, free and open 24 hours. Nearest Tube: Westminster (Jubilee/Circle/District, north bank) or Lambeth North (Bakerloo, south bank). Buses 12, 53, 77, 148, 211, 381 serve the bridge. No dedicated parking; nearest NCP at Upper Ground. The South Bank walkway is accessible 24/7 with no gates
  • Difficulty: easy
  • Recommended settings: Blue Hour River Reflection: f/11, 20 sec, ISO 100, 24mm, tripod  ·  Golden Hour Parliament Facade: f/8, 1/200 sec, ISO 100, 35mm  ·  Tunnel Arch Framing: f/8, 1/60 sec, ISO 800, 35mm  ·  Sunrise Silhouette: f/11, 1/500 sec, ISO 100, 24mm

Shots to chase:

  • Classic wide-angle bridge perspective with the Elizabeth Tower centered at golden hour from the south sidewalk
  • Arch-framed shot through the Westminster Bridge tunnel with the illuminated clock face visible in the opening
  • Long-exposure of the Thames with Parliament reflected as shimmering golden light at blue hour
  • Red double-decker bus passing on the bridge with Big Ben as backdrop — use 1/60 sec for motion blur on the bus
  • Symmetrical 35mm view down Whitehall from Trafalgar Square with the tower as a distant backdrop on a clear day

Pro tip: The south side walkway of Westminster Bridge (closest to the South Bank) gives the best unobstructed front-on view. Weekday mornings before 7:30 AM are nearly crowd-free; at weekends it becomes difficult to get a people-free frame by 8:30 AM. For the arch/tunnel shot, stand at the foot of the stone staircase under the south approach — this is rarely photographed despite being only 50 metres from the main tourist flow.

Common mistake to avoid: Shooting from the north (Westminster) bank gives a side-angle view with scaffolding visible and misses the full facade. Midday overhead sun creates flat grey light on the Gothic stone — avoid 11 AM–3 PM. Forgetting that renovation scaffolding can appear without notice; check Parliament’s website before visiting.

3. London Eye + South Bank

At 135 metres the London Eye is the tallest cantilevered observation wheel in the world and the defining structure of the South Bank skyline. The 30-minute rotation offers London’s most dynamic photography platform — pods rotate slowly enough for tripod use and offer 40 km visibility on clear days. The exterior of the wheel is equally photogenic from the riverside walk, Golden Jubilee Bridges, and Westminster Bridge, where the steel structure creates bold geometric compositions.

  • GPS: 51.5033, -0.1195
  • Elevation: 10 ft
  • Best time of day: sunset / blue hour — the Eye is illuminated after dark; shooting from across Westminster Bridge at blue hour captures both the lit wheel and the Parliament skyline in one frame
  • Sun direction: The London Eye sits on the south bank facing north across the Thames. From the north bank (Victoria Embankment), the wheel is front-lit by the afternoon sun in the west. From the south side, shooting westward at sunset places the sun behind/beside the wheel for silhouette shots. At 51.5°N, the sun sets to the west-northwest in summer (azimuth ~300°) and west-southwest in winter (azimuth ~240°). Golden Jubilee Bridges (Hungerford Bridge) directly east of the Eye provide elevated pedestrian vantage points facing west for sunset shots with the wheel silhouetted against the sky
  • Access: Riverside Building, County Hall, Westminster Bridge Road, SE1 7PB. London Eye standard tickets from £29/adult online (walk-up £39); children (2–15) from £26 online. Open daily approximately 11 AM–6 PM (extended to 8:30 PM in summer). Nearest Tube: Waterloo (Northern/Jubilee/Bakerloo) or Westminster (5-min walk across bridge). The South Bank riverside walkway is free and open 24 hours. Book at londoneye.com
  • Difficulty: easy
  • Recommended settings: Exterior Blue Hour Illuminated: f/11, 20 sec, ISO 100, 24mm, tripod  ·  Interior Pod Cityscape: f/5.6, 1/60 sec, ISO 800, 16mm  ·  Golden Hour Silhouette Wheel: f/11, 1/500 sec, ISO 100, 35mm  ·  Long Exposure Light Trails: f/16, 60 sec, ISO 100, 16mm, ND filter, tripod

Shots to chase:

  • Wide-angle blue-hour shot from Westminster Bridge showing the illuminated wheel reflected in the Thames with Parliament behind
  • Interior pod shot looking down along the Thames toward Tower Bridge from the highest point of the rotation
  • Silhouette of the wheel’s steel structure against a vivid sunset sky shot from the Golden Jubilee footbridge
  • Long-exposure at night creating a complete glowing circle from the full 30-minute rotation using a 60-sec multi-exposure or star trails technique
  • Street-level shot on South Bank with the wheel framed between the trees on the riverside promenade

Pro tip: For interior pod photography, stand at the window facing east (toward Tower Bridge and The Shard) during the ascent for the best City skyline composition. Avoid fogged or rainy days — the glass pods mist up and reduce sharpness. From outside, the Golden Jubilee pedestrian bridge (Hungerford Bridge) gives an elevated westward angle that frames the wheel against the sunset sky with Westminster Bridge below — an underused vantage point.

Common mistake to avoid: Shooting the wheel exterior from directly below creates distorted wide-angle results; step back to Westminster Bridge or the North Bank for full-wheel compositions. Booking the last rotation of the day and missing the blue-hour lighting that follows. Not checking the rotation schedule — pods rotate continuously and there is no dedicated ‘photographic’ stop at the top.

4. St Paul’s Cathedral from Millennium Bridge

The Millennium Bridge creates one of London’s most perfect photographic compositions — a sweeping steel suspension bridge that acts as a natural leading line directly to St Paul’s dome. The view is protected by law as a Strategic View Corridor, ensuring no skyscraper can be built to obstruct it. At low tide, the Thames foreshore beneath the bridge offers a rarely-used alternative vantage with the bridge overhead as a frame.

  • GPS: 51.5099, -0.0985
  • Elevation: 15 ft
  • Best time of day: golden hour (morning) — the cathedral’s Portland stone dome glows warm amber when lit by the rising eastern sun; approach from the Tate Modern side for the iconic bridge-leading-line composition
  • Sun direction: St Paul’s faces east down Ludgate Hill. At sunrise the low eastern sun (azimuth ~80–100° depending on season) lights the cathedral’s east end and dome directly when shooting from the Millennium Bridge (which runs north-south). Morning golden hour creates the quintessential shot: the dome glows warm gold at the end of the bridge’s steel leading line. By afternoon the sun moves to the southwest, back-lighting the dome from behind — ideal for dramatic rim-lit silhouettes. At blue hour the dome is illuminated by floodlights and the Thames reflects the scene below
  • Access: Millennium Bridge, EC4V 3QQ (north end) / SE1 9DT (south end, near Tate Modern). Pedestrian bridge, free and open 24 hours. Nearest Tube: St Paul’s (Central Line, north bank) or Southwark/London Bridge (Jubilee/Northern, south bank). Thames foreshore accessible via steps near the Globe Theatre for low-tide compositions. No entry fee for the bridge; St Paul’s Cathedral interior: £22/adult (book at stpauls.co.uk)
  • Difficulty: easy
  • Recommended settings: Golden Hour Dome Leading Line: f/11, 1/200 sec, ISO 100, 24mm  ·  Blue Hour Illuminated Dome: f/11, 15 sec, ISO 100, 35mm, tripod  ·  Foreshore Wide Angle: f/8, 1/125 sec, ISO 200, 16mm  ·  Interior Dome Available Light: f/2.8, 1/30 sec, ISO 3200, 24mm

Shots to chase:

  • Classic leading-line shot from the south end of the bridge at golden hour with the dome centered between the steel cables
  • Low-angle foreshore shot (check tide tables for low tide) with the bridge reflected in pools and the dome rising above
  • Blue-hour long exposure from the bridge center with light trails from river traffic and the floodlit dome
  • Contrast shot framing St Paul’s dome between the glass facade of One New Change shopping centre (visible from Cheapside)
  • Worm’s-eye upward view from directly below the bridge’s pedestrian deck looking up at the steel structure toward the dome

Pro tip: Shoot from the center of the bridge for the most symmetrical composition — the handrails create perfect converging lines toward the dome. Check tide times at bbc.co.uk/weather/coast-and-sea — low tide exposes a sandy/pebbly foreshore accessible from the steps by Shakespeare’s Globe for an entirely different shooting perspective. At Christmas, temporary lights on the bridge add colour.

Common mistake to avoid: Using a focal length wider than 24mm from the bridge causes barrel distortion that makes the dome appear smaller and curves the leading lines. Arriving at peak tourist hours (10 AM–2 PM) makes people-free shots nearly impossible. Missing the foreshore access — this alternative angle is largely unknown and requires checking tide predictions 48 hours ahead.

Want this in your pocket on the street?
The full-resolution version of every spot above — with full-page hero photography, GPS maps with gold location pins, sun direction diagrams, multi-season tables, and a complete safety + packing checklist — is inside the London Ultimate Photographer’s Guide PDF ($47). Print it, save it offline, take it on the walk. Get the guide →

5. Tower of London

Tower of London London photography sampleSave
Tower of London — cinematic reference from the London Photographer’s Guide PDF

The Tower of London is a UNESCO World Heritage Site with over 900 years of royal history. The Norman White Tower (built 1078) dominates the inner ward, surrounded by medieval curtain walls, a working portcullis, and the iconic Yeoman Warders. The Crown Jewels — including the Koh-i-Noor diamond — are displayed inside. The external view from Tower Hill and the Thames riverside walk is free, offering dramatic battlements framing with Tower Bridge visible immediately to the east.

  • GPS: 51.5081, -0.0759
  • Elevation: 15 ft
  • Best time of day: morning (9–11 AM) — soft directional light from the east illuminates the Norman White Tower’s pale stone; the Yeoman Warder (Beefeater) guided tours start at 10 AM and offer portrait opportunities
  • Sun direction: The Tower of London faces roughly southeast from Tower Hill. Morning sun from the east-northeast strikes the White Tower’s Norman facade directly, giving warm modelling light on the stone. The medieval walls run roughly along an east-west axis; the best lit wall section for textural photography is the south-facing riverside wall, which receives southerly light all day. At sunset the Tower is backlit when shooting from Tower Hill, creating dramatic silhouettes of the battlements against a western sky
  • Access: Tower of London, EC3N 4AB. Adult: £37.00 (members free); Child (5–15): £18.50; under-5s free. Book online at hrp.org.uk — advance booking recommended, especially during school holidays. Open daily; summer Tue–Sat 9 AM–5:30 PM, Mon & Sun 10 AM–5:30 PM; winter closes 4:30 PM. Nearest Tube: Tower Hill (Circle/District). Free Yeoman Warder tours depart from the main entrance every 30 minutes — the best way to photograph the guards in context
  • Difficulty: easy
  • Recommended settings: White Tower Morning Facade: f/8, 1/400 sec, ISO 100, 35mm  ·  Yeoman Warder Portrait: f/2.8, 1/500 sec, ISO 400, 85mm  ·  Battlements Silhouette Sunset: f/11, 1/1000 sec, ISO 100, 24mm  ·  Crown Jewels Interior No Flash: f/2.8, 1/30 sec, ISO 6400, 24mm

Shots to chase:

  • Wide establishing shot of the White Tower from the inner ward at 9 AM when the courtyard is largely empty of tourists
  • Close portrait of a Yeoman Warder in Tudor uniform against the stone wall — request permission, which is usually granted
  • Battlements silhouette from Tower Hill at sunset with Tower Bridge visible through the crenellations
  • Reflections of the medieval walls in the Thames at blue hour from the riverside promenade (free, no entry required)
  • Looking through the Traitors’ Gate arch toward the outer ward — the iron portcullis creates a natural dramatic frame

Pro tip: Join the free Yeoman Warder tour immediately on entering — the guides position themselves in the most photogenic spots and their scarlet uniforms contrast brilliantly against the grey stone. No photography inside the Crown Jewels vault (enforced). For exterior shots, the free riverside promenade on the Thames side gives a dramatic low-angle view of the south curtain wall with Tower Bridge behind — no admission required.

Common mistake to avoid: Arriving after 11 AM in summer when tour groups fill the inner ward — early entry at 9 AM gives clean compositions. Attempting to photograph inside the Crown Jewels room results in confiscation of camera equipment. Using flash photography anywhere inside the Tower, which is prohibited and damages conservation.

6. Buckingham Palace + The Mall

The official London residence of the British monarch is one of the world’s most recognisable buildings. The iconic east facade with the central balcony (where the Royal Family appears for major events) faces directly down The Mall — London’s ceremonial boulevard — creating an axis that stretches all the way to Trafalgar Square. The Victoria Memorial in front provides a formal golden foreground element, and The Mall’s double row of plane trees creates a perfect 200mm telephoto compression shot.

  • GPS: 51.5015, -0.1419
  • Elevation: 35 ft
  • Best time of day: morning (8–10 AM) — soft directional light from the east illuminates the palace’s east-facing facade; the Mall’s tree-lined avenue creates leading lines at low angle; 11 AM for Changing of the Guard (Mon, Wed, Fri, Sun)
  • Sun direction: Buckingham Palace faces due east down The Mall. At sunrise and morning golden hour (sun azimuth 80–100°) the entire east-facing facade is front-lit — the optimal time for facade photography. By midday the sun is high to the south and the facade falls into flat overhead light. The Mall runs east-west; at the eastern end (Trafalgar Square direction) the morning sun back-lights the Victoria Memorial and palace in dramatic rim-light. Late afternoon in winter (3–4 PM) creates low south-southwest sun that skims the palace walls with warm raking light
  • Access: Buckingham Palace, SW1A 1AA. Exterior: free and open 24/7. The Mall and St James’s Park: free, open dawn–midnight. State Rooms summer opening (2025: 10 July–28 September): ~£33/adult, book at royalcollection.org.uk. Changing of the Guard: free to watch, Mon/Wed/Fri/Sun at approximately 11 AM (check Royal Household website as schedule varies). Nearest Tube: St James’s Park (Circle/District, 5 min) or Victoria (Victoria/Circle/District, 10 min). Buses 11, 211, C1 stop near Buckingham Gate. No photography inside the palace; gardens photography permitted
  • Difficulty: easy
  • Recommended settings: Palace Facade Morning: f/8, 1/400 sec, ISO 100, 35mm  ·  The Mall Tree Leading Lines: f/11, 1/250 sec, ISO 100, 70mm  ·  Changing Of Guard Action: f/5.6, 1/800 sec, ISO 800, 200mm  ·  Victoria Memorial Gold Hour: f/8, 1/500 sec, ISO 100, 50mm

Shots to chase:

  • Morning telephoto compression shot from the Trafalgar Square end of The Mall — the double rows of trees frame the palace at 200mm
  • Wide-angle shot from Victoria Memorial steps at golden hour with the facade and guards’ sentry boxes in frame
  • Changing of the Guard — position on the Victoria Memorial plinth for an elevated view over the crowd at 200mm
  • Aerial-perspective substitute: stand on the roof terrace of the ICA (Institute of Contemporary Arts) on The Mall for a slightly elevated straight-down-the-avenue view
  • State Rooms garden shot: from the garden pathway, the north wing of the palace reflected in the ornamental lake at golden hour (summer season only)

Pro tip: For Changing of the Guard, arrive 45 minutes early to claim a position on the Victoria Memorial plinth — the elevated standing height there gets you above the crowd. The first Sunday of each month often has a smaller ceremony, easier to photograph. For The Mall leading-line shot, stand on the road surface (cordoned off to traffic) at the St James’s Park end and use 70–200mm to compress the perspective dramatically.

Common mistake to avoid: Arriving at Changing of the Guard without positioning — the palace forecourt fills quickly and photographers at ground level get only crowd shots. No photography inside the palace during State Rooms visits — guards will confiscate camera memory cards. The gates are kept closed except during official ceremonies, so wide-angle shots that include the gate grille need a telephoto lens from across the road.

7. Sky Garden (20 Fenchurch Street)

Sky Garden is London’s highest free public viewpoint — a dramatic glass-enclosed tropical garden atrium 160 metres above the City offering 360° panoramic views. The unique combination of lush plants, curved glass architecture, and panoramic City views makes it unlike any other viewpoint in London. The west-facing terrace overlooks St Paul’s Cathedral directly, while the east terrace frames Tower Bridge with The Shard beyond. Unlike paid observation decks, the garden environment adds foreground interest for photographic compositions.

  • GPS: 51.5116, -0.0836
  • Elevation: 525 ft
  • Best time of day: sunset / blue hour — book the last available free slot before sunset; the 360° glass atrium allows shooting east toward Tower Bridge and The Shard or west toward St Paul’s and the City of London simultaneously
  • Sun direction: Sky Garden sits at 160 m (525 ft) on the 35th–37th floors of 20 Fenchurch Street in the eastern City of London. The curved glass walls face all directions. Looking west, afternoon sun illuminates St Paul’s dome and the City skyline. Looking east-southeast toward The Shard and Tower Bridge, evening sun creates dramatic backlit golden hour shots. At sunset the sun drops to the west-northwest in summer (behind the St Paul’s view), casting the Eastern City in warm reflected light. Blue-hour views in all directions are spectacular as London’s street lights create an orange haze below
  • Access: 20 Fenchurch Street, EC3M 3BY. Free public access — tickets must be booked online in advance at skygarden.london (up to 3 weeks ahead; tickets released in weekly blocks). Weekday free access: 10 AM–6 PM; weekend: 11 AM–9 PM. Time limit: 1 hour per visit. Photo ID required for all adults. Walk-ins accepted if space available but not guaranteed; no walk-ins after 5 PM weekdays. Restaurant reservation holders get complimentary access without separate ticket. Nearest Tube: Monument (Circle/District) or Bank (Central/Northern/Waterloo & City), both ~5-min walk
  • Difficulty: easy
  • Recommended settings: Panoramic Cityscape Sunset: f/8, 1/250 sec, ISO 400, 24mm  ·  Blue Hour City Lights: f/5.6, 1/15 sec, ISO 1600, 35mm  ·  Garden Plants With City Bokeh: f/2.8, 1/200 sec, ISO 400, 85mm  ·  Glass Reflection Abstract: f/8, 1/125 sec, ISO 400, 50mm

Shots to chase:

  • West-facing panorama over St Paul’s and the City of London at golden hour from the upper terrace
  • Foreground of tropical plants and flowers with The Shard visible through the glass wall behind
  • East-facing view toward Tower Bridge and Canary Wharf at blue hour with the Thames winding below
  • Long corridor composition through the garden atrium with the curved glass ceiling reflecting the sky above
  • Glass reflection shot capturing both the interior greenery and the external cityscape simultaneously

Pro tip: Book the latest available free-entry slot on a clear day — the final slot before 6 PM on weekdays catches golden hour. Tickets sell out 2–3 weeks ahead for sunset slots; log on to skygarden.london at midnight on Tuesday (when the new 3-week window opens) for the best availability. The west-facing open terrace (if not closed for private events) provides the clearest glass-free photography conditions. Bring a wide-angle lens — the curved glass causes reflection issues with longer focal lengths unless you shoot straight out.

Common mistake to avoid: Shooting through the glass without pressing the lens against it — reflections of the interior are severe. Arriving without a booking — walk-ins are refused after 5 PM on weekdays, and weekend walk-ins have low success rates. Forgetting photo ID, which is mandatory for all adults.

8. Notting Hill (Lancaster Road / Portobello)

Notting Hill is London’s most colourful neighbourhood — pastel-painted Victorian terraces in turquoise, coral, yellow, lilac, and sky blue line the narrow streets around Lancaster Road and Portobello Road. The concentration of painted stucco facades creates a distinctly European street aesthetic that has made this one of the most photographed residential neighbourhoods in Europe. The area was the filming location for the 1999 film Notting Hill and the annual Notting Hill Carnival (August bank holiday).

  • GPS: 51.5142, -0.2032
  • Elevation: 55 ft
  • Best time of day: morning (9–11 AM) on weekdays — soft directional light rakes across the colourful facades; avoid Portobello Market Saturdays when the street is completely blocked by stalls and 100,000 visitors
  • Sun direction: Lancaster Road runs roughly east-west in Notting Hill; the colourful terraced houses face south and north along the street. At 51.5°N, morning sun comes from the east-northeast, cross-lighting the colourful facades on the south side of the road with raking directional light that accentuates the texture of the painted stucco. By midday the high southern sun lights both sides evenly but loses shadow depth. Afternoon sun moves to the southwest and front-lights the north-facing row. Portobello Road runs roughly north-south — the west side (facing east) is optimally lit in the morning, the east side in the afternoon
  • Access: Lancaster Road, W11 1QT (central Notting Hill). Free public street, open 24 hours. Nearest Tube: Ladbroke Grove (Circle/Hammersmith & City, 3-min walk) or Notting Hill Gate (Central/Circle/District, 10-min walk). Portobello Road market: Saturdays 9 AM–7 PM (very crowded), Mon–Fri and Sun for quieter street photography. Limited on-street parking; recommend arriving by Tube
  • Difficulty: easy
  • Recommended settings: Facade Colour Morning: f/8, 1/400 sec, ISO 100, 35mm  ·  Street Portrait Environmental: f/2.8, 1/500 sec, ISO 200, 85mm  ·  Market Stall Tight: f/4, 1/250 sec, ISO 400, 50mm  ·  Overcast Flat Colour: f/5.6, 1/200 sec, ISO 400, 35mm

Shots to chase:

  • Row of multi-coloured terraced houses on Lancaster Road at 35mm with dappled morning shadow across the facades
  • Portobello Road market stalls in the morning with antiques dealers and colourful bunting overhead
  • The famous blue doorway at 280 Westbourne Park Road (from the film Notting Hill) — request permission to photograph
  • Elgin Crescent’s pastel easter-egg row of houses with a single figure walking away creating scale and depth
  • Hillgate Place and Farmer Street junction — the densest concentration of painted facades in Notting Hill, ideal for a multi-coloured wide shot

Pro tip: Enter GPS coordinates 27 Lancaster Road (W11 1QT) for the most vibrant purple/multi-coloured house cluster. For cleaner compositions without parked cars, visit Tuesday–Friday before 9 AM when residents haven’t moved cars out yet. The Notting Hill Carnival (last weekend of August) transforms these streets into an explosion of colour and music — extraordinary for documentary-style photography but requires a different tactical approach.

Common mistake to avoid: Visiting on Saturday when Portobello Market creates impenetrable crowds on Portobello Road itself. Shooting in harsh midday sun loses the colour vibrancy — the soft morning or overcast light renders pastels most saturated. Photographing residents through their windows without permission, which is illegal and antisocial.

9. Camden Market + Regent’s Canal

Camden Market + Regent's Canal London photography sampleSave
Camden Market + Regent’s Canal — cinematic reference from the London Photographer’s Guide PDF

Camden Market is London’s most eclectic neighbourhood market — a labyrinth of alternative fashion, street food, vintage stalls, and live music spread across five interconnected market spaces beside the Regent’s Canal lock. The Gothic-arched ceilings of the Stables Market, the narrowboat-lined lock, and the Victorian bridge create a rich photographic environment. The canal towpath here is one of London’s most photogenic urban waterways, with colourful narrowboats, Victorian bridges, and graffiti murals reflected in the still water.

  • GPS: 51.5414, -0.1466
  • Elevation: 75 ft
  • Best time of day: early afternoon (12–3 PM) for market energy with vendors at peak activity; golden hour along the canal towpath for reflections in the still water
  • Sun direction: Regent’s Canal runs roughly east-west through Camden. The canal towpath faces north at Camden Lock, and from mid-morning onward the southern sun illuminates the south-facing warehouse facades and bridges from behind the camera. The lock area and black-and-white Camden Lock bridge are best lit by afternoon sun from the south-southwest. At golden hour (4–8 PM in summer) low sunlight rakes along the canal surface from the west, creating mirror-like reflections. The market interior is largely shaded by overhead structures, making it suitable for overcast shooting
  • Access: Camden Lock Market, NW1 8AF. Free entry to market and canal towpath (open 24 hours). Market open daily 10 AM–6 PM. Nearest Tube: Camden Town (Northern Line, 2-min walk). Buses 24, 27, 29, 31, 88, 134, 168, 214, 253, 274 all serve Camden. Canal towpath free and accessible from Regent’s Park to King’s Cross. The towpath narrows in some sections — no cycling permitted through the market area
  • Difficulty: easy
  • Recommended settings: Market Stall Documentary: f/4, 1/250 sec, ISO 800, 35mm  ·  Canal Golden Hour Reflection: f/11, 1/60 sec, ISO 100, 24mm  ·  Stables Market Arches: f/5.6, 1/60 sec, ISO 1600, 16mm  ·  Canal Narrowboat Portrait: f/5.6, 1/500 sec, ISO 200, 50mm

Shots to chase:

  • The black-and-white Camden Lock bridge with narrowboats moored below and gothic market buildings reflected in the still water
  • Food court stalls in the Stables Market with light shafts falling through the Victorian arched roof
  • Documentary portrait of a market vendor surrounded by their colourful merchandise with a 85mm at f/2.8
  • Canal towpath at golden hour looking east from Camden Lock with the setting sun reflected as a golden streak in the water
  • Street art on the railway arches along Hawley Road with the market crowd providing human scale

Pro tip: Visit on a weekday morning (10–11 AM) to photograph the market setting up — vendors arrange their goods, creating still-life opportunities before the crowd arrives. The Regent’s Canal towpath west of Camden (toward Little Venice) offers quieter reflective shots with narrowboats and the Regent’s Park tree canopy. The Camden Horse Tunnel under the Stables Market creates a dramatic gothic-arched passageway lit by hanging chandeliers.

Common mistake to avoid: Shooting inside the Stables Market vaults without compensating for extreme contrast — bracket exposures or shoot on overcast days. Weekend afternoons (2–5 PM) are so crowded that street photography becomes impossible to compose cleanly. Missing the canal towpath entirely — most tourists never venture 50 metres east along the water, where the best reflections and narrowboat compositions are found.

Want this in your pocket on the street?
The full-resolution version of every spot above — with full-page hero photography, GPS maps with gold location pins, sun direction diagrams, multi-season tables, and a complete safety + packing checklist — is inside the London Ultimate Photographer’s Guide PDF ($47). Print it, save it offline, take it on the walk. Get the guide →

10. Trafalgar Square + Nelson’s Column

Trafalgar Square is London’s civic heart and one of the world’s great urban spaces — dominated by the 51.6 m Nelson’s Column with Landseer’s bronze lions at its base, flanked by two baroque fountains and overlooked by the National Gallery. The square hosts New Year’s Eve celebrations, protest rallies, and the annual Christmas tree from Norway. The fourth plinth on the northwest corner hosts rotating contemporary art commissions, adding an ever-changing creative element. Looking south down Whitehall from the top of the column steps, Big Ben is visible as a distant backdrop.

  • GPS: 51.508, -0.1281
  • Elevation: 30 ft
  • Best time of day: blue hour / evening — the National Gallery, Nelson’s Column, and fountains are illuminated; Tuesday–Thursday evenings are far less crowded than weekends
  • Sun direction: Trafalgar Square faces roughly south, with the National Gallery (facing south) and Nelson’s Column at its center. At solar noon the column casts minimal shadow. Morning sun from the east-northeast illuminates the National Gallery’s north-facing portico from the side. The best directional light for the column and fountains is late afternoon in winter (3–4 PM) when the low south-southwest sun creates long shadows and warm raking light across the column’s stone plinth. The Whitehall axis (running south from the square) creates a clear sightline to Big Ben and Parliament — a telephoto shot best attempted at golden hour
  • Access: Trafalgar Square, WC2N 5DN. Free public space, open 24 hours. Nearest Tube: Charing Cross (Bakerloo/Northern) or Embankment (Circle/District), both 2–3 min. Buses 3, 6, 9, 11, 12, 13, 15, 23, 24, 29, 53, 87, 88, 91, 139, 159, 176 all serve the square. Fountains illuminated after dark. The Trafalgar Square webcam at trafalgar-square.org shows current conditions
  • Difficulty: easy
  • Recommended settings: Blue Hour Fountains Illuminated: f/11, 20 sec, ISO 100, 24mm, tripod  ·  Column Silhouette Sunset: f/11, 1/1000 sec, ISO 100, 16mm  ·  Lion Detail Morning: f/5.6, 1/400 sec, ISO 100, 85mm  ·  Whitehall Big Ben Telephoto: f/8, 1/400 sec, ISO 100, 200mm

Shots to chase:

  • Wide-angle blue-hour shot from the square’s north steps with the lit fountains as foreground and illuminated National Gallery behind
  • Low-angle shot from between the bronze lion feet looking up the column with the Union Jack flying at the top
  • 200mm telephoto shot from the north side of the square straight down Whitehall with Big Ben at the far end
  • Long-exposure fountain shot at dusk creating silky water motion with the National Gallery as a backdrop
  • Fourth plinth contemporary art installation as an abstract foreground element with Nelson’s Column in the background

Pro tip: The best position for a symmetrical fountain shot is from the north steps of the square (in front of the National Gallery), shooting south — both fountains frame the column with perfect symmetry. Arrive after 10 PM on weekdays when the square empties entirely for crowd-free compositions with full illumination. The steps on either side of the square offer slightly elevated vantage points that remove the tourist crowd from the foreground.

Common mistake to avoid: Shooting at midday when overhead sun creates harsh shadows under the lion manes and washes out the stone. Standing in the square and shooting upward at 16mm severely distorts the column — step back to the steps for a 35mm perspective. Weekend afternoons attract protest marches, festivals, and events that can make structured photography impossible.

11. Borough Market

Borough Market is London’s oldest and most celebrated food market, trading continuously since at least 1014. The Victorian cast-iron and glass roof creates a cathedral-like atmosphere with dramatic light shafts. The market produces extraordinary colour — vivid fruit and vegetable stalls, cheeses, fresh bread, spices, and flowers — creating still-life and documentary photography opportunities in a tight space. The nearby railway viaduct arches and Southwark Cathedral garden add architectural variety.

  • GPS: 51.5054, -0.0913
  • Elevation: 15 ft
  • Best time of day: Friday 10 AM–12 PM or Saturday 9–11 AM — peak vendor activity, morning light filtering through the Victorian market roof; Saturdays offer the largest selection but also the most crowds
  • Sun direction: Borough Market sits under Victorian railway viaduct arches on Southwark Street in SE1. The market roof creates diffused overhead light inside — direct sun direction is largely irrelevant for the covered sections. The open Jubilee Market entrance on Bedale Street faces northwest, allowing soft morning sun to illuminate the first row of stalls. The market’s southern (Winchester Walk) entrance faces northeast and receives gentle morning light from the east. The best natural light shafts filter through the Victorian iron roof panels around 10–11 AM on sunny days, creating dramatic beams between the stalls
  • Access: 8 Southwark Street, SE1 1TL. Free entry. Open Tue–Fri 10 AM–5 PM, Saturday 9 AM–5 PM, Sunday 10 AM–4 PM. Closed Monday. Nearest Tube: London Bridge (Jubilee/Northern, 2-min walk). Borough station (Northern Line) is slightly closer. Buses 21, 35, 40, 43, 133, 141, 521 serve Borough High Street. No parking; the surrounding streets are permit-only
  • Difficulty: easy
  • Recommended settings: Market Stall Natural Light: f/4, 1/250 sec, ISO 800, 35mm  ·  Light Shaft Dramatic: f/2.8, 1/125 sec, ISO 1600, 24mm  ·  Produce Macro Colour: f/4, 1/200 sec, ISO 400, 50mm  ·  Vendor Portrait Candid: f/2.8, 1/500 sec, ISO 800, 85mm

Shots to chase:

  • Wide shot of the main covered market hall with the Victorian iron roof and light shafts illuminating a busy stall below
  • Tight still-life of stacked colourful fruit with selective focus and market activity blurred behind
  • Candid portrait of a cheesemonger or baker at work with natural overhead light (ask permission for close-ups)
  • Street-level view looking east from Bedale Street entrance through the market with the railway arches and Southwark Cathedral spire visible beyond
  • Clink Street (just east of the market) for dramatic cobblestone alleyway with Victorian warehouse walls and arched ceilings

Pro tip: Enter from Bedale Street for the best initial light and less congestion. Walk east to Clink Street and the river after the market for excellent architectural photography. The market is at its most authentic on Tuesday–Thursday (fewer tourists, mostly trade buyers) — full food selection but manageable crowds. Cheese and bread vendors in the northeast corner under the arches create the most dramatic shaft-of-light photography opportunities.

Common mistake to avoid: Visiting on Monday when the market is completely closed. Saturday afternoons (1–5 PM) are so congested it’s nearly impossible to compose a clean food photograph. Not photographing the approach via Stoney Street or Winchester Walk, which offer the most dramatic framing of the Victorian railway arches.

12. Greenwich Observatory (Canary Wharf Skyline View)

Greenwich Observatory provides one of London’s finest protected skyline views — the panoramic north-facing hilltop viewpoint delivers a 180° arc from Canary Wharf on the right to the City of London skyscrapers on the left, with the River Thames curving between them. The view is protected by a Royal Observatory Strategic View Corridor, guaranteeing that no new building can obscure the sightline. The red Flamsteed House, the Prime Meridian marker, and the camera obscura add photogenic historic elements.

  • GPS: 51.4769, -0.0005
  • Elevation: 164 ft
  • Best time of day: golden hour to blue hour — the Canary Wharf skyscrapers and City of London skyline glow in the setting sun from the northwest; arrive 1 hour before sunset to claim the hilltop position in front of the General Wolfe statue
  • Sun direction: Greenwich Observatory sits at 50 m (164 ft) on a hill facing north-northwest across the Thames toward Canary Wharf (azimuth ~330°) and the City of London (azimuth ~310°). At sunset in summer the sun drops to the west-northwest behind Canary Wharf, creating dramatic rim-lighting on the skyscrapers with orange sky behind. In winter the sun sets more to the south-southwest, and the Canary Wharf towers are front-lit by warm golden light from the west. Blue hour views to the north show all the office towers illuminated against a deep indigo sky. Morning sun from the east-northeast front-lights the famous Royal Observatory’s Flamsteed House facade
  • Access: Royal Observatory, Blackheath Avenue, SE10 8XJ. Greenwich Park is free and open daily (summer 6 AM–9 PM, winter 8 AM–6 PM). The hilltop viewpoint and General Wolfe statue are free to access. Royal Observatory museum entry: £18/adult, free for under-15s with paying adult. Nearest DLR: Cutty Sark (5-min walk) or rail to Greenwich station (15-min walk through park). Thames Clipper river boat to Greenwich Pier is a scenic alternative. The Prime Meridian line at the observatory is a classic photo prop (free to stand on outside)
  • Difficulty: moderate
  • Recommended settings: Skyline Golden Hour Telephoto: f/8, 1/500 sec, ISO 100, 70mm  ·  Blue Hour City Lights: f/11, 15 sec, ISO 100, 24mm, tripod  ·  Wide Park Panorama: f/11, 1/250 sec, ISO 100, 16mm  ·  Flamsteed House Architecture: f/8, 1/400 sec, ISO 100, 35mm

Shots to chase:

  • Panoramic 180° view from the General Wolfe statue at sunset with Canary Wharf and the City skyline glowing orange
  • Blue-hour long exposure with the Thames curving below and both bank skylines fully illuminated
  • Telephoto compression of the Canary Wharf tower cluster from the hilltop at 200mm with the Thames visible below
  • The Prime Meridian line on the observatory courtyard as a creative foreground element with the city view behind (day)
  • Red Flamsteed House facade with the Old Royal Naval College’s classical columns visible down the hill in the background

Pro tip: The General Wolfe statue viewpoint is the most photographed spot but fills quickly at sunset. Position your tripod at the eastern end of the hilltop terrace (slightly away from the statue) for an unobstructed view of both Canary Wharf and The Shard simultaneously. Check the tide tables — low tide exposes the mud foreshore on the Thames far below, adding texture to the river. A DLR arrival via Cutty Sark avoids the long uphill walk and provides better timing control.

Common mistake to avoid: Arriving at sunset and finding no tripod space on the crowded viewpoint — arrive 60 minutes before golden hour. Shooting into the sun when it is directly behind Canary Wharf in winter washes out the towers; wait for the 10 minutes after sunset when golden light rakes across the facades from the side. Missing the downhill view of the Old Royal Naval College (facing south from the hill) which is equally stunning in its own right.

13. Leadenhall Market

Built in 1881, Leadenhall Market is one of London’s most elaborately decorated Victorian covered markets — the ornate cream, maroon, and green iron-and-glass roof is so distinctively fantastical that it served as the filming location for Diagon Alley in Harry Potter and the Philosopher’s Stone. The contrast between the 140-year-old Victorian arcade and the glass-and-steel skyscrapers (including The Cheesegrater and the Lloyds Building) visible through the market entrances is uniquely London. The blue doorway at 42 Bull’s Head Passage was the fictional Leaky Cauldron pub entrance.

  • GPS: 51.5128, -0.0837
  • Elevation: 35 ft
  • Best time of day: early weekday morning (7–9 AM) — the market is open but quiet before office workers arrive; the ornate Victorian roof is best lit in the morning when the eastern sun catches the cream and maroon paintwork; closed weekends
  • Sun direction: Leadenhall Market lies in the heart of the City of London, covered by its Victorian iron-and-glass roof. Direct sunlight penetrates the roof panels for only a brief window in the morning. The market’s main east-west axis (Gracechurch Street entrance) faces east, allowing the rising sun to flood the main gallery floor with warm light from approximately 8–10 AM. The north-south cross-axis receives diffused overhead light throughout the day. At blue hour and night the ornate lighting rig illuminates the painted vault in warm amber — the most atmospheric time for architectural photography
  • Access: Gracechurch Street, EC3V 1LT. Free entry. Open Mon–Fri 10 AM–6 PM (market stalls); the Victorian covered passageways are accessible from the surrounding street grid from early morning. Nearest Tube: Bank (Central/Northern/Waterloo & City) or Monument (Circle/District), both 3-min walk. Liverpool Street 8-min walk. Weekends: the market arcade is accessible (24-hour public passageway) but all shops are closed — the empty arcade is actually ideal for clean architectural photography
  • Difficulty: easy
  • Recommended settings: Roof Architecture Wide Angle: f/11, 1/125 sec, ISO 400, 16mm  ·  Blue Hour Warm Interior Lights: f/5.6, 1/15 sec, ISO 1600, 24mm  ·  Harry Potter Blue Door: f/5.6, 1/200 sec, ISO 400, 50mm  ·  Empty Arcade Weekend: f/11, 4 sec, ISO 100, 16mm, tripod

Shots to chase:

  • Look-up wide-angle shot from the central crossing point of the two market galleries toward the ornate painted vault above
  • The blue doorway at 42 Bull’s Head Passage (Leaky Cauldron film location) framed symmetrically with market activity
  • Weekend tripod shot with 4-second exposure at blue hour — empty arcade glows with warm amber lantern light
  • Looking from the market interior toward The Cheesegrater (Leadenhall Building) through the entrance arch — old and new juxtaposed
  • Floor-level reflection in the polished stone paving of the painted vault above on a wet morning

Pro tip: Visit on weekend mornings (Saturday 8–9 AM) for completely empty passageways ideal for tripod architectural work — the market arcade is a 24-hour public thoroughfare even when shops are closed. The central crossing where all four arms of the market meet provides the most dramatic upward perspective. The 16mm look-up shot from the exact center requires a very low camera position (lying on the floor) — this is worth doing as it reveals the full symmetry of the painted octagonal dome.

Common mistake to avoid: Visiting on a weekday lunchtime when City workers fill every inch — the narrow passages make composed photography nearly impossible. Missing the 42 Bull’s Head Passage blue door (the Harry Potter reference) by not walking all four arms of the market. Shooting the interior at ISO 100 without a tripod in the relatively dim ambient light — use ISO 1600 or bring a tripod on quiet weekend mornings.

14. Primrose Hill (Panoramic London Skyline)

Primrose Hill offers the finest free panoramic view of central London — a 180° sweep taking in The Shard, The Gherkin, the BT Tower, St Paul’s dome, Canary Wharf, the London Eye, and the BT Tower simultaneously at a distance that compresses them into one striking skyline. Unlike enclosed paid viewpoints, the open hilltop allows wide-angle panoramic stitches and dramatic foreground-sky compositions. The hill’s grass summit bench is one of the most romantic spots in London, frequently featured in films and TV series.

  • GPS: 51.5399, -0.1607
  • Elevation: 207 ft
  • Best time of day: golden hour to blue hour — the south-facing summit looks directly over central London; in summer sunsets (after 9 PM BST) the view to the south-southwest catches The Shard, BT Tower, St Paul’s dome, and Canary Wharf all in one frame
  • Sun direction: Primrose Hill summit (63 m / 207 ft) faces due south across London. At 51.5°N, the sun at noon is due south at approximately 35° elevation in summer and only 15° in winter — all day long it is in the southern half of the sky, meaning the view from Primrose Hill looks away from the sun for most of the day. This is ideal: the city below is front-lit by southern sunlight in clear conditions. At golden hour in summer, the sun drops to the west-southwest (azimuth ~280–300°), raking warm light across the Canary Wharf towers and creating dramatic lengthening shadows. Blue hour delivers the quintessential shot — the entire London skyline illuminated against a deep blue-grey sky
  • Access: Primrose Hill, NW1 4NR. Free public park, open daily dawn–dusk (no overnight access). Nearest Tube: Chalk Farm (Northern Line, 5-min walk) or Camden Town (Northern Line, 12-min walk). Bus 274 stops on Primrose Hill Road. Street parking on Fitzroy Road and Chalcot Crescent (usually available on weekday evenings). The hilltop viewpoint is about 300 m walk from the park entrance — a gentle 5-minute climb on grass paths
  • Difficulty: easy
  • Recommended settings: Golden Hour City Panorama: f/11, 1/250 sec, ISO 100, 35mm  ·  Blue Hour Skyline Long Exposure: f/11, 20 sec, ISO 100, 24mm, tripod  ·  Telephoto City Layers: f/8, 1/500 sec, ISO 100, 200mm  ·  Wide Sky Foreground Grass: f/8, 1/400 sec, ISO 100, 16mm

Shots to chase:

  • Panoramic stitch from the hilltop bench at blue hour covering the full 180° London skyline from The Shard to Canary Wharf
  • Single wide-angle shot (16mm) placing the classic Primrose Hill bench in the foreground with the full illuminated skyline behind
  • 200mm telephoto compression of the Shard and surrounding skyscrapers with the BT Tower visible to the left
  • Sunrise silhouette from the summit looking southeast toward The Shard as dawn light catches the tower’s glass spire
  • People on the hill bench silhouetted against the golden city glow at blue hour — a classic London lifestyle image

Pro tip: In winter, blue hour falls conveniently around 4:30–5:00 PM — arrive at 3:30 PM in daylight to secure the best position on the summit. The classic bench on the summit crest is the ideal tripod position, but popular — weekday evenings after 7 PM (summer) see far fewer people than weekends. The Primrose Hill village streets below (Fitzroy Road, Chalcot Crescent) offer colourful Victorian terraces as a bonus walking route to/from the summit.

Common mistake to avoid: Shooting with a wide-angle lens from midway up the hill — you need to reach the summit crest to see over the treeline into the full skyline. Weekend afternoons (3–5 PM) see hundreds of visitors on the small summit, making tripod photography nearly impossible. Arriving only at sunset and missing the blue-hour window — the skyline is most photogenic in the 15–25 minutes after the sun drops below the horizon.

When to photograph London: a year-round breakdown

London is photogenic every month of the year — but the conditions differ radically by season. Here is what to expect:

April–September (longer golden hours, fewer overcast days, late sunsets past 9 PM in June); October–March for dramatic moody skies, mist on the Thames, Christmas lights, and blue-hour windows that fall in the early evening

Photographer safety in London: read this

City photography has its own risks: gear visibility, neighborhood timing, traffic, weather. Read the briefing before you go.

  • Gear visibility: Use a discreet bag with no obvious camera branding. Keep a body strapped under a jacket on transit.
  • Neighborhood timing: Pre-dawn and post-sunset shoots reward early scouting. Cross-reference each location with current local guidance and choose well-lit transit routes.
  • Situational awareness: Headphones out. One eye in the viewfinder, one on the street.
  • Traffic: Bridges, medians, and bike lanes are not setup zones. Shoot from sidewalks and pedestrian areas only.
  • Weather: Summer storms move quickly; winter cold drains batteries. Layer up, keep gear dry, watch for ice on cobblestones at blue hour.

The complete safety briefing is inside the London Photographer’s Guide PDF.

Take this guide into the city

This post is the complete field reference. The London Ultimate Photographer’s Guide PDF is the field-deployable version: full-page resolution hero photography, GPS maps with gold pins for every location, multi-season shooting calendars, gear notes per location, sun-angle diagrams, the full city safety briefing, and a print-ready editorial layout in Framehaus black and gold. Save it offline. Print it. Take it on the walk.

London Ultimate Photographer’s Guide
Downloadable PDF · 14 GPS-mapped locations · Multi-season calendar · City safety briefing · Packing checklist

Get the London guide — $47

Combo Deal

Get the London Guide + Preset Pack

Photograph it. Edit it. Done.

$66
$54
Save $12
PDF Guide Every spot, GPS, golden hour
Preset Pack 20 Lightroom presets
Book your tours & experiences in London

All links go to Viator (a TripAdvisor company), the world’s largest marketplace for guided experiences. Tagged as affiliate per FTC.

Also on Amazon: gear that helps with this technique

Quick Amazon shortcuts to the gear most useful for this kind of shot. Use them if Prime shipping or Amazon credit makes more sense than B&H. As an Amazon Associate ShutYourAperture earns from qualifying purchases.

Take London home in your pocket.

Every shot location, every angle, every time of day worth shooting. Printable PDF + GPS-tagged map.

Instant download. Works on phone, tablet, and printed.

Continue reading

← Back to International Cities Photography Guides

Related guides nearby

Three more photography guides within striking distance — perfect for combining into one trip.

Browse all 78 guides → · Open the map

Save your trip-planning hours

The complete London guide is $47

All vantage points above + 5 bonus secret spots, printable map, gear pack list, and editing recipes. One-time payment, instant download, lifetime updates.

Buy London PDF →

Common questions about the London guide

Is the London photography guide worth $47?

For most photographers, yes. The guide saves 8-12 hours of trip-planning research and prevents the most common mistake of London photography: shooting at the wrong time of day. If a single better frame is worth $47 to you, the guide pays for itself on day one. Buyers get every GPS coordinate, every golden-hour window, every cultural rule, and a printable shot list.

Does the London guide include GPS coordinates?

Yes — every vantage point in the guide has Google Maps-ready GPS coordinates so you can pin them before you fly. The guide also includes a printable map showing all locations clustered by walking distance, so you can build efficient half-day routes.

What's in the London PDF that isn't in this article?

The article shows the highlights. The PDF includes: 5 additional secret spots not published online, a 14-day itinerary with daily routes, the full camera-settings cheat sheet for every scenario in London, a printable gear packing list, post-processing recipes with screenshot examples, and a list of local guides we trust for portrait commissions.

Do I get the Lightroom presets too?

The $47 guide is the PDF only. The matching London preset pack is a separate $19 download — most buyers grab both as a bundle and save the editing time. Both are instant download, both work on Lightroom Classic and Lightroom Mobile.

Will the guide work for a London trip in 2026?

Yes. The guide is updated annually as fees, restrictions, and new vantage points change. All buyers get free lifetime updates. The 2026 edition includes the latest drone rules, museum photography policies, and seasonal light data for the year.

Get the London guide · $47