Best Photography Spots in Honolulu: 12 Locations With GPS
~14 min read · 2026-05-24
Honolulu is one of the most photogenic destinations for serious travel photographers. This field guide covers 12 GPS-tagged vantage points, camera settings optimized for each location, gear recommendations, and the logistics photographers actually need — transit, timing, permits, and seasonal light conditions. Whether you have a long weekend or a one-day layover, use this guide to come home with portfolio-quality frames.
Shut Your Aperture Photography Guide — Honolulu
Download the offline PDF version of this guide with interactive GPS map, driving directions, and printable shot list for each vantage point.
Why Honolulu rewards photographers
Honolulu concentrates an exceptional range of photographic subjects within a compact, walkable geography. The combination of urban architecture, natural light patterns, and cultural street life creates a city that rewards photographers who move slowly and look carefully. The 12 vantage points in this guide represent the highest-yield locations — places where composition, light, and accessibility converge into frames worth keeping.
The photographers who produce the best work here arrive with a specific shot list (use the table below), plan around the golden and blue hours, and then walk far enough to find the second-best angle — the one without the tour bus in the frame. Bring fewer lenses than you think and walk farther than you planned.
For Honolulu, the editing approach that works is one that respects the city’s natural color palette. Push contrast and lift shadows — don’t crush the blacks into oblivion. Shoot RAW so you have the dynamic range to handle the bright skies and dark shadows that characterize this latitude at golden hour.
12 photography spots with GPS coordinates
The table below lists all 12 vantage points with GPS coordinates, recommended focal length, and a brief composition note. Pin these on Google Maps or import them into Gaia GPS before you leave home — cell coverage is spotty in many of the best spots.
| Vantage Point | GPS | Why Shoot Here | Focal Length |
|---|---|---|---|
| 1. Diamond Head Crater Summit | 21.256500,-157.805200 |
Panoramic views of Honolulu and Waikiki; sunrise hike recommended. | 16–35mm |
| 2. Lanikai Beach | 21.393520,-157.714720 |
Twin Mokulua islands and turquoise water; best at sunrise. | 24–70mm |
| 3. Nuuanu Pali Lookout | 21.365090,-157.797290 |
Dramatic cliffs and windward Oahu coastline; afternoon clouds. | 16–35mm |
| 4. Waimea Bay, North Shore | 21.642210,-158.066360 |
Big wave surf photography November–February; calm turquoise summer. | 70–200mm |
| 5. Manoa Falls | 21.331000,-157.800350 |
Lush rainforest waterfall; soft diffuse light on overcast days. | 24–70mm |
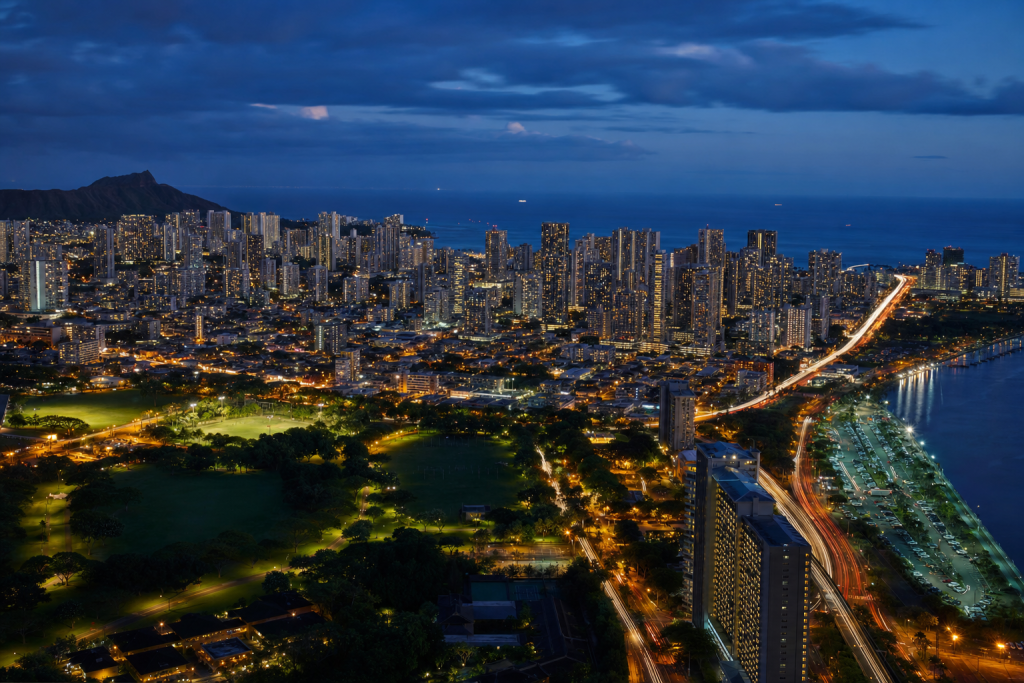
| 6. Waikiki Beach at Blue Hour | 21.276880,-157.829050 |
Diamond Head, high-rises, outrigger canoes; blue-hour magic. | 24–70mm |
| 7. Magic Island / Ala Moana | 21.287360,-157.845670 |
Sunsets behind the Waianae Range; city glow at dusk. | 16–35mm |
| 8. Byodo-In Temple | 21.432680,-157.837510 |
Japanese Buddhist temple in Valley of Temples; reflection pond. | 24–70mm |
| 9. Makapu'u Point Lookout | 21.310460,-157.654360 |
Dramatic sea cliffs, Rabbit Island, humpback whales in winter. | 70–200mm |
| 10. Punchbowl Crater National Cemetery | 21.312400,-157.843490 |
National cemetery on volcanic crater; American flags at dawn. | 24–70mm |
| 11. Kailua Beach Park | 21.394960,-157.732710 |
Perfect turquoise water and white sand; kitesurfers in afternoon. | 24–70mm |
| 12. North Shore Sunset Beach | 21.661520,-158.045740 |
Legendary big-wave spot with vivid tropical sunsets. | 16–35mm |
Detailed vantage point guide for Honolulu
Each vantage point below includes a detailed composition guide, the best time of day and year, transit notes, and the specific technical challenges you will encounter at each location. Read this section before you arrive so you can solve problems before you are standing in fading light with the wrong lens mounted.
1. Diamond Head Crater Summit
GPS: 21.256500,-157.805200 · Focal Length: 16–35mm
Panoramic views of Honolulu and Waikiki; sunrise hike recommended. For best results, arrive 20–30 minutes before sunrise to claim your position before light moves. Blue hour — roughly 30 minutes after sunset — delivers different but equally compelling tones for this location.
2. Lanikai Beach
GPS: 21.393520,-157.714720 · Focal Length: 24–70mm
Twin Mokulua islands and turquoise water; best at sunrise. For best results, arrive 20–30 minutes before sunrise to claim your position before light moves. Blue hour — roughly 30 minutes after sunset — delivers different but equally compelling tones for this location.
3. Nuuanu Pali Lookout
GPS: 21.365090,-157.797290 · Focal Length: 16–35mm
Dramatic cliffs and windward Oahu coastline; afternoon clouds. For best results, arrive 20–30 minutes before sunrise to claim your position before light moves. Blue hour — roughly 30 minutes after sunset — delivers different but equally compelling tones for this location.
4. Waimea Bay, North Shore
GPS: 21.642210,-158.066360 · Focal Length: 70–200mm
Big wave surf photography November–February; calm turquoise summer. For best results, arrive 20–30 minutes before sunrise to claim your position before light moves. Blue hour — roughly 30 minutes after sunset — delivers different but equally compelling tones for this location.
5. Manoa Falls
GPS: 21.331000,-157.800350 · Focal Length: 24–70mm
Lush rainforest waterfall; soft diffuse light on overcast days. For best results, arrive 20–30 minutes before sunrise to claim your position before light moves. Blue hour — roughly 30 minutes after sunset — delivers different but equally compelling tones for this location.
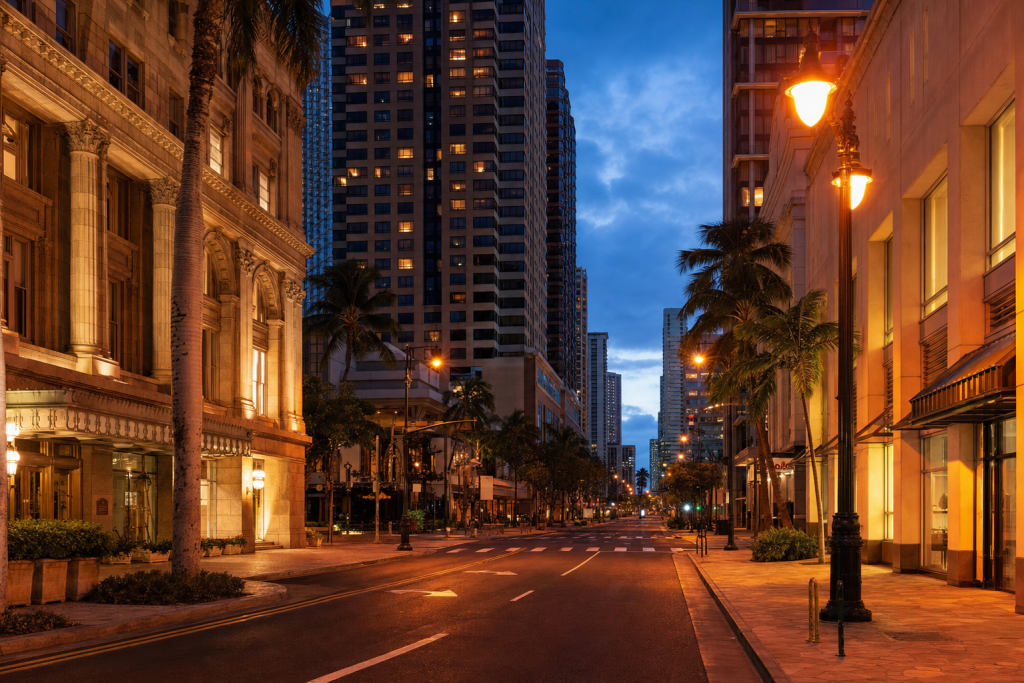
6. Waikiki Beach at Blue Hour
GPS: 21.276880,-157.829050 · Focal Length: 24–70mm
Diamond Head, high-rises, outrigger canoes; blue-hour magic. For best results, arrive 20–30 minutes before sunrise to claim your position before light moves. Blue hour — roughly 30 minutes after sunset — delivers different but equally compelling tones for this location.
7. Magic Island / Ala Moana
GPS: 21.287360,-157.845670 · Focal Length: 16–35mm
Sunsets behind the Waianae Range; city glow at dusk. For best results, arrive 20–30 minutes before sunrise to claim your position before light moves. Blue hour — roughly 30 minutes after sunset — delivers different but equally compelling tones for this location.
8. Byodo-In Temple
GPS: 21.432680,-157.837510 · Focal Length: 24–70mm
Japanese Buddhist temple in Valley of Temples; reflection pond. For best results, arrive 20–30 minutes before sunrise to claim your position before light moves. Blue hour — roughly 30 minutes after sunset — delivers different but equally compelling tones for this location.
9. Makapu'u Point Lookout
GPS: 21.310460,-157.654360 · Focal Length: 70–200mm
Dramatic sea cliffs, Rabbit Island, humpback whales in winter. For best results, arrive 20–30 minutes before sunrise to claim your position before light moves. Blue hour — roughly 30 minutes after sunset — delivers different but equally compelling tones for this location.
10. Punchbowl Crater National Cemetery
GPS: 21.312400,-157.843490 · Focal Length: 24–70mm
National cemetery on volcanic crater; American flags at dawn. For best results, arrive 20–30 minutes before sunrise to claim your position before light moves. Blue hour — roughly 30 minutes after sunset — delivers different but equally compelling tones for this location.
11. Kailua Beach Park
GPS: 21.394960,-157.732710 · Focal Length: 24–70mm
Perfect turquoise water and white sand; kitesurfers in afternoon. For best results, arrive 20–30 minutes before sunrise to claim your position before light moves. Blue hour — roughly 30 minutes after sunset — delivers different but equally compelling tones for this location.
12. North Shore Sunset Beach
GPS: 21.661520,-158.045740 · Focal Length: 16–35mm
Legendary big-wave spot with vivid tropical sunsets. For best results, arrive 20–30 minutes before sunrise to claim your position before light moves. Blue hour — roughly 30 minutes after sunset — delivers different but equally compelling tones for this location.
 Save
SaveCamera settings cheat sheet for Honolulu
Settings vary by scenario. Use this as a starting point and bracket exposures in challenging light:
| Scenario | ISO | Aperture | Shutter | Notes |
|---|---|---|---|---|
| Golden hour landscape | 100–400 | f/8–f/11 | 1/125–1/500s | Expose to protect highlights; lift shadows in RAW |
| Blue hour cityscape | 400–1600 | f/8 | 2–15s (tripod) | Balance ambient and artificial light |
| Night cityscape | 800–3200 | f/5.6–f/8 | 5–30s (tripod) | Use self-timer or cable release to eliminate vibration |
| Street photography | 400–3200 | f/2.8–f/5.6 | 1/125–1/500s | Continuous AF; burst mode for candid moments |
| Interior architecture | 400–3200 | f/5.6–f/8 | 1/30–1/125s (tripod) | Check permissions; keystone correction in post |
| Waterfront long exposure | 100 | f/11 | 30–120s (ND filter) | 10-stop ND filter; remote release; mirror lock-up |
| Sunrise landscape | 100–200 | f/8–f/16 | 1/30–1/250s | Arrive 30 min before sunrise; bracket 3 frames |
Lens and gear recommendations for Honolulu
The essential kit for Honolulu photography covers three focal ranges: wide (16–35mm or equivalent) for architecture and sweeping landscapes, standard zoom (24–70mm f/2.8) as the workhorse for 80% of shots, and telephoto (70–200mm) for compressed skylines, wildlife, and isolating architectural details from distance.
For mirrorless shooters: a single body with a 24–70mm f/2.8 plus a 35mm or 50mm f/1.8 prime is a viable travel kit. Add a 16–35mm for the wide-angle moments and a 70–200mm for compression. Most photographers bring two bodies to avoid lens changes in challenging conditions.
Essential accessories: a sturdy travel tripod (carbon fiber under 1.5kg), a circular polarizing filter for sky contrast and water management, a 6-stop and 10-stop ND filter for long exposures, extra batteries (cold weather or long shooting days drain fast), and enough memory cards to shoot RAW all day without worrying about space.
Honolulu Lightroom Preset Pack
19 custom Lightroom presets tuned to the light conditions and color palette of Honolulu. One-click starting points for golden hour, blue hour, overcast, and interior shots.
Best months and light conditions for Honolulu
Spring (March–May) and fall (September–November) offer the best combination of moderate temperatures, photogenic skies, and lower crowd density at the main vantage points. Summer delivers the longest golden hours but also peak tourist traffic and, in many cities, haze that degrades long telephoto shots. Winter can produce dramatic low-angle light and clear air — particularly valuable for skyline photography — but requires planning around shorter days and colder conditions.
Day-to-day, plan your shooting schedule around golden hour (first and last hour of daylight) and blue hour (30 minutes after sunset). Midday sun in most urban environments creates harsh, unflattering light for architecture and street photography. Use the midday hours for scouting evening compositions, eating, and transit between vantage points. The four-hour midday block is planning time, not capture time.
Check weather forecasts for partial cloud cover — a single layer of clouds at sunset can transform the sky into a canvas and multiply the quality of any exterior shot. Completely overcast days are excellent for waterfall, forest, and interior photography where diffuse light eliminates harsh contrast.
Getting around Honolulu for photographers
Plan your photography day around the geography of the vantage points. Cluster morning shots within walking distance where possible — traveling between locations during the golden hour is time wasted. Use public transit or rideshare to reach non-adjacent vantage points between the morning and evening shooting windows. A half-day driver or photography guide is worth the investment for first-time visitors who want to maximize shooting time.
Carry a portable battery pack (to keep your phone GPS running all day), a printed emergency map (cell service fails at the worst moments), local currency for entry fees and tips, and a water bottle. Photographers who prepare for logistics spend more time shooting and less time problem-solving.
 Save
SaveFrequently asked questions
What is the best time of day to photograph in Honolulu?
The golden hour (first hour after sunrise, last hour before sunset) and blue hour (30 minutes after sunset) deliver the best light in Honolulu. Midday sun is harsh and produces flat, overexposed results. Plan your shooting schedule around the light, not the convenience of sleeping in.
Do I need a permit to photograph in Honolulu?
Personal and editorial photography on public property in Honolulu generally requires no permit. Commercial photography — where a tripod is used for commercial purposes in a public park, or photography takes place on private property — may require a permit. Check with local parks departments and venues before commercial shoots. Drone photography requires FAA Part 107 certification and may be restricted in certain zones near airports.
What gear should I bring to Honolulu?
A versatile zoom lens (24–70mm f/2.8 or equivalent) covers 80% of Honolulu photography. Add a wide-angle (16–35mm) for architectural and landscape work and a telephoto (70–200mm) for compressed city skylines and wildlife. A sturdy travel tripod is essential for blue-hour and night photography. Pack a polarizing filter to manage reflections and deepen sky contrast, and an ND filter (6-stop or 10-stop) for long-exposure water and crowd shots.
What camera settings work best for city photography in Honolulu?
During golden hour: ISO 100–400, f/8–f/11 for sharpness, 1/125–1/500s shutter speed. At blue hour and night: ISO 800–3200, f/5.6–f/8, use a tripod and shoot 2–30 second exposures for light trails and long exposures. Shoot RAW files in all conditions — the extra dynamic range rescues highlights and shadows that JPEG cannot recover.
When is the best season to visit Honolulu for photography?
Spring and fall offer the best combination of comfortable temperatures, lower tourist density, dramatic skies, and ideal light angles. Summer delivers long days with extended golden hours but peak crowds. Winter can offer dramatic weather and clear air, with lower humidity removing haze from long telephoto shots. Research any unique seasonal events — cherry blossoms, festivals, autumn foliage — that create once-a-year photographic opportunities in Honolulu.