Best Photography Spots in Arches National Park: 12 Locations With GPS
Updated
 Save For practitioners, see our breakdown of 1/2000s for birds in flight.
Arches National Park is one of the most photogenic landscapes in the United States. If you have a camera and the patience to show up before dawn, Arches will give you images that last a career — but only if you know where and when to point it.
This is the definitive field guide to the 12 best photography spots in Arches National Park, with GPS coordinates you can drop straight into Google Maps, exact camera settings tuned to Arches’s unique light, precise timing for every location, and the access notes nobody else bothers to document.
Planning multiple parks? See also: best photography spots in Zion, Grand Canyon, and the full National Parks Photography Guides hub.
Quick jump to the 12 spots
- Delicate Arch
- Delicate Arch Viewpoint
- Double Arch
- Landscape Arch
- Park Avenue
- Balanced Rock
- The Windows — North Window and South Window
- Turret Arch
- Sand Dune Arch
- Skyline Arch
- Tower Arch
- Fiery Furnace Overlook
 Save
SaveBefore you shoot Arches: the essentials
- Park entrance fee (2026): $30 per vehicle (7-day pass); $25 motorcycle; $15 individual/pedestrian/cyclist; $55 Arches/Canyonlands annual pass; $80 America the Beautiful annual pass. Timed entry reservation fee: $2 per vehicle (separate from entrance fee). No cash — credit/debit only. Children under 16 free. Current rates at nps.gov.
- Best photography seasons: Spring (Mar–May) and Fall (Sep–Oct) for ideal temps, clearer light, and comfortable hiking; Summer (Jun–Aug) for Milky Way peak but brutal heat demands pre-7am or post-5pm shooting only; Winter (Dec–Feb) for rare snow-on-red-rock compositions and zero crowds — no timed entry required.
- Dark sky / Milky Way: International Dark Sky Park — Bortle Class 2 (one of the darkest skies in the American Southwest; Milky Way visible to naked eye, 15,000+ stars on clear new-moon nights).
- Drone policy: Drones are completely prohibited on all NPS land under 36 CFR § 1.5. Fines up to $5,000.
 Save
Save1. Delicate Arch
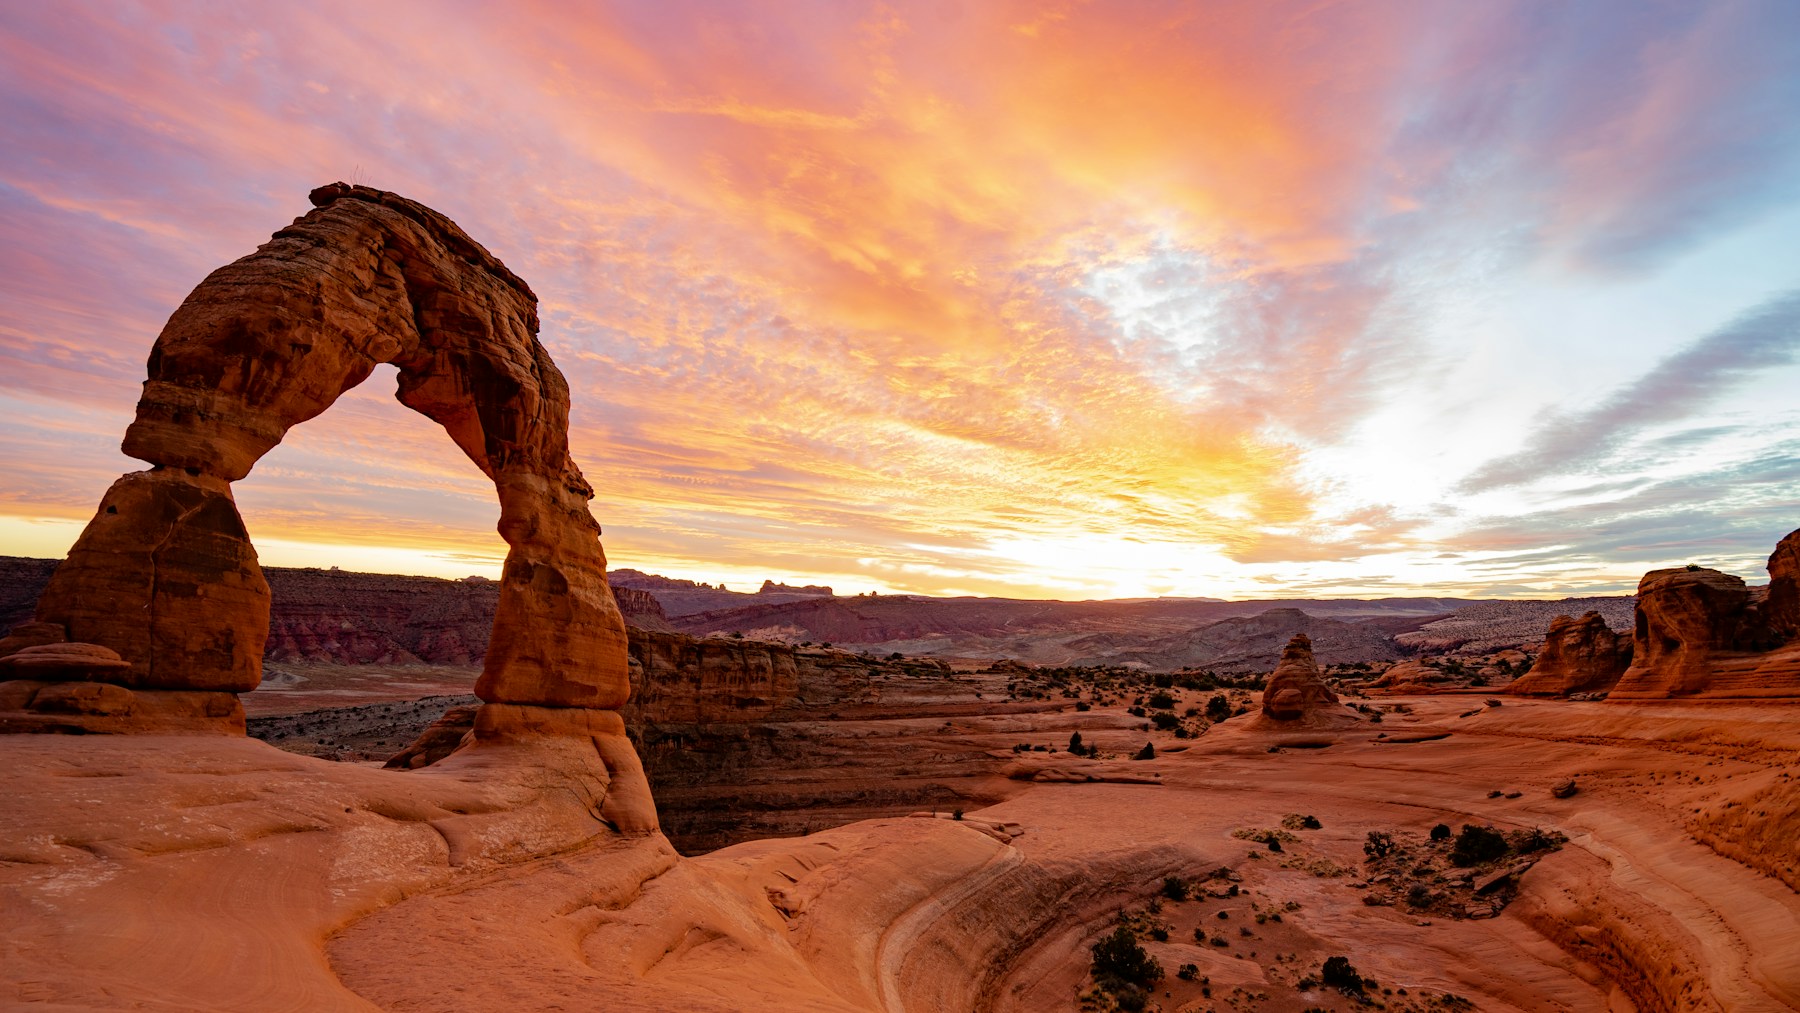
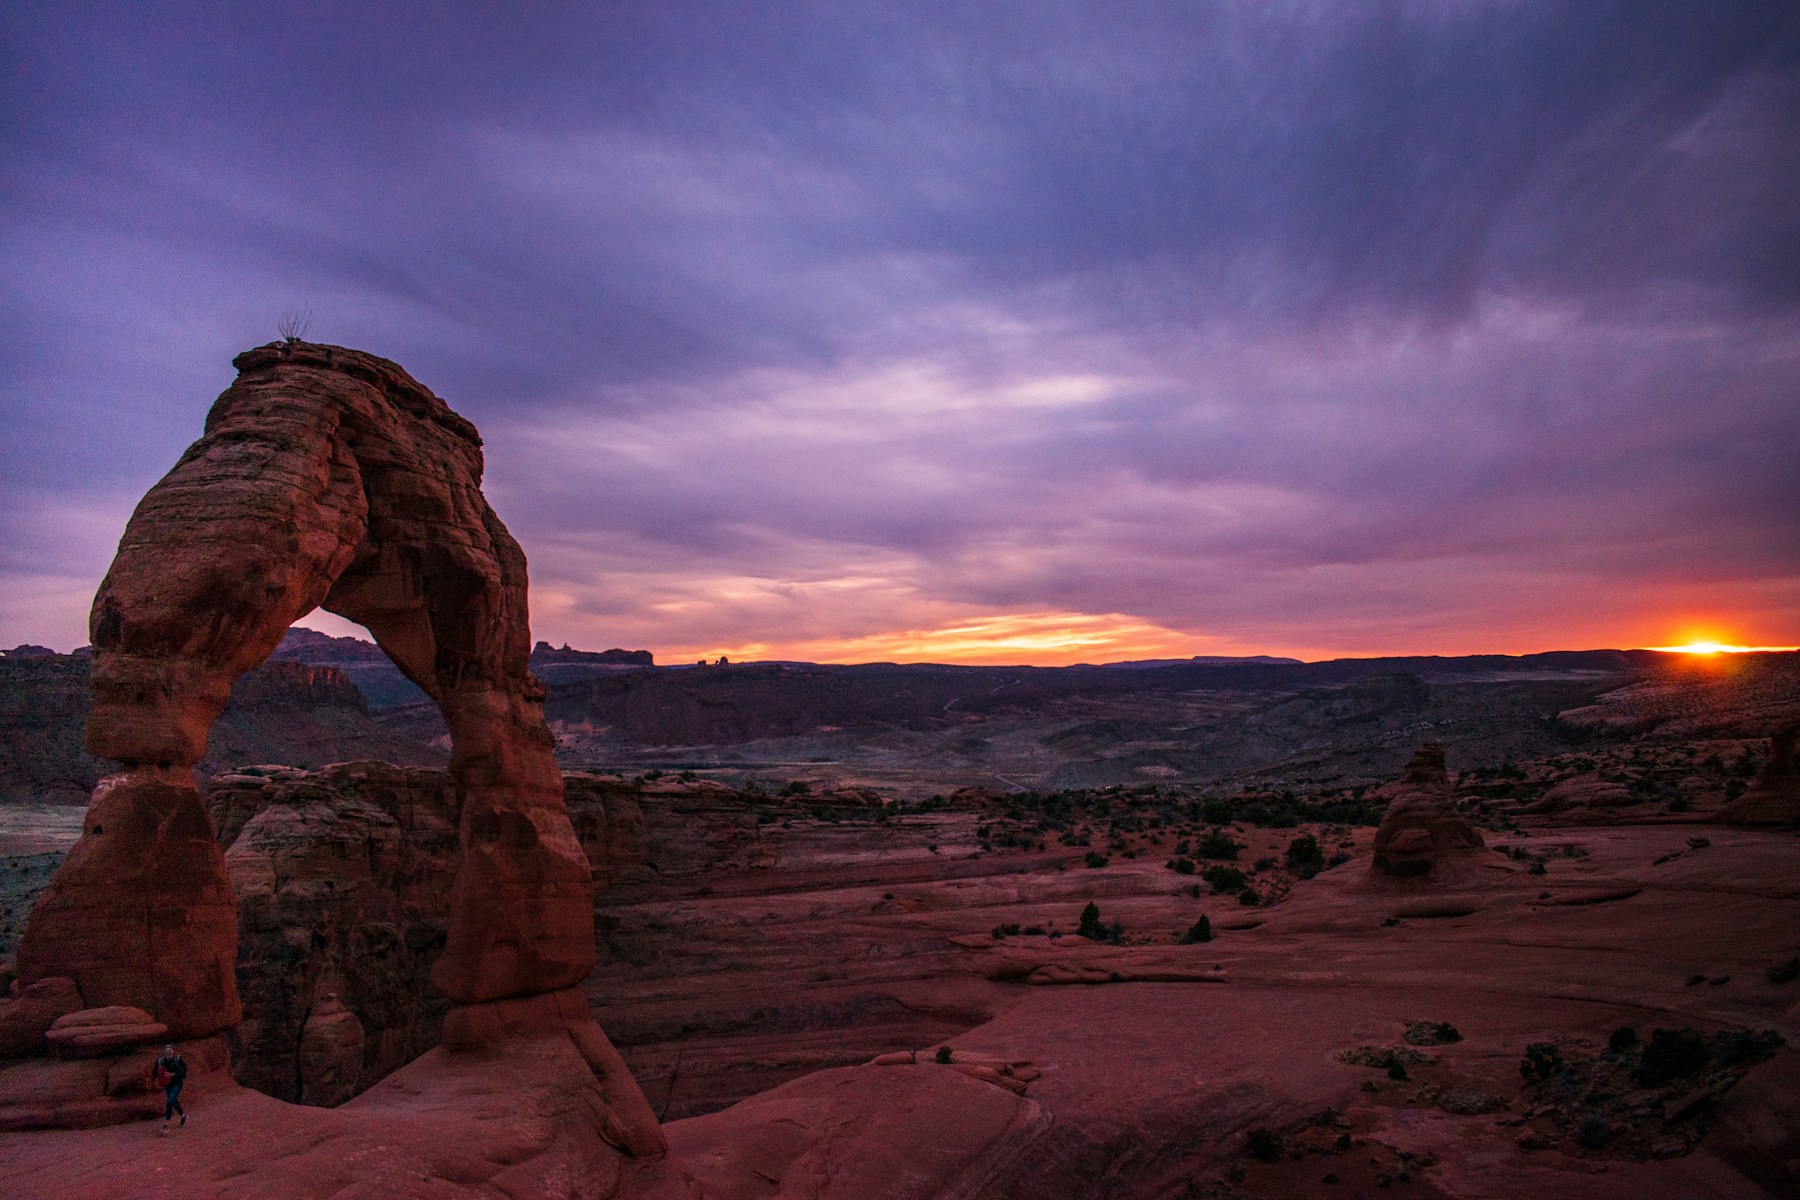
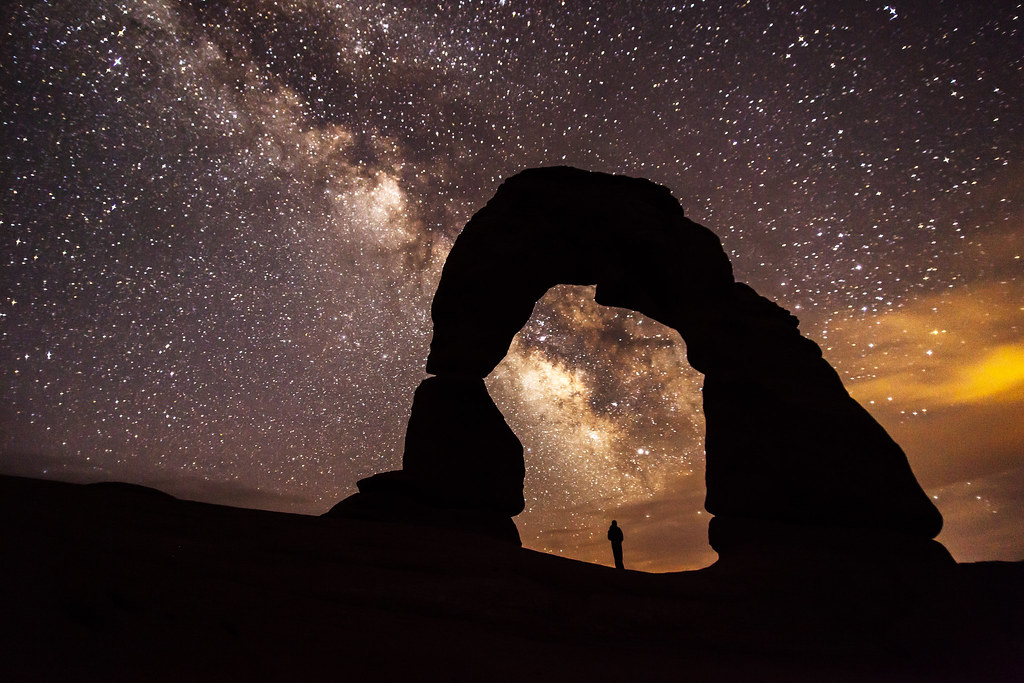
The most iconic freestanding natural arch in the world — a 52-ft-tall ribbon of Entrada sandstone that appears to float above a curved slickrock bowl with the La Sal Mountains (13,000 ft) as backdrop. No other arch on Earth combines this scale, isolation, and color. At golden hour the arch transforms from beige to deep copper-orange in minutes. The bowl setting means 40+ photographers crowd the rim at sunset — arrive 90 min early for a position. At night (new moon, Milky Way season Apr–Oct) the arch frames the galactic core facing southeast — arguably the finest astrophotography foreground in the American Southwest.
- GPS: 38.7436, -109.4993
- Elevation: 4,829 ft
- Best time of day: Sunset (primary — arch face receives warm direct light and glows brilliant orange-red); Sunrise (secondary — arch in soft front-light with La Sal Mountains snowcapped backdrop in spring). Delicate Arch faces EAST-SOUTHEAST: at sunset (late April–August), the setting sun catches the arch face head-on from the west, creating the iconic glowing orange effect. At sunrise the sun rises behind the arch for backlit/silhouette shots from the main viewpoint, but hikers who position themselves in the bowl BELOW get soft warm front-light on the arch face.
- Sun direction: The arch faces roughly east-southeast. At sunset (approx. 6:30–8:30 PM MDT in summer), the low western sun strikes the face of the arch directly, turning the Entrada sandstone a deep copper-orange — the single most photographed event in the park. This front-lighting window lasts 30–45 minutes before the sun drops behind the canyon wall to the southwest. At sunrise, the arch is backlit; silhouette shots are possible from the standard bowl position, while photographers who drop into the basin below and angle back up shoot the arch with soft warm light on the face. Golden hour here is compressed and dramatic — sandstone captures warmth that flatlight cannot.
- Access: Trailhead: Wolfe Ranch parking area (38.7356, -109.5205), 12 miles from visitor center. 3-mile RT moderate hike with 480 ft elevation gain on slickrock. TIMED ENTRY required Apr–Oct (7 am–4 pm). Enter before 7 am for no-reservation sunrise hike. No shade on trail. Wolfe Ranch historic cabin (1898) is a worthwhile foreground subject near trailhead.
- Difficulty: Moderate — 3 miles RT, 480 ft elevation gain, entirely exposed slickrock. One section has a steel cable handhold. Takes 45–75 min to ascend. Not suitable for young children in summer heat.
- Recommended settings: Sunrise: aperture: f/8, shutter: 1/60s, iso: 200, lens: 24-70mm, notes: Position in the bowl below/east of arch for front-lit arch against brightening sky. Arch goes warm first before sun fully clears the canyon wall. Bracket ±2 EV for sky-to-shadow range. · Sunset: aperture: f/11, shutter: 1/60s, iso: 100, lens: 24-70mm or 70-200mm, notes: Classic bowl position: wide angle (16–35mm) includes slickrock bowl foreground and La Sal Mountains. Telephoto (200mm+) from the rim above compresses arch against mountains. Polarizer deepens red in sandstone and cuts sky haze. · Blue Hour: aperture: f/2.8, shutter: 20s, iso: 1600, lens: 16-35mm, notes: 20–30 min after sunset, the sky cools to deep blue and the arch holds residual warmth. Crowd thins fast — best uncrowded window of the day. Long exposure smooths sky. · Milky Way: aperture: f/2.8, shutter: 20s, iso: 3200, lens: 14-24mm, notes: Galactic core rises SE — aligns through the arch June–August roughly 1–2 hours after sunset. Use PhotoPills or Sky Guide to plan exact alignment date. Get down low in the bowl, close to the arch, shooting at 16mm or wider. Light painting the arch with a low-power warm LED enhances the shot but NPS prohibits illuminating park features — keep any light subtle and use as fill only. Focus on brightest star, switch to manual.
Shots to chase:
- Classic sunset: wide angle (16–24mm) from the main bowl rim with slickrock foreground curving toward the arch and La Sal Mountains in the frame — the definitive Delicate Arch composition
- Telephoto compression (200–400mm) from the upper Delicate Arch Viewpoint road pull-off: arch reduced against massive mountain backdrop, good for sunrise east light
- Self-portrait at sunrise: hike up early, position yourself standing in the arch as the sun rises — backlit silhouette shot with the canyon below
- Blue hour 20–30 min post-sunset: the last warm light clings to the arch while the sky deepens to violet-blue, almost no one remains, perfect for clean tripod positions
- Milky Way arch alignment (June–August): galactic core frames through the arch leg facing SE — requires PhotoPills to time the alignment window precisely
- Winter snow composition: after rare snowfall, red arch and white snow create maximum contrast — even dusting is stunning and extremely rare (few other photographers will be present)
Pro tip: Arrive at the trailhead 90–120 min before sunset in summer. The bowl fills up by 45 min pre-sunset. Walk past the crowd and descend into the slickrock bowl for compositions that separate you from the rim line of photographers. In summer heat (May–Sep), hike at sunrise only — the 3-mile climb in afternoon sun above 95°F is dangerous. Carry 2+ liters of water regardless of season. The trail is entirely unmarked — follow cairns; navigating back down in darkness requires a headlamp. Cell service is zero at the arch — download offline maps.
Common mistake to avoid: Shooting from the flat bowl rim at the same height as every other photographer — descend into the bowl or move far left/right for unique angles. Arriving at sunset time rather than 90 min early — you’ll be squeezed out. In summer, attempting the afternoon hike without acclimatizing to heat or carrying enough water (minimum 1 liter per mile in July–August). Forgetting a headlamp for the descent in darkness.
 Save
Save2. Delicate Arch Viewpoint
The only legal viewpoint where you can photograph Delicate Arch without doing the 3-mile hike. The upper viewpoint puts you at canyon rim level looking directly across a steep drop at the arch — a perspective only telephoto lenses can exploit effectively. At sunrise the arch silhouettes against an orange sky producing an iconic graphic image impossible to get from the arch itself. Eliminates crowd issues entirely (almost no one uses the upper viewpoint).
- GPS: 38.7383, -109.4868
- Elevation: 4,760 ft
- Best time of day: Morning/Sunrise (primary — sun rises behind Delicate Arch, giving telephoto shooters dramatic back-lit arch against brightening eastern sky); late afternoon for telephoto-compressed arch against La Sal Mountains.
- Sun direction: This viewpoint looks west toward Delicate Arch from across a deep canyon. At sunrise, the arch appears as a silhouette against the lightening sky — strong graphic shape. By mid-morning, the arch face is in shadow. In late afternoon (4–6 PM), the arch begins to glow from the west sun — a long telephoto (300–600mm) from this viewpoint produces a dramatically compressed image of the glowing arch against the mountains. The viewpoint gets direct east morning light, ideal for shooting the surrounding canyon walls in warm tones.
- Access: Drive past Wolfe Ranch trailhead 1 mile to the signed Delicate Arch Viewpoint parking area (13.6 miles from visitor center). Lower viewpoint: 100-yard flat paved walk, accessible. Upper viewpoint: 0.5-mile moderately strenuous one-way hike gaining 200 ft on slickrock — ends at a canyon rim directly opposite the arch. TIMED ENTRY required Apr–Oct. This is an underused alternative to the 3-mile arch hike — ideal for sunrise telephoto shooting.
- Difficulty: Easy (lower viewpoint, 5 min flat paved walk) or Moderate (upper viewpoint, 0.5 mile/200 ft elevation gain on unmarked slickrock)
- Recommended settings: Sunrise: aperture: f/8, shutter: 1/125s, iso: 400, lens: 300–600mm, notes: Arch is approximately 0.5 mile away; 300mm on full frame fills the arch reasonably well. 600mm gives a tight portrait. Shoot silhouette against brightening sky — expose for the sky. Bring a monopod for stability at long focal lengths. · Sunset: aperture: f/11, shutter: 1/250s, iso: 200, lens: 300–600mm, notes: Arch glows orange-red against La Sal Mountains backdrop. Polarizer reduces atmospheric haze for sharper mountains. Wind can cause camera shake at long focal lengths — brace or use faster shutter.
Shots to chase:
- Telephoto sunrise silhouette: arch as dark graphic shape against orange/pink sky — a composition impossible from the arch itself
- Compressed 400–600mm: arch framed against snowcapped La Sal Mountains in spring — the mountains appear massive behind the arch at extreme compression
- Two-person scale: ask a hiking companion to stand at the arch (visible with binoculars) while you photograph from the viewpoint — the scale of the arch relative to a person is extraordinary
- Upper viewpoint canyon composition: shoot the deep canyon between you and the arch using the canyon walls as natural framing
Pro tip: Bring a 300mm minimum — the arch is too small to be impressive at shorter focal lengths from this distance. Upper viewpoint trail is unmarked slickrock; navigate by cairns and bring water. This viewpoint is nearly empty at sunrise while the main arch trail has 40+ people. An excellent strategy: shoot sunrise from here with telephoto, then hike to the arch itself at golden hour 2 hours later.
Common mistake to avoid: Bringing only a wide-angle or kit lens — the arch is 0.5 mile away and will appear as a small dot in the frame. Skipping the upper viewpoint and settling for the lower paved viewpoint where the arch is even further.
3. Double Arch
The largest twin arches in the park — the primary arch spans 163 ft and rises 105 ft. Walking beneath the double spans and looking up produces a stunning abstract of layered sandstone and sky. The interior alcove space between the arches is one of the most dramatic enclosed spaces in any national park: you’re inside a bowl of red rock looking up at two sky windows. A small juniper grove near the trailhead provides foreground framing on approach.
- GPS: 38.6927, -109.5419
- Elevation: 5,105 ft
- Best time of day: Morning (7–10 AM) — the two spans catch warm east light directly, turning the Entrada sandstone vivid amber. Avoid midday glare. Also strong at blue hour for astrophotography — Milky Way visible through the arch openings.
- Sun direction: Double Arch opens roughly facing east-southeast. Morning light (7–10 AM) illuminates the interior of both spans, catching the underside of the larger arch in warm amber. By mid-morning (10 AM+), light becomes overhead and harsh — the interior goes flat. Late afternoon produces rim-lit silhouettes from inside looking out. Both arches create a dramatic framing device: stand beneath and look up or out through either span.
- Access: Trailhead at Windows/Double Arch parking area (11.5 miles from visitor center). 0.5-mile easy, flat trail from parking lot. Short 0.4-mile trail on level ground. TIMED ENTRY required Apr–Oct. Same parking as The Windows section — combine both in one morning visit.
- Difficulty: Easy — 0.5 mile RT, flat trail, minimal elevation gain. Brief scramble to stand directly beneath the arches.
- Recommended settings: Sunrise: aperture: f/8, shutter: 1/60s, iso: 400, lens: 16-24mm, notes: Stand beneath the arches and point wide-angle lens up — expose for the bright sky to silhouette the dark arch edges, or bracket for HDR. The wide-angle distortion enhances the soaring height of the spans. · Morning: aperture: f/11, shutter: 1/125s, iso: 200, lens: 16-35mm, notes: 7–9 AM is peak light window. Front-light on arch faces. Polarizer deepens blue sky and red sandstone contrast. Include the juniper grove in foreground for approach shot. · Milky Way: aperture: f/2.8, shutter: 25s, iso: 3200, lens: 14mm, notes: Stand beneath one arch span and shoot through the other toward the southeast sky where the Milky Way rises. The double span creates a natural arch-within-arch frame for the galaxy.
Shots to chase:
- Look-up composition: lie flat on the slickrock directly beneath the primary arch and shoot straight up with a 16mm — the arch curves overhead against deep blue sky
- Arch-in-arch: position yourself inside the smaller span looking through to the larger span beyond — nested arch composition unique to this location
- Morning human scale: have a subject stand beneath the arch — the 105-ft height makes people appear tiny, conveying scale
- Milky Way through double span: both arches visible in a single ultra-wide frame with galactic core rising between/above — requires planning with PhotoPills for exact timing
- Parade of Elephants approach shot: from the trail, the Parade of Elephants rock formation is visible — a telephoto from this angle with Double Arch in background is a strong composite scene
Pro tip: Morning is definitively the best time — arrive at 7 AM when the first light catches both spans simultaneously. The interior alcove beneath the arches stays cool and shaded — a useful refuge in summer heat. Crowds peak 9–11 AM; arrive before 8 AM for empty shots. In summer: pair a sunrise visit to Double Arch with The Windows in the same morning before 10 AM, then leave the park or stay in shade.
Common mistake to avoid: Shooting only from outside the arch instead of walking beneath it and shooting upward — the under-arch view is far more dramatic than the exterior approach. Coming at midday when the interior is in harsh overhead light.
4. Landscape Arch
The longest natural arch in North America at 290 ft (88.4 m) span — longer than a football field. The arch is extraordinarily thin at its midpoint, appearing almost impossibly fragile. In 1991, a massive slab fell from the underside; further rock slabs visible on the ground beneath. The NPS has closed all access directly beneath the arch — you view from a roped-off area. Despite this, the viewing area provides a full-arch silhouette profile against open sky that is one of the most compelling geometry shots in any national park.
- GPS: 38.7917, -109.6075
- Elevation: 5,180 ft
- Best time of day: Morning (8–10 AM) — sun lights the arch face from the east, highlighting the impossibly thin ribbon of stone. Morning also catches the red fins flanking the arch in warm directional light. First light before 8 AM produces deep amber-orange on surrounding walls.
- Sun direction: Landscape Arch runs roughly east-west, with the span visible from the south side of the viewing area. Morning light from the east catches the southern face of the arch. At this time, the gossamer-thin ribbon (only 6 ft thick at its thinnest point) is dramatically lit, emphasizing its fragile profile against the sky. Afternoon light comes from the west and backlights the arch — strong silhouette potential. Midday overhead light flattens the span entirely.
- Access: Devils Garden Trailhead (17.5 miles from visitor center, the farthest maintained trailhead). 1.6-mile RT easy-to-moderate trail, modest elevation. The arch is 0.8 miles from the trailhead. Trail beyond Landscape Arch is closed to foot traffic (rockfall risk after 1991 collapse). TIMED ENTRY required Apr–Oct.
- Difficulty: Easy-Moderate — 1.6 miles RT with minimal elevation change; sandy sections slow pace. Trail accessible to most fitness levels but exposes hikers to sun.
- Recommended settings: Morning: aperture: f/11, shutter: 1/125s, iso: 200, lens: 24-70mm, notes: Position to capture the full 290-ft span in one frame — requires stepping back from the viewing area. Use a wide-to-normal focal length. Include red fins on either side as brackets. · Silhouette: aperture: f/16, shutter: 1/250s, iso: 100, lens: 24-70mm, notes: Late afternoon backlight creates a strong arch silhouette. Expose for the bright sky; the arch ribbon goes dark against blue. A polarizer deepens sky contrast.
Shots to chase:
- Full-span geometry: wide angle or standard zoom positioned to capture the entire 290-ft span — a remarkable abstraction of stone against sky
- Thin point close-up: telephoto (200mm) focused on the 6-ft-thin middle section, emphasizing the fragility of the stone
- Red wall framing: use the tall red sandstone fins on either side of the trail as foreground elements leading the eye to the distant arch
- Dappled shadow play: morning light creates shadow patterns in the Devils Garden that serve as complementary images on the walk to/from the arch
Pro tip: The trail to Landscape Arch passes Pine Tree Arch and Tunnel Arch — both reachable via short 0.2-mile spur trails and both excellent morning photography subjects. Budget 2–3 hours total for the Devils Garden section. Landscape Arch is most dramatic when lit from the side (morning or late afternoon) — avoid midday. The thin midpoint is best captured with a telephoto that compresses and isolates the fragile ribbon of stone.
Common mistake to avoid: Standing too close to the viewing area rope and not stepping back far enough to capture the full arch span. Coming at midday when the arch is lit from overhead and loses all sense of depth and fragility.
5. Park Avenue
The gateway canyon of Arches — the first dramatic red-rock tableau visitors encounter after entering the park. Tall Entrada sandstone monoliths (up to 300 ft) line both sides of the canyon in rows, genuinely resembling a skyline. The formations Queen Nefertiti, the Courthouse Towers, and Three Gossips are all visible from the viewpoint. The canyon floor makes a strong lead-in line for compositions. La Sal Mountains visible in the distance on clear days. Often overlooked in favor of the arches further north — but at sunset it is one of the most dramatic canyon light shows in Utah.
- GPS: 38.6228, -109.597
- Elevation: 4,550 ft
- Best time of day: Late afternoon and sunset (primary) — the canyon walls to the west glow red-orange as the low sun rakes across the vertical faces; Morning for shadow-filled canyon drama with lit upper walls.
- Sun direction: Park Avenue runs roughly north-south. In late afternoon (4–7 PM), the setting western sun lights the canyon’s eastern walls in warm amber while the floor remains in shadow — creating a classic canyon light-and-shadow split. This is exactly the effect that makes Park Avenue resemble its New York City namesake: towering illuminated walls above a darkened ‘street.’ At morning, the effect reverses: western walls glow, eastern walls stay dark. The Courthouse Towers at the north end of the canyon catch warm late light dramatically.
- Access: Park Avenue Viewpoint: 2.1 miles from visitor center; first major stop on the scenic drive. Paved viewpoint with ADA-accessible observation platform. Full trail (1.8 miles RT, moderate, 320 ft elevation gain) descends into the canyon toward Courthouse Towers. TIMED ENTRY required Apr–Oct.
- Difficulty: Easy (viewpoint only, 0.2 mile paved flat) or Moderate (full trail 1.8 miles RT with 320 ft descent/re-ascent)
- Recommended settings: Late Afternoon: aperture: f/11, shutter: 1/125s, iso: 200, lens: 24-70mm, notes: Shoot from the viewpoint with the canyon walls as vertical framing elements. Include the sandy canyon floor as a foreground lead-in. A polarizer deepens reds and reduces sky wash-out. · Sunset: aperture: f/11, shutter: 1/60s, iso: 400, lens: 16-35mm, notes: After the sun drops, the canyon walls hold warm afterglow for 10–15 min. Include the road or trail as a leading line toward the Courthouse Towers. Long exposure blur of any passing vehicles creates light trails.
Shots to chase:
- Viewpoint panorama: 2–3 frame horizontal stitch at 35mm captures the full canyon width with layered sandstone walls on both sides
- Canyon floor leading line: descend the trail 200 m to shoot back up the canyon using the sandy trail as a converging line toward the monoliths
- Queen Nefertiti silhouette: in late afternoon, the pointed spire to the left of the viewpoint silhouettes against the glowing western sky
- Vehicle light trails at blue hour: slow shutter (15–30s) captures any passing cars as light streaks through the canyon — surreal combination with red rock
- Telephoto compression of Courthouse Towers from 200+ mm: the stacked layers of sandstone walls compress dramatically against the far canyon walls
Pro tip: Park Avenue viewpoint is the only location in Arches accessible before the timed entry window opens (the viewpoint is effectively at the park entrance — many photographers park here before the entry gate opens at 7 AM). In summer, this is a perfect pre-timed-entry location for sunset if you’ve been inside the park all day — you can stay after 4 PM without a new reservation. The canyon sees far fewer photographers than Delicate Arch, making it more accessible for tripod setups.
Common mistake to avoid: Dismissing Park Avenue as a quick drive-by — the canyon floor trail offers much stronger compositions than the viewpoint above. Shooting only at midday when the canyon floor is uniformly lit with no drama.
6. Balanced Rock
The 3,577-ton capstone balanced on a deteriorating pedestal — a formation so precarious it looks like a physics error. Total height 128 ft, with the balancing boulder 55 ft above the narrowed pedestal. The profile changes dramatically as you circle: from some angles it looks like an enormous hammerhead, from others a classical mushroom. The La Sal Mountains provide a majestic snowcapped backdrop in spring. Roadside location means it’s one of the easiest dramatic shots in the park — no hiking required.
- GPS: 38.7017, -109.566
- Elevation: 5,036 ft
- Best time of day: Sunset (primary) — the 128-ft formation silhouettes dramatically against a colorful western sky; Early morning (golden hour) for warm front-light on the red rock with La Sal Mountains behind.
- Sun direction: Balanced Rock sits near the main park road 9.2 miles from the visitor center. The formation is visible from all sides. At sunset, Balanced Rock silhouettes against the western sky — particularly dramatic when clouds are present. At early morning, the sun rises behind the rock (east), front-lighting the La Sal Mountains to the east and side-lighting the rock itself. Late afternoon (4–6 PM) provides the best front-light on the rock’s west face — emphasizing the red-orange sandstone color against a deep blue sky. The Gardens of Eden section just north can be combined in the same afternoon/sunset session.
- Access: 9.2 miles from visitor center; parking lot directly adjacent to the rock with ADA-accessible trail. 0.33-mile loop around the formation. Extremely popular — large parking lot fills by 9 AM on spring/fall weekends. TIMED ENTRY required Apr–Oct.
- Difficulty: Easy — 0.33-mile paved/gravel loop, 45 ft elevation gain. ADA accessible for first portion.
- Recommended settings: Sunset: aperture: f/11, shutter: 1/30s, iso: 400, lens: 16-35mm, notes: Position east of the rock to silhouette it against the western sunset sky. Include clouds when available — the formation’s profile against a multi-colored sky is its peak shot. Long exposure at blue hour smooths wind-rippled clouds. · Morning: aperture: f/8, shutter: 1/125s, iso: 200, lens: 24-70mm, notes: West face lit in warm golden light with La Sal Mountains behind to the east. Move to the eastern side of the loop trail for this composition. Polarizer deepens rock color and sky.
Shots to chase:
- Western silhouette at sunset: rock as dramatic dark profile against orange/pink/purple sky — include cloud detail for maximum drama
- Eastern side morning: warm lit rock face with La Sal Mountains snowcapped backdrop — stack a telephoto (100mm+) to compress mountains
- Worm’s-eye: crouch low near the trail and shoot up — the pedestal appears even more impossibly thin from low angle
- Blue hour abstract: 30 seconds after sunset, deep blue sky and warm residual rock light create a two-tone palette
- Milky Way: the park road location (low horizon) makes this a viable Milky Way foreground — galactic core visible to the south/southeast above the rock in summer
Pro tip: The most photographed object at Arches after Delicate Arch — competition for sunset positions is intense on weekends. Arrive 60 min before sunset and walk the full loop to preview compositions from multiple angles before committing. The west and northwest angles (shooting east) are the most distinctive and least crowded positions. Early morning visits (7 AM) will find the parking lot nearly empty.
Common mistake to avoid: Shooting only from the parking lot/road side (north side) where thousands of identical shots have been taken. Walk 200 m around the loop to the south and east sides for entirely different and less photographed angles. Underestimating the sunset crowd.
7. The Windows — North Window and South Window
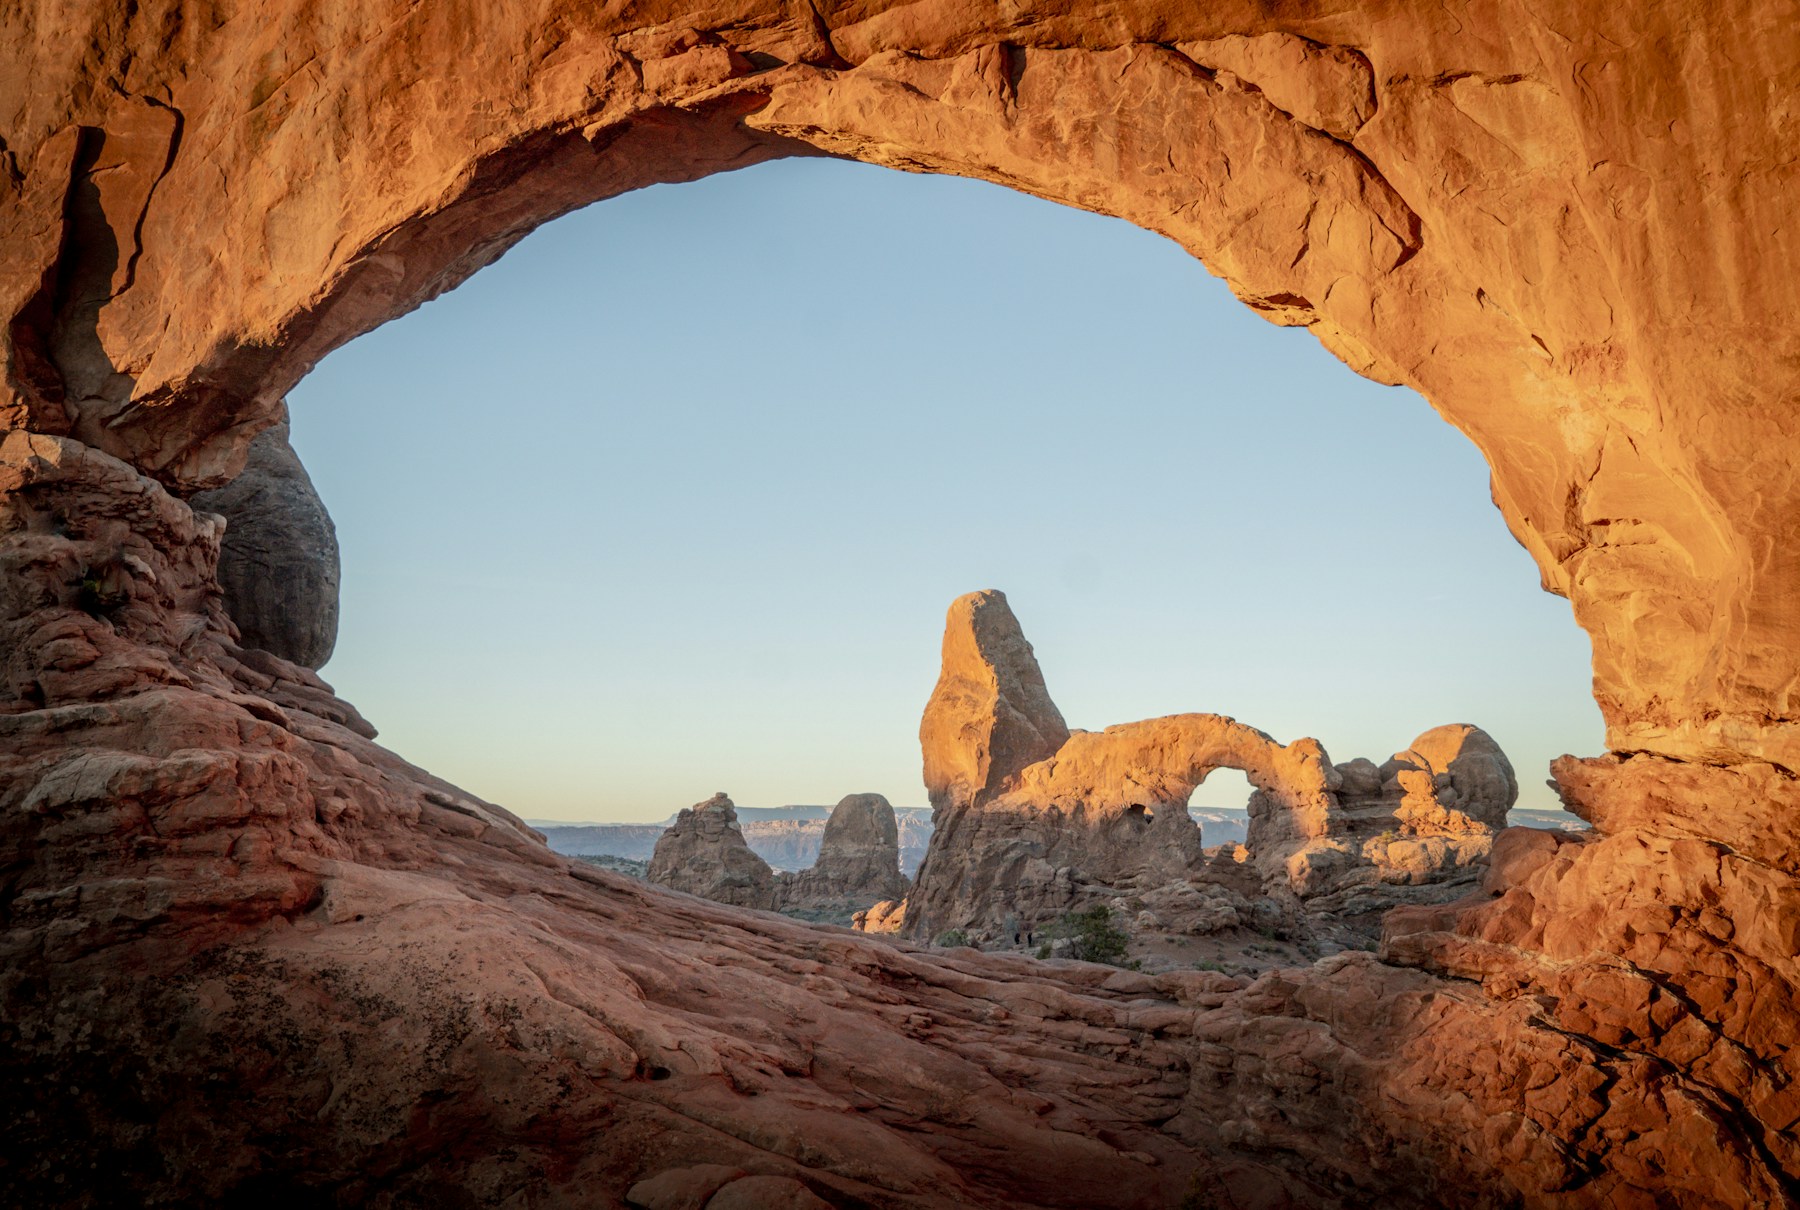
The most arch-dense area in the park — three major arches within a 1-mile loop. The view of Turret Arch through North Window is one of the most printed images in Arches photography. Both Windows create natural ‘picture frames’ for the canyon beyond. From inside North Window on the primitive trail, you look 50 m back through the arch opening at a canyon landscape that feels like a living painting. The east-facing openings create one of the few locations in Arches where sunrise produces the primary shot (most arches face westward and reward sunset).
- GPS: 38.6877, -109.5378
- Elevation: 5,150 ft
- Best time of day: Sunrise and morning (6–10 AM) for classic interior-to-exterior shots with warm light entering through the openings; Late afternoon for side-lit arch faces glowing in warm sandstone tones.
- Sun direction: The two windows — North Window (105 ft wide, 51 ft tall) and South Window (105 ft wide, 66 ft tall) — face roughly east-southeast, with Turret Arch visible to the southwest from the primitive trail. At sunrise, orange light pours through the windows, illuminating the interior walls. The classic shot — Turret Arch framed through the opening of North Window — requires hiking the primitive trail to the back (east) side of North Window. Light entering through South Window at sunrise creates a bright ‘spotlight’ effect on the canyon below. Late afternoon side-lights the arch faces from the west.
- Access: Windows parking area (11.3 miles from visitor center, 2.5 miles past Balanced Rock via the Windows Road). 1-mile loop trail (North + South Windows + Turret Arch). The primitive trail that loops behind the arches extends the hike by 0.9 miles — this is where the iconic Turret Arch-through-North Window shot is made. TIMED ENTRY required Apr–Oct.
- Difficulty: Easy — 1-mile loop, 150 ft elevation gain. Primitive trail extension is slightly more challenging on loose rock.
- Recommended settings: Sunrise: aperture: f/8, shutter: 1/60s, iso: 400, lens: 16-24mm, notes: Stand on the primitive trail behind North Window and shoot through the opening toward the lit exterior canyon. The arch frame naturally exposes correctly for the bright exterior — use spot metering on the middle tones inside the arch or HDR bracket. · Morning: aperture: f/11, shutter: 1/125s, iso: 200, lens: 24-70mm, notes: 30–60 min after sunrise, the warm light entering through both windows is optimal. Walk to the primitive trail (behind arches) for the Turret Arch framing shot.
Shots to chase:
- Turret Arch through North Window: hike primitive trail to stand 40 m behind/through North Window; Turret Arch appears perfectly framed in the opening with warm morning sky beyond — the iconic Windows shot
- South Window floor view: from the parking area side, wide angle captures the full 105-ft opening with canyon landscape as backdrop at late afternoon when the south face glows
- Interior wall texture: wide angle from inside the North Window opening looking at the curved sandstone ceiling — the rock texture catches raking morning light dramatically
- Both windows in one frame: from the primitive trail area at a distance, both windows appear as two glowing eyes against the ridge — the ‘Spectacles’ composition
- Silhouette portrait: position a person in the South Window opening at late afternoon — they become a perfect silhouette against the glowing canyon beyond
Pro tip: Do the primitive loop trail — it is the best photography trail in Arches for the effort. Only 0.9 miles extra, almost no one does it, and the Turret Arch-through-North Window shot is impossible without it. Hike the primitive trail clockwise (start at the south side of South Window, circle behind North Window) for optimal light sequence in the morning.
Common mistake to avoid: Shooting only from the main front-of-arch side (same as most tourists) and skipping the primitive trail behind the arches. The interior looking-through compositions only work from the primitive trail — not the standard loop.
8. Turret Arch
The most architecturally unique arch in the Windows section — the ‘towers’ of the arch give it a fortified castle silhouette unlike any other formation in the park. Can be photographed at both sunrise AND sunset with quality light. At sunrise, the arch opening frames a lit sky dramatically. When viewed from the primitive trail through North Window, it provides the most recognizable ‘arch-within-arch’ composition in American landscape photography.
- GPS: 38.6844, -109.535
- Elevation: 5,120 ft
- Best time of day: Sunrise (primary — light enters through the arch opening from the east, front-lighting Turret Arch dramatically); Late afternoon (secondary — side light from the west catches the arch’s castellated sandstone towers).
- Sun direction: Turret Arch faces roughly east — the sun rises directly through or near the opening at certain times of year, creating a classic interior-to-exterior lit composition. The arch ‘towers’ above like a castle turret, with a distinct notch opening to the east. At sunrise, shooting from inside or beneath the arch looking east produces a strongly lit exterior against a warm sky. When shot through North Window from the primitive trail, Turret Arch catches warm morning light for 1–2 hours after sunrise.
- Access: Same trailhead and parking as North and South Windows (11.3 miles from visitor center). 1-mile loop includes Turret Arch. Short walk (0.4 mile from trailhead) on packed gravel. TIMED ENTRY required Apr–Oct.
- Difficulty: Easy — 0.4 mile from parking, level terrain with minor rocky sections
- Recommended settings: Sunrise: aperture: f/8, shutter: 1/60s, iso: 400, lens: 16-35mm, notes: Stand beneath or inside Turret Arch looking east — expose for the bright exterior and let the dark rock frame silhouette. Or bracket for HDR. Wide angle captures both towers and the full opening. · Arch In Arch: aperture: f/11, shutter: 1/125s, iso: 200, lens: 24-70mm, notes: From primitive trail behind North Window, 24–35mm captures Turret Arch filling the North Window opening. This shot requires the North Window arch as foreground frame — exact positioning matters: move 40 m behind North Window for optimal framing.
Shots to chase:
- Arch-in-arch: the definitive shot — Turret Arch framed inside the North Window opening viewed from the primitive trail behind (this requires hiking the extra 0.9-mile primitive loop)
- Interior sunrise: stand within the Turret Arch opening pointing east as the sun rises — the ‘turrets’ frame a glowing orange sky
- Milky Way: the south-facing opening of the arch against the sky visible from the front makes a viable Milky Way foreground at dark sky — Bortle 2 skies make the galactic core vivid
- Telephoto compression: from the main loop trail, 70–200mm compresses the two flanking towers against each other
- Storm light: when off-season clouds build from the south (July–September), dramatic storm light on the castle-like structure is extraordinary
Pro tip: Most visitors walk up, snap a quick photo from the front, and leave. Walk beneath the arch and turn around — shooting from inside looking out produces images no tourist gets. The arch-in-arch primitive trail composition is nearly impossible to get wrong once you’re in the right position — but be 40 m behind North Window, not 10 m.
Common mistake to avoid: Only photographing Turret Arch from the front exterior. Skipping the primitive trail loop entirely and therefore missing the arch-in-arch shot.
9. Sand Dune Arch
The most intimate arch in the park — the approach through the narrow slot canyon is a tactile, enclosed experience unlike any other Arches trail. Sand on the canyon floor is fine and deep (kids love it). The arch span itself is relatively modest (30 ft wide) but the surrounding sandstone fins make it feel enclosed and otherworldly. Shaded conditions make it the only reliable midday photography location in the park during summer. A strong complement to the wide-open desert photography elsewhere.
- GPS: 38.7649, -109.5837
- Elevation: 5,190 ft
- Best time of day: Midday (surprisingly — arch is tucked between shaded sandstone fins and receives diffuse, even light all day; harsh midday sun elsewhere in the park is non-issue here); Morning for soft ambient light in the slot canyon approach.
- Sun direction: Sand Dune Arch is nestled between two massive parallel sandstone fins that block direct overhead sun almost all day. The slot approach channel creates soft, diffused light from above — similar to shooting inside a north-facing room. This makes it an unusually good midday location when other Arches photographic subjects are washed out by harsh overhead sun. In morning, ambient light in the slot is warm and slightly directional. The arch span itself catches brief patches of direct sun only at certain times of year.
- Access: 16 miles from visitor center; parking area on the east side of the main park road. 0.4-mile RT easy trail through deep sand and a narrow slot between sandstone fins. TIMED ENTRY required Apr–Oct. Often combined with Broken Arch (extra 1.1 miles) or as a transition stop to Devils Garden.
- Difficulty: Easy — 0.4 mile RT through deep sand; no elevation change. Best family-friendly photography stop in the park.
- Recommended settings: Any Time: aperture: f/5.6, shutter: 1/30s, iso: 800, lens: 16-24mm, notes: Low light inside the slot requires widening aperture and raising ISO. A tripod is ideal but the slot is narrow — a monopod or bracing against the fin wall helps. The arch is 30 ft wide — a 16mm wide angle captures it fully at close range.
Shots to chase:
- Looking up through the slot: position in the sandy channel below the arch and shoot up — the narrow gap between fins creates a letterbox sky with the arch span visible
- Texture close-up: the sandstone fin walls within 2 feet show extraordinary texture and color — macro or close-range shots of fin face patterns
- Leading line through slot: 16mm wide angle with the sandy slot floor as a leading line curving toward the arch opening — people in the distance for scale
- Black-and-white: the high-contrast geometry of slot walls against sky translates powerfully to monochrome
Pro tip: This is the best midday photography stop in all of Arches — plan it specifically for the 11 AM–2 PM window when everything else in the park is too harsh. Bring extra water — the soft sand makes the short hike feel more tiring than it is. No shade outside the slot; the slot itself is cool and comfortable. Combine with the Broken Arch loop for a 2.3-mile morning or midday hike.
Common mistake to avoid: Trying to shoot straight-on at the arch from outside the slot — the best images are made inside the slot looking up or down the channel. Overlooking this stop entirely because it seems too easy or short.
10. Skyline Arch
The visual drama of seeing a large natural arch positioned exactly on a ridge skyline — the arch reads clearly against open sky from a distance. In 1940 a boulder equivalent to the current arch’s opening fell overnight, nearly doubling the arch’s size in an instant — one of the most dramatic documented changes to any natural arch. This geological dynamism makes it a compelling story location. Strong astrophotography subject: Milky Way above a ridge-line arch is a classic composition.
- GPS: 38.7744, -109.5901
- Elevation: 5,243 ft
- Best time of day: Late afternoon (primary — arch is positioned on the skyline of a ridge; low western sun backlit against the sky creates a strong silhouette); Morning from the Devils Garden Campground amphitheater for front-lit arch on the horizon.
- Sun direction: Skyline Arch is positioned on the crest of a sandstone ridge — literally on the skyline as seen from the valley below. The arch appears as a distinct gap on the horizon ridge. In late afternoon, the western sun catches the arch from behind/beside, creating a silhouette against the sky. At morning, viewing from the Devils Garden Campground (north side), the arch receives direct east morning light. The arch (77 ft tall, 33 ft span opening) nearly doubled in size overnight in November 1940 when a massive slab fell out.
- Access: 16.5 miles from visitor center; short 0.4-mile flat trail from the main park road. Also visible from the Devils Garden Campground amphitheater (same parking for trailhead and campground). TIMED ENTRY required Apr–Oct. The campground amphitheater view is accessible 24/7 for campers.
- Difficulty: Easy — 0.4 mile RT, flat, no technical terrain.
- Recommended settings: Late Afternoon: aperture: f/11, shutter: 1/250s, iso: 100, lens: 70-200mm, notes: Telephoto from trail compresses the arch on the ridge against the sky. Polarizer deepens sky contrast. Shoot slightly underexposed to saturate sky color. · Milky Way: aperture: f/2.8, shutter: 20s, iso: 3200, lens: 14-24mm, notes: From below the ridge, the arch appears on the horizon with open sky (and Milky Way) behind. Use a foreground element (juniper, boulders) to anchor the composition. Bortle 2 conditions — Milky Way visible to naked eye in summer.
Shots to chase:
- Ridge silhouette: the arch on the horizon at blue hour — minimalist composition of dark ridge with arch gap against deep blue sky
- Telephoto isolation: 200–400mm from the trail collapses distance and makes the arch appear to sit above the desert floor
- Milky Way arch on horizon: galactic core rising behind the ridge-line arch — one of the most dramatic Arches astrophotography compositions
- Before and after storytelling: pair a current shot of the arch with historical images showing its smaller pre-1940 size
Pro tip: Stay at the Devils Garden Campground (book months in advance — perpetually sold out in spring/fall) to access Skyline Arch at dawn before any day-trippers arrive. The arch is visible from the campground amphitheater without even hiking to the trailhead. For astrophotography, the campground provides a legal overnight position with Bortle 2 darkness.
Common mistake to avoid: Shooting only from immediately below the arch (front-on close-up) rather than stepping back to use the ridge-line and horizon as compositional elements. This arch rewards distance and wide framing more than proximity.
11. Tower Arch
The most remote major arch in Arches — a 92-ft span in the Klondike Bluffs section that 95% of park visitors never see. Absolute solitude even on peak summer days. The Marching Men spires (unique eroded formations resembling marching figures) are visible on the walk in/out, adding compositional variety. The approach through sandstone fins and sand dunes is itself photogenic. At sunset, Tower Arch + Marching Men in the same evening offers two distinct subjects without driving to another location.
- GPS: 38.7903, -109.6881
- Elevation: 5,200 ft
- Best time of day: Late afternoon and sunset (primary — arch and surrounding Klondike Bluffs catch low western sun; Marching Men spires lit from behind on the return walk create dramatic backlighting); Morning for front-light on the arch face.
- Sun direction: Tower Arch faces roughly east, with the Marching Men spires visible to the north. Late afternoon light rakes across the sandstone spires creating deep shadow contrast — the most dramatic light in this remote area. At golden hour, the arch face glows deep amber against a darkening sky. Morning east light front-lights the arch directly. The Klondike Bluffs backdrop provides verticality that most other arch locations lack. The isolation means zero crowd competition for prime positions at any time of day.
- Access: TWO ACCESS OPTIONS — (1) 4WD required route: Salt Valley Road north from the main park road, then dirt 4WD track approximately 8 miles total — ends at a short 0.3-mile trail to the arch. High-clearance 4×4 mandatory; rocky technical sections. Ask at visitor center for current road conditions. (2) Hiking route: 3.4-mile RT moderate hike from Klondike Bluffs trailhead (accessible via 2WD dirt Salt Valley Road — ask about conditions). Either way: 25+ miles from visitor center via Salt Valley Road. No timed entry required for the remote section if entering via Salt Valley Road AFTER the main gate; the park’s 24-hour open policy still applies. Timed entry applies at the main entrance Apr–Oct.
- Difficulty: Moderate (hiking route: 3.4 miles RT, loose sand, fin-scrambling, full sun exposure) or Technical (4WD route: low-speed rock crawling on a backcountry road requiring genuine 4-wheel drive with low range)
- Recommended settings: Late Afternoon Sunset: aperture: f/11, shutter: 1/60s, iso: 200, lens: 24-70mm, notes: Position with the arch as primary subject and Klondike Bluffs visible through the opening. Warm light rakes across textured sandstone — use f/11–16 for full sharpness. Arrive 90 min before sunset for the best light progression. · Morning: aperture: f/8, shutter: 1/125s, iso: 200, lens: 16-35mm, notes: Direct east morning light on the arch face — stand inside the arch and look out toward the valley for a strong interior-to-exterior shot with lit landscape beyond.
Shots to chase:
- Arch with Klondike Bluffs: shoot through the arch opening with the mesa bluffs visible beyond — a layered depth composition unique to this location
- Marching Men at sunset: on the walk back from Tower Arch, the eroded spires catch backlight — photograph them as a series of silhouettes against the sunset sky
- Solitude self-portrait: the only location in Arches where a single person standing in the arch has zero chance of other visitors in frame
- 4WD approach documentary: the drive in through Salt Valley is itself cinematic — red-walled canyon, no pavement, blue sky — worth shooting as a travel sequence
Pro tip: Check road conditions at the visitor center before driving out — the Salt Valley Road washes out after rain and becomes impassable even for 4×4 vehicles. Budget 4–5 hours total for the Tower Arch experience (drive + hike + photography + return). Carry at minimum 3 liters of water — no services for 25+ miles. Sunset at Tower Arch followed by camping at Devils Garden (30 min drive on paved road back) is a legendary two-day Arches photography itinerary. This is NOT a location for spontaneous afternoon visits.
Common mistake to avoid: Attempting the 4WD route with a 2WD vehicle or standard SUV — the rocky technical sections have damaged many rental cars. Underestimating the round-trip time and running out of daylight. Not checking road conditions after any recent rainfall.
12. Fiery Furnace Overlook
The Fiery Furnace is the most visually dramatic geological formation in Arches — a dense labyrinth of 150-ft sandstone fins that from above resembles a frozen red sea. From the overlook, the maze is visible in its entirety at golden hour when the fins ignite in deep red. The La Sal Mountains visible in the southeast create a three-layer composition: blue sky, snow-capped mountains, burning red fins. Entry into the furnace itself (ranger tour or permit) reveals a world of narrow passages, unexpected arches, and complete disorientation — legitimate wilderness photography inside a popular national park.
- GPS: 38.7422, -109.5647
- Elevation: 4,730 ft
- Best time of day: Late afternoon (primary — the labyrinth of sandstone fins glows deep red-orange as the low western sun rakes horizontally across the formations); Sunset for maximum color saturation on the fins.
- Sun direction: The Fiery Furnace is a labyrinth of parallel sandstone fins running roughly north-south. The overlook faces west into the fin maze. At late afternoon (4–7 PM), the low western sun catches all the fin faces simultaneously, turning the entire formation a vivid deep red — the effect that inspired the ‘Fiery Furnace’ name. The La Sal Mountains are visible to the southeast from the overlook, and can be included in a telephoto composition with the fins. Morning produces side-lit shadows in the fin canyons that enhance depth. The overlook itself is 0.1 miles from parking — an easy flat paved trail.
- Access: 14 miles from visitor center (13.9 miles per CNHA data). Easy 0.1-mile flat paved trail from the parking area to the overlook. ENTRY TO THE FIERY FURNACE ITSELF requires either: (1) Ranger-led tour (April–October; book in advance via recreation.gov; fills weeks ahead) or (2) Self-guided permit ($10/person adult; $5 youth; available at visitor center; requires mandatory orientation video). The overlook is free and open to all with park entry. TIMED ENTRY required Apr–Oct for the parking area.
- Difficulty: Easy (overlook only: 0.1 mile paved flat); Strenuous (interior: ranger-led tour 2–3 hours of scrambling through narrow canyons — no maintained trails, GPS unreliable inside)
- Recommended settings: Late Afternoon: aperture: f/11, shutter: 1/125s, iso: 200, lens: 70-200mm, notes: Telephoto from the overlook compresses the layers of fins into a dense pattern. Include La Sal Mountains in the upper frame for depth. Polarizer eliminates haze and deepens the red color. Shoot at f/11–16 for full fin-to-mountain sharpness. · Sunset: aperture: f/11, shutter: 1/60s, iso: 400, lens: 24-70mm, notes: As the sun sets, the fins transition from orange to deep crimson — maximum saturation in the last 15 min before sunset. A wide angle captures the scale of the formation. After sunset, blue hour cools the fins to purple against a twilight sky.
Shots to chase:
- Telephoto fin compression: 200mm from the overlook collapses the depth of the fin maze into an abstract pattern of parallel red walls
- La Sal Mountains layered: wide angle capturing sky + snow-capped mountains + red fins in a three-tier composition — best in spring when peaks are still snowcapped
- Interior ranger tour: with an official ranger tour, photograph inside the narrow canyons between fins — 30-ft-wide slots lit from above with diffused light, hidden arches, cryptobiotic soil details
- Sunset afterglow: 10 min after sunset, the fins hold residual warm light while the sky above goes cooler — a split-tone effect requiring no Lightroom manipulation
Pro tip: Book a ranger-led Fiery Furnace tour if visiting in spring or fall — it opens photography opportunities impossible from the overlook. Tours typically sell out 2–4 weeks in advance; book via recreation.gov as early as possible. From the overlook alone, bring a 200mm+ telephoto — the fin details and La Sal Mountains are too distant for wide angles to resolve. The Fiery Furnace viewpoint is also an excellent Milky Way foreground — the overlook has a wide southern exposure and Bortle 2 skies.
Common mistake to avoid: Visiting Fiery Furnace overlook at midday expecting ‘fiery’ colors — the fins appear beige and flat without the raking late-afternoon light. Not booking the ranger tour far enough in advance (availability goes quickly in spring/fall).
When to photograph Arches: a year-round breakdown
Arches is photogenic every month of the year — but the conditions differ radically by season. Here is what to expect:
Spring (March–May)
Best overall photography season. Temperatures 45–75°F at lower elevations. La Sal Mountains snowcapped through May — maximum backdrop drama. Desert wildflowers (evening primrose, phlox, Indian paintbrush) bloom March–May on canyon floors. Timed entry begins April 1 — book reservations as early as January 2 (when April slots open).
Highlights: Snowcapped La Sal Mountains behind Delicate Arch — the premier spring composition. Crystal-clear air after winter. Pinyons and cottonwoods greening in April. Comfortable hiking temperatures for the Delicate Arch trail at any time of day. Longer-duration golden hour than summer.
Challenges: Timed entry kicks in April 1 — the first spring slots for peak dates (April weekends) sell out within hours of release in January. Spring winds (30–40 mph) can create camera shake on tripods and sand blasting on lenses; use a lens hood and carry a micro-fiber cloth. Late-season snowstorms in March occasionally dust arches — extraordinary rare photography opportunity but roads may be icy.
Summer (June–August)
Brutal heat — Sunrise/Sunset photography ONLY. Temperatures reach 100–110°F by 10 AM; midday park visits are genuinely dangerous and produce flat, harshly lit photography. Milky Way peak season: galactic core visible from ~10 PM, best alignment through Delicate Arch in July. off-season season (July–September) brings dramatic afternoon storms and rainbow light — extraordinary when it occurs.
Highlights: Milky Way peak season (June–August) — Bortle 2 skies + galactic core aligned with arches. off-season afternoon storms create dramatic storm clouds, rainbows, and dramatic light when they clear. Pre-dawn hikes (4:30–5 AM departure for Delicate Arch sunrise) in cool morning air are genuinely peaceful. Long evenings allow time to combine sunset at Delicate Arch with blue-hour astrophotography without staying up until midnight.
Challenges: Heat is the dominant hazard — any hike in direct sun after 10 AM risks heatstroke. Must enter before 7 AM (no reservation) or book timed entry for mid-day entry. Water consumption doubles vs. spring/fall. Afternoon thunderstorms (2–5 PM) can be violent; retreat from exposed viewpoints when lightning visible.
Fall (September–November)
Best photography season overall — comfortable temperatures (50–80°F), clear nights for astrophotography, crowds thin from October. Cottonwood trees along canyon washes turn golden in late October–early November. Timed entry continues through October 31; November is reservation-free. The Milky Way season winds down by late October as nights get colder.
Highlights: Clear, dry high-pressure systems deliver maximum visibility and air quality — views to the La Sal Mountains are sharpest in fall. October golden hour light is 20–30 min longer per session than summer as the sun angle lowers. Fall cottonwood gold in canyon washes adds color contrast to the red rock. Near-zero crowd competition for sunrise positions in October vs. spring. Perfect overnight temperatures for Milky Way astrophotography through September.
Challenges: Timed entry through October 31 — book fall weekends early (July 1 when October slots open). October weekends still draw significant crowds, particularly Columbus Day weekend. Nights get cold fast — overnight temperatures can drop to 30–35°F in November; dress in layers for pre-dawn photography.
Winter (December–February)
Snow on red rock — extraordinarily rare and visually stunning. No timed entry required (November–March). Near-zero crowds. Temperatures 25–45°F. The park is open year-round but roads can ice. The Delicate Arch trail is slippery when wet — microspikes recommended after any precipitation.
Highlights: Snow-dusted arches are the rarest and most dramatic photography conditions at Arches. The contrast of white snow on deep orange-red sandstone is unmatched by any other condition. Zero timed entry means spontaneous sunrise visits are possible. Crowds are 80% lower than peak season — you may have Balanced Rock or the Windows entirely to yourself. Blue-hour photography in winter produces rich indigo skies against warm-toned rock.
Challenges: Snow events are unpredictable — the park may not receive snow at all in a given winter (elevation too low for reliable snow; Moab averages only 13 inches annually). Ice on slickrock is extremely dangerous — microspikes essential for the Delicate Arch trail after any freezing event. Short winter days mean sunrise is around 7:30 AM and sunset by 5 PM — compressed photography window. Some park roads (Willow Springs Road to Tower Arch area) close in winter.
How to get to Arches National Park
Nearest airports
- CNY — Canyonlands Field Airport, Moab, Utah: 20–25 minutes to park entrance. Closest airport — 11 miles from park entrance. Limited daily service from Denver (United) and Phoenix/Salt Lake City (seasonal). Rental cars available at terminal (Enterprise, Hertz, Alamo). Best choice for photographers who want maximum flexibility and immediate park access.
- SLC — Salt Lake City International Airport (SLC): 3.5–4 hours to park entrance. Primary gateway for most visitors — full international hub with flights from 100+ cities. Route: I-15 South → US-6 East → US-191 South to Moab. The drive through Price Canyon and Castle Valley is itself scenic. Rental car mandatory (no shuttle service to Moab). Most economical flight option in most seasons.
- GJT — Grand Junction Regional Airport, Grand Junction, Colorado: 2 hours to park entrance. Closest commercial airport with more flight options than CNY. Route: I-70 West → US-191 South to Moab. American, United, Delta serve GJT. Excellent choice for photographers coming from the East Coast or Midwest.
- DEN — Denver International Airport (DEN): 5.5–6 hours to park entrance. Largest nearby major hub; full international connections. Often the most affordable option for photographers from the East Coast and internationally. Route: I-70 West to US-191 South — scenic but long. Consider breaking up the drive in Grand Junction.
Photographer safety at Arches: read this
Every national park has its own hazards. Read the briefing before you go.
- Heat: Summer temperatures (June–August) regularly exceed 100°F (38°C) with no shade on most trails. Hike Delicate Arch BEFORE 10 AM or AFTER 5 PM from June through August — the 3-mile round trip in afternoon summer heat has caused multiple heatstroke rescues. The NPS recommends avoiding all strenuous hikes between 10 AM and 5 PM in summer. Even parking lots become dangerously hot. The Arches visitor center is air-conditioned — use it as a midday refuge.
- Water Requirements: Minimum 1 gallon (3.8 liters) per person per day for summer hiking. 1 liter per mile for strenuous hikes. No water sources exist in the park beyond the visitor center — fill bottles in Moab before entering. Dehydration is the most common cause of emergency rescues at Arches.
- Sun Protection: SPF 50+ sunscreen, wide-brim hat, and UV-protective clothing are essential. No shade exists on the Delicate Arch trail, Balanced Rock loop, or most Windows section trails. UV radiation at 5,000 ft elevation is significantly higher than at sea level.
- Flash Floods: Slot canyons and low-lying washes (including Park Avenue canyon floor and Sand Dune Arch slot) are vulnerable to flash floods from distant thunderstorms. The sky above you may be clear while a storm 20 miles away sends a wall of water through the canyon system. Check NOAA weather forecasts (weather.gov) before entering any slot areas July–September. If you hear a rumbling sound in a canyon, immediately move to high ground.
- Biological Soil Crust: Black, bumpy cryptobiotic crust covers desert soil throughout the park. It takes 50–250 years to form and is destroyed by a single footstep. NPS policy: ‘Stay on the rock or stay on the trail.’ Never step on the black crust. This applies to photography — do not set tripod legs on cryptobiotic soil.
- Wildlife: Rattlesnakes (Great Basin rattlesnake): most active April–October during warm hours; watch where you place hands and feet on rocky terrain. Scorpions: check shoes before putting on if left outside overnight. Peregrine falcons nest near several arches April–July — NPS may close areas temporarily; check current conditions. No dangerous megafauna (no bears, no mountain lions regularly documented).
- Drone Policy: BANNED — Launching, landing, or operating any drone in Arches National Park is prohibited under 36 CFR §1.5. Applies to all recreational and commercial operators. Violators face fines up to $5,000 plus confiscation. Special Use Permits are essentially never granted for photography drones in Arches.
- Artificial Light: NPS photography rules explicitly prohibit using artificial light sources to illuminate landscape features, rock formations, or other park features. Light painting arches (projecting light onto the sandstone) is prohibited. Artificial light may be used only for personal route-finding. This is enforced — rangers patrol the park at night during peak Milky Way season.
- Night Hiking: Both trailhead lots (Delicate Arch/Wolfe Ranch, Devils Garden) remain open 24 hours — no special permit required for pre-dawn or post-sunset hiking. Headlamp with fresh batteries is mandatory; the Delicate Arch trail has no light and is navigated by feel and memory after dark. Download offline maps in advance — zero cell service at the arch.
- Timed Entry Reminder: Photography trips requiring entry between 7 AM and 4 PM April–October need a timed entry reservation ($2 via recreation.gov). The most effective photographer workaround: arrive before 7 AM for sunrise, then stay until after 4 PM for sunset — no reservation needed for continuous stays. Or book the reservation if a midday arrival is unavoidable.
Related guides nearby
Other photography destinations to explore:
-
Mesa Verde
44 km away, national park, USA -
Great Sand Dunes
369 km away, national park, USA -
Denver
402 km away, city, USA
Frequently asked questions
Do I need a timed entry reservation to photograph Arches National Park?
It depends on when you plan to arrive. Timed entry reservations ($2/vehicle) are required for entry between 7 AM and 4 PM, April 1 through October 31. However, you can enter any time before 7 AM or after 4 PM without any reservation — and these windows are perfectly aligned with the best photography light: sunrise begins 30 min before 7 AM, and golden hour sunset starts well before 4 PM. The single best photographer strategy is to enter before 7 AM (no reservation needed), enjoy sunrise photography, and either stay inside all day or re-enter after 4 PM for sunset. Reserve at recreation.gov — April–June and September–October slots sell out within minutes of release.
When is the best time to hike to Delicate Arch for photography?
Sunset is the primary answer: the arch face glows brilliant orange-red when the low western sun strikes it directly. Arrive at the Wolfe Ranch trailhead 90–120 minutes before sunset, hike 45–75 minutes, and you’ll have 30–45 minutes of ideal light before it fades. The bowl fills with 40+ photographers at peak season — position early, descend into the bowl, and move left or right of the main crowd for distinct angles. At sunrise, the arch is backlit (silhouette shots), but photographers inside the bowl below catch soft warm front light on the arch face — a more technical but equally valid composition. In summer (June–August), avoid the afternoon hike entirely due to heat — sunrise is the only safe option.
Do I need a photography permit for Arches National Park?
No permit is required for personal, non-commercial photography, including tripods, at all standard accessible locations in the park. Commercial photography (photos used in advertising, product sales, or editorial content that generates revenue) requires a Commercial Use Authorization (CUA) from the park; apply via nps.gov/arch well in advance of your trip. Filming with production crews also requires a permit. Drone operation is banned park-wide — no exceptions for photography. Illuminating park features with artificial light (light painting arches) is prohibited under park regulations.
Can I photograph the Milky Way at Arches, and which arch is best?
Arches is one of the premier Milky Way photography destinations in the United States, rated Bortle Class 2 — the galactic core is visible to the naked eye on new-moon nights. The best subjects: (1) Delicate Arch — galactic core aligns through/above the arch in June–August, roughly 1–2 hours after sunset. Plan with PhotoPills. The arch is accessible via the 3-mile trail even at night (headlamp mandatory, no reservation needed after 4 PM). (2) Turret Arch — the opening faces south-southeast, directly toward the galactic core in summer. (3) Skyline Arch — positioned on the horizon ridge, the arch against a Milky Way sky is a classic minimalist composition. All three locations benefit from no artificial light requirement — NPS prohibits illuminating the arches with flashlights or strobes.
What do competitors’ photography guides get wrong about Arches?
Two critical details are consistently mishandled in generic travel guides: First, the timed entry system is often presented as an obstacle, when in reality the smartest photographers use it as an advantage — entering before 7 AM gives access to the best light (pre-dawn and sunrise) with no crowds and no reservation requirement. Most guides don’t explain this. Second, almost every guide recommends Delicate Arch at sunset without explaining that arriving at sunset-time is far too late — you need to be at the arch 90+ minutes early in peak season to claim a position in the bowl. The hike takes up to 75 minutes, and showing up at sunset time means you’ll be setting up on the outer rim with the crowd rather than inside the bowl with the best compositions.
National Parks Guide Series
This guide is part of the Shut Your Aperture national parks series: GPS-tagged vantage guides, camera settings cheat sheets, and seasonal light notes for the parks photographers ask about most.
Continue reading
- National Parks Photography Guides – every park, mapped
- Best photography spots in Acadia National Park
- Travel photography destinations
← Back to National Parks Photography Guides
Related photography spots in US National Parks
If you liked this guide, our other curated location guides in the same region:
Browse all photography spots in US National Parks →
Related photo spot: If you’re heading there with a camera, our Maroon Bells (Aspen, CO) location guide covers classic alpine reflection with twin peaks, with GPS, vantage points, and best times.
Plan a Arches outing with Klook
This is a self-guided driving tour, not a guided photo workshop. Check the app requirements, park entry rules and seasonal road conditions before you go.
shutyouraperture-20). Buying through these links costs you nothing extra and helps fund our free guides.
What to Pack
A landscape kit built around wide views, steady support, and changing light is a useful starting point. Compare the gear and choose what fits your camera, budget, and conditions. These links lead to B&H Photo Video and Amazon.
| What & Why | B&H | Amazon |
|---|---|---|
Sony 16-35mm f/2.8 GM Check the camera mount before buying. Choose a focal length that fits the photos you plan to make. | Shop B&H → | Shop Amazon → |
Peak Design Travel Tripod Check the load rating, packed size and local tripod rules before buying. | Shop B&H → | Shop Amazon → |
Breakthrough X4 CPL Check the filter type and lens thread size before buying. Use a filter only when the effect fits your photo. | Shop B&H → | Shop Amazon → |
Breakthrough X4 10-stop ND Check the filter type and lens thread size before buying. Use a filter only when the effect fits your photo. | Shop B&H → | Shop Amazon → |
Sony NP-FZ100 battery Use the battery type specified for your camera. Bring a spare if your shooting plan calls for one. | Shop B&H → | Shop Amazon → |
SanDisk Extreme Pro 128GB Check the card format and speed requirements specified for your camera. | Shop B&H → | Shop Amazon → |
Koh microfiber cloths Compare this option with your current kit. Check compatibility and the product details before buying. | Shop B&H → | Shop Amazon → |
B&H and Amazon links are affiliate links. We earn a small commission on purchases at no extra cost to you.