Best Photography Spots in Acadia National Park: 6 Top Locations With GPS
Updated
 Save
SaveAcadia National Park is one of the most photogenic landscapes in the United States. If you have a camera and the patience to show up before dawn, Acadia will give you images that last a career — but only if you know where and when to point it.
This is a field guide to 6 of the best photography spots in Acadia National Park (the full downloadable guide covers all 12), with GPS coordinates you can drop straight into Google Maps, suggested camera settings for each spot, precise timing for every location, and access notes for each spot. It mirrors the intel inside our Acadia Ultimate Photographer’s Guide ($47 PDF) — a downloadable field guide with full-page hero images, GPS maps, seasonal tables, a safety briefing, and a complete photographer’s packing list. Get the guide →
Planning multiple parks? See also: best photography spots in Zion, Grand Canyon, and the full National Parks Photography Guides hub.
12 GPS-mapped locations · Suggested camera settings · Multi-season shooting calendar · Free annual updates
Download the PDF guide →
Get the Acadia Ultimate Photographer’s Guide
Every location in the guide has GPS coordinates, light and settings advice, and access notes. Review current park conditions before you go.
Quick jump to the 6 spots
- Cadillac Mountain Summit
- Bass Harbor Head Lighthouse
- Jordan Pond
- Otter Cliff
- Thunder Hole
- Schoodic Point
 Save
SaveBefore you shoot Acadia: the essentials
- Park entrance fee (2026): $35 per vehicle (7-day pass); $30 motorcycle; $20 individual/pedestrian/cyclist; $80 America the Beautiful annual pass. Fees collected May–October. Children under 16 free. Current rates at nps.gov.
- Best photography seasons: Fall (early–mid Oct) for LEGENDARY foliage and Jordan Pond reflections; Spring (late May–June) for lupines and thin crowds; Summer (Jul–Aug) for long days, lupines past, wildflowers, and coastal light; Winter (Dec–Mar) for solitude, ice, and Cadillac snowshoe access.
- Drone policy: Drones are completely prohibited on all NPS land under 36 CFR § 1.5. Fines up to $5,000.
The full-resolution version of every map below — plus seasonal calendars, gear matrices per location, sun-angle diagrams, and a complete photographer’s packing checklist — is inside the Acadia Photographer’s Guide PDF ($47).
 Save
Save1. Cadillac Mountain Summit
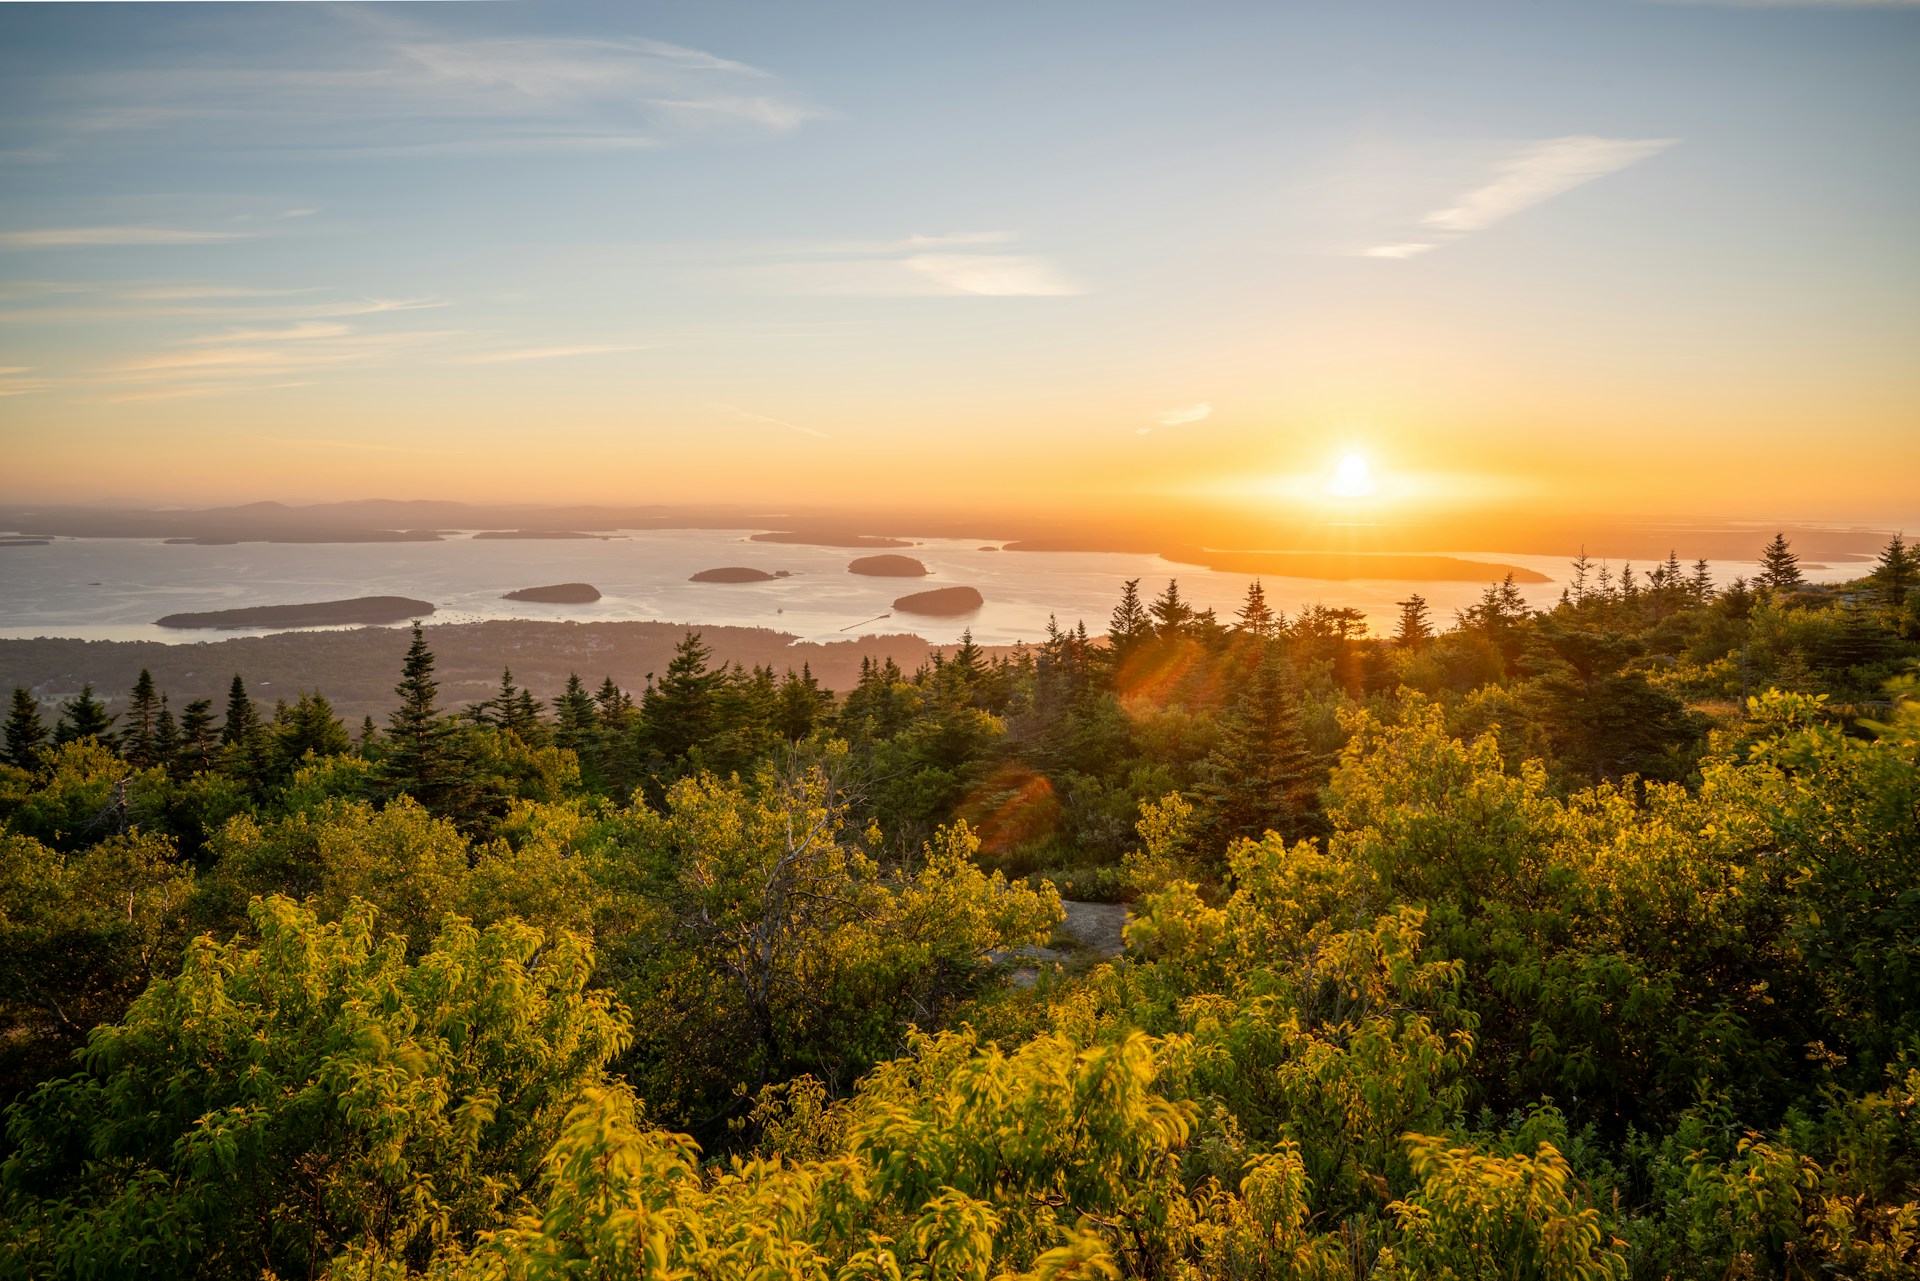
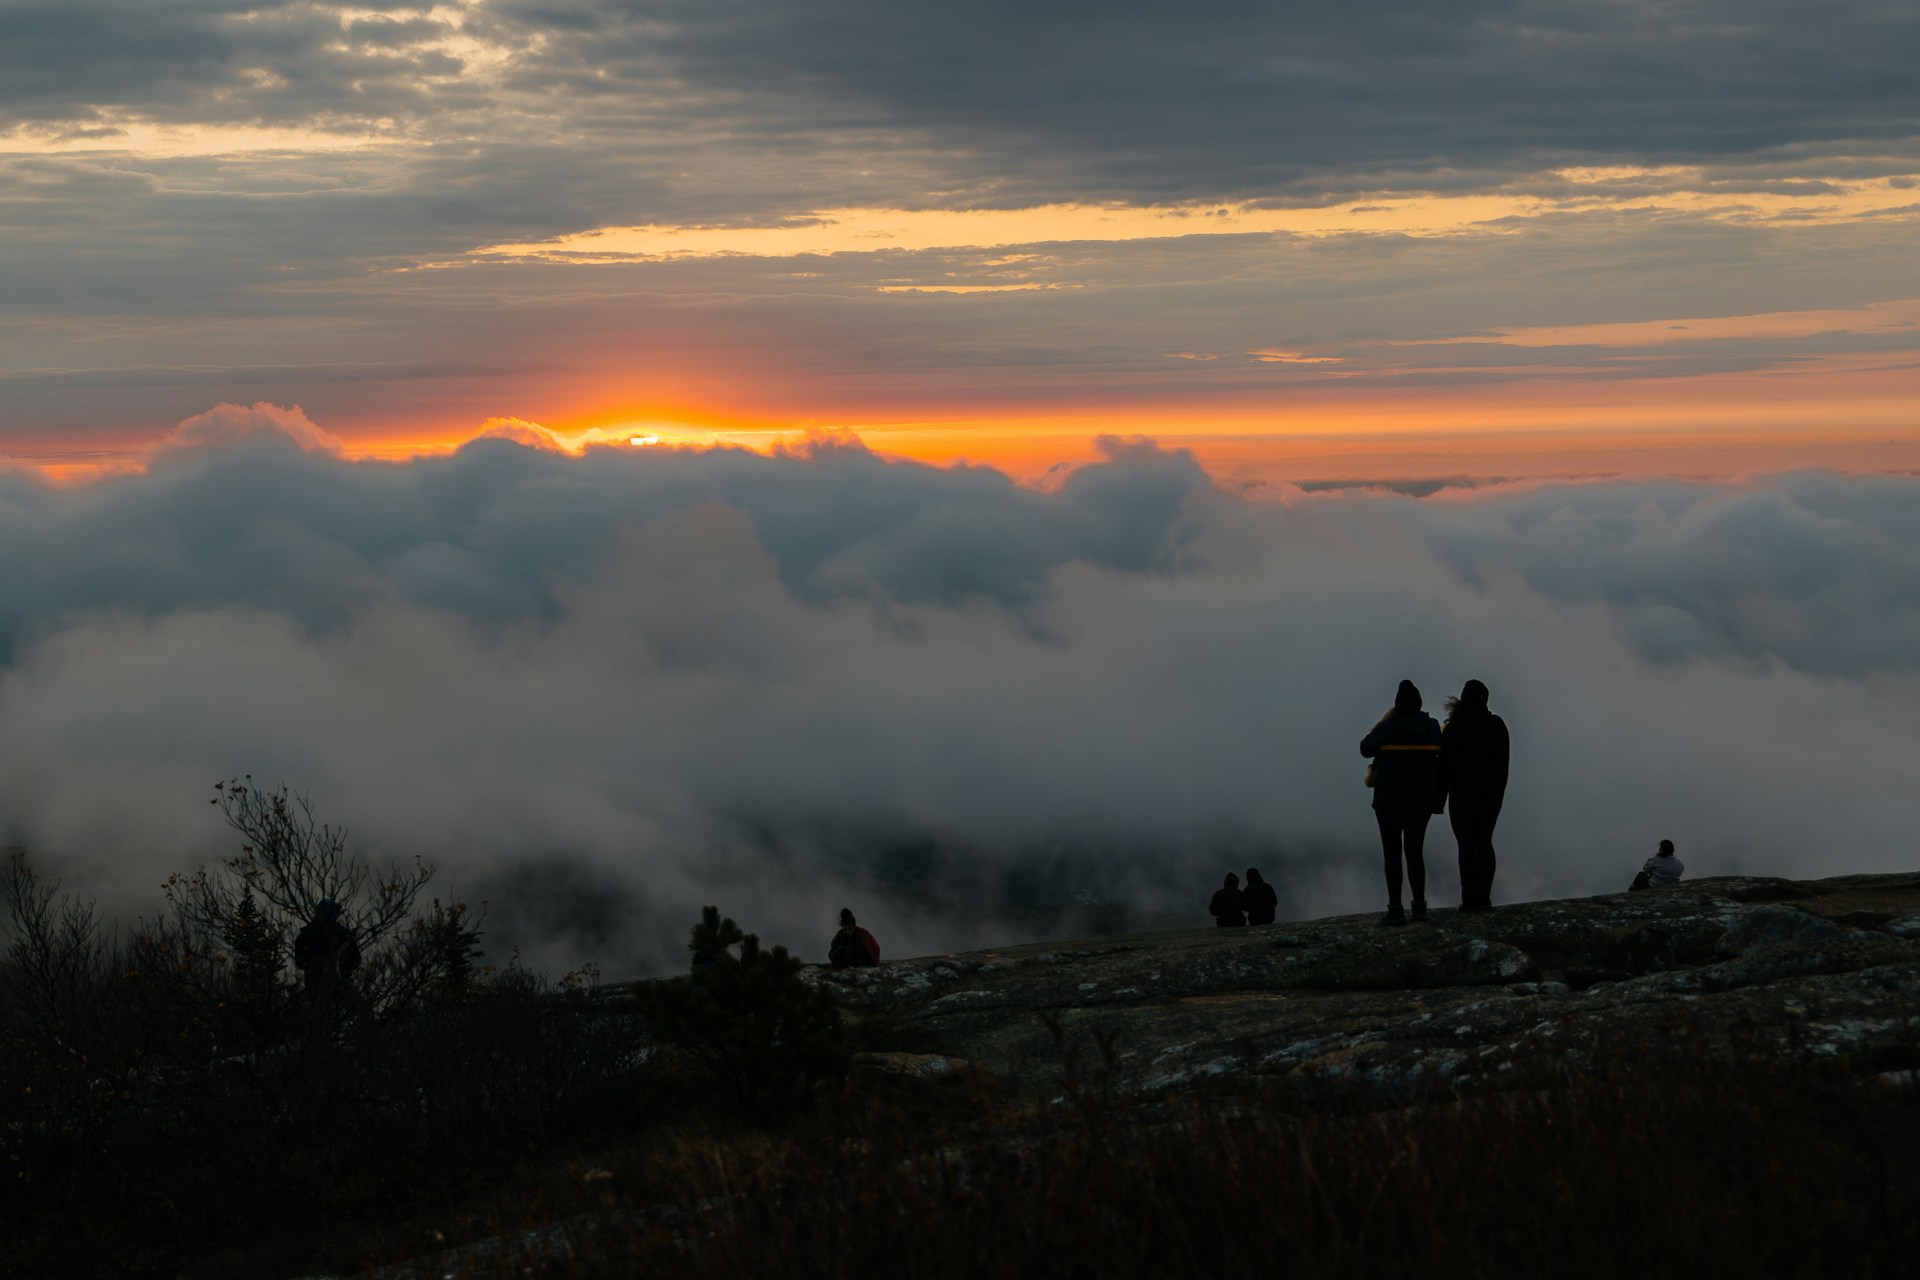
At 1,530 feet, Cadillac Mountain is the highest point on the United States Atlantic coast and the only place in the continental US where you can witness the very first sunrise from October 7 through March 6. The 360-degree panorama from the bare pink granite summit spans Frenchman Bay and the Porcupine Islands to the east, Eagle Lake and the interior peaks to the west, and dozens of offshore islands to the south. No other accessible US East Coast peak offers this combination of easy vehicle access and genuine summit photography without treeline obstruction. In fall, the summit rises above blazing foliage canopy, and the island-studded bay turns to pewter and copper.
 Save
Save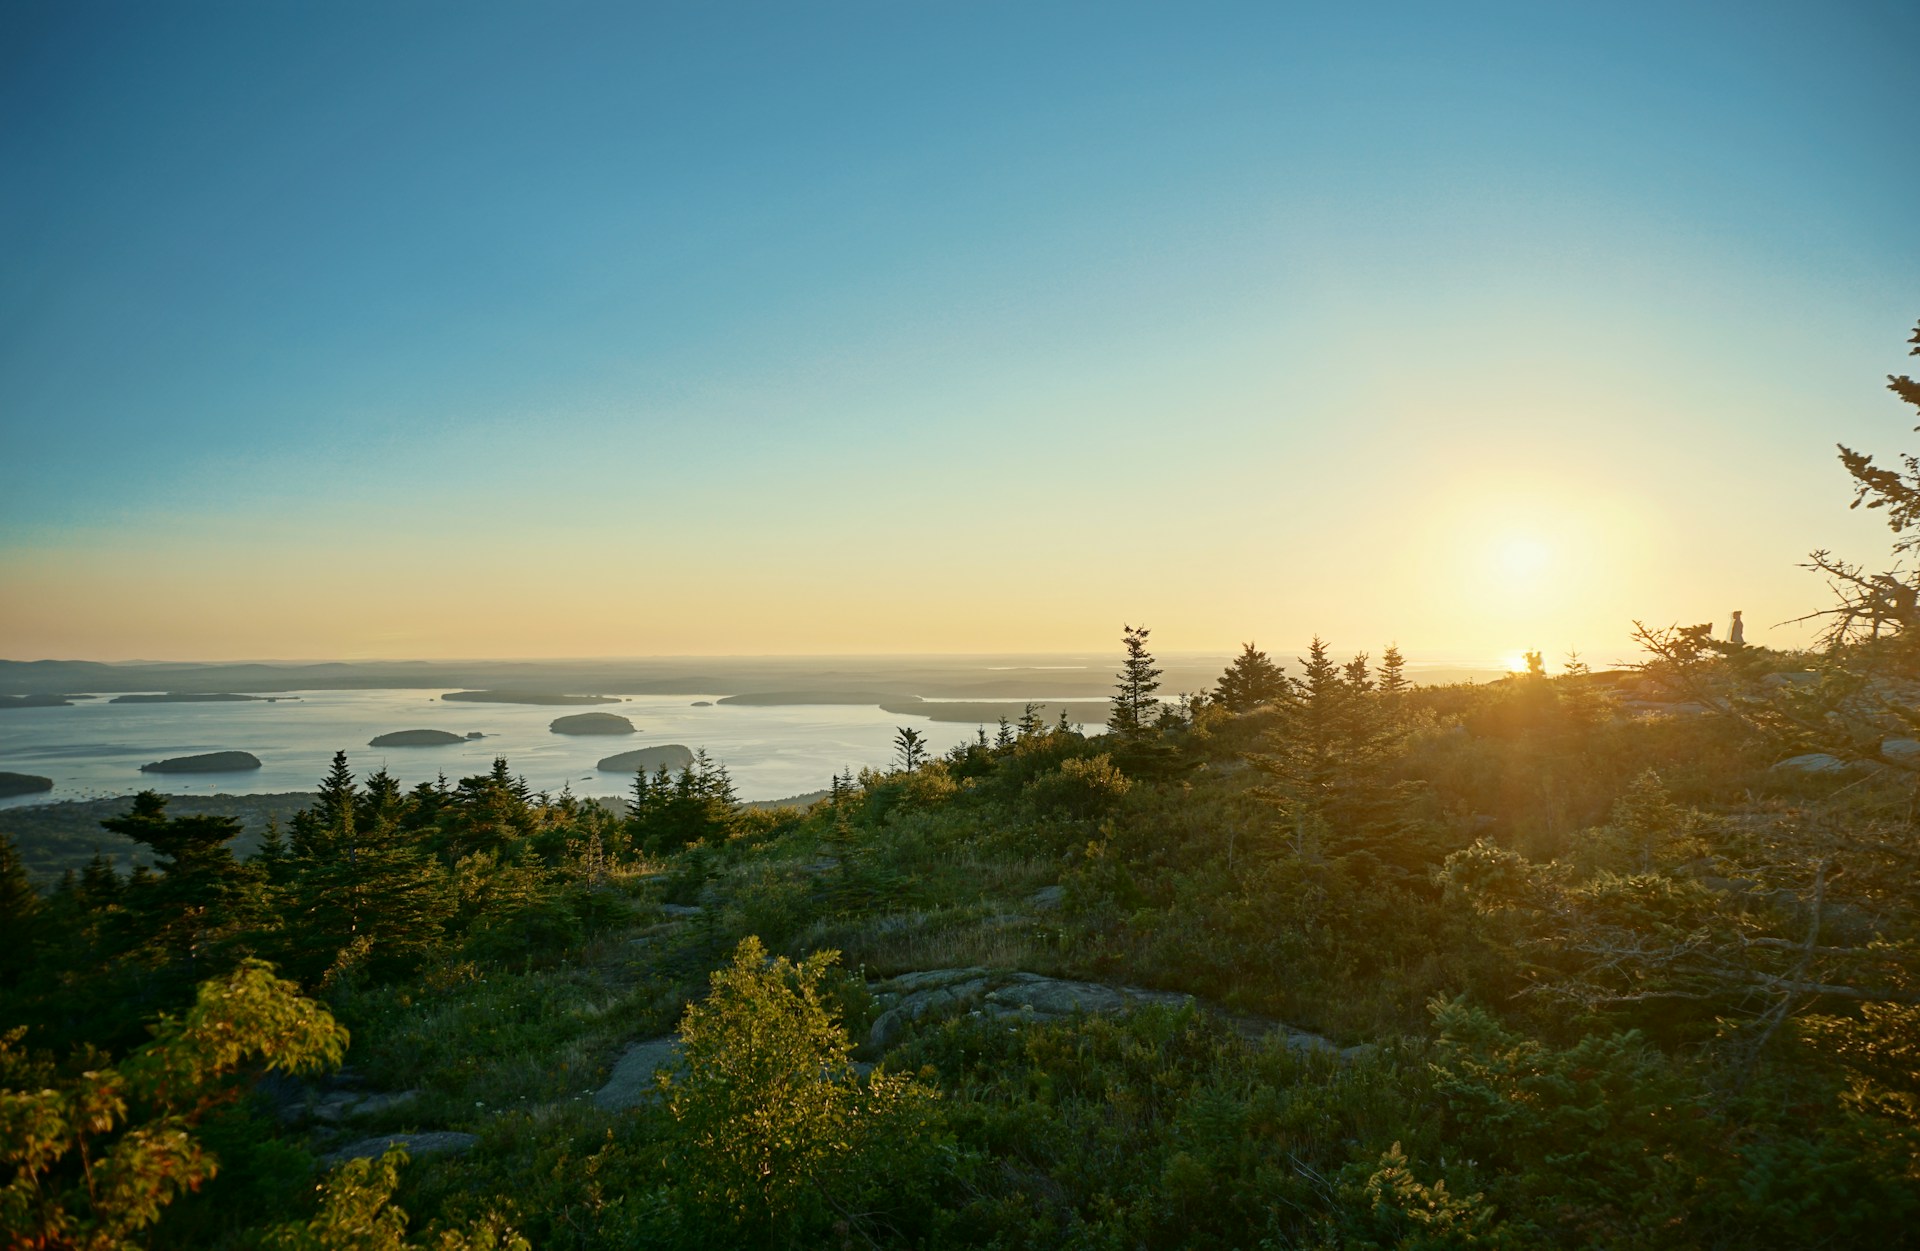 Save
Save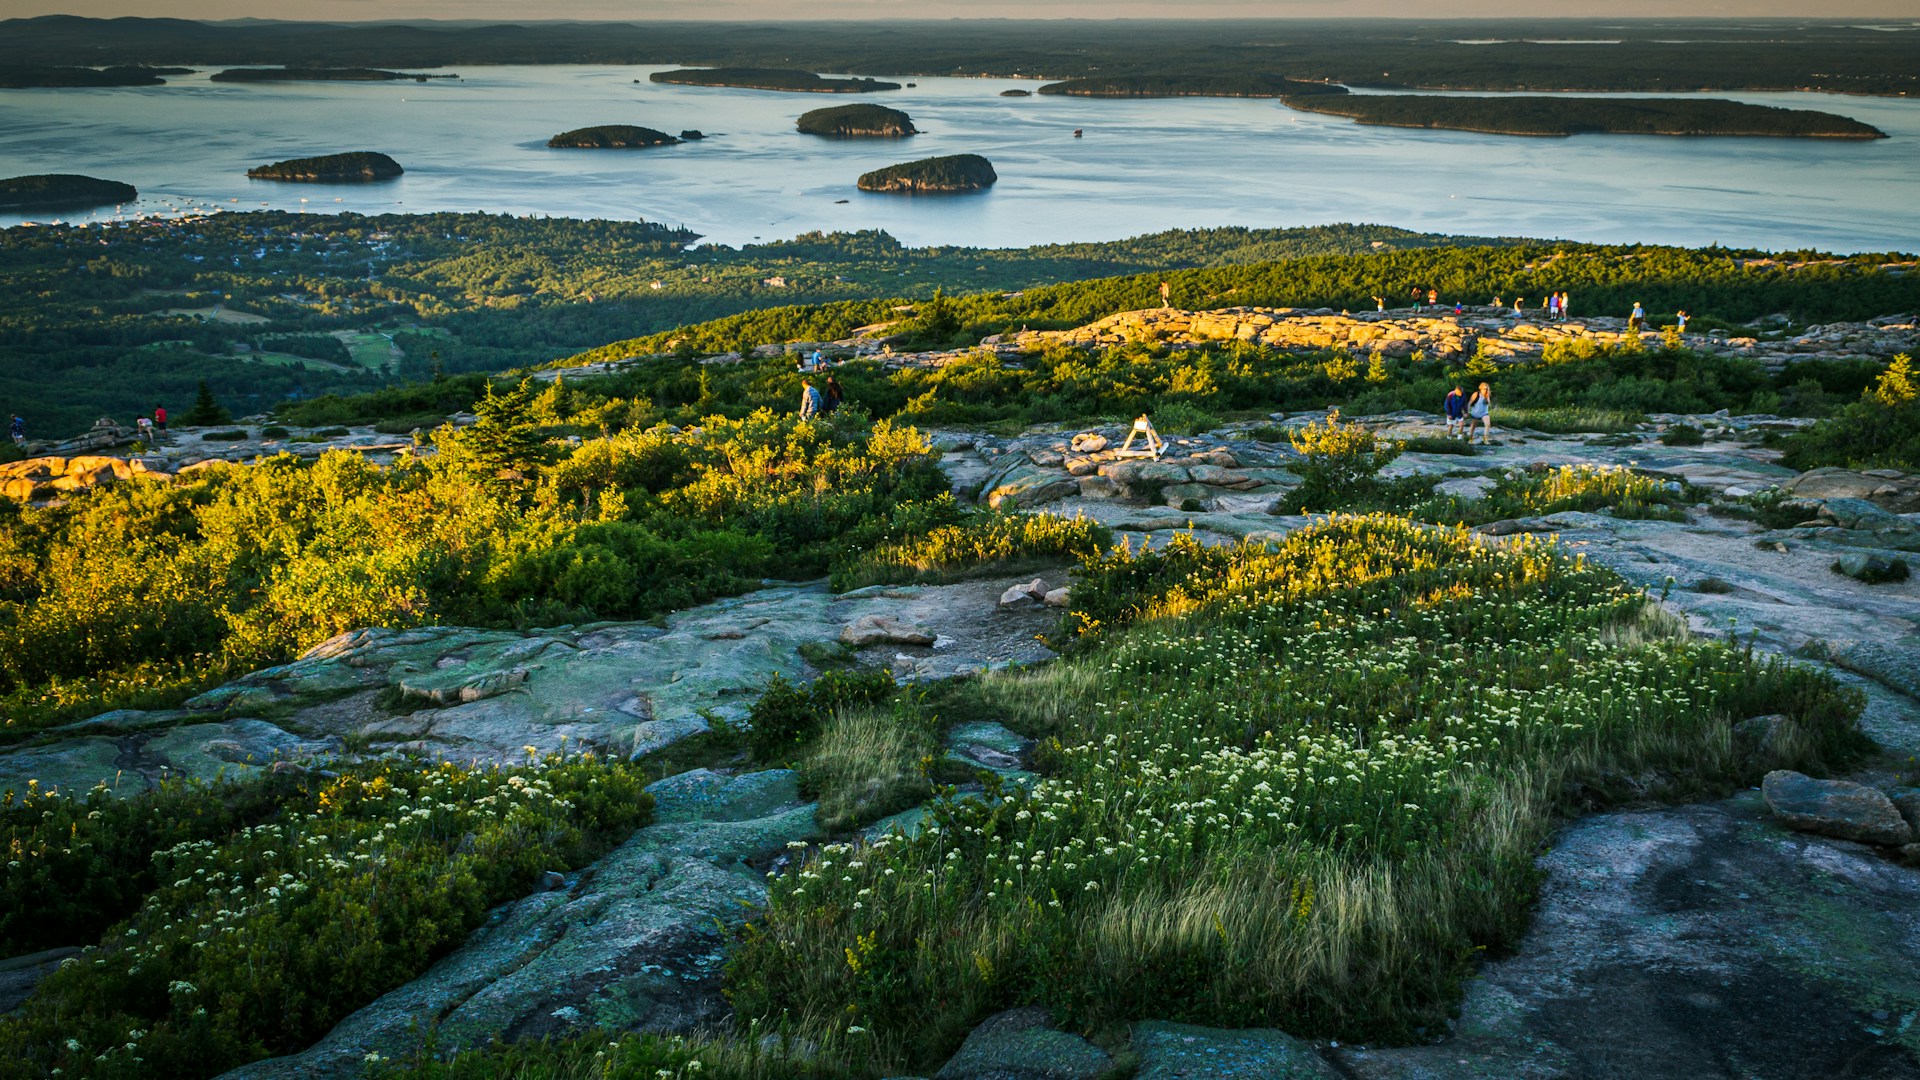 Save
Save- GPS: 44.3528, -68.2249
- Elevation: 1,530 ft
- Best time of day: Sunrise (Oct 7–Mar 6 = FIRST sunrise in continental US); Sunset year-round; Milky Way late summer–early fall
- Sun direction: Summit faces east-northeast across Frenchman Bay. Sunrise azimuth is roughly ENE (70–80°) in Oct–Mar, swinging more northeast in summer. The sun rises over the open Atlantic horizon, giving an unobstructed first-light show with no land mass to the east. Photographers should be in position 30–45 minutes before official sunrise — the pre-dawn progression from deep blue through violet, pink, and gold over the islands is the true spectacle. At sunset, face west for panoramas of Eagle Lake and the interior of Mount Desert Island glowing under side-light.
- Access: Drive via Cadillac Summit Road (3.5-mile road from Park Loop Road junction). RESERVATIONS REQUIRED May 20–Oct 25 via Recreation.gov. 30% of reservations available 90 days in advance; 70% released at 10 AM ET two days before. Sunrise window: 90-minute entry starting as early as 4 AM in May–July, 5:30 AM in Oct 1–15, 6 AM in Oct 16–25. No re-entry after exiting. One sunrise reservation per vehicle per 7 days. Day-of reservations occasionally available — check at 10 AM ET. Outside reservation period (Nov–May 19), the summit road is first-come, first-served. The Cadillac North Ridge and South Ridge hiking trails also reach the summit.
- Difficulty: Easy — paved summit loop walk (0.5 miles), ADA accessible portions; driving-required for most visitors
Shots to chase:
- Pre-dawn to first light sequence: shoot a 5-7 frame time-series from blue-black pre-dawn through to full golden light — the color progression over Frenchman Bay is the definitive Cadillac image
- Pink granite foreground: get low on the rounded summit boulders and use them as textured foreground against the dawn sky — the smooth, salmon-pink granite glows distinctively in the first light
- Porcupine Islands compression: with 200mm telephoto, compress the wooded Porcupine Islands into a flat stack of silhouettes rising from the bay at blue hour — a uniquely Acadian composition
- Fog inversion: on autumn mornings, the lower valleys fill with fog while the summit stays clear — shoot looking down on a sea of cloud with island hilltops poking through
- Milky Way arch over Frenchman Bay: align wide-angle lens south over the open ocean for the galactic core rising above the Atlantic — one of the best Milky Way foregrounds on the US East Coast
Pro tip: For October sunrise reservations, book exactly 90 days in advance the moment the 30% allotment opens — the Oct 7–Mar 6 first-sunrise window is the most sought-after slot in the park. Sunrise entry window begins 90 minutes before official sunrise time, so arriving early in your window maximizes pre-dawn shooting time. Dress for wind and cold even in summer: summit temperatures run 10–20°F colder than Bar Harbor and winds routinely exceed 25 mph. Bring a lens cloth — morning dew and wind-driven spray can coat optics quickly.
Common mistake to avoid: Arriving at the official sunrise time rather than 30–45 minutes earlier — the alpenglow and twilight progression before the sun clears the horizon is typically the most dramatic phase. Shooting only wide-angle when the telephoto views of the island-chain and bay channels compress beautifully. Underestimating summit wind: a lightweight tripod will vibrate enough to destroy sharpness.
 Save
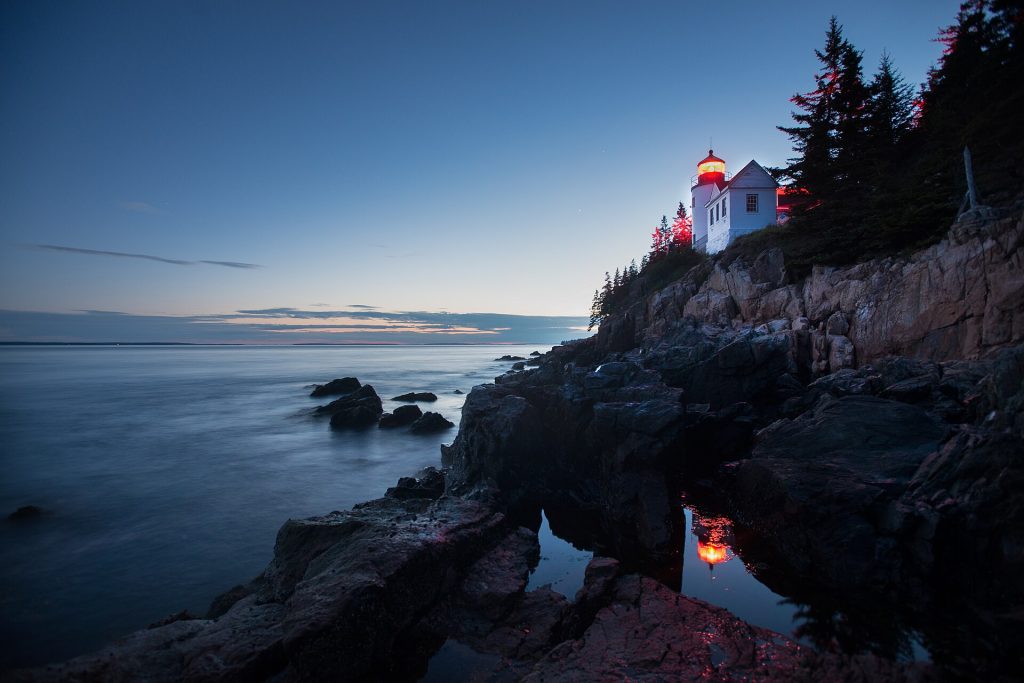
Save2. Bass Harbor Head Lighthouse
Bass Harbor Head Lighthouse is the most photographed lighthouse in Maine and arguably the most iconic coastal subject in the entire northeastern US. It is the only lighthouse within Acadia National Park on Mount Desert Island, perched directly on a granite headland above crashing surf. The red-painted tower, white keeper’s house, and spray-wrapped rocks below create a composition that has defined the ‘Maine lighthouse’ image for a century. Among roughly 80 Maine lighthouses, it is one of only three operated by Acadia National Park. The fifth-busiest site in the park despite its western-quiet-side location, it draws 180,000+ visitors annually.
- GPS: 44.2222, -68.3372
- Elevation: 56 ft
- Best time of day: Sunset and blue hour (primary); Milky Way June–Oct (secondary)
- Sun direction: The lighthouse sits on the southwest corner of Mount Desert Island, facing south-southwest across Bass Harbor and Blue Hill Bay. The sun sets behind and to the right of the lighthouse from a position on the rocks below, creating a silhouetted lighthouse against an orange-to-red sky. In summer, sunset falls to the northwest and paints the sky behind the structure; in fall, the sun tracks more to the southwest and positions closer behind the lighthouse tower itself, producing the most dramatic backlit silhouette. Blue hour — 20–30 minutes after sunset — is often considered the peak window: the lighthouse’s red light begins to cycle, the sky deepens to cobalt, and the rocks below hold enough light for foreground detail.
- Access: Drive Route 102 south along the quiet (west) side of MDI, then Route 102A south through Bass Harbor village. Turn onto Lighthouse Road for 0.5 miles to the small parking lot (approx. 24 spaces). The lot fills rapidly at sunset — arrive 60–90 minutes early. Buses, trailers, and RVs prohibited. From the lot, a gravel path leads east along the fence line to a wooden viewing platform. The iconic photography position requires descending a steep wooden staircase to the rocky coastline below and scrambling carefully on the rocks to gain distance from the base of the cliff. Rocks are extremely slippery when wet — non-slip shoes are mandatory.
- Difficulty: Moderate — requires careful scrambling on wet coastal rocks below the lighthouse; high fall-risk on slippery granite
- Recommended settings: Sunset: aperture: f/11, shutter: 1/30s, iso: 100, lens: 24-70mm, notes: Compose from the rocks below with lighthouse in upper third and wave-washed foreground rocks filling the lower frame. Use grad ND to balance bright sky against shadowed rocks. · Blue Hour: aperture: f/8, shutter: 5-15s, iso: 400, lens: 16-35mm, notes: The lighthouse’s red light cycles every 4 seconds — use a long enough exposure (8s+) to capture a full rotation showing the light sweep. Sky deepens to cobalt while rocks hold warm color. · Milky Way: aperture: f/2.8, shutter: 20s, iso: 3200, lens: 14-24mm, notes: Face south from the rocks below for galactic core over the open ocean. The lighthouse silhouette works as a left-frame anchor. Best March–October on new moon nights. · Tide Pool Low: aperture: f/11, shutter: 1-4s, iso: 100, lens: 16-35mm, notes: At low tide, the tide pools below capture lighthouse reflections. Get extremely low (tripod at near-ground level) to maximize the reflection pool in foreground.
Shots to chase:
- Classic backlit sunset: position yourself 40–60 feet below and west of the lighthouse on the rocks, compose with the tower against the orange sky and wave-splashed rocks in the foreground — this is the defining Bass Harbor image
- Tidal reflection pool: at low tide, flat-water tide pools mirror the lighthouse — use f/11 at 2–4 seconds for a perfect reflection shot that most visitors miss entirely
- Blue hour light cycle: stay 20–30 minutes after sunset when the lighthouse light begins its cycle; use 8–15 second exposure to capture the red light sweep arc against deep blue sky
- Milky Way silhouette: face the lighthouse south with the galactic core rising from the open ocean behind it — one of the East Coast’s most dramatic Milky Way compositions
- Storm approach: moody overcast days with breaking surf produce some of the most dramatic shots — the lighthouse against a graphite sky with white foam spray has an entirely different emotional register than the classic sunset
Pro tip: The iconic low-angle rock position is only accessible during calm conditions — check the surf forecast before attempting. The rocks below the wooden platform are notoriously slippery and several photographers have been injured; wear rubber-soled hiking boots or water shoes. The parking lot holds only ~24 vehicles and is routinely full 1.5 hours before sunset in summer — plan accordingly or take the Island Explorer shuttle to Southwest Harbor and taxi to the lighthouse. In fall (late September–October), the sun’s southwestern arc aligns more directly behind the tower, producing the best silhouette framing of the year.
Common mistake to avoid: Standing on the parking-lot-level wooden platform, which gives only a side view of the lighthouse with no composition room. You must descend to the rocks below for the iconic shot. Also: shooting only at the moment of sunset instead of staying for blue hour, when the lighthouse light activates and the sky reaches its richest color. And arriving at sunset time rather than 60–90 minutes early — the lot fills completely well before the light peaks.
3. Jordan Pond
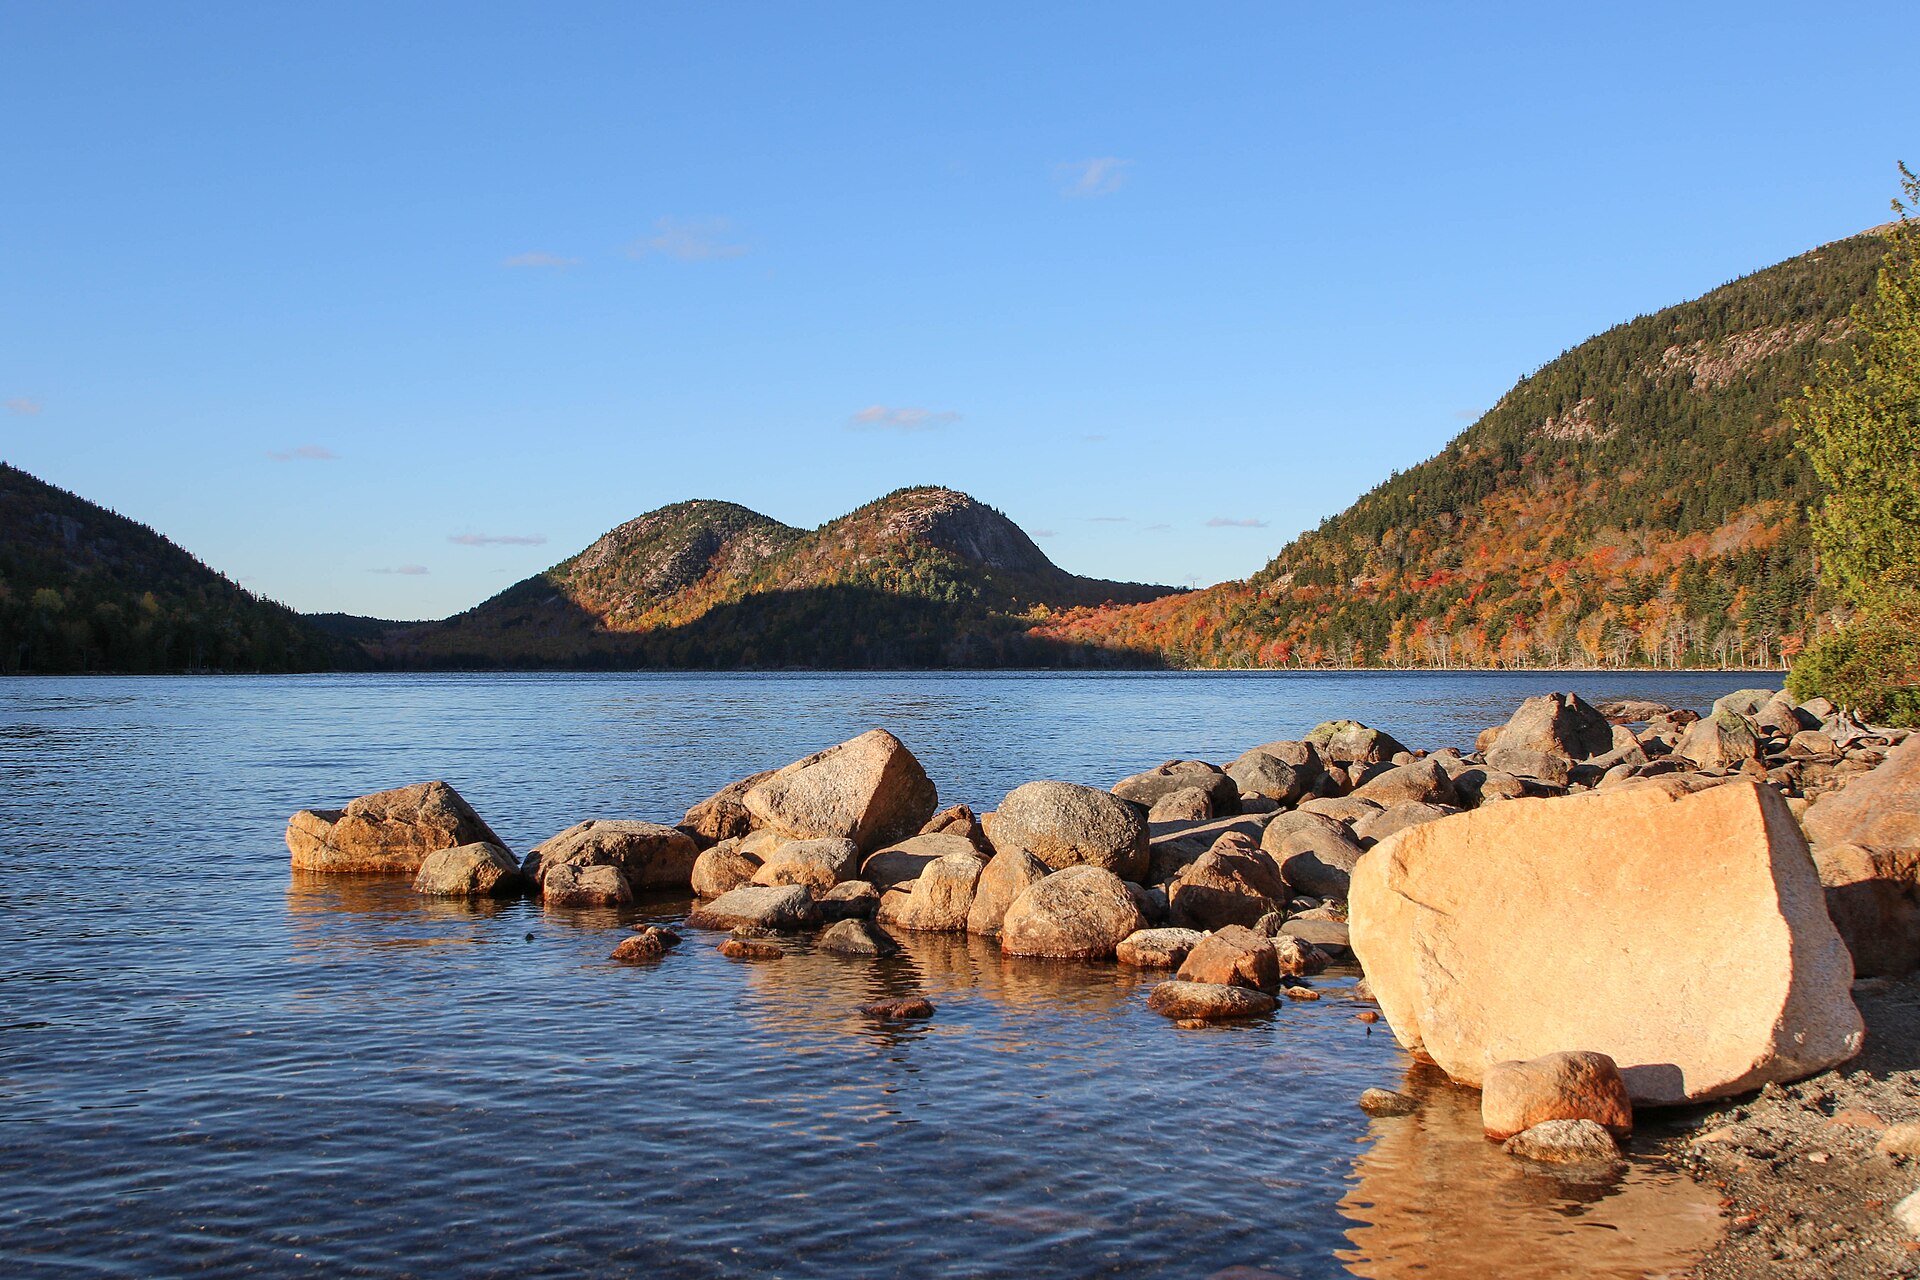
Jordan Pond is Acadia’s signature interior landscape — a deep, crystal-clear glacially-carved pond whose remarkably transparent water reveals the rocky bottom at considerable depth, giving the surface an almost turquoise tone. The twin Bubbles — smooth glacially-rounded mountains — rise 872 and 768 feet above sea level at the north end and reflect with perfect symmetry on calm mornings. In early-to-mid October this is one of the most spectacular fall foliage reflection shots in the northeastern US, when the surrounding hillsides ignite in red and gold and the entire scene doubles in the still water. The Jordan Pond House, the only full-service restaurant inside the park, serves legendary popovers on its lawn with the Bubbles as backdrop — a uniquely Acadian cultural subject.
- GPS: 44.3214, -68.252
- Elevation: 274 ft
- Best time of day: Sunrise (primary) — calm water and soft light; Fall foliage early–mid October for color reflections (secondary)
- Sun direction: Jordan Pond is oriented roughly north–south. The twin Bubbles (North and South Bubble) rise at the north end of the pond. The classic reflection shot faces north from the south shore. Sunrise light comes from the east and catches the Bubbles’ eastern flanks in warm side-light while the reflection on the glassy pond doubles the image. By mid-morning, breezes typically disturb the surface. At sunset, west-facing light doesn’t directly illuminate the Bubbles — instead, the western sky reflects into the pond creating colorful water-glow shots. In early-to-mid October, the hillside foliage surrounding the pond turns red, orange, and gold; on still mornings, the reflection literally doubles the leaf color.
- Access: Main parking lot at Jordan Pond House (restaurant), accessed via Park Loop Road. The south-end trailhead is 100 yards from the lot on a flat, smooth path — the easiest access to the classic reflection viewpoint. The Island Explorer Shuttle stops at Jordan Pond House (late June–Columbus Day). During peak fall foliage weekends, parking fills by 7 AM — arrive before 6:30 AM or take the shuttle.
- Difficulty: Easy — flat paved path to south-shore viewpoint; full Jordan Pond Loop trail is 3.3 miles with some rocky sections
- Recommended settings: Sunrise Reflection: aperture: f/11, shutter: 1/4–1s, iso: 100, lens: 16-35mm, notes: Use polarizer to control reflection intensity — partially polarized gives the best balance of water surface texture and mountain reflection. Shoot from near-ground level on the south shore to maximize the reflected Bubbles in frame. · Fall Foliage: aperture: f/11, shutter: 1/4s, iso: 100, lens: 16-35mm and 24-70mm, notes: Overcast fall mornings give even, saturated color without harsh shadows — don’t skip cloudy days. Include foreground shoreline grasses or rocks for depth. · Fog Morning: aperture: f/8, shutter: 1/30s, iso: 400, lens: 24-70mm, notes: Fog sitting in the valley while the Bubbles poke above is a magical and highly sought image — requires patience, typically early June or cool fall mornings. · Nd Long Exposure: aperture: f/11, shutter: 15-30s, iso: 100, lens: 16-35mm, notes: 6-stop ND smooths out any surface ripple and turns cloud movement into streaks above the Bubbles — effective even when there’s a light breeze.
Shots to chase:
- The classic: south shore at sunrise with North and South Bubble perfectly reflected in the glassy pond — compose with a low camera position to maximize the reflection’s portion of the frame
- Fall foliage double: early-to-mid October, the hillsides around the pond turn red and gold; combine a wide-angle shot that includes shoreline foliage in the foreground with the reflected color explosion on the water
- Fog and Bubbles: cool fall mornings sometimes produce low-lying fog that fills the pond surface while the Bubbles emerge above — one of the most ethereal Acadia images possible
- Carriage road bridge reflection: walk the east shore carriage road to find stone bridges and wooded sections that reflect in the pond — a less-shot but beautiful compositional alternative to the main south-shore viewpoint
- Polarizer comparison: bracket your polarizer rotation from 0° to 90° to show the full range from mirror-like reflection to near-invisible water surface — both are usable shots in different editorial contexts
Pro tip: The south shore access trail is only 100 yards from the Jordan Pond House parking lot — you need to be set up and shooting before 7 AM on weekends to avoid other photographers in your frame. Wind is the enemy of reflection shots: check the forecast for low-wind mornings and prioritize those days. The pond surface is typically calmest in the first 90 minutes after sunrise before valley breezes build. For fall foliage timing, target the first two weeks of October (coastal Maine peaks slightly later than inland) — peak color often coincides with the biggest crowds of the year, so a weekday visit is strongly recommended.
Common mistake to avoid: Shooting from standing height — getting low to within 18 inches of the water surface dramatically increases the reflection’s proportion of the frame. Visiting only in summer and missing the iconic fall foliage window. Using a circular polarizer at maximum polarization, which eliminates the reflection entirely — use 25–50% rotation for balanced reflection-plus-clarity results.
4. Otter Cliff
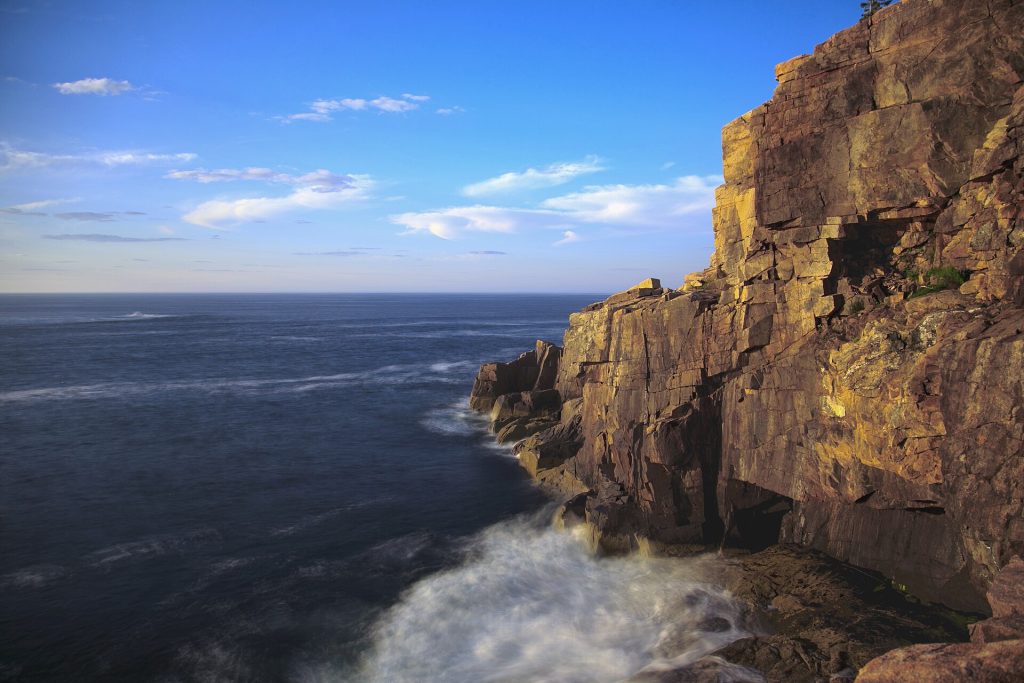
Otter Cliff is the highest headland on the US Atlantic coast north of Rio de Janeiro at 110 feet — a sheer pink granite wall dropping directly into the ocean. It is Acadia’s most iconic coastal subject for long-exposure seascape photography: waves surge into cracks and channels at the cliff base, creating rushing white-water effects that reward 1–4 second exposures. The cliff’s east-facing aspect means it receives direct first light at sunrise, painting the granite in the warm amber tones that have made it one of the most award-winning landscape photography locations on the East Coast. The famous bell buoy just offshore — audible warning to mariners — adds an evocative audio element.
- GPS: 44.3144, -68.1945
- Elevation: 110 ft
- Best time of day: Sunrise (primary) — east-facing coast gets first light directly; Milky Way (secondary) — southern ocean horizon
- Sun direction: Otter Cliff faces east directly over the open Atlantic. At sunrise (azimuth approximately 70–100° depending on season), the first light catches the sheer pink granite cliff face and the rock formations directly below in warm side-light while the ocean beyond transitions from steel-blue to gold. The cliff’s east-southeast orientation means the sun rises roughly in line with the cliff face in spring and fall, creating dramatic side-lighting on the granite texture. At sunset, the cliff itself falls into shadow, but the view north toward Otter Cove with Cadillac and Dorr Mountains in the background receives warm side-light — a viable but secondary composition.
- Access: Park Loop Road parking area at Otter Cliff (GPS for lot: 44.3108, -68.1898) — 0.7 miles past Thunder Hole on the one-way section. Ocean Path walking trail also passes the base. The cliff top is accessible via a short walk from the lot. Climbing the cliff face requires a separate Acadia Rock Climbing permit and is managed by the park — the NPS requires scheduled climbing windows at Otter Cliff (typically April–August restricted during peregrine falcon nesting).
- Difficulty: Easy to viewpoint; Moderate–Strenuous for cliff-base rock access (wet scramble required)
- Recommended settings: Sunrise Long Exposure: aperture: f/16, shutter: 1-4s, iso: 100, lens: 16-35mm, notes: Use a 3-stop ND filter to extend exposure while maintaining depth of field. 1–2 seconds captures wave motion with definition; 4–8 seconds creates silky white-water effect. Tripod is non-negotiable on the rocks — use a ball-head leveler for precision on uneven granite. · Sunrise Fast: aperture: f/8, shutter: 1/500s, iso: 200, lens: 70-200mm, notes: Fast shutter to freeze a single wave crest exploding against the cliff face — a completely different and equally valid shot. Use burst mode during active swell. · Milky Way: aperture: f/2.8, shutter: 20s, iso: 3200, lens: 14-24mm, notes: Documented Milky Way location — galactic core rises over the southern Atlantic horizon. The cliff provides a strong geometric foreground. Check bioluminescent plankton in summer — an electric blue glow in the breaking waves is occasionally photographable. · Blue Hour: aperture: f/8, shutter: 30s, iso: 400, lens: 16-35mm, notes: The blue-to-black color transition over the Atlantic at blue hour, with white wave foam against dark granite, creates a monochromatic graphic composition.
Shots to chase:
- Long-exposure surge channels: position tripod low at the cliff base during low-to-mid tide and shoot wave water flowing through the natural channels in the granite at 2–4 seconds — the flowing water against static pink rock is the quintessential Otter Cliff image
- Cliff face compression: from the viewpoint 100m to the south, use 200mm telephoto to compress the full 110-foot cliff face with the ocean below — shows the true scale of the headland
- Bell buoy with cliff: include the offshore bell buoy in the mid-ground with the cliff as backdrop — adds navigational narrative to the coastal landscape
- Milky Way arch over Atlantic: face south-southeast from the cliff top, align the galactic core over the open ocean at 1–3 AM in summer — a prime East Coast Milky Way position
- Bioluminescence: summer evenings in calm conditions occasionally produce bioluminescent plankton — walk the water’s edge at midnight and check for electric blue in breaking waves; use ISO 6400 and f/2.8 at 30s
Pro tip: Wet granite rocks at the cliff base are genuinely dangerous — wear non-slip footwear and never position yourself where an unexpected wave could knock you from your feet. Check the surf forecast: 2–4 foot seas create the best wave action for photography without becoming dangerous; seas above 6 feet make the base inaccessible. The one-way section of Park Loop Road means you approach from the north — if you miss the Otter Cliff lot, you must continue the full loop before returning. Visit out of peak season (spring, fall, winter) for uncrowded conditions; the summer crowds can place 50+ people at the viewpoint simultaneously.
Common mistake to avoid: Standing at the paved viewpoint overlook and shooting down — the best compositions require scrambling to the rocks at the base of the cliff. Visiting only during dry conditions and missing the fact that slight rain intensifies the granite color and reduces crowds. Forgetting that peregrine falcon nesting closures (typically April–August) restrict certain sections of the cliff for rock climbers — check with the park before planning a technical approach.
Want this in your pocket on the trail?
The full-resolution version of every spot above — with full-page hero photography, GPS maps with gold location pins, sun direction diagrams, multi-season tables, and a complete safety + packing checklist — is inside the Acadia Ultimate Photographer’s Guide PDF ($47). Print it, save it offline, take it into the park. Get the guide →
5. Thunder Hole
Thunder Hole is a narrow granite sea chasm where incoming waves compress trapped air and water and erupt upward with a booming ‘thunder’ sound — audible from 100 yards away in the right conditions. Waves can reach 40 feet in height during strong northeast storms. The timing element makes it unique among Acadia’s photography subjects: the chasm performs on a schedule tied to tide and swell, making it a tide-dependent appointment rather than a casual drive-by. The dramatic spray columns, mist clouds, and sonic experience combine to create one of the most sensory-rich photography environments on the US Atlantic coast.
- GPS: 44.3204, -68.1881
- Elevation: 20 ft
- Best time of day: 2–3 hours before high tide with 4–6 foot seas; morning light (east-facing); fall storms for dramatic surges
- Sun direction: Thunder Hole faces east-northeast across the Atlantic. Morning light (6–9 AM) creates direct illumination on the water spray and creates rainbow effects in the mist when the sun is low and behind the photographer. Afternoon light falls from the west and back-lights the spray — a different but also usable effect. The narrow chasm itself stays in partial shadow from surrounding rock most of the day, so the spray column is the primary light-catching subject rather than the rock walls.
- Access: Parking lot on the one-way section of Park Loop Road between Sand Beach and Otter Cliff. Island Explorer shuttle stops at Thunder Hole in summer. Ocean Path walking trail passes directly by the main viewing platform. Parking fills by 8 AM in summer — arrive before 7 AM or take the shuttle from Bar Harbor.
- Difficulty: Easy — paved observation platform; roped viewing area for safety
- Recommended settings: Freeze Splash: aperture: f/8, shutter: 1/1000s, iso: 400, lens: 70-200mm, notes: Use telephoto from the upper platform position to isolate the spray column against the sky at fast shutter. Burst mode (8–10 fps) during active wave sets; the spray crown at maximum height is a 1/10-second window. · Silky Water: aperture: f/16, shutter: 1-2s, iso: 100, lens: 16-35mm, notes: From the platform, use a 3-stop ND to extend shutter and smooth the incoming wave surge while the spray column becomes a softened white plume. Works best on medium-energy swells. · Rainbow Moment: aperture: f/8, shutter: 1/500s, iso: 200, lens: 24-70mm, notes: Morning sun (6–9 AM) backlit spray creates prismatic rainbows — position yourself with the sun behind you and shoot into the mist. A brief but repeating opportunity on clear mornings. · Storm Surge: aperture: f/8, shutter: 1/2000s, iso: 800, lens: 70-200mm, notes: Fall northeasters produce the most explosive eruptions; stay behind the safety rope but use a long telephoto to capture the full column height. Protect camera from spray with a rain cover.
Shots to chase:
- Spray crown freeze: use burst mode at 1/2000s with 200mm to capture the wave at maximum eruption — the instant the spray fans outward into a crown shape is the definitive Thunder Hole image
- Rainbow in mist: arrive by 7 AM on clear summer mornings when the low sun creates spectral rainbows in the spray column — usually lasts only 15–20 minutes before the sun angle changes
- Incoming wave sequence: shoot a 5-frame sequence showing wave entering the chasm, compressing, erupting, and retreating — effective as a wall of images or editorial sequence
- Context wide: use 16mm to include the observation platform, onlookers, and spray column together — provides human scale that makes the eruption height comprehensible
- Stormy autumn: September–October nor’easters produce 30–40 foot eruptions — use a telephoto safely from the upper platform position and protect gear with rain cover
Pro tip: Time your visit to arrive 2–3 hours before high tide — waves have maximum force entering the chasm but haven’t fully peaked, creating the most dramatic and repeatable eruptions. Check the NOAA tide chart for Bar Harbor and look for tides between 3–6 feet; tides below 3 feet produce little action. After a recent storm has passed with 2–3 foot residual swell, Thunder Hole is at its photogenic best. Morning light (east-facing) is superior to afternoon for photography. The platform fills quickly in summer — visiting in shoulder season or early morning gives you freedom to reposition.
Common mistake to avoid: Visiting at dead low tide (no wave action) or dead high tide (chasm fully flooded, no air compression) — both produce minimal eruptions. Visiting on a flat calm day with no swell. Standing too close to the safety rope during active surges — waves have swept visitors from the platform during high seas; always stay behind the rope.
6. Schoodic Point
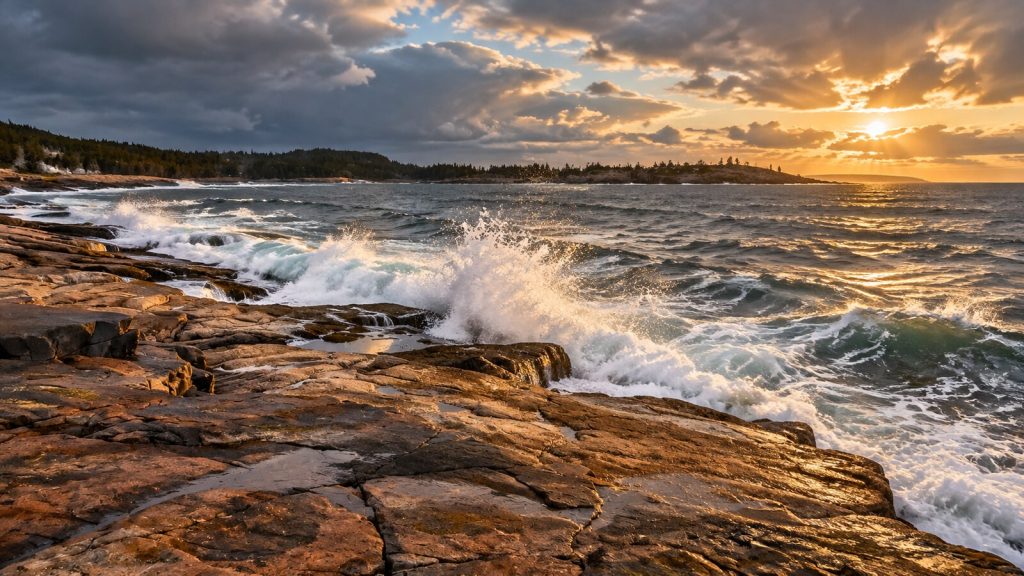
Schoodic Point is the only mainland section of Acadia National Park and the park’s best-kept secret for photography. The pink granite headland is bisected by dramatic black basalt dike intrusions — geological features where ancient magma forced its way through cracks in the granite and solidified, creating stark geometric patterns of dark rock cutting across the lighter granite. These dikes create natural leading lines and graphic compositions unavailable elsewhere in the park. The west-facing exposure across Frenchman Bay gives the finest sunset view of Cadillac Mountain and the MDI silhouette from outside the island. Wave action on the exposed seaward face is consistently more powerful than the sheltered MDI coast.
 Save
Save- GPS: 44.3355, -68.061
- Elevation: 30 ft
- Best time of day: Sunset (primary) — west-facing across Frenchman Bay toward MDI; Sunrise for eastern Atlantic light
- Sun direction: Schoodic Point faces southwest across Frenchman Bay toward Mount Desert Island and Cadillac Mountain. At sunset, the sun descends over MDI’s mountain silhouette, creating a spectacular backdrop of layered peaks and islands. Golden hour begins approximately 60 minutes before sunset. The famous dark basalt dike intrusions that cross the pink granite point are illuminated from the west in late afternoon — the extreme color contrast between black basalt and warm-lit pink granite is a geological photography subject unique in the northeastern US. Morning light from the east catches the ocean swells and lights the spray on the seaward (east) face of the point.
- Access: One-hour drive from Bar Harbor: take Rte 1 north to Sullivan, then Rte 186 to Winter Harbor, and follow the park road south. The Schoodic Loop Road is primarily one-way (clockwise). Schoodic Point has its own dedicated parking area off a two-way spur road. The Island Explorer shuttle serves Schoodic Peninsula (separate route from MDI — no cross-bay service). Schoodic receives approximately 8% of Acadia’s total visitors, making it consistently less crowded than MDI.
- Difficulty: Easy — flat granite headland, accessible from the parking lot
- Recommended settings: Sunset Dike: aperture: f/11, shutter: 1/30s, iso: 100, lens: 16-35mm, notes: Use the black basalt dike as a diagonal leading line from foreground corner toward MDI on the horizon. The color contrast — dark wet basalt, warm pink granite, golden sky — is the defining Schoodic image. · Wave Long Exposure: aperture: f/16, shutter: 2-4s, iso: 100, lens: 16-35mm, notes: 6-stop ND on the seaward (east) face — incoming Atlantic swells pour across the low granite shelves in 2-4 second exposures for silky white-water effects. · Mdi Silhouette: aperture: f/11, shutter: 1/30s, iso: 100, lens: 70-200mm, notes: At golden hour, use telephoto to compress the layered MDI peaks and Cadillac Mountain against the orange sky — the ‘island mountain silhouette at sunset’ shot that rivals any in the park. · Ravens Nest: aperture: f/11, shutter: 1/60s, iso: 100, lens: 16-35mm, notes: Ravens Nest, 1 mile before Schoodic Point on the one-way road, faces SW from a cliff-edge position — arrive 45 min before sunset, then continue to Schoodic Point for the final light as the sky deepens to blue.
Shots to chase:
- Basalt dike diagonal: position the black dike as a strong diagonal leading line from lower-left corner toward Cadillac Mountain on the horizon — the color contrast between dark rock, pink granite, and warm sky is unique to Schoodic
- West sunset across Frenchman Bay: face southwest and use the MDI mountain silhouette (including Cadillac) as the backdrop for the setting sun — the distance compresses the island into a dramatic layered ridgeline
- Ravens Nest cliff-edge: 1 mile before Schoodic Point, this SW-facing cliff perch is the most dramatic sunset position on the peninsula — wave action against granite far below, MDI silhouette beyond
- Tide pool macro: at low tide, the flat granite shelves above the dikes fill with tide pools — star fish, urchins, periwinkles, and anemones accessible for macro photography; early morning light is best
- Seaward east face: the ocean-facing east side of Schoodic Point receives powerful Atlantic swells — use 2–4 second exposures to smooth the water pouring across the granite shelves
Pro tip: The Schoodic Loop Road is one-way — Ravens Nest is positioned before Schoodic Point on the clockwise route, so plan to stop at Ravens Nest first for sunset, then continue to Schoodic Point for the last twilight color. This is the most efficient evening photography routing. Even on busy summer weekends, Schoodic rarely feels crowded — it’s Acadia’s best escape from the MDI crowds. The extra hour of driving each way is consistently worth it for photography. The Schoodic Institute campus near the point offers occasional dark-sky programs.
Common mistake to avoid: Driving past Ravens Nest without stopping (it’s the superior sunset position). Visiting only Schoodic Point and missing the series of viewpoints along the one-way road leading to it, each with different compositions. Assuming Schoodic is ‘just more rocks’ — the basalt dike geology is genuinely unique and not found at MDI locations.
Want this in your pocket on the trail?
The full-resolution version of every spot above — with full-page hero photography, GPS maps with gold location pins, sun direction diagrams, multi-season tables, and a complete safety + packing checklist — is inside the Acadia Ultimate Photographer’s Guide PDF ($47). Print it, save it offline, take it into the park. Get the guide →
6 more Acadia spots are in the full guide
This post covers 6 of the 12 locations. The Acadia Ultimate Photographer’s Guide has all 12, with GPS, shot lists, suggested settings and timing for each:
- Sand Beach
- Eagle Lake
- Bubble Pond
- Ocean Path Overlooks
- Hunter’s Beach
- Beech Cliff
When to photograph Acadia: a year-round breakdown
Acadia is photogenic every month of the year — but the conditions differ radically by season. Here is what to expect:
Spring (March–May)
Highlights: Lupines (late May–early June along carriage roads, Beech Hill, and Somesville fields — purples, pinks, and whites against green hillsides); park emerges from winter with thin crowds through Memorial Day; waterfalls from snowmelt active in May; peregrine falcons active (cliff closures apply); spring wildflowers along Jesup Path and Sieur de Monts
Summer (June–August)
Highlights: Long days (civil twilight before 5 AM in late June); Cadillac Summit reservations essential; Island Explorer shuttle fully operational late June–Columbus Day; Sand Beach most swimmable; wildflowers; Acadia Night Sky Festival in September; whale watching and seabird tours from Bar Harbor
Fall (September–November)
Highlights: LEGENDARY foliage: Acadia’s fall colors are considered among the best in the northeastern US. Colors begin changing in late September; coastal Maine typically peaks October 5–15 (slightly later than inland Maine). Jordan Pond reflections with red-and-gold Bubbles and surrounding hillsides is the park’s most iconic autumn image. Crowds remain high but thinner than August by mid-October. Cadillac reservation system continues through Oct 25. Island Explorer runs reduced service from mid-August through Columbus Day.
Winter (December–February)
Highlights: Solitude — most of Park Loop Road closes (Ocean Drive section remains open from Sand Beach to Otter Cliff Road); Cadillac Summit Road closes; Island Explorer ceases operation; no admission fee charged. Snowshoe and ski access to carriage roads (Friends of Acadia grooms ~30 miles). Cadillac summit accessible via North/South Ridge hiking trails in winter — first sunrise continues Oct 7–Mar 6. Ice formations on coastal rocks create rare photography opportunities.
How to get to Acadia National Park
Photographer safety at Acadia: read this
Every national park has its own hazards. Read the briefing before you go.
- Tides: {‘overview’: ‘Tidal range at Bar Harbor runs approximately 12–14 feet — among the largest on the US East Coast. This dramatically affects photography conditions at coastal locations throughout the day.’, ‘thunder_hole’: ‘Visit Thunder Hole 2–3 hours before high tide for peak wave action and photography. At dead low tide, the chasm lacks sufficient water for eruptions. At full high tide, the chasm is submerged. 5-foot tides produce moderate splashes; tides above 6 feet can create 40-foot eruptions. Check NOAA Tides for Bar Harbor Station before each visit.’, ‘otter_cliff’: ‘Rock scrambling at the cliff base is only safe at low-to-mid tide and in calm seas. Never position yourself where a wave surge could knock you from footing. Incoming tide can cut off retreat routes from low rock shelves quickly.’, ‘bass_harbor’: ‘The rocks below the lighthouse platform are tide-accessible but can be slippery at any tide level. The iconic low-angle shots require getting within wave-splash range — confirm calm seas before committing to the rock position.’, ‘ocean_path’: “Boulder Beach tidepool photography requires low tide. Monument Cove’s cobbles are safest to work at mid-tide or lower. Never turn your back on ocean waves while on coastal rocks.”, ‘tidepool_etiquette’: ‘Walk only on dry rocks. Do not step in tide pools. Do not collect marine animals. Put back any specimens exactly where found — they are protected under the National Park Act.’}
- Wet Rocks: Acadia’s pink and gray granite becomes extremely slippery when wet — comparable to ice. Wet rock fatalities and serious injuries occur annually in the park. Wear non-slip rubber-soled footwear at all coastal locations. Otter Cliff, Bass Harbor Head, and all ocean-side rock shelves are high-risk after rain. ‘Restoration Area’ ropes indicate vegetation-protected zones — never step over them.
- Winter Conditions: Most of Park Loop Road closes to vehicles in winter (typically November through April). The Ocean Drive section (Sand Beach to Otter Cliff) remains open for snowshoe, ski, and limited vehicle access. Cadillac Summit Road closes to vehicles but the summit is accessible via snowshoe on the North or South Ridge trails — winter conditions add ice and extreme wind chill. Carriage roads are maintained for skiing and snowshoeing by Friends of Acadia volunteers. Check current conditions at the park Headquarters Visitor Center (open year-round) before entering in winter.
- Ticks: Deer ticks (black-legged ticks) are prevalent throughout Acadia from late April through November, with peak activity June–August according to the Maine CDC. Lyme disease transmission requires tick attachment for approximately 24–36 hours. Prevention: wear light-colored clothing (to spot ticks), tuck pants into socks, use DEET-based repellent on shoes and clothing, walk in the center of trails away from tall grass and brush, inspect yourself thoroughly after every outing. Ticks gravitate to warm body areas. If you find an attached tick, remove promptly with fine-point tweezers and monitor the bite area for 14 days.
- Drones: Unmanned aircraft (drones) are BANNED throughout all of Acadia National Park — on Mount Desert Island, Schoodic Peninsula, and all park lands — under NPS policy effective 2014. Violations are misdemeanors with fines up to $5,000 and potential jail time. Special research permits may be applied for through NPS Washington D.C. No exceptions for photography, videography, or recreational use.
- Cliff Edges: Acadia’s granite cliff edges are unguarded at most viewpoints. The Beehive, Precipice, Beech Cliff, and Otter Cliff all have sheer drops. Never lean over cliff edges, never step past safety ropes, and never attempt cliff-edge positions in wet or windy conditions. The NPS safety page explicitly warns: ‘Be careful while walking near cliff ledges.’
- Peregrine Falcons: Peregrine falcons nest on Acadia cliffs (particularly Otter Cliff and Jordan Cliffs) from approximately April through late July. Nesting closures may affect specific climbing and approach routes — check current closures at the Visitor Center or the NPS Acadia website before planning technical approaches.
The complete safety briefing is inside the Acadia Photographer’s Guide PDF.
Frequently asked questions
How do I get a Cadillac Mountain sunrise reservation?
Book via Recreation.gov — search ‘Cadillac Summit Road Vehicle Reservations.’ Reservations open in two waves: 30% of slots become available exactly 90 days before your desired date (the key advance-planning window for sunrise); 70% of slots open at 10:00 AM Eastern Time two days before (check back at 10 AM ET if your advance date passes without success). The sunrise slot carries a 90-minute entry window starting as early as 4 AM in summer and 6 AM in mid-October. One sunrise reservation per vehicle per 7 days. Reservations required May 20–Oct 25 annually. Outside that window, no reservation is needed. Day-of releases occasionally appear when bookings are cancelled — check Recreation.gov at 10 AM ET.
When is peak fall foliage at Acadia and when should I be at Jordan Pond?
Peak foliage at Acadia and coastal MDI typically falls in the first two weeks of October — most commonly October 5–15, though this shifts by 1–2 weeks depending on the season. Coastal Maine peaks slightly later than inland western Maine. For Jordan Pond reflections with red-and-gold Bubbles, target the window October 7–14 as your primary shooting dates. Monitor the Foliage Network or Maine Tourism’s fall foliage tracker for real-time color reports. At peak, arrive at Jordan Pond’s south shore before 6:30 AM on weekdays to find uncrowded conditions.
Can I access Bass Harbor Head Lighthouse for photography?
Yes. The lighthouse grounds are open to visitors daily. From the small parking lot (24 spaces), a gravel path leads east along the fence to a wooden viewing platform. For the iconic photography position, you must descend the steep staircase to the rocky shoreline below the cliff, then scramble carefully on the rocks to gain sufficient distance from the structure. This requires non-slip footwear and is only safe in calm sea conditions. Never attempt in wet, slippery, or rough-surf conditions. Arrive 60–90 minutes before sunset — the lot fills completely before peak light. The lighthouse’s red light activates at nautical twilight (best for blue-hour photography).
When is Cadillac Mountain the first place in the US to see sunrise?
Cadillac Mountain is the first place in the continental United States to see sunrise from October 7 through March 6. During this period, the combination of its 1,530-foot elevation and relatively southern latitude (compared to the higher-but-more-southern coastal peaks of the US) gives it the first solar view. Outside this window, the first sunrise shifts to more northern locations (West Quoddy Head, Lubec, ME holds the distinction at other times of year). Note that the ‘first in the US’ title, technically speaking, goes to points in Alaska — Cadillac’s distinction is ‘first in the continental United States.’
Is Schoodic Peninsula worth the extra drive for photography?
Absolutely — Schoodic Peninsula is frequently cited by professional photographers as the most overlooked section of Acadia. It receives approximately 8% of the park’s total visitors, meaning parking is rarely a problem even on peak summer weekends. The unique basalt dike formations (dark rock cutting through pink granite) create compositional elements impossible to find on MDI. The west-facing exposure gives superior sunset views of Cadillac Mountain and MDI silhouette. The extra hour of driving each way from Bar Harbor is consistently considered worthwhile by landscape photographers seeking uncrowded conditions and geological uniqueness. Combine Schoodic with Ravens Nest on a single evening for a full sunset-to-blue-hour shoot.
Take this guide into the park
This post is the complete field reference. The Acadia Ultimate Photographer’s Guide PDF is the field-deployable version: full-page resolution hero photography, GPS maps with gold pins for every location, multi-season shooting calendars, gear matrices per location, sun-angle diagrams, the full safety briefing, and a print-ready editorial layout in Shut Your Aperture black and gold. Save it offline. Print it. Take it into the park.
Acadia Ultimate Photographer’s Guide
Downloadable PDF · 12 GPS-mapped locations · Multi-season calendar · Safety briefing · Packing checklist
Get the Acadia guide — $47
Take Acadia National Park home in your pocket.
Every shot location, every angle, every time of day worth shooting. Printable PDF + GPS-tagged map.
Instant download. Works on phone, tablet, and printed.
Continue reading
- Travel photography destinations
- How to shoot golden hour like a pro
- Milky Way photography settings and locations
← Back to National Parks Photography Guides
The complete Acadia guide is $47
12 photography locations with GPS coordinates, settings and route notes, plus a packing list. One-time payment and instant download.
Common questions about the Acadia guide
Is the Acadia photography guide worth $47?
The 12-location guide gives you GPS coordinates, starting settings, light advice and a shot list. Use the free article to see whether that depth fits your trip.
Does the Acadia guide include GPS coordinates?
Yes. Each of its 12 locations has a GPS pin and field notes. Treat pins as location starting points, not exact tripod positions.
What’s in the Acadia PDF that isn’t in this article?
It covers 12 Acadia locations with map links, settings and shot lists, plus a packing checklist and planning notes.
Will the guide work for a Acadia trip in 2026?
The guide includes planning notes, but park rules, fees and access can change. Check current National Park Service information before you travel.
Visiting more than Acadia?
Bundle multiple destination guides and save planning time across the trip:
Related photography spots in US National Parks
If you liked this guide, our other curated location guides in the same region:
Browse all photography spots in US National Parks →
shutyouraperture-20). Buying through these links costs you nothing extra and helps fund our free guides.
What to Pack
A landscape kit built around wide views, steady support, and changing light is a useful starting point. Compare the gear and choose what fits your camera, budget, and conditions. These links lead to B&H Photo Video and Amazon.
| What & Why | B&H | Amazon |
|---|---|---|
Sony 16-35mm f/2.8 GM Check the camera mount before buying. Choose a focal length that fits the photos you plan to make. | Shop B&H → | Shop Amazon → |
Peak Design Travel Tripod Check the load rating, packed size and local tripod rules before buying. | Shop B&H → | Shop Amazon → |
Breakthrough X4 CPL Check the filter type and lens thread size before buying. Use a filter only when the effect fits your photo. | Shop B&H → | Shop Amazon → |
Breakthrough X4 10-stop ND Check the filter type and lens thread size before buying. Use a filter only when the effect fits your photo. | Shop B&H → | Shop Amazon → |
Sony NP-FZ100 battery Use the battery type specified for your camera. Bring a spare if your shooting plan calls for one. | Shop B&H → | Shop Amazon → |
SanDisk Extreme Pro 128GB Check the card format and speed requirements specified for your camera. | Shop B&H → | Shop Amazon → |
Koh microfiber cloths Compare this option with your current kit. Check compatibility and the product details before buying. | Shop B&H → | Shop Amazon → |
B&H and Amazon links are affiliate links. We earn a small commission on purchases at no extra cost to you.